Here’s an overview of splitting an Excel sheet into multiple worksheets.
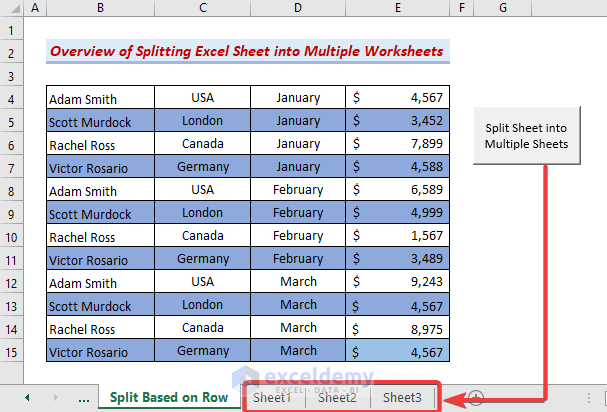
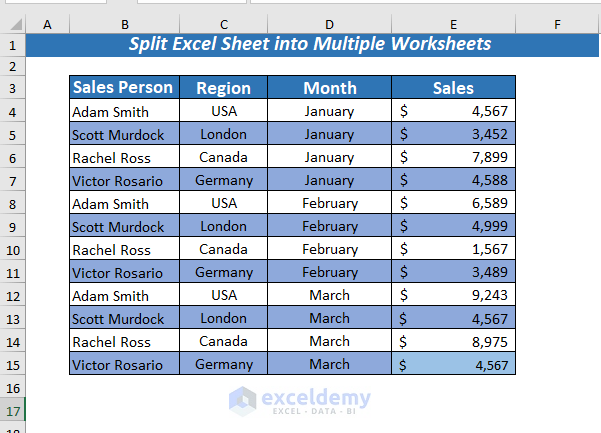
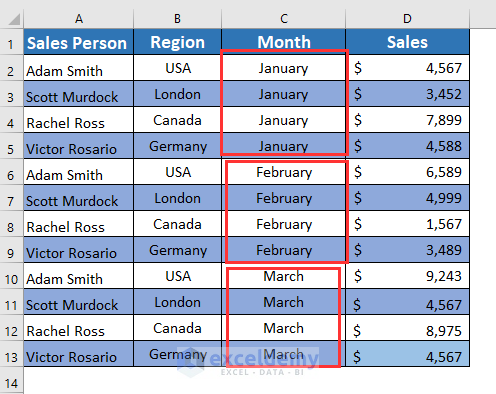
We’ll use a sample dataset representing the sales information of different months.
Method 1 – Using Filter and Copy to Split an Excel Sheet into Multiple Worksheets
Steps:
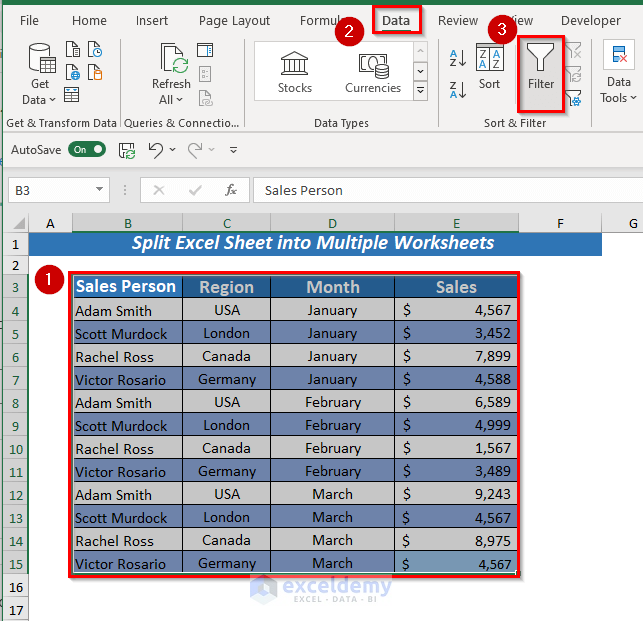
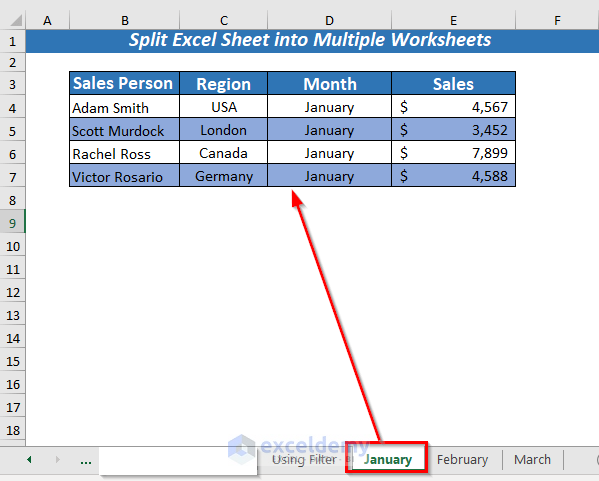
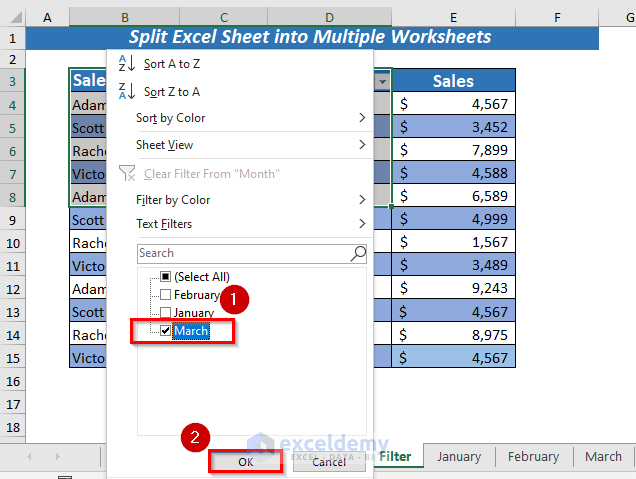
- Select the cell range where you want to apply the Filter. We selected the cell range B3:E15.
- Open the Data tab and select Filter.
- You also can use CTRL + SHIFT + L to apply Filter using the keyboard.
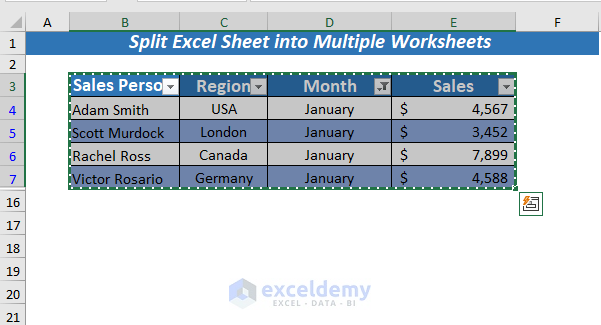
- A Filter is applied to the selected cell range.
- Click on the Month column since that’s what we’re using to split the sheet.
- We deselected everything except January.
- Click OK.

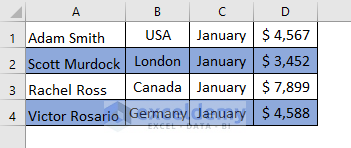
- All the values where the Month is January are filtered.
- Copy the data and Paste it into a new worksheet.
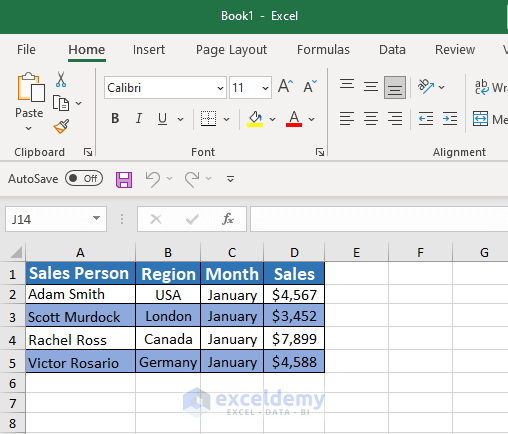
- We named the new sheet January. Thus, you will see all sales information for January is presented here.
- Repeat the process for other months.
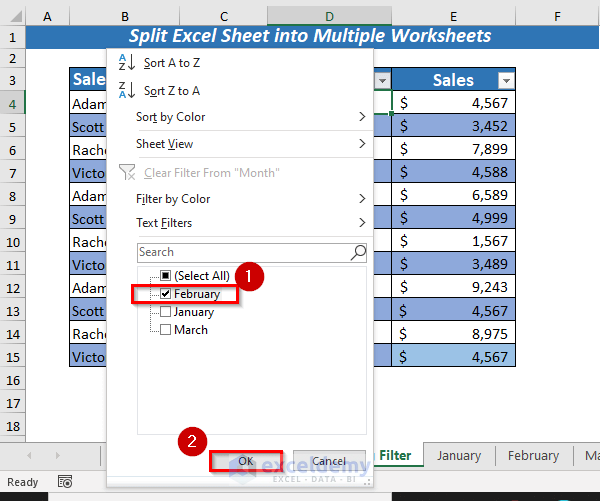
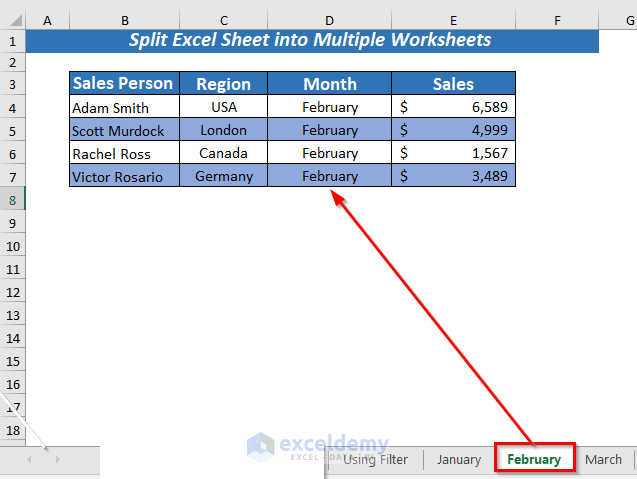
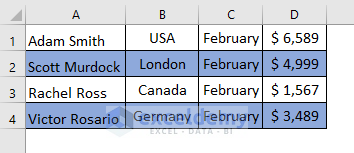
- Copy the data and paste it into new worksheets.
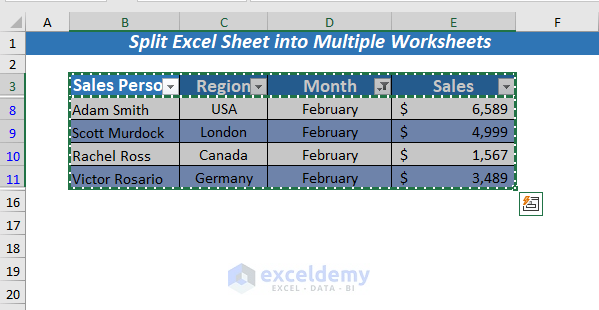
- We named the second sheet February.
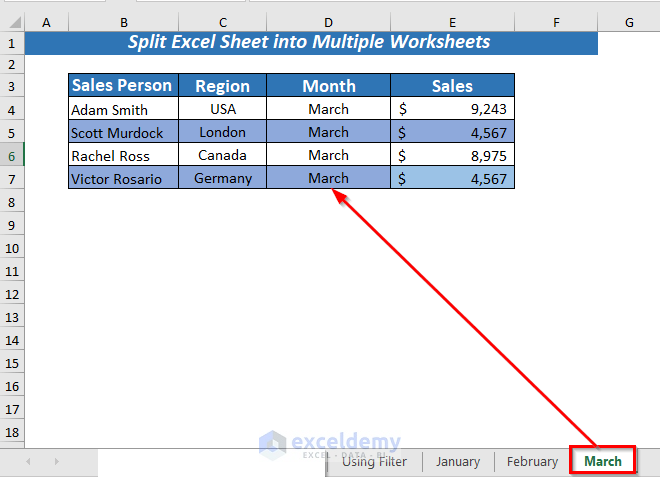
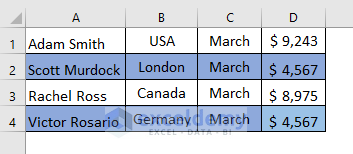
- Repeat the filtering process for March.
- Copy the data and paste it into the new worksheet.
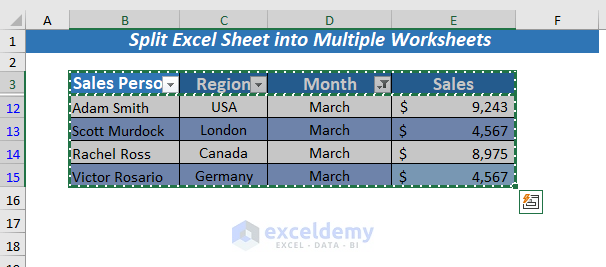
- We named the new sheet March.
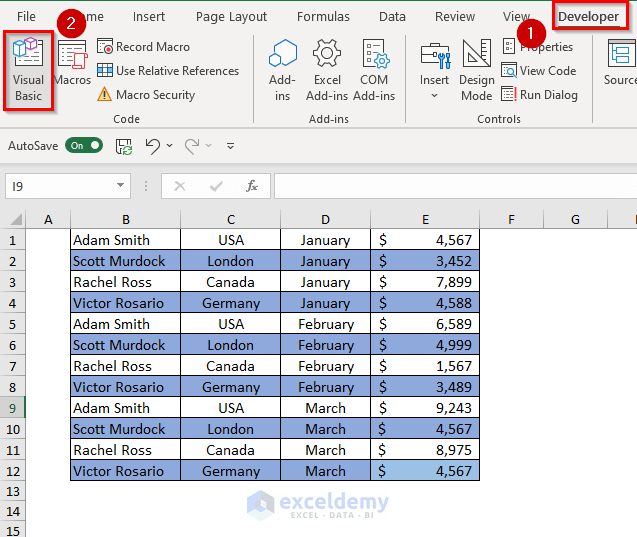
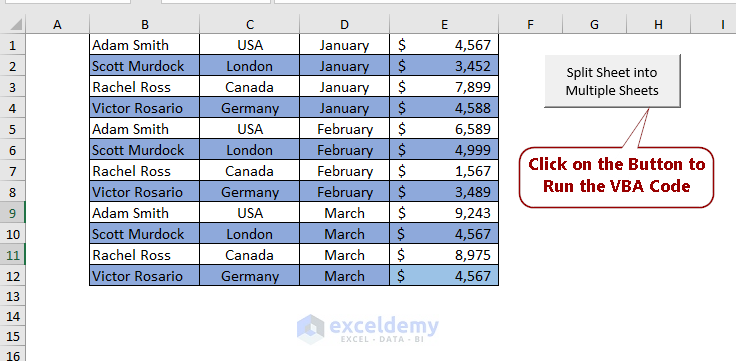
Method 2 – Splitting an Excel Sheet into Multiple Worksheets Based on Row Count Using VBA
Steps:
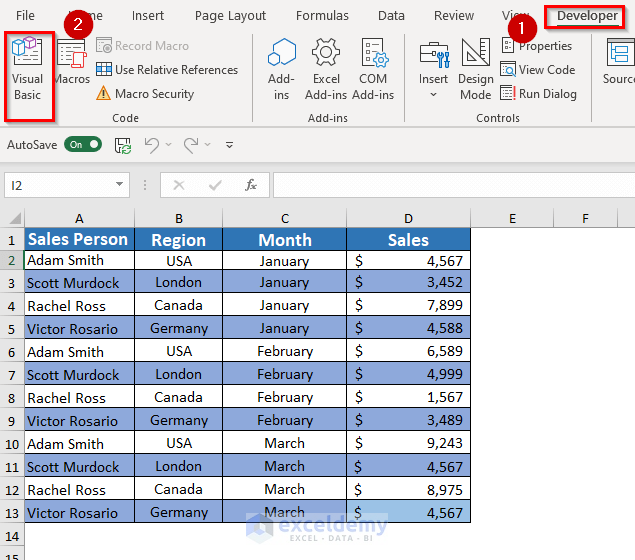
- Make the dataset start from the first row and remove column headers.
- Open the Developer tab and select Visual Basic.
- You’ll get the window for Microsoft Visual Basic for Applications.
- From Insert, select Module.
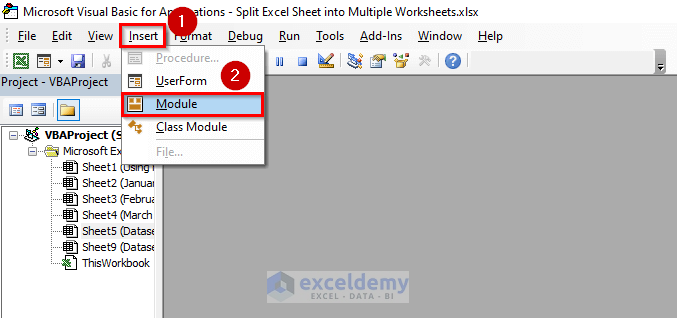
- A Module will open.
- Insert the following code in the Module.
Sub SplitExcelSheet_into_MultipleSheets()
Dim WorkRng As Range
Dim xRow As Range
Dim SplitRow As Integer
Dim xWs As Worksheet
On Error Resume Next
EcelTitleId = "Split Row Numt"
Set WorkRng = Application.Selection
Set WorkRng = Application.InputBox("Range", ExcelTitleId, WorkRng.Address, Type:=8)
SplitRow = Application.InputBox("Split Row Num", ExcelTitleId, 4, Type:=1)
Set xWs = WorkRng.Parent
Set xRow = WorkRng.Rows(1)
Application.ScreenUpdating = False
For i = 1 To WorkRng.Rows.Count Step SplitRow
    resizeCount = SplitRow
    If (WorkRng.Rows.Count - xRow.Row + 1) < SplitRow Then resizeCount = WorkRng.Rows.Count - xRow.Row + 1
    xRow.Resize(resizeCount).Copy
    Application.Worksheets.Add after:=Application.Worksheets(Application.Worksheets.Count)
    Application.ActiveSheet.Range("A1").PasteSpecial
    Set xRow = xRow.Offset(SplitRow)
Next
Application.CutCopyMode = False
Application.ScreenUpdating = True
End Sub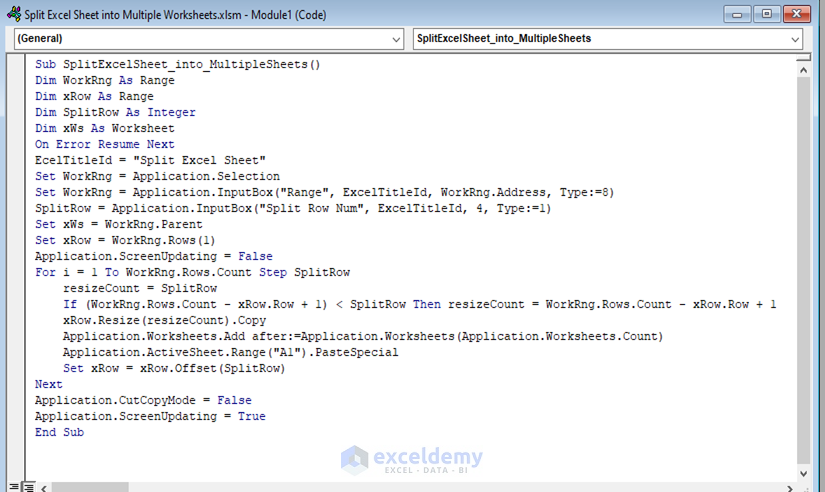
We’ve created a sub-procedure called SplitExcelSheet_into_MultipleSheets.
We declared a couple of variables these are WorkRng and xRow as Range type then SplitRow as Integer also xWs as Worksheet type.
We used ExcelTitleId to give the dialog box a title.
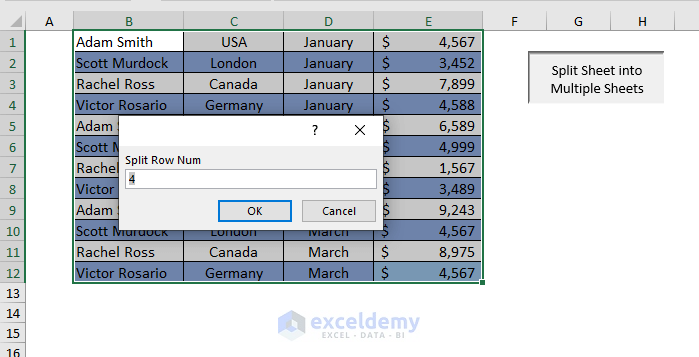
We’ve provided split row number 4 to split data by 4 rows because in my dataset the Month of January has 4 rows.
We used a For loop to SplitRow until the given cell range ends.
- Save the code and go back to the worksheet.
- Open the Developer tab.
- From Insert, select Button
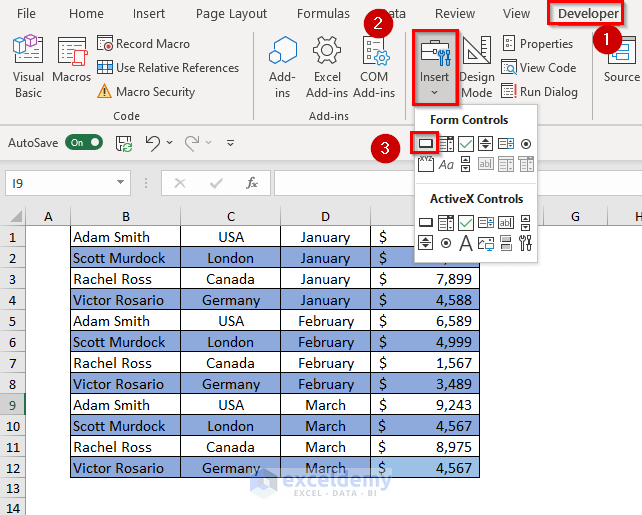
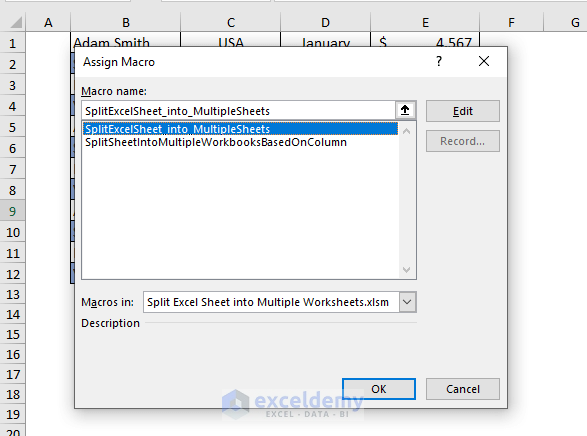
- A dialog box will pop up. Select SplitExcelSheet_into_Multiplesheets from Macro Name and click OK.
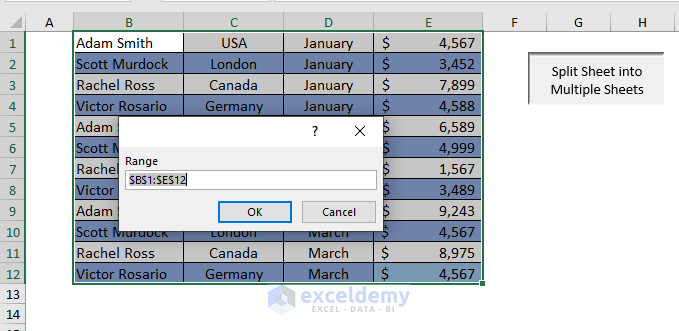
- Click on the button to run the macro.
- A dialog box will pop up where you can put the data range. We selected the cell range B1:E12
- Click OK.
- Another dialog box will pop up to show you the selected row count you already provided in the code to split the dataset. We put 4 as Split Row Num.
- You’ll get three sheets.
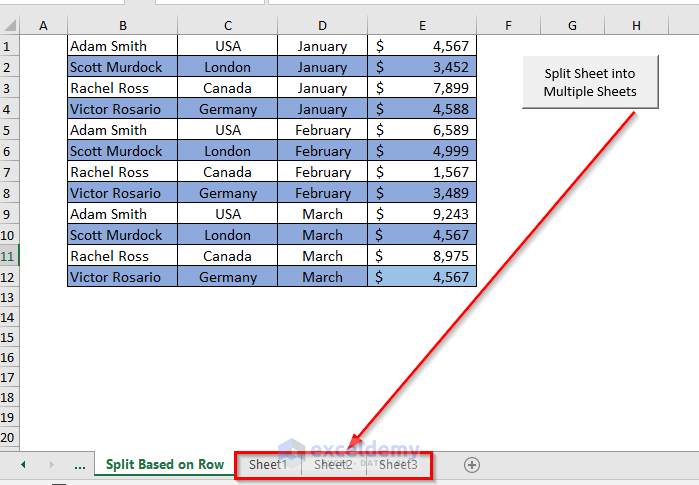
- In Sheet1, you will see the data of the first 4 rows.
- In Sheet2, you will see the data of rows 5 to 8.
- In Sheet3, you will see the data of the last 4 rows.
Method 3 – Splitting an Excel Sheet into Multiple Workbooks Based on Column
Steps:
- Move the data so it starts from A1.
- Open the Developer tab and select Visual Basic.
- From Insert, select Module
- A Module will open.
- TInsert the following code in the Module.
Sub SplitSheetIntoMultipleWorkbooksBasedOnColumn()
Dim objWorksheet As Excel.Worksheet
Dim nLastRow, nRow, nNextRow As Integer
Dim strColumnValue As String
Dim objDictionary As Object
Dim varColumnValues As Variant
Dim varColumnValue As Variant
Dim objExcelWorkbook As Excel.Workbook
Dim objSheet As Excel.Worksheet
Set objWorksheet = ActiveSheet
nLastRow = objWorksheet.Range("A" & objWorksheet.Rows.Count).End(xlUp).Row
Set objDictionary = CreateObject("Scripting.Dictionary")
For nRow = 2 To nLastRow
strColumnValue = objWorksheet.Range("C" & nRow).Value
If objDictionary.Exists(strColumnValue) = False Then
objDictionary.Add strColumnValue, 1
End If
Next
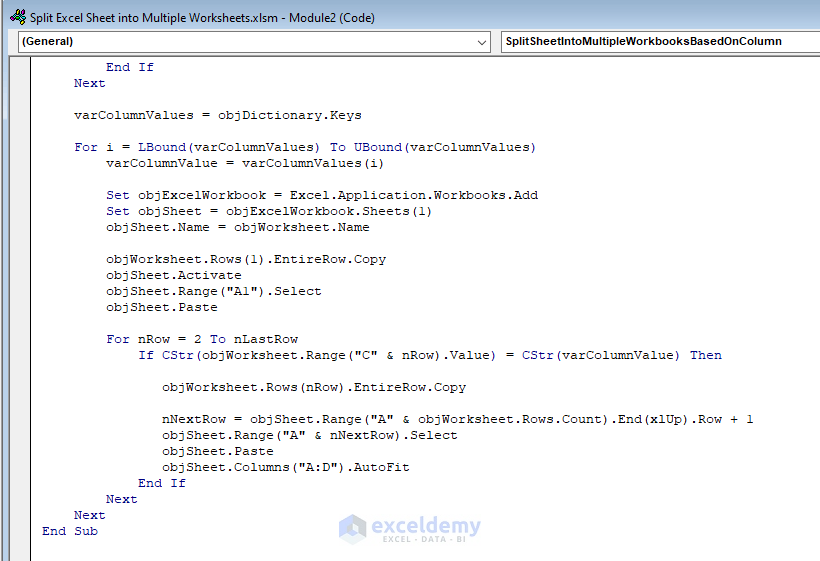
varColumnValues = objDictionary.Keys
For i = LBound(varColumnValues) To UBound(varColumnValues)
varColumnValue = varColumnValues(i)
Set objExcelWorkbook = Excel.Application.Workbooks.Add
Set objSheet = objExcelWorkbook.Sheets(1)
objSheet.Name = objWorksheet.Name
objWorksheet.Rows(1).EntireRow.Copy
objSheet.Activate
objSheet.Range("A1").Select
objSheet.Paste
For nRow = 2 To nLastRow
If CStr(objWorksheet.Range("C" & nRow).Value) = CStr(varColumnValue) Then
objWorksheet.Rows(nRow).EntireRow.Copy
nNextRow = objSheet.Range("A" & objWorksheet.Rows.Count).End(xlUp).Row + 1
objSheet.Range("A" & nNextRow).Select
objSheet.Paste
objSheet.Columns("A:D").AutoFit
End If
Next
Next
End Sub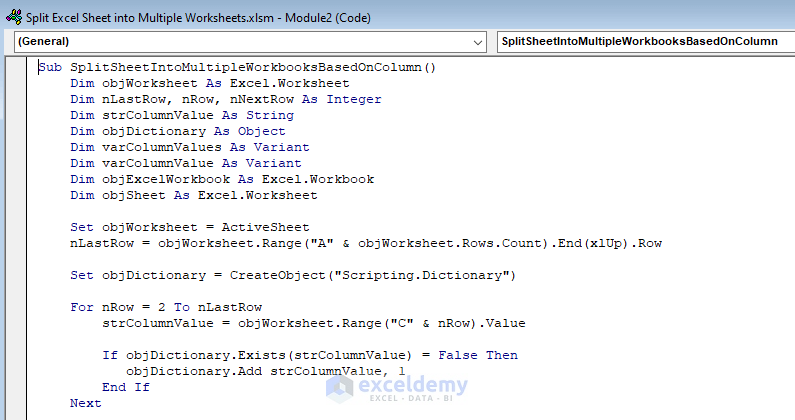
- Save the code and go back to the worksheet.
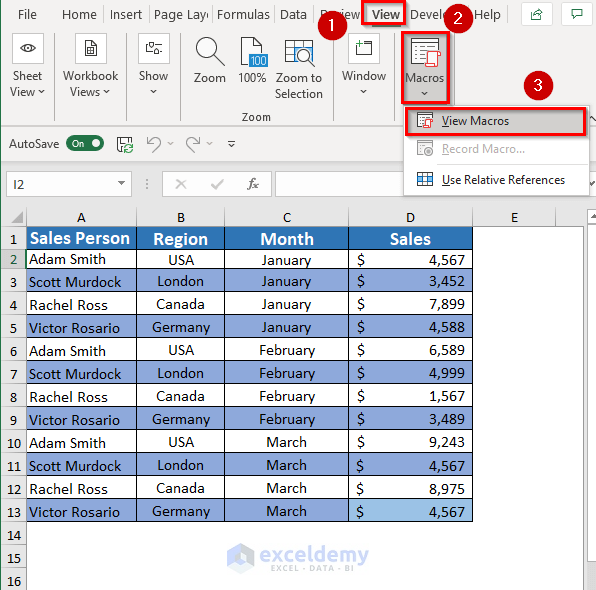
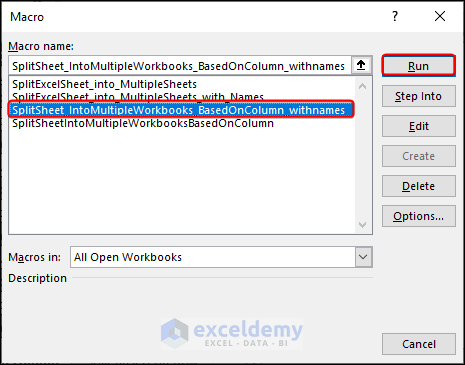
- Open the View tab.
- From Macros, select View Macros
- A dialog box will pop up.
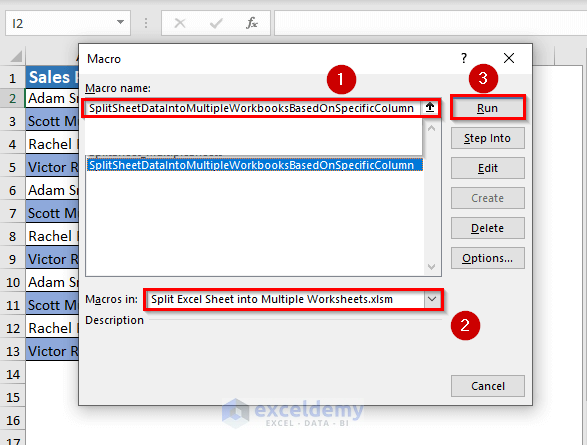
- From Macro name select SplitSheetIntoMultipleWorkbooksBasedOnColumn, and select the workbook within Macros in.
- Run the selected macro.
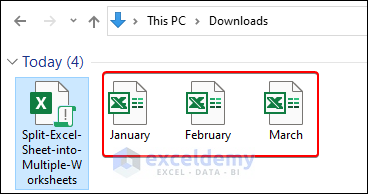
- You will see 3 new workbooks have been created as there are 3 different Months in column C. The Book1 is for January.
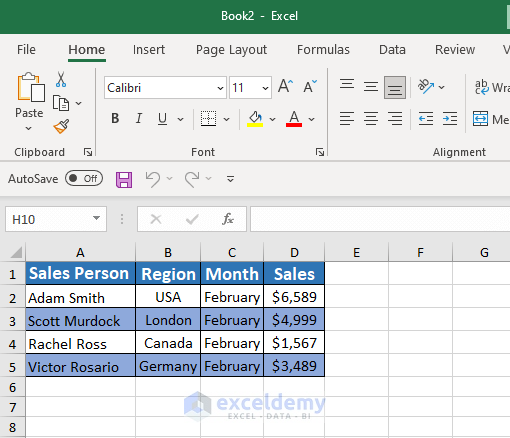
- The Book2 is for February.
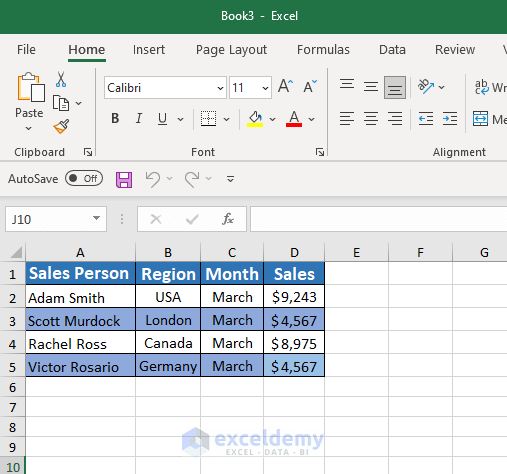
- The Book3 is for March.
Download the Practice Workbook
Related Articles
- How to Split Sheet into Multiple Sheets Based on Rows in Excel
- How to Split Excel Sheet into Multiple Sheets Based on Column Value
- How to Split Excel Sheet into Multiple Files
- How to Enable Side-by-Side View with Vertical Alignments in Excel
- Excel VBA: Split Sheet into Multiple Sheets Based on Rows
- How to Split a Workbook to Separate Excel Files with VBA Code
<< Go Back to Split Excel Cell | Excel Worksheets | Learn Excel
Get FREE Advanced Excel Exercises with Solutions!

Hi Shamima! Thank you for your hard work! I have been searching a tool for cutting my big excel file and your last code saved my life! Thank you so much!
Hi A,
Thanks for your appreciation.
Hi Shamima, thanks for this and could I clarify something? Using method 3 to split via column value, if I need to run the macro after the first use (wherein the macro creates the new sheets) to account for new data does the macro just update the sheets it created in the first use?
M.
Hello Michelle,
Hope you are doing well. If you need to run the macro after the first use it will create new sheets with the updates you made on your dataset.
It won’t automatically update the workbooks created previously (Book1, Book2, and Book3) rather it will create Book4, Book5, and Book6 with the updated dataset.
Thanks
Shamima Sultana
Hi SHAMIMA,
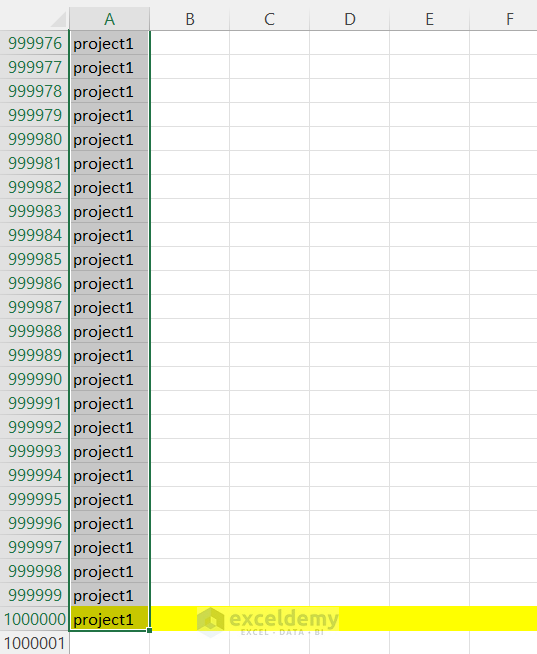
when I used the code for a smaller sheet with the smaller split numbers it works perfectly but I need to split a file that include 1M records into 10 sheets that include 100,000 records. Do you know how can I achieve that?
Hi Milad,
Thanks for your question.
According to your requirement, I have created a random dataset containing 1M records within 1M rows of a dataset in Excel. Using a VBA code, I will split it into 10 different worksheets each containing 100,000 rows.
• Type the following VBA code. Here, instead of using the InputBox method, we are directly declaring the total range and the split number in the code which will expediate running the code.
• Press F5.
In this way, we have created 10 different sheets each with 100000 records.
Thanks, it works perfectly. you are the best
Hello Milad,
Thanks for your compliment.
Hi! This is great! Is there a way to split the worksheet into separate sheets within the same workbook based on column?
Hi Jeff Blackwell,
Thanks for reaching us. You can use the following code with some adjustments to split a worksheet based on column into some worksheets of the same workbook.
Here, we will split the following worksheet based on the Month column and so the worksheet will be split into 3 different sheets – January, February, March.
• Use the following code. Adjust the starting row number in nRow = 2, the column indicating letter in (the base column on which you will split the worksheet) objWorksheet.Range(“C” & nRow).
• Press F5.
Then, you will have 3 sheets- January, February, March.
Hi,
Good day,
I have a problem when split the data . for example I use sheet name as Arrow Electronics Asia (S) Pte. Ltd. and its prompt error due to this reason:
type the invalid for sheet/chart
1. The name thatyou type doest not exceed 31 character.
2. The name does not contain any of the following character:/
3.You did not leave the name blank.
Debug highlighted this code : xWS.Name = varColumnValue
VBA code:
Sub SplitSheetIntoMultipleWorkbooksBasedOnColumn()
Dim objWorksheet As Excel.Worksheet
Dim nLastRow, nRow, nNextRow As Integer
Dim strColumnValue As String
Dim objDictionary As Object
Dim varColumnValues As Variant
Dim varColumnValue As Variant
Dim xWS As Excel.Worksheet
Set objWorksheet = ActiveSheet
nLastRow = objWorksheet.Range(“A” & objWorksheet.Rows.Count).End(xlUp).Row
Set objDictionary = CreateObject(“Scripting.Dictionary”)
For nRow = 2 To nLastRow
strColumnValue = objWorksheet.Range(“C” & nRow).Value
If objDictionary.Exists(strColumnValue) = False Then
objDictionary.Add strColumnValue, 1
End If
Next
varColumnValues = objDictionary.Keys
For i = LBound(varColumnValues) To UBound(varColumnValues)
varColumnValue = varColumnValues(i)
Set xWS = Sheets.Add(after:=Worksheets(Worksheets.Count))
objWorksheet.Rows(1).EntireRow.Copy
xWS.Name = varColumnValue
xWS.Activate
xWS.Range(“A1”).Select
xWS.Paste
For nRow = 2 To nLastRow
If CStr(objWorksheet.Range(“C” & nRow).Value) = CStr(varColumnValue) Then
objWorksheet.Rows(nRow).EntireRow.Copy
nNextRow = xWS.Range(“A” & objWorksheet.Rows.Count).End(xlUp).Row + 1
xWS.Range(“A” & nNextRow).Select
xWS.Paste
xWS.Columns(“A:D”).AutoFit
End If
Next
Next
End Sub
May I know how to fix the error since i have no issues when save the file with other name.
Thank you in advance
Hello, AMIRA!
Thanks for sharing your problem with us!
The code works properly for me.
Can you please send me your excel file via email? ([email protected]).
So that, I can solve your problem.
Good Luck!
Regards,
Sabrina Ayon
Author, ExcelDemy.
This is so incredibly helpful!!! thank you!!! I almost feel like an ingrate asking for anything more, but here goes. Is there a way to choose the name of the resultant files? Like in your example, could the resultant files have been called January.xls, February.xls, etc.? How would you automate the naming process?
Hello Neil,
Yes, there is a way to name the resultant files using Excel VBA. I am modifying the VBA code to split the column into multiple workbooks given above. This code will rename the new files as month names using monthNames () array.
Here is the modified code:
Steps:
1. Enter the code in a module >> close the Visual Basic window.
2. Go to the sheet you want to split >> Click on Developer >> Macros.
3. In Macro dialog, select SplitSheet_IntoMultipleWorkbooks_BasedOnColumn_withnames >> Run.
4. Consequently, the new files appear with declared names.
Note: The new files are created in .xls format as you requested. You can change the format in the code if you want.
I hope this was helpful to you. Let me know if you have any further queries.
Best Regards,
Yousuf Shovon
Hello
Change in the original sheet How changes apply to separated sheets simultaneously
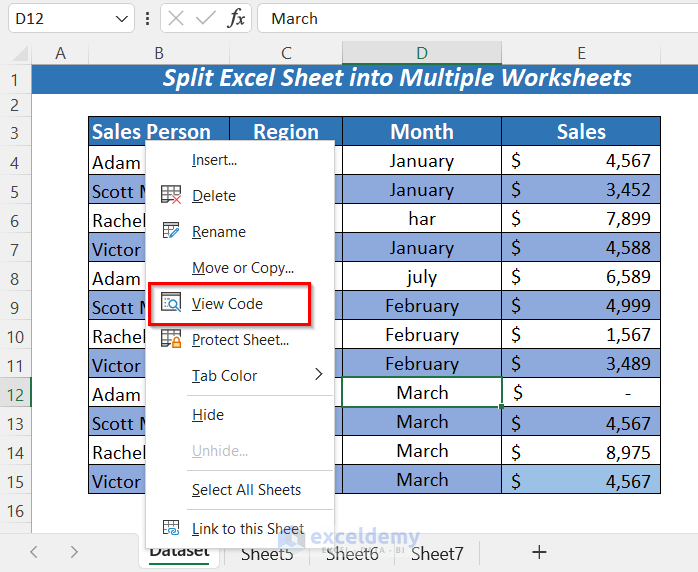
Thanks for your comment, Mojtaba. You can use VBA code which should be written in the original sheet. For example, I have a sheet named “Dataset“. I have divided this sheet into 3 sheets based on row. The names of these three sheets are Sheet5, Sheet6, and Sheet7. Now, write click on “Dataset” >> from the Context Menu Bar >> select View Code.
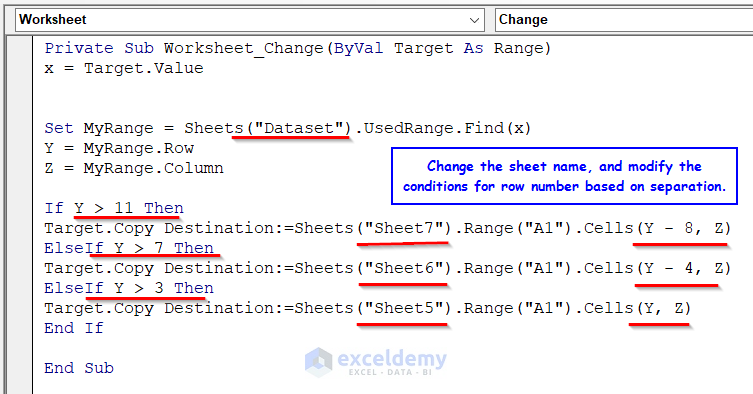
Write the following code in VB Editor.
Here, you must change the sheet names according to your workbook. Then you have to modify the conditions. Here, in my dataset there was 15 used rows. In the separated sheets there was 4 rows for each of them (except column headers). So, I set the conditions as row number > 11/7/3. So, when you change any cell value that value will be updated in the corresponding sheet. Like, if I change the cell value of C8 cell, then the change will be done in C4 cell of Sheet6 (as row number was 8).
So, set all the conditions properly for all sheets, then with any change of the original sheet, you will get the updated values in other sheet too.
Still, if you don’t get my point, then please comment or email us with the workbook. We will try to solve your problem.
Regards
Musiha/Exceldemy
Hi, and thank you for this. Silly question; what to change if I wanted to split the data into separate files (or sheets) based on different column? In the example, it was by months but if I wanted to use the Sales Person or Region?
Hello Miran,
You are most welcome. To split data into separate sheets based on different columns like Sales Person or Region, you will need to adjust the VBA code.
Here is the updated VBA code:
In the first InputBox insert the dataset range.
Then choose the column number to spilt the data.
Regards
ExcelDemy