If we open CSV files using Open with > Excel, it’ll open in Excel. However, opening CSV files in Excel does not convert them into xlsx files.
If we want to view the content of any CSV file, we can Right-click on the CSV file > Select Open with (from Options) > Click on Notepad.
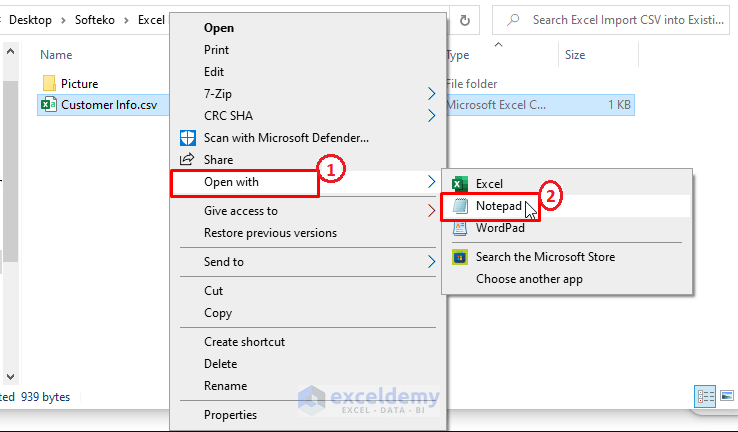
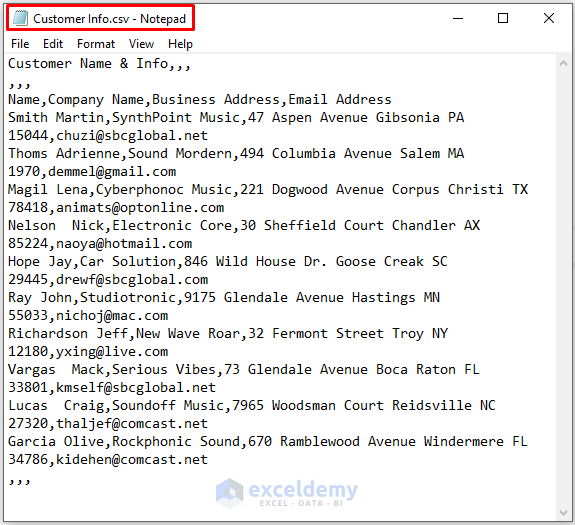
The Notepad window opens, and the CSV file contents are displayed, as shown in the below image.
Method 1 – Importing CSV into an Existing Sheet by Browsing from the Folder Directory
Steps:
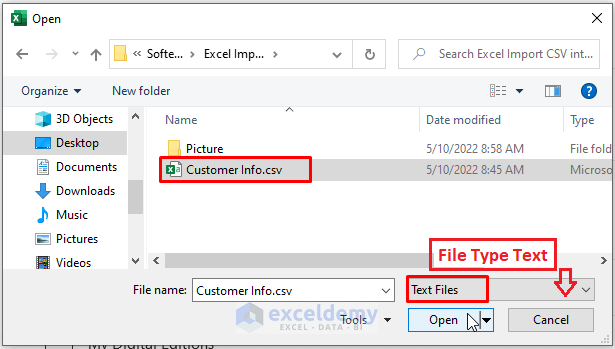
- Open an existing Excel file or blank Excel worksheet. Go to File > Open > Browse.

- Choose the search file type as Text Files (right side of the File name box). Browse through the device directory and select the respective CSV file. Click on Open.
- Excel imports the CSV file into an existing worksheet. Enter the data to get a similar outcome, as shown below.

Read More: How to Convert CSV to XLSX
Method 2 – Importing CSV Using the From the Text/CSV Feature
Steps:
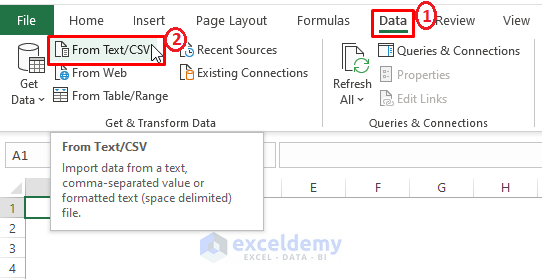
- Go to the Data tab > Select From Text/CSV (from the Get & Transform Data section).
- Browse through files and select the required CSV file from the file directory. Excel automatically displays Text or CSV files as you direct it to import only Text or CSV files.
- Click on Import.
 A preview of the CSV data appears. Excel automatically distinguishes delimiters.
- Click Load > Load To.
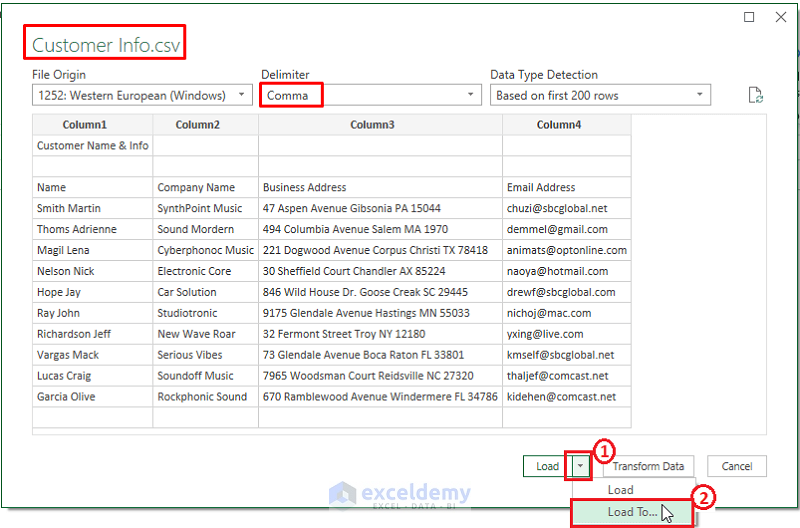 Each time we use the Get Data feature (in this case, expect Legacy Wizard) to import CSV files, Excel displays a preview of the about-to-load data.
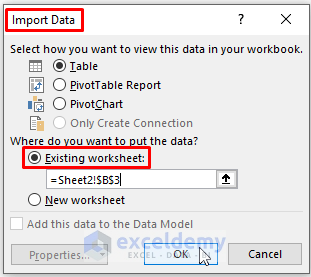
- The Load To option fetches an Import Data dialog box. In the Import Data dialog box, choose where you want to put your imported data.
- Mark the Existing worksheet option
- Click OK.
Excel takes a moment afterward to load the CSV data in an existing worksheet, as shown in the following image.
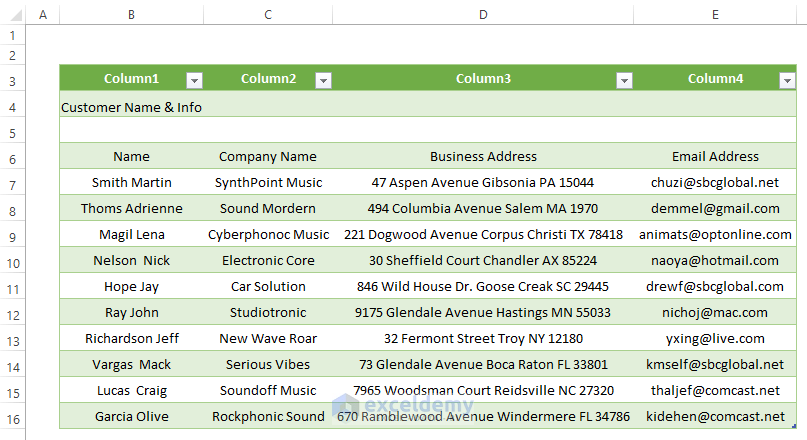
You can modify the loaded data. Import Data dialog box offers different views (i.e., Table, Pivot Table Report, and Pivot Table). You can choose any of the options to shape your data.
Read More: Difference Between CSV and Excel Files
Method 3 – Importing CSV Using the ‘Get Data’ Feature
Steps:
- Move to the Data tab > Click on Get Data > From File > From Text/CSV.

- Excel takes you to the device directory. Select the respective file
- Click on Import.

- Repeat Steps 3 and 4, and load the data into an existing Excel worksheet. Modify the data according to your requirements.

Method 4 – Using Legacy Wizard to Import CSV into an Existing Sheet
Steps:
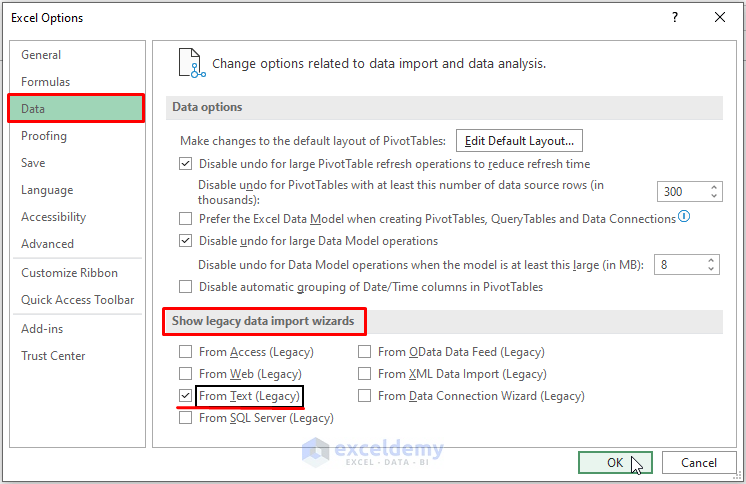
- In an existing Excel worksheet, click on File > Options.
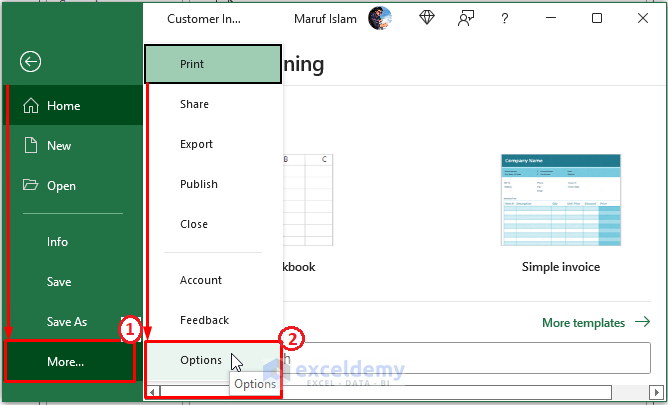
- The Excel Options window appears. From the window, Select Data > Tick From Text (Legacy) (under Show legacy data import wizards).
- Click on OK.
- Go to Data > Click on Get Data > Choose the Legacy Wizard option (that was previously unavailable in the options) > Click on From Text (Legacy).
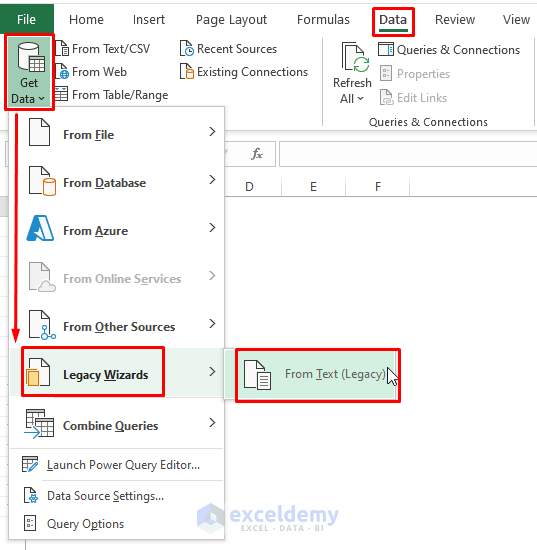
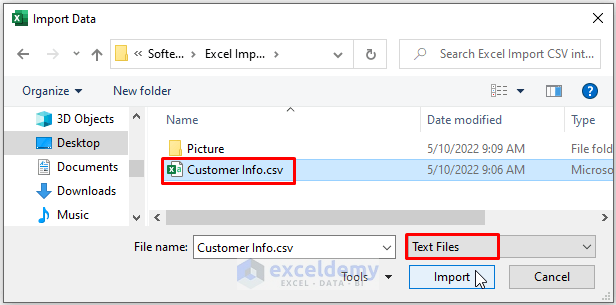
- Import the desired CSV file from the directory.
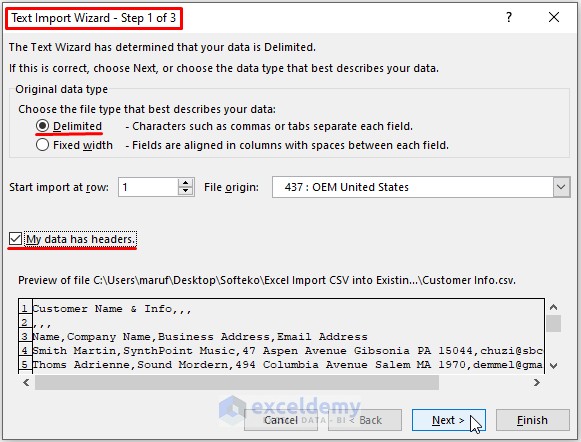
- Excel displays Text Import Wizard (Steps 1 of 3), as depicted in the following image.
- Mark Delimiter under Choose the file type that best describes your data.
- Tick My data has headers (in case you have data headers or designations)
- Click on Next.
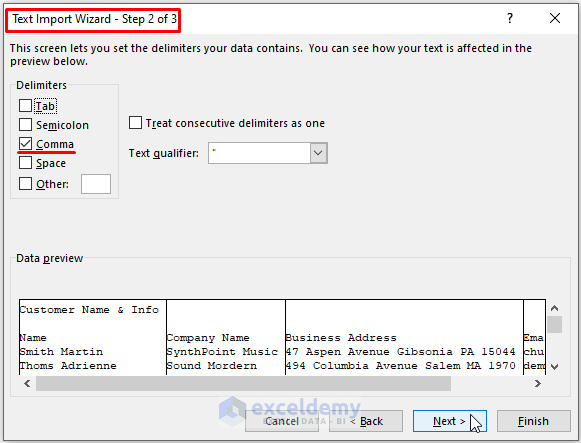
- In Step 2 of 3 Text Import Wizard, Tick Comma as Delimiter. Click on Next.
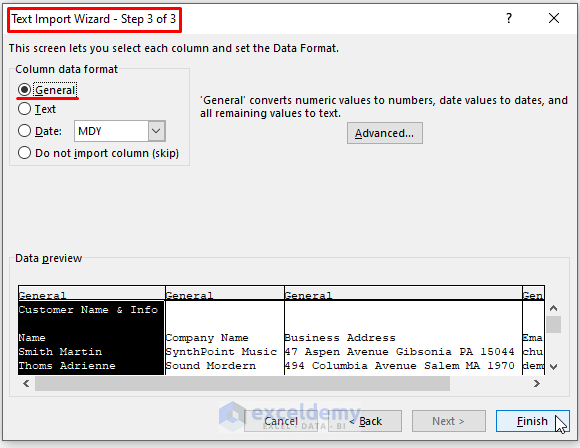
- Mark General as the Column data format in the Import Text Wizard Step 3 of 3.
- Click on Finish.
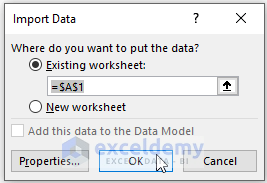
- Excel brings up an Import Data dialog box. Mark the Existing worksheet box under ‘Where do you want to put the data?’ Click on OK.
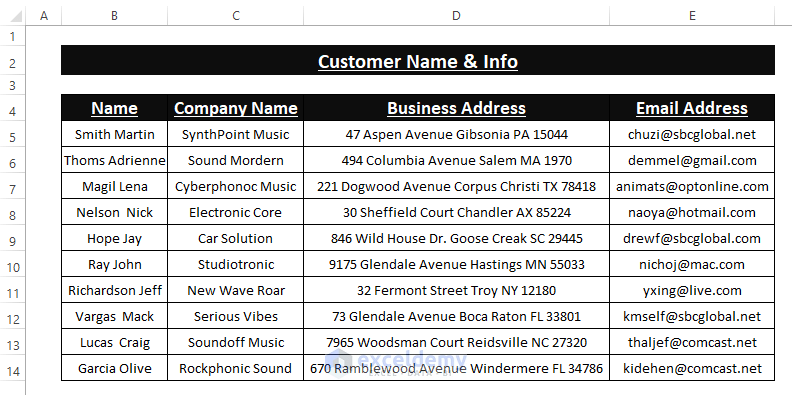
- Excel loads the data. Modify the data according to your requirements. The outcome will look like the picture below.
Read More: How to Import Text File to Excel Automatically
Method 5 – VBA Macro to Import CSV into an Existing Sheet
Steps:
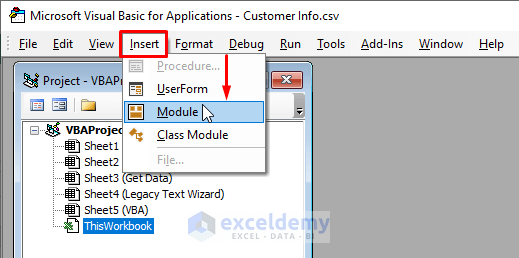
- Press ALT+F11 or go to the Developer tab > Visual Basic (in the Code section) to open the Microsoft Visual Basic window.
- In the Visual Basic window, Select Insert > Click on Module.
- Enter the below macro code into the Module:
Sub ImportCSVFile()
Dim wrkSheet As Worksheet, mrfFile As String
Set wrkSheet = ActiveWorkbook.Sheets("VBA")
mrfFile = Application.GetOpenFilename("Text Files (*.csv),*.csv", , "Provide Text or CSV File:")
With wrkSheet.QueryTables.Add(Connection:="TEXT;" & mrfFile, Destination:=wrkSheet.Range("B2"))
.TextFileParseType = xlDelimited
.TextFileCommaDelimiter = True
.Refresh
End With
End Sub 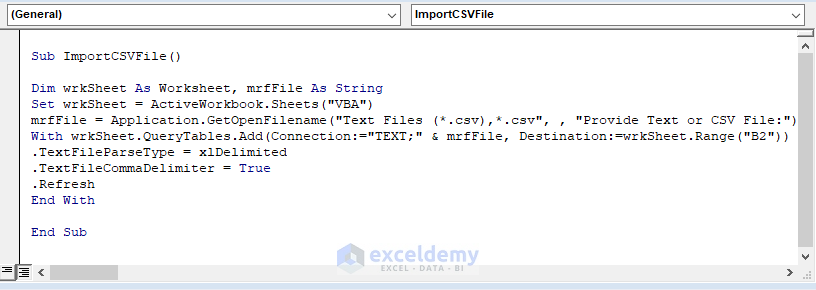
The Macro Application.GetOpenFilename statement opens the device directory to select CSV files from. The macro sets the connection as the Text destination to B2. The macro directs to load the comma-delimited file declaring the file type as True.
The CSV file gets loaded in the given worksheet (i.e., VBA). The macro uses commas as the separation delimiter to distribute the data into columns.

Read More: How to Import CSV Data into Excel
Download the Excel Workbook
Related Articles
- How to Convert CSV to XLSX without Openings
- How to Open Notepad or Text File in Excel with Columns
- Convert CSV to Excel Automatically
- How to Convert CSV to Excel with Columns
- How to Convert CSV to XLSX Command Line
- How to Compare 2 CSV Files in Excel
<< Go Back to Import CSV to Excel | Importing Data in Excel | Learn Excel
Get FREE Advanced Excel Exercises with Solutions!

Method 2 does not work. Error after “Mark the Existing worksheet option;
Click OK,” is: “Query results cannot overlap a table or XML mapping,”
This page was first hit from googling: “In Excel, when importing an external CSV-file how do I put that into existing formula-linked tables?”
Hello Steve,
You can address the error by ensuring there is enough space in the target worksheet for the CSV data to be imported without overlapping existing tables or XML mappings. Consider moving the existing table to another location or importing the CSV data into a new worksheet and then linking it to the existing formulas or tables.
Regards
ExcelDemy