Method 1 – Use IF, AND, NOW, and Other Functions to Insert Timestamp in Excel
Steps
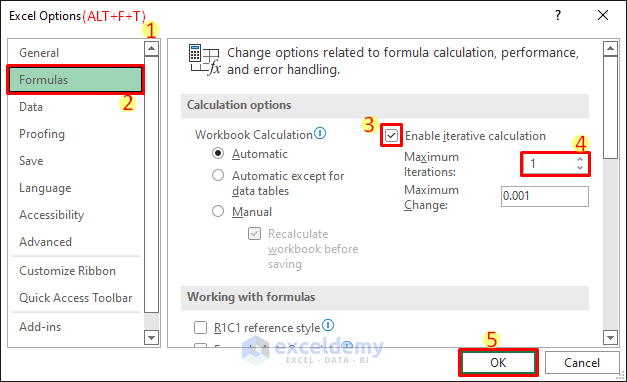
- Press Alt F T to open Excel Options.
- Go to the Formulas tab.
- Check the Enable iterative calculation checkbox.
- Set the Maximum Iterations to 1.
- Click OK.
- Enter the following formula in cell C5:
=IF(AND(B5<>"",D5<>B5),NOW(),IF(B5="","",C5))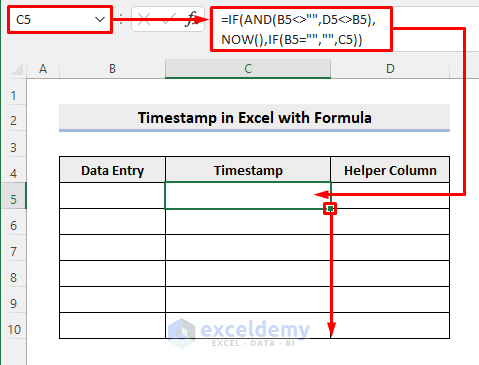
- Press Enter and use the Fill Handle icon to copy the formula to the cells below.
- Copy the following formula in cell D5:
=IF(B5="","",IF(OR(C5="",AND(ISNUMBER(D5),B5=D5)),D5,B5))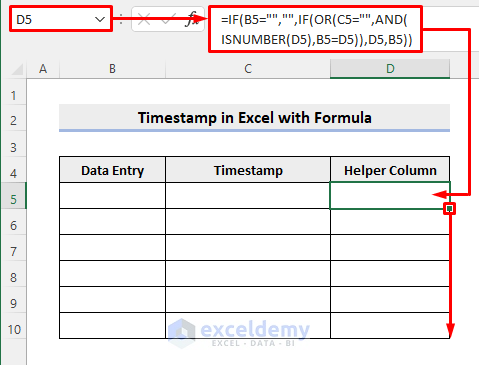
- Press Enter.
- Drag the Fill Handle icon to the cells below as earlier.
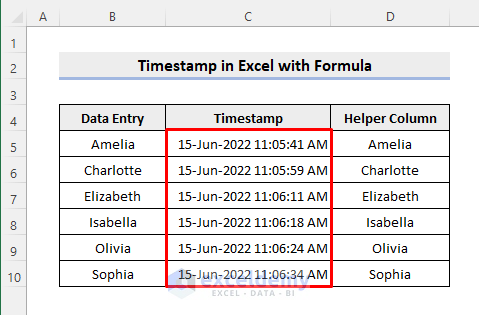
- Start entering values in the cells in column B. After that, the table will start populating.
- Here, column D is a helper column. You can hide it by right-clicking after selecting the column.
- Alternatively, you can just enter the following formula in cell C5 to get the same result:
=IF(B5<>"",IF(C5="",NOW(),C5),"")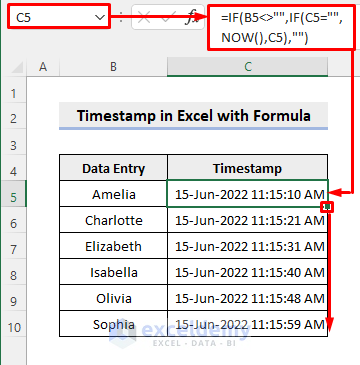
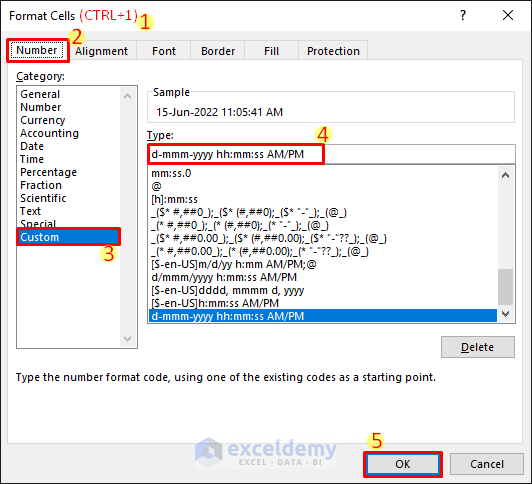
You may need to change the formatting of the cells in column C.
- Select the column by clicking the column number at the top.
- Press Ctrl + 1 to open the Format Cells dialog box.
- Click on the Custom number format.
- Enter d-mmm-yyyy hh:mm:ss AM/PM in the Type field.
- Click OK.
Formula Breakdown:
Formula in Cell C5:
➤ IF(B5=””,””,C5))
The IF function returns nothing if cell B5 is empty. Otherwise, returns the same value stored in C5.
➤ NOW()
The NOW function returns the current date and time.
➤ AND(B5<>””,D5<>B5)
The AND function returns TRUE if both arguments are true i.e cell B5 is not empty and cells B5 and D5 do not have the same value.
➤ IF(AND(B5<>””,D5<>B5),NOW(),IF(B5=””,””,C5))
If the AND function returns TRUE, then the IF function returns the current date and time obtained from the NOW function. Otherwise, it returns the result obtained from the argument containing the IF function.
Formula in Cell D5:
➤ ISNUMBER(D5)
The ISNUMBER function returns TRUE if cell D5 contains a number. Otherwise, it returns False.
➤ AND(ISNUMBER(D5),B5=D5)
The AND function returns TRUE if cell D5 contains a number and cells B5 and D5 have the same value. It returns FALSE otherwise.
➤ OR(C5=””,AND(ISNUMBER(D5),B5=D5))
The OR function returns TRUE if any one of the arguments is true i.e cell C5 is empty or the AND function returns TRUE. It returns FALSE if all of the arguments are false.
➤ IF(OR(C5=””,AND(ISNUMBER(D5),B5=D5)),D5,B5)
The IF function returns the same value stored in cell D5 if the OR function returns TRUE. Otherwise, it returns the value of cell B5.
➤ IF(B5=””,””,IF(OR(C5=””,AND(ISNUMBER(D5),B5=D5)),D5,B5))
The IF function returns nothing if cell B5 is empty. Otherwise, it returns the result obtained from the argument containing the IF function.
Read More: How to Insert Last Modified Date and Time in Excel Cell
Method 2 – Apply VBA Code to Insert Timestamp in Excel When Cell Changes
Steps
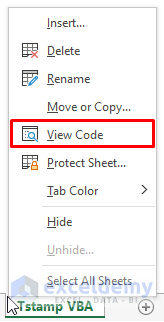
- Right-click on the target worksheet tab.
- Select View Code. This will open the code module for that particular worksheet.
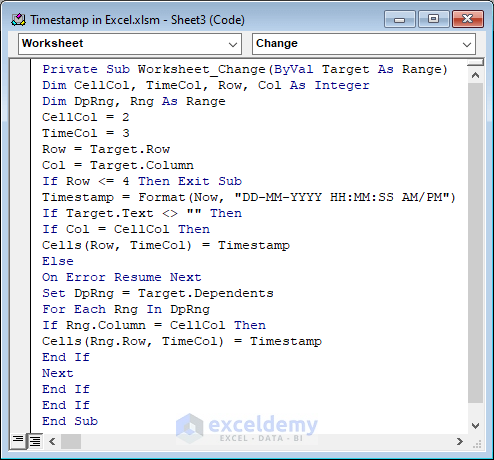
- Copy the following code.
Private Sub Worksheet_Change(ByVal Target As Range)
Dim CellCol, TimeCol, Row, Col As Integer
Dim DpRng, Rng As Range
CellCol = 2
TimeCol = 3
Row = Target.Row
Col = Target.Column
If Row <= 4 Then Exit Sub
Timestamp = Format(Now, "DD-MM-YYYY HH:MM:SS AM/PM")
If Target.Text <> "" Then
If Col = CellCol Then
Cells(Row, TimeCol) = Timestamp
Else
On Error Resume Next
Set DpRng = Target.Dependents
For Each Rng In DpRng
If Rng.Column = CellCol Then
Cells(Rng.Row, TimeCol) = Timestamp
End If
Next
End If
End If
End Sub- Paste the copied code on the blank module as shown below.
- Save the document as a macro-enabled workbook. (File > Save As > Browse > change save type to Macro-Enabled Workbook)
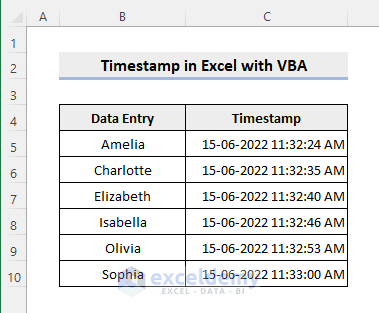
- Start entering data in the cells in column B. Then you will get the same results as earlier.
VBA Code Explanation:
Private Sub Worksheet_Change(ByVal Target As Range)
We will write the code inside this private subprocedure. The code will only affect the particular worksheet.
Dim CellCol, TimeCol, Row, Col As Integer
Dim DpRng, Rng As Range
Declaring necessary variables.
CellCol = 2
Data entry column.
TimeCol = 3
Timestamp column.
Row = Target.Row
Col = Target.Column
Storing the row and column numbers of the selected cell.
If Row <= 4 Then Exit Sub
Any changes within the top 4 rows won’t create a timestamp.
Timestamp = Format(Now, “DD-MM-YYYY HH:MM:SS AM/PM”)
The timestamp will be formatted this way. Change it as required.
If Target.Text <> “” Then
If Col = CellCol Then
Cells(Row, TimeCol) = Timestamp
Create a timestamp if the selected cell is empty.
On Error Resume Next
Ignores any error if occurs.
Set DpRng = Target.Dependents
For Each Rng In DpRng
If Rng.Column = CellCol Then
Cells(Rng.Row, TimeCol) = Timestamp
Create timestamps for a range of cells if not empty.
Read More: How to Insert Excel Timestamp When Cell Changes Without VBA
Things to Remember
- You need to use a custom format for the cells in column B to get a properly formatted timestamp.
- The alternate formula only works when data is entered in blank cells.
- The data entry and the timestamp column are hard coded in the VBA code. You need to modify the code based on your dataset.
Download Practice Workbook
You can download the practice workbook from the download button below.
Related Articles
- How to Insert Current Date and Time in Excel
- How to Combine Date and Time in One Cell in Excel
- How to Auto Update Current Time in Excel
- Excel Current Time Formula
- How to Add Date and Time in Excel When Printing
- How to Enter Date and Time in Excel
<< Go Back to Timestamp | Date-Time in Excel | Learn Excel
Get FREE Advanced Excel Exercises with Solutions!

Hello Md. Shamim Reza,
This has been very helpful, thank you for your assistance!
Would you be able to provide the alteration to the code necessary for this to work for a row instead of a column?
Could you provide the changes if it were for multiple rows?
I appreciate your help,
Brian
Thank you, Brian for the comment. You can use the following code to insert timestamp when value from a specific row change:
The following shows it working.
Now, for your second part of the comment. You can use this code for multiple rows:
The animated image shows it is working for two rows.
Regards
Bishawajit, on behalf of ExcelDemy
Bishawajit,
How would I adjust this to return timestamp for multiple columns that are not adjoining. example Row D returns stamp in E and Row F returns in G and Row H returns time stamp in I
Hello C. Jordan,
You can handle this by modifying the VBA code so that each monitored column writes its timestamp to a specific (non-adjacent) column. Instead of assuming the timestamp is always in the next column, you explicitly map source columns to timestamp columns.
For your example:
Changes in column D → timestamp in E
Changes in column F → timestamp in G
Changes in column H → timestamp in I
Use this pattern in the Worksheet_Change event:
This way, each non-adjoining column is handled independently, and the correct timestamp is written to the corresponding column whenever a change occurs.
Regards,
ExcelDemy
Hello Bishawajit,
Do you know how to change this VBA for multiple collumns starting from row 2 all thay down . Thank you
Thank you, RAFAL, for your wonderful question.
Here is the solution to your question.
This is the VBA code we have applied for multiple columns starting from row 2.
Now, for a better understanding of the output, you can see the below image.
I hope this may solve your issue.
Raiyan , on behalf of ExcelDemy
Hello Bishawajit,
Do you know how to change this VBA for multiple data columns and multiple timestamp columns e.g.:
CellCol = 1 inserts a time stamp into TimeCol = 4
CellCol1 = 2 insets a time stamp into TimeCol1 = 5
CellCol2 = 3 inserts a time stamp into TimeCol2 = 6
Thank you in advance.
Peter
Thank you, Peter Abbott, for your wonderful question.
Here is the solution to your question:
This is the VBA code we have changed for multiple data columns and multiple timestamp columns.
First, input data for multiple columns, like below.
Now, paste the following in the module. Then, click on the Run button to see the output.
Finally, see the following output:
I hope this may solve your issue.
Bishawajit, on behalf of ExcelDemy
Can the formula in method 1 be altered to check for changes in multiple columns?
Hello Anon
Thanks for your question! You wanted formulas to check for changes in multiple columns. Assuming you have three columns: First Name, Middle Name, and Last Name, you want to check for changes in the Timestamp column.
Solution Overview:
Follow these steps:
Now, input the intended names to see the output, like the GIF above.
I hope these are the formulas you were looking for. I have attached the solution workbook; good luck.
DOWNLOAD SOLUTION WORKBOOK
Regards
Lutfor Rahman Shimanto
ExcelDemy