If you are looking for some special tricks to split date and time in Excel, you’ve come to the right place. In Microsoft Excel, there are numerous ways to split date and time. In this article, we’ll discuss eight methods to split date and time. Let’s follow the complete guide to learn all of this.
You will also find some other articles here if you need to split data and time without using formula or using VBA. You will also find an article to separate date from text here.
We will use eight effective and tricky methods to split date and time in Excel in the following section. This section provides extensive details on eight methods. You should learn and apply all of these, as they improve your thinking capability and Excel knowledge.
1. Using INT Function to Split Date and Time in Excel
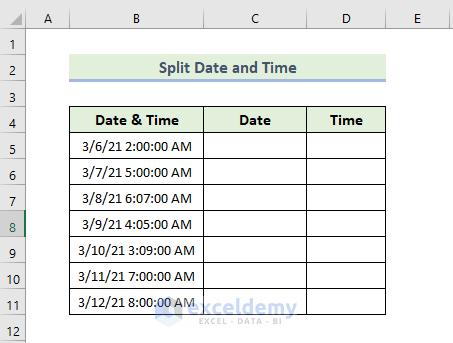
Here, we have a dataset containing the date and time. Our main goal is to split date and time in Columns C and D. Using the INT function is the convenient way to split date and time. You have to follow the following rules.
📌 Steps:
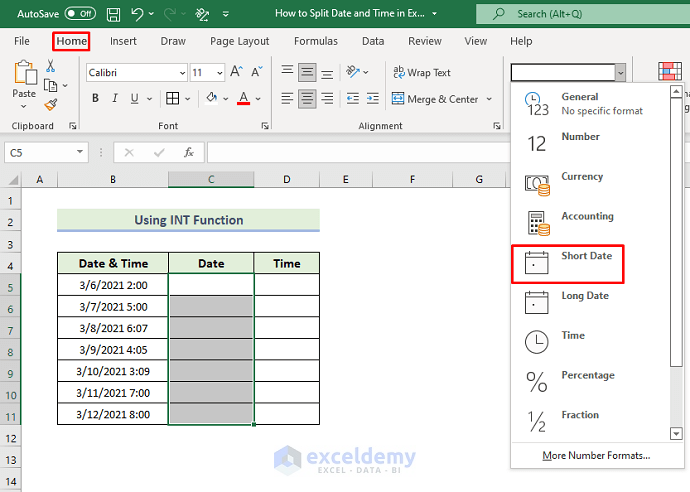
- First, select the range of cells C5:C11.
- After that, you have to format them in Short Date format.
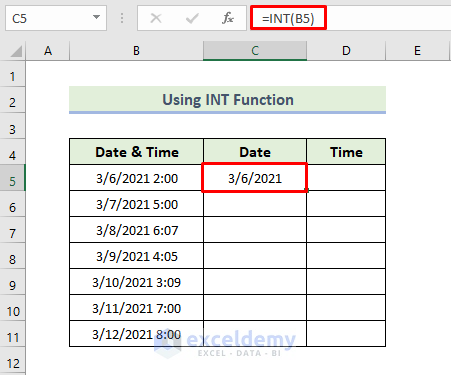
- We will use the following formula in the cell C5:
=INT(B5)
Here, the INT function rounds a number down to the nearest integer.
- Press Enter and drag the Fill handle icon.
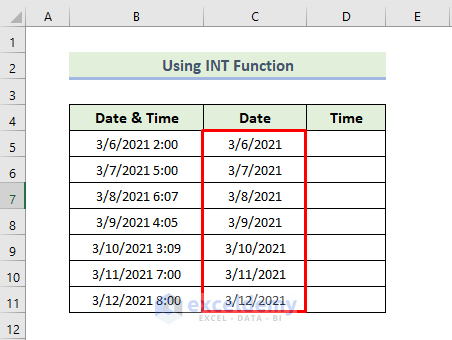
- As a consequence, you will get the date in Column C like the following.
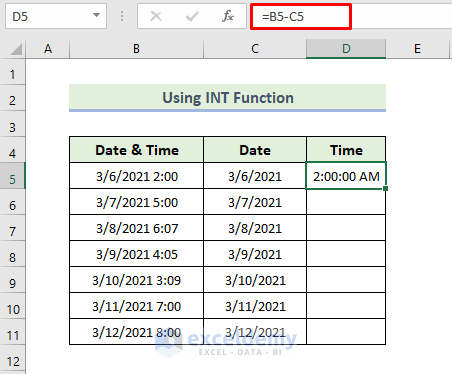
- We will use the following formula in the cell D5:
=B5-C5
Here, this formula returns time in column D.
- Press Enter and drag the Fill handle icon.
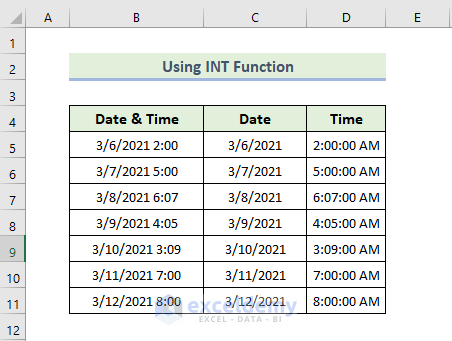
- Finally, you will be able to split the date and time like the following.
2. Applying Excel TEXT Function to Split Date and Time
Here, we use another method to separate date and time by using the TEXT function. Here, the Text function converts a value to text in a specified format. Let’s walk through the steps to find out how to split date and time in Excel.
📌 Steps:
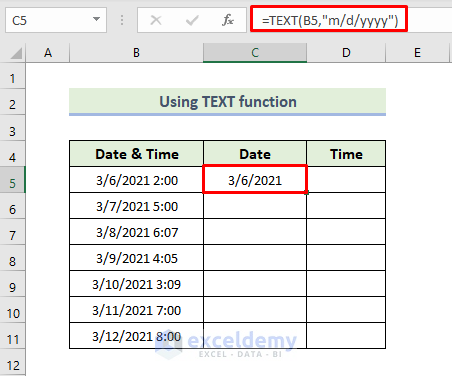
- We will use the following formula in the cell C5:
=TEXT(B5,"m/d/yyyy")
Here, the Text function is used to modify a date format in Excel. You must put the cell reference of a date in the first argument. By customizing the cell reference, you can define an appropriate date.
- Press Enter and drag the Fill handle icon.
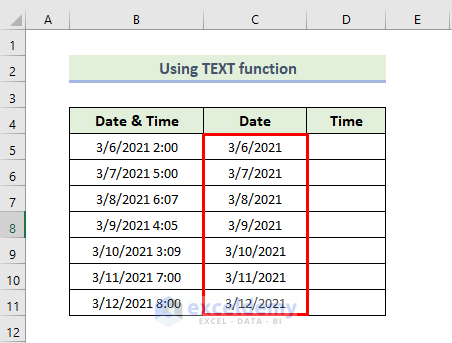
- As a consequence, you will get the date in column C like the following.
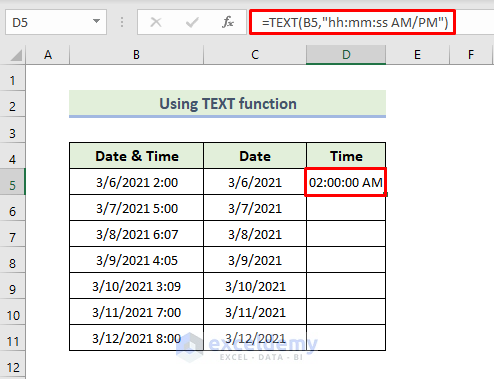
- We will use the following formula in the cell D5:
=TEXT(B5,"hh:mm:ss AM/PM")
Here, the Text function is used to modify a date format in Excel. You must put the cell reference of a date in the first argument. and you can customize the cell reference to define the time.
- Press Enter and drag the Fill handle icon.
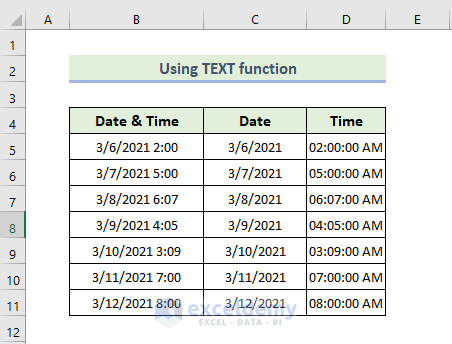
- Finally, you will be able to split the date and time like the following.
3. Separating Date and Time with TRUNC Function in Excel
Here, we use another method to separate date and time by using the TRUNC function. Here, the TRUNC function truncates a number to an integer by removing the decimal, or fractional, part of the number. Let’s walk through the steps to find out how to split date and time in Excel.
📌 Steps:
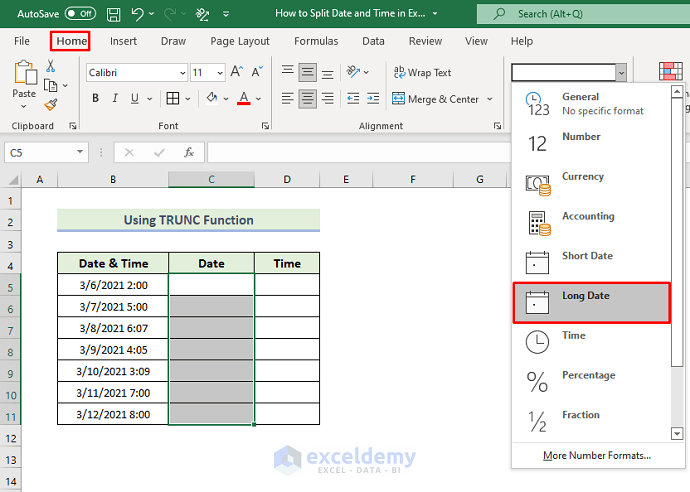
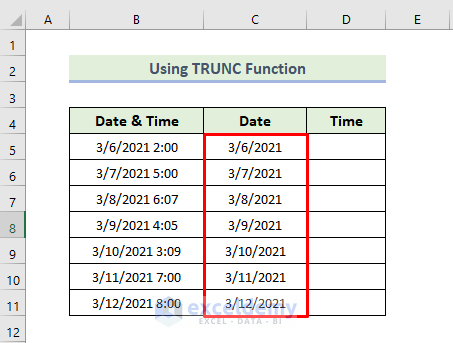
- First, select the range of cells C5:C11.
- After that, you have to format them in Short Date format.
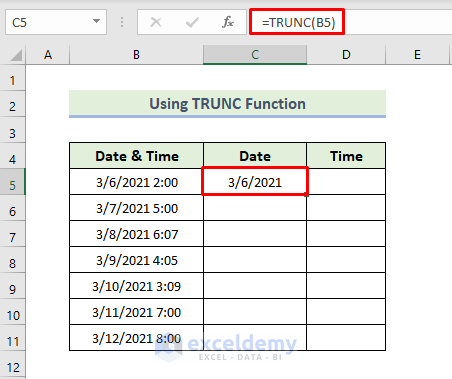
- We will use the following formula in the cell C5:
=TRUNC(B5)
Here, the TRUNC function is used to remove the decimal parts of the number. In this formula, cell B5‘s number will be truncated so that there will be no decimal points in the result.
- Press Enter and drag the Fill handle icon.
- As a consequence, you will get the date in column C like the following.
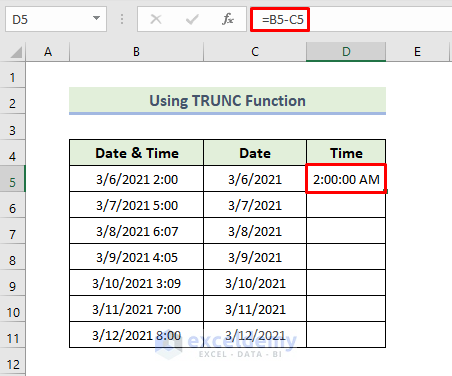
- We will use the following formula in the cell D5:
=B5-C5
Here, this formula returns time in column D.
- Press Enter and drag the Fill handle icon.
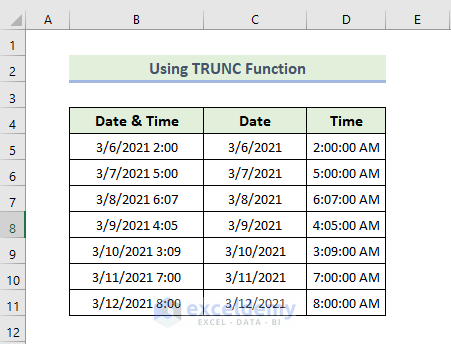
- Finally, you will be able to split the date and time like the following.
4. Inserting ROUNDDOWN Function to Separate Time and Date
Here, we use another simple method to separate date and time by using the ROUNDDOWN function. Here, the ROUNDDOWN function rounds a number, toward zero. Let’s walk through the steps to find out how to split date and time in Excel.
📌 Steps:
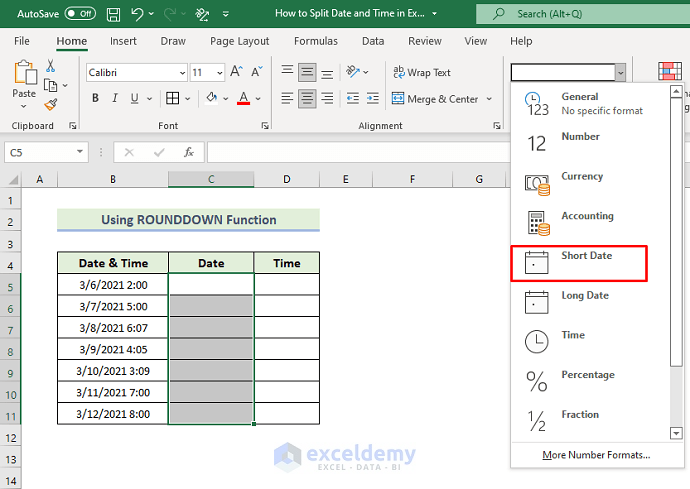
- First, select the range of cells C5:C11.
- After that, you have to format them in Short Date format.
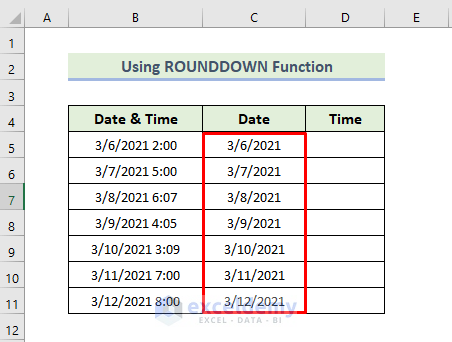
- We will use the following formula in the cell C5:
=ROUNDDOWN(B5,0)
Here, the ROUNDDOWN function is used to round down the reference cell. Here, B5 represents what we are rounding down, and 0 represents the number of digits we want to round down to. In other words, we want to round down our number to zero decimal places.
- Press Enter and drag the Fill handle icon.
- As a consequence, you will get the date in Column C like the following.
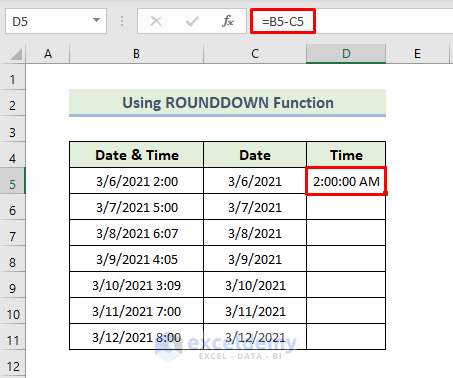
- We will use the following formula in the cell D5:
=B5-C5
Here, this formula returns time in column D.
- Press Enter and drag the Fill handle icon.
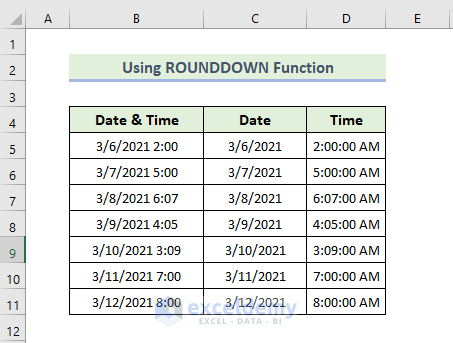
- Finally, you will be able to split the date and time like the following.
5. Separating Date and Time Applying Flash Fill Tool
Here, we use another simple method to separate date and time by using the Flash Fill feature. Let’s walk through the steps to find out how to split date and time in Excel.
📌 Steps:
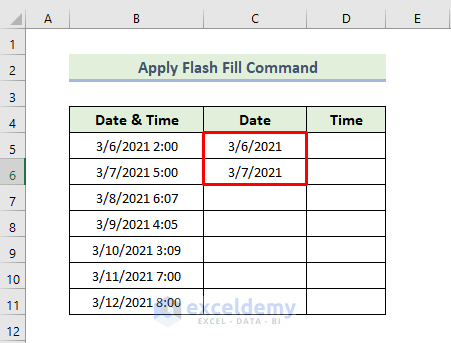
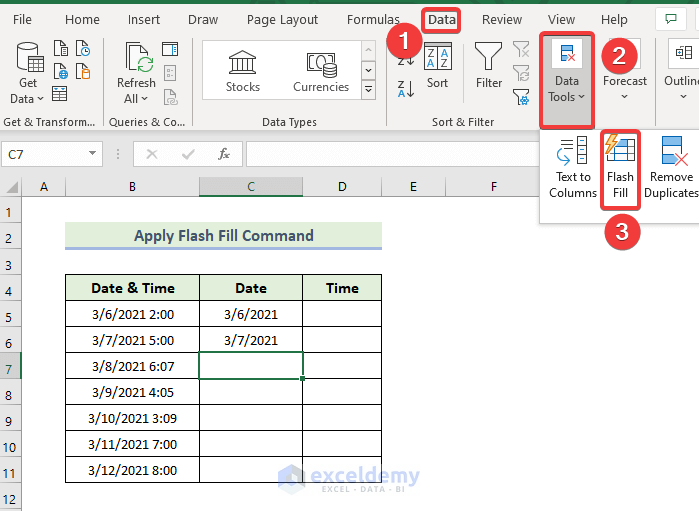
- Firstly, type the first two dates in columns C5 and C6.
- Next, go to the Data tab, select Data Tools, and finally, select the Flash Fill option.
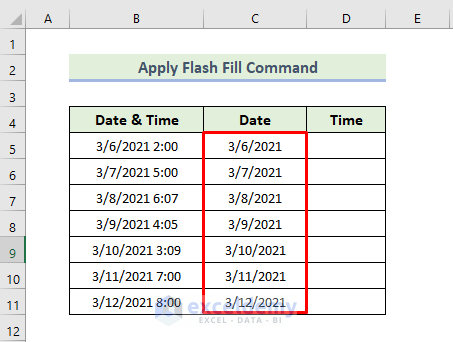
- As a consequence, you will get the date in column C like the following.
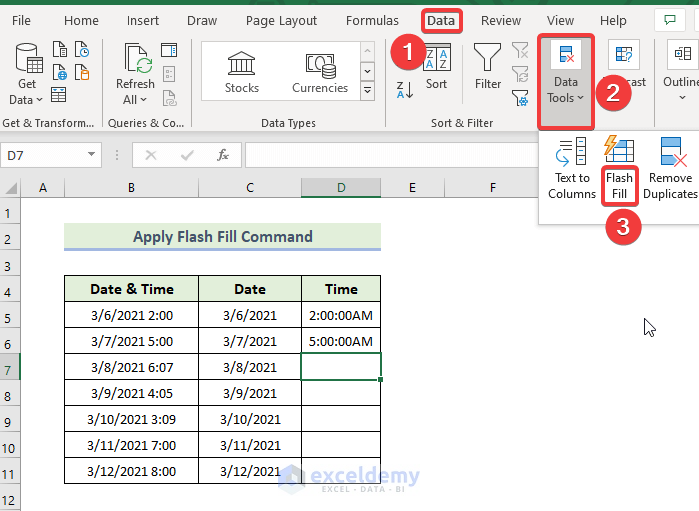
- Again, type the first two times in columns D5 and D6. Then, go to the Data tab, select Data Tools, and finally, select the Flash Fill option.
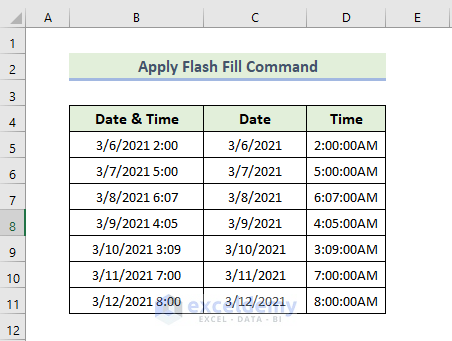
- Finally, you will be able to split the date and time like the following.
6. Splitting Date and Time Through Keyboard Shortcut
Using a keyboard shortcut is the fastest way to spit date and time. Let’s walk through the steps to find out how to split date and time in Excel.
📌 Steps:
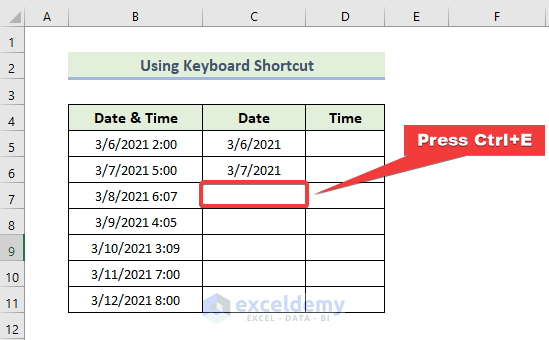
- Firstly, type the first two dates in columns C5 and C6.
- Next, press ‘Ctrl+E’ from the keyboard.
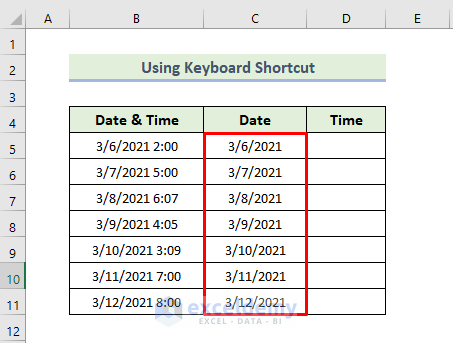
- As a consequence, you will get the date in Column C like the following.
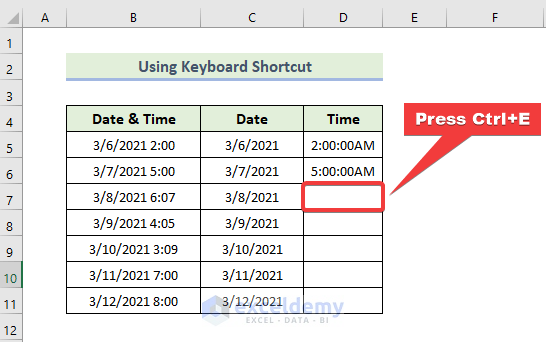
- Again, type the first two times in columns D5 and D6, and next, press ‘Ctrl+E’ from the keyboard.
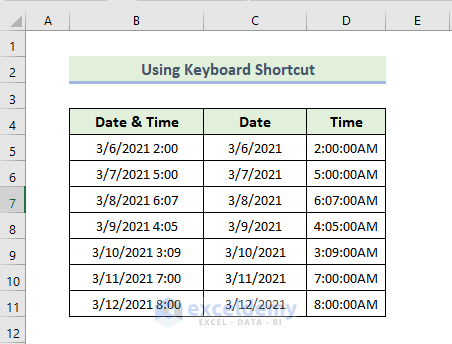
- Finally, you will be able to split the date and time like the following.
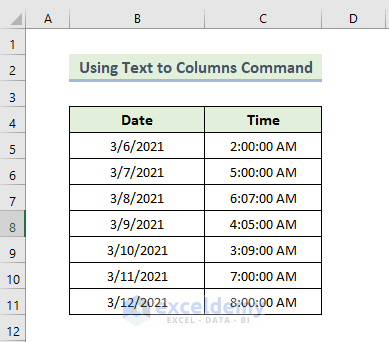
7. Using Excel Text To Columns Tool to Split Date and Time
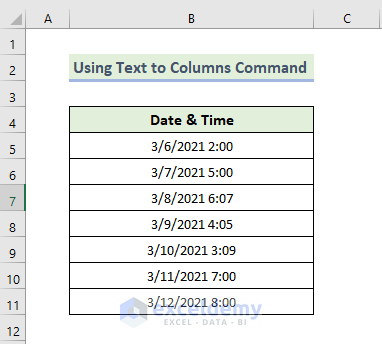
Here, we use another simple method to separate date and time by using the Text to Columns command. Here, we have a dataset containing the date and time. Let’s walk through the steps to find out how to split date and time in Excel.
📌 Steps:
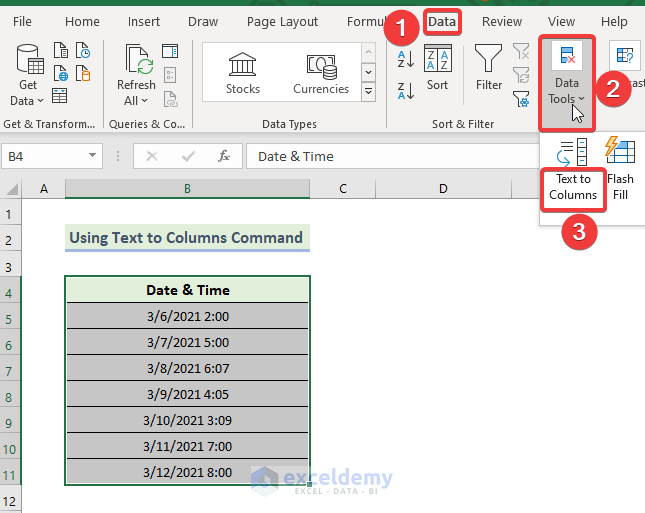
- Firstly, select the range of the dataset. Next, go to the Data tab, select Data Tools, and finally, select the Text to Columns option.
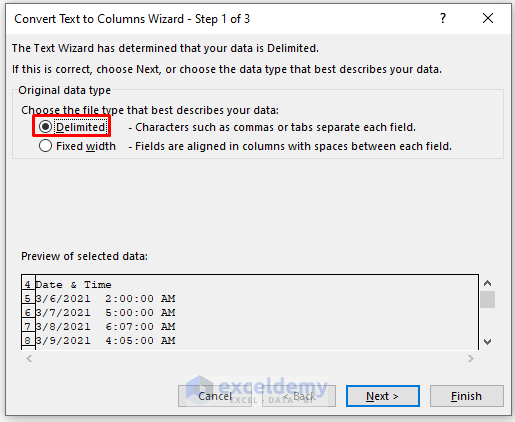
- When the Convert Text to Columns Wizard – Step 1 of 3 dialogue box appears, check the Delimited Then click on Next.
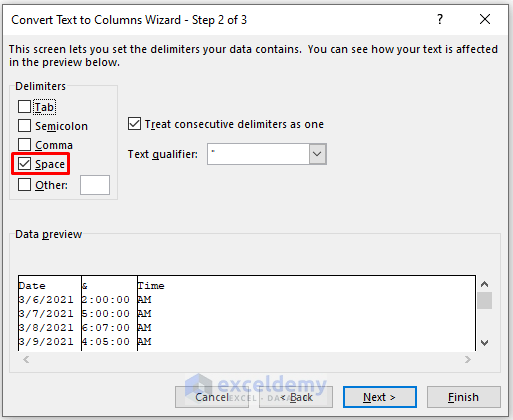
- Next, the Convert Text to Columns Wizard – Step 2 of 3 dialogue box appears. In the Delimiters section, check Space. Then click on Next.
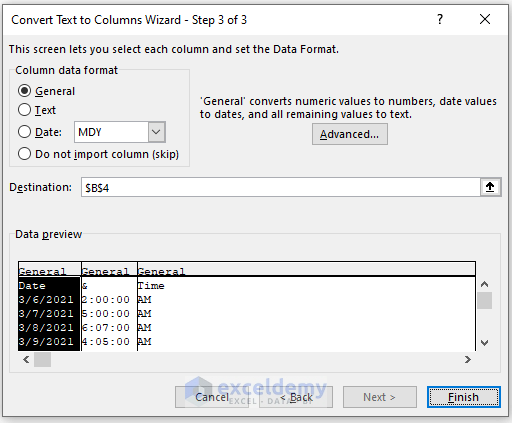
- Now, the Convert Text to Columns Wizard -Step 3 of 3 dialogue box appears. Click on Finish.
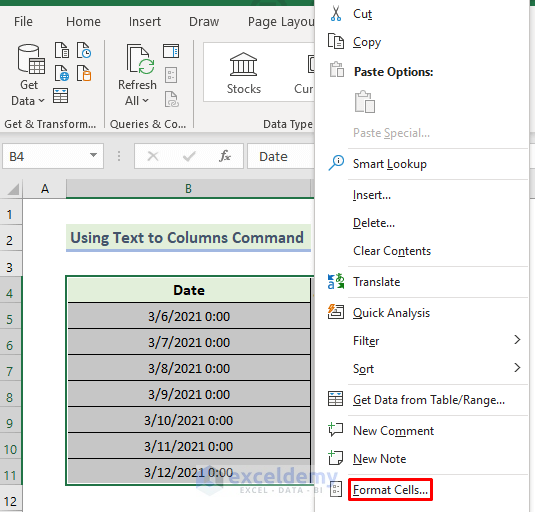
- As a consequence, you will get the date in column B like the following and you need to customize the date. For this reason, you have to select the range of the cell and right-click and select the Format Cells option.
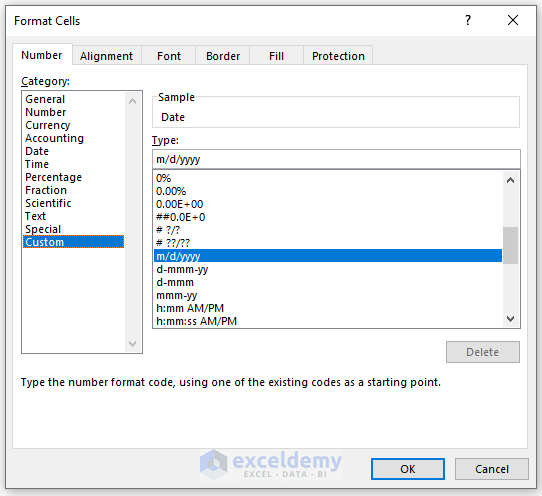
- When the Format Cells dialogue box appears, select Custom from the Category. Select your desired date type from the Type section.
- As a result, you will get the date in column B like the following.
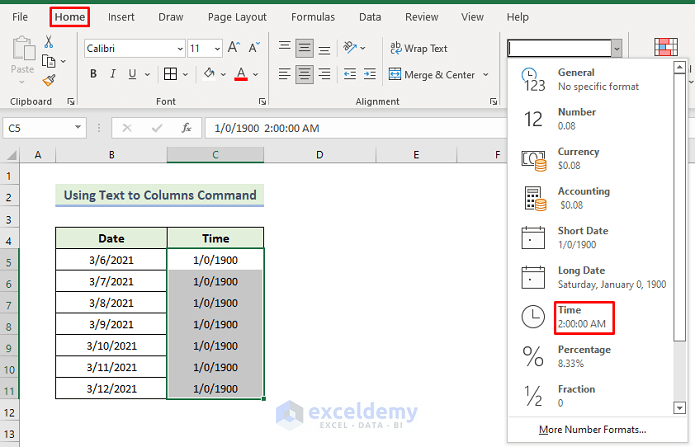
- Now, you have to select the range of the cell of column Time that you need to customize. Then go to Home Tab and select the Time option like the following.
- Finally, you will be able to split the date and time like the following.
8. Splitting Date and Time with Excel Power Query
Here, we use another simple method to separate date and time by using Power Query. Here, we have a dataset containing the date and time. Let’s walk through the steps to find out how to split date and time in Excel.
📌 Steps:
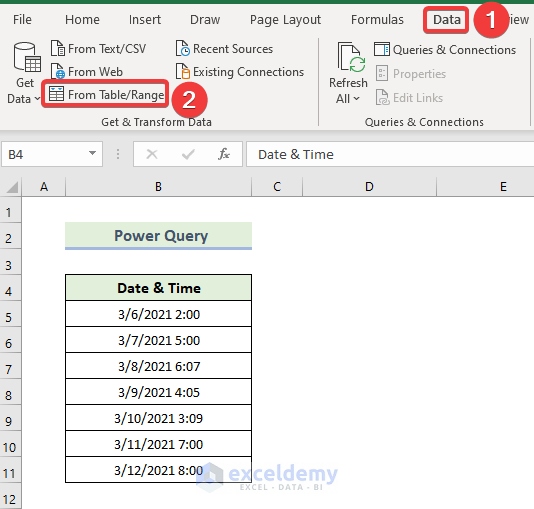
- Firstly, select the range of the dataset. Next, go to the Data tab, and select From Table/Range.
- Next, you can see your dataset in Power Query Editor.
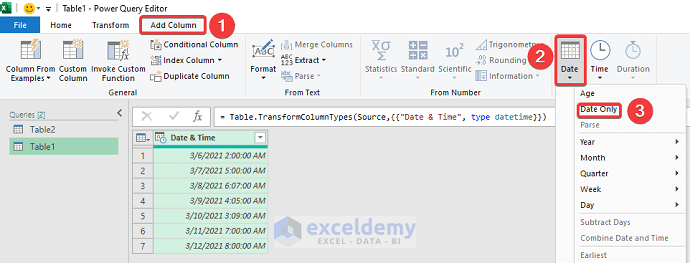
- Now, to extract the date go to Add Column tab, select Date, and finally, select the Date Only option.
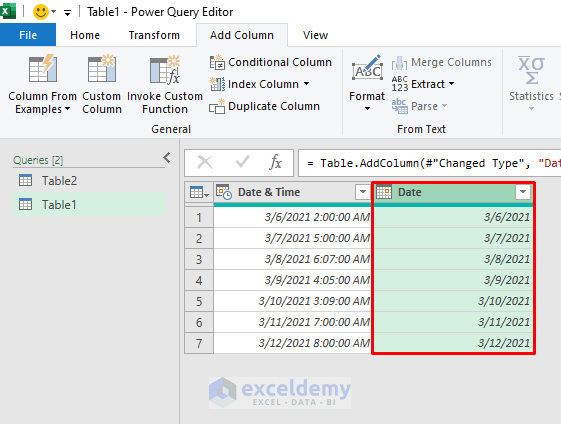
- As a consequence, you will get a new Column with date like the following.
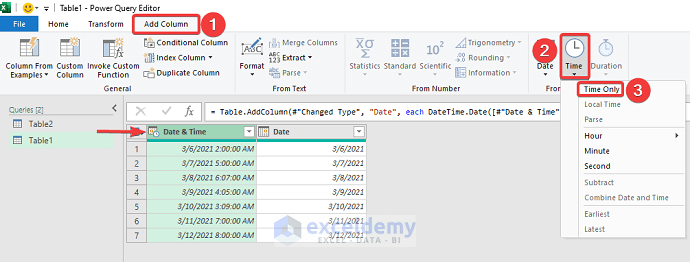
- Next, select the range of the dataset. To extract time go to Add Column tab, select Time, and finally, select the Time Only option.
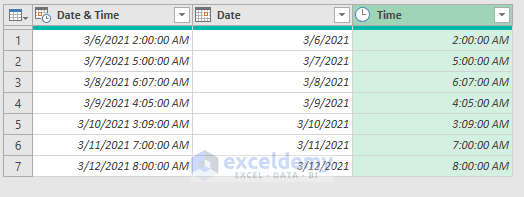
- As a result, you will get a new Column with time like the following.
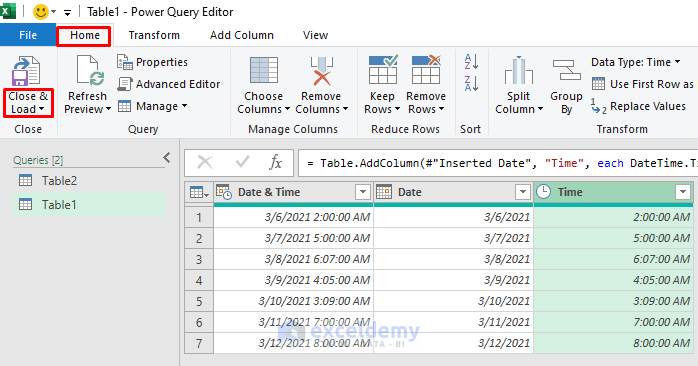
- Now, go to the Home tab, and select Close & Load.
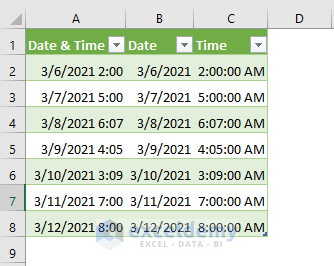
- Finally, you will be able to split the date and time like the following.
Download Practice Workbook
Download this practice workbook to exercise while you are reading this article.
Conclusion
That’s the end of today’s session. I strongly believe that from now you may split date and time in Excel using formula, without using formula or VBA. If you have any queries or recommendations, please share them in the comments section below. Keep learning new methods and keep growing!
Split Date and Time: Knowledge Hub
<< Go Back to Split | Learn Excel
Get FREE Advanced Excel Exercises with Solutions!