Whenever working with Excel you might face a situation where you will need to copy a cell address. If you are looking for a way to copy cell addresses in Excel, then this article will be helpful for you. The main objective of this article is to explain how to copy cell addresses in Excel.
How to Copy Cell Address in Excel: 5 Simple Ways
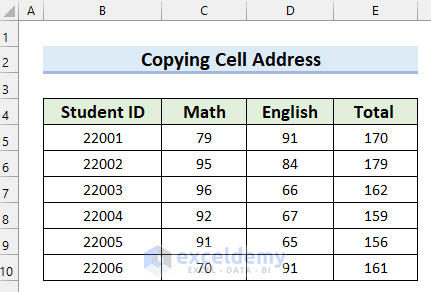
Here, I have taken the following dataset to explain this article. I will explain 5 simple ways in which you can copy the cell address in Excel.
1. Use of Name Box to Copy Cell Address in Excel
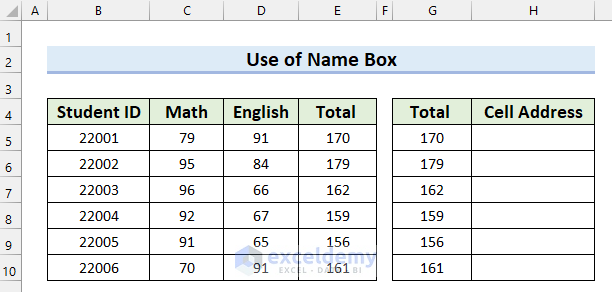
In this 1st method, I will explain how you can copy the cell address in Excel by using the Name Box. To explain this example, I have taken the following dataset. Here, I will copy the cell address for the cell that contains that specific Total mark.
Let’s see the steps.
Steps:
- Firstly, select the cell to which you want to copy the cell address. Here, I selected cell E5.
- Secondly, select the cell address from the Name Box.
- Thirdly, copy the cell address by pressing CTRL+C on your keyboard.

- After that, select the cell where you want to paste the cell address. Here, I selected cell H5.

- Next, press CTRL+V from your keyboard and you will see that you have the desired cell address in your selected cell.

- Finally, in the same way, copy the other cell addresses.

Read More: Example of Cell Address in Excel
2. Applying ADDRESS Function to Copy Cell Addresses in Excel
Here, I will show you how to copy the cell address in Excel using the ADDRESS function. Let’s see the steps.
Steps:
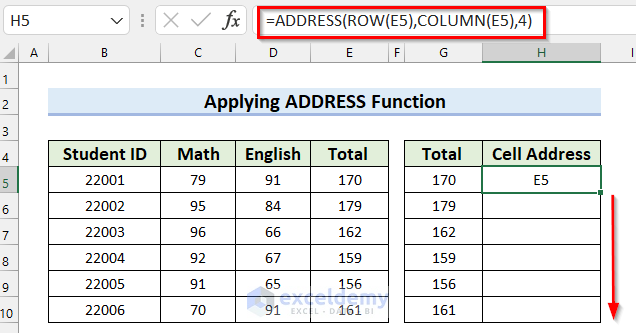
- Firstly, select the cell where you want to show your copied cell address. Here, I chose cell H5.
- Secondly, in cell H5 write the following formula.
=ADDRESS(ROW(E5),COLUMN(E5),4)
Formula Breakdown
- ROW(E5) —-> Here, the ROW function will return the row number of cell E5.
- Output: {5}
- COLUMN(E5) —-> Here, the COLUMN function will return the column number of cell E5.
- Output: {5}
- ADDRESS(ROW(E5),COLUMN(E5),4) —-> turns into
- ADDRESS({5},{5},4) —-> Now, the ADDRESS function will return the cell address of the specified row and column. It will return the relative cell address as 4 was selected as asb_num.
- Output: {“E5”}
- ADDRESS({5},{5},4) —-> Now, the ADDRESS function will return the cell address of the specified row and column. It will return the relative cell address as 4 was selected as asb_num.
- Thirdly, press ENTER to get the cell address.

- After that, drag the Fill Handle to copy the formula to the other cells.
Finally, you can see that I have copied the formula to the other cells and got the cell address for each cell.

Read More: How to Use Cell Address in Excel Formula
3. Using Special Character to Copy Cell Address in Excel
In this method, I will use a Special Character (#) to copy the cell address in Excel. Here, I will use the Number Sign (#). Let’s see how it is done.
Steps:
- Firstly, select the cell where you want to display the copied cell address. Here, I selected cell H5.
- Secondly, in cell H5 write the following formula.
=E5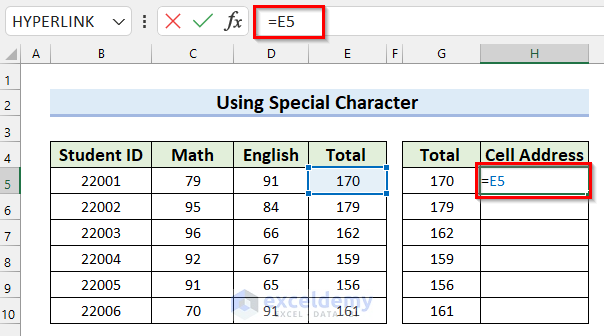
- After that, replace the Equals Sign (=) with a Number Sign (#).

- Then, press ENTER.

- Now, enter the other cell addresses with the Number Sign (#) in the same way.

After that, I will remove the Number Sign (#) to get the cell address.
- Then, select the cells from where you want to remove the Number Sign. Here, I selected the cell range H5:H10.

- Next, press CTRL+H on your keyboard.
Now, you will see a dialog box named Find and Replace will appear.
- Firstly, write a Number Sign (#) in the Find what section.
- Secondly, leave the Replace with section blank.
- Thirdly, select Replace All.

Here, another dialog box will appear showing all the replacement that has been done.
- After that, select OK.

- Finally, you will see that you have removed the Number Sign (#) and got your desired cell address.

Read More: Excel VBA to Find Cell Address Based on Value
4. Employing CELL and ADDRESS Functions
Here, I will explain how you can employ the CELL function to copy the cell address in Excel. For this example, I have taken the following dataset. Now, I will copy the cell address for Profit. And then use that cell address to calculate the Sales.

Let’s see the steps.
Steps:
- Firstly, select the cell where you want to display the cell address. Here, I selected cell F6.
- Secondly, in cell F6 write the following formula.
=CELL("address",D6)
Here, in the CELL function, I selected “address” as info_type and D6 as reference. Now, the formula will return the cell address of the reference cell.
- Thirdly, press ENTER to get the cell address.

- After that, drag the Fill Handle to copy the formula.

Finally, you can see that I have copied the formula to all the other cells and got the cell addresses.

Now, I will calculate the Sales.
- Firstly, select the cell where you want to calculate the Sales. Here, I selected cell G6.
- Secondly, in cell G6 write the following formula.
=$D$6+C6
Here, the formula will return the summation of the values in cells D6 and C6.
- Thirdly, press ENTER to get the result.

- Finally, calculate the Sales for the other cells in the same way.

Read More: How to Return Cell Address Instead of Value in Excel
5. Use of Macros to Copy Cell Address
In this method, I will show you how you can use Macros to copy the cell address in Excel. Let’s see the steps.
Steps:
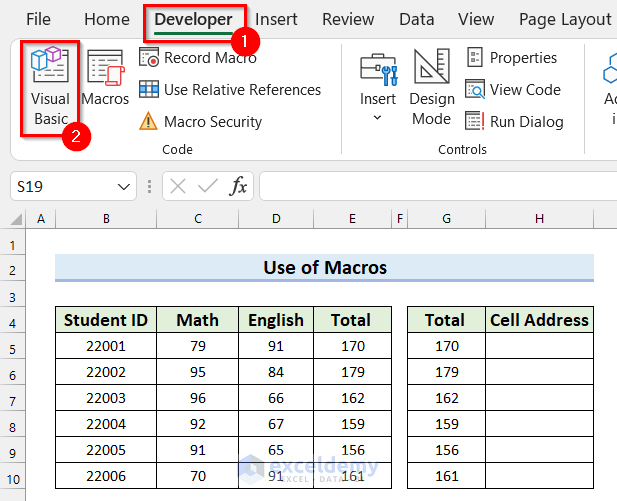
- Firstly, go to the Developer tab.
- Secondly, select Visual Basic.
After that, the Visual Basic Editor window will open.
- Then, select the Insert Tab.
- Next, select Module.
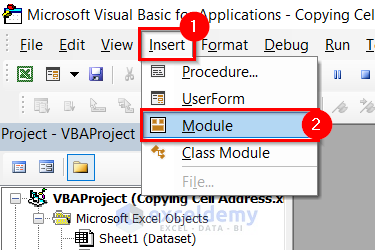
Now, a Module will open.
- After that, write the following code in that module.
Sub Copy_Cell_Address()
Dim input_address As Range
Dim output_cell As Range
On Error Resume Next
Set input_address = Application.InputBox("Select a Cell to Copy the Cell Address:", _
"Input Box for Copy", Selection.Address, , , , , 8)
Set output_cell = Application.InputBox("Select a Cell to Paste the Cell Address:", _
"Input Box for Paste", , , , , , 8)
output_cell(1).Value = input_address.Address
End Sub
Code Breakdown
- Here, I have created a Sub Procedure named Copy_Cell_Address.
- Then, I declared a variable named input_assress as Range and another variable named output_cell as Range.
- Next, I use the Application.InputBox method to create an input dialog box and I selected 8 as the Type argument which means Cell Reference. In this method, I used the Selection.Address property to get the cell address.
- After that, I used anotherInputBox method to create another dialog box to select the cell where I would paste the cell address.
- Then, I used the Value property to select the output value.
- Next, I used the Address property to get the cell address.
- Finally, I ended the Sub Procedure.
After that, Save the code and go back to your worksheet.
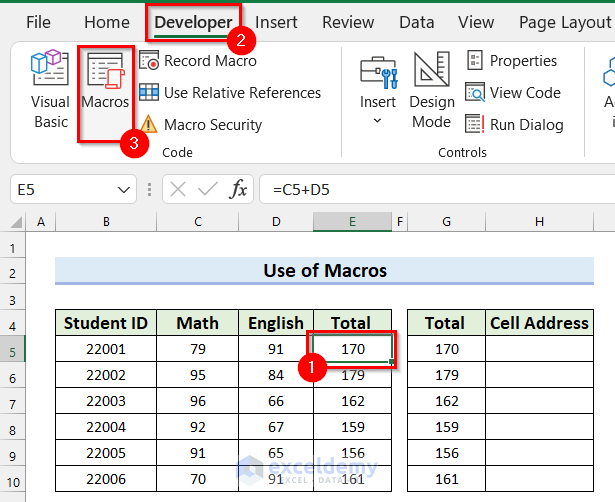
- Firstly, select the cell to which you want to copy the cell address. Here, I selected cell E5.
- Secondly, go to the Developer tab.
- Thirdly, select Macros.
Now, the Macro dialog box will appear.
- Firstly, select Copy_Cell_Address as the Macro name.
- Secondly, select Run.

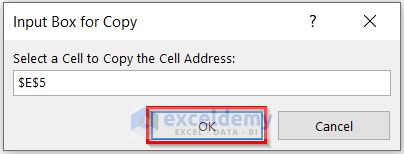
Here, a dialog box named Input Box for Copy will appear. Your selected cell will already be selected.
- Thirdly, press OK.
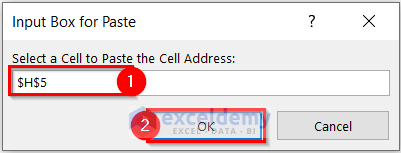
Now, another dialog box named Input Box for Paste will appear.
- Firstly, select the cell where you want to paste the cell address.
- Secondly, select OK.
Finally, you will see that you have got the cell address you wanted.
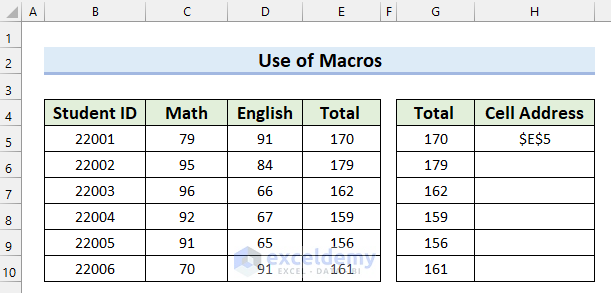
- After that, copy the other cell addresses in the same way.

Things to Remember
Whenever working with Macros you must save your Excel file as Excel Macro-Enabled Workbook. Otherwise, the VBA code will not work.
Practice Section
Here, I have provided a practice sheet for you to practice how to copy cell address in Excel.

Download Practice Workbook
You can download the practice workbook for how to copy cell addresses in Excel from the link below.
Conclusion
In this article, I tried to cover how to copy cell address in Excel. Here, I explained 5 simple ways of doing it. I hope this article was clear to you. Lastly, if you have any questions feel free to let me know in the comment section below.
Related Articles
<< Go Back to Excel ADDRESS Function | Excel Functions | Learn Excel
Get FREE Advanced Excel Exercises with Solutions!
