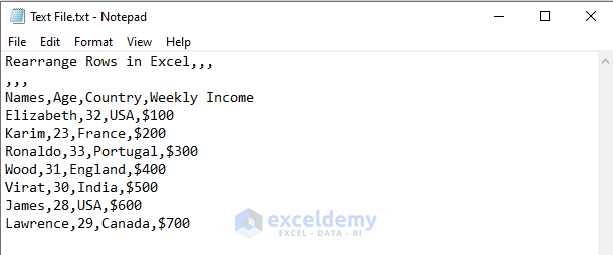
Excel offers some cool features to import txt, csv, etc. files in the worksheet. Suppose, we have a sample text file containing Text and commas as delimiters. Now, we will see a couple of codes in Excel VBA Import Text File Comma Delimited to resolve our issue.
2 Cases to Import Comma Delimited Text File Using Excel VBA
Here, we will see how to import a text file with comma delimiter in one cell in our first method and also to import them in different cells according to their delimiter in the text file.
Case 1: Import Comma Delimited Text File Using VBA Macro to Defined Sheet
In our first method, we will import our text data in sheet 2. Let’s see, how to do this.
Steps:
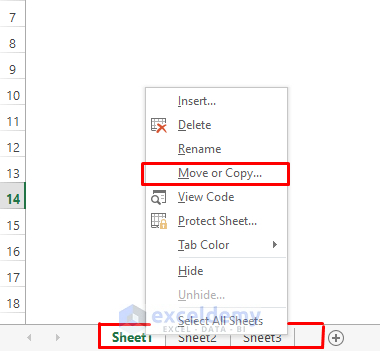
- First, right-click on the sheet and go to View Code.
- After that, copy and paste the VBA code below.
VBA code:
Option Explicit

Public Sub ImportTextComma()

Dim Openthefile As Variant
Dim FFtype As String
Dim sht As Worksheet

Set sht = ThisWorkbook.Sheets("Sheet2")
sht.Cells.Delete

FFtype = "Text Files (*.txt; *.csv), *.txt; *.csv"

Openthefile = Application.GetOpenFilename(FFtype)

If Openthefile = False Then

MsgBox "No file selected."
Else
ImportCommaSValue Openthefile, 1, sht.Range("A1")
End If

End Sub

Public Sub ImportCommaSValue(ByVal ACSV_FullName As String, ByVal AStartrow As Long, ByVal ADest As Range)
With ADest.Parent.QueryTables.Add(Connection:="TEXT;" & ACSV_FullName, Destination:=ADest)
.TextFileStartRow = AStartrow
.TextFileParseType = xlDelimited
.TextFileCommaDelimiter = True
.Refresh BackgroundQuery:=False
End With
End Sub
Here, we’ve declared several types of variables to do the task. Then we’ve set the file location using the GetOpenFilename application method.
First of all, we’ve checked whether the file is selected correctly or not, if not the macro will trigger a message that we’ve provided using MsgBox. And the correct selection of file will lead to another sub ImportCSV.
Within the ImportCSV sub, we’ve added the text using QueryTables.Add method. Several parameters are set to make the fetching work by counting the delimiter comma.
- After that, press the F5 or play button to run the code. As a result, a dialogue box will pop up and we will select the text file.
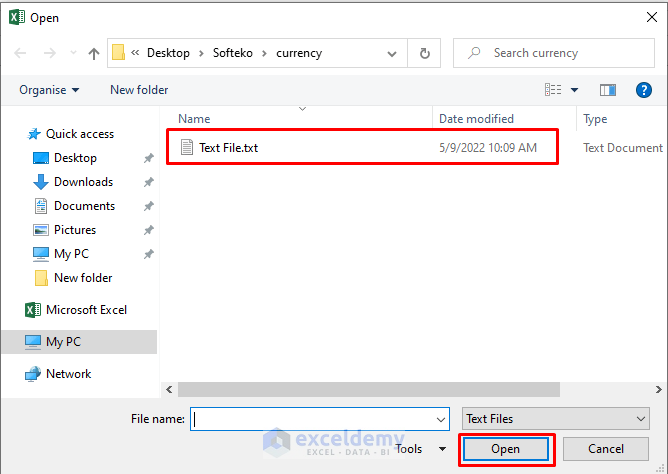
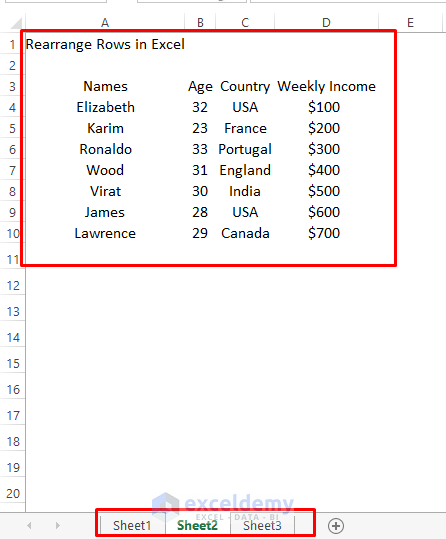
- Finally, click Open, text data are in Sheet 2 as we wanted.
Read More: How to Import Text File to Excel Using VBA
Case 2: Import Comma Delimited Text File Using VBA Macro in Selected Cell
In this method, we will import text data to our selected location and also separate them into rows and columns according to the comma delimiter.
Steps:
- First, right-click on the sheet and go to View Code.

- After that, copy and paste the VBA code below.
VBA code:
Sub ImportTXT2XL()

Dim FileLocation As Variant
Dim Currentbook As Excel.Workbook
Dim CurrentSheet As Excel.Worksheet
Dim Myrng As Range, TextLine As String
Dim row As Long, column As Long
Dim iL As Long, jL As Long, aryStr() As String, a As Variant

Set Currentbook = Excel.ActiveWorkbook

FileLocation = Application.GetOpenFilename("TXT (Comma Separated) (*.Txt),*.Txt" _
, 1, "Select the file", , False)

MsgBox FileLocation

Set Myrng = Application.InputBox(Prompt:="Pick the Sheet & a Cell", Type:=8)
Myrng.Parent.Parent.Activate
Myrng.Parent.Activate
row = Myrng(1).row
column = Myrng(1).column

Close #1
iL = row
Open FileLocation For Input As #1
Do While Not EOF(1)
Line Input #1, TextLine
aryStr = Split(TextLine, ",")
jL = column
For Each a In ary
Cells(iL, jL).Value = a
jL = jL + 1
Next a
iL = iL + 1
Loop
Close 1

End Sub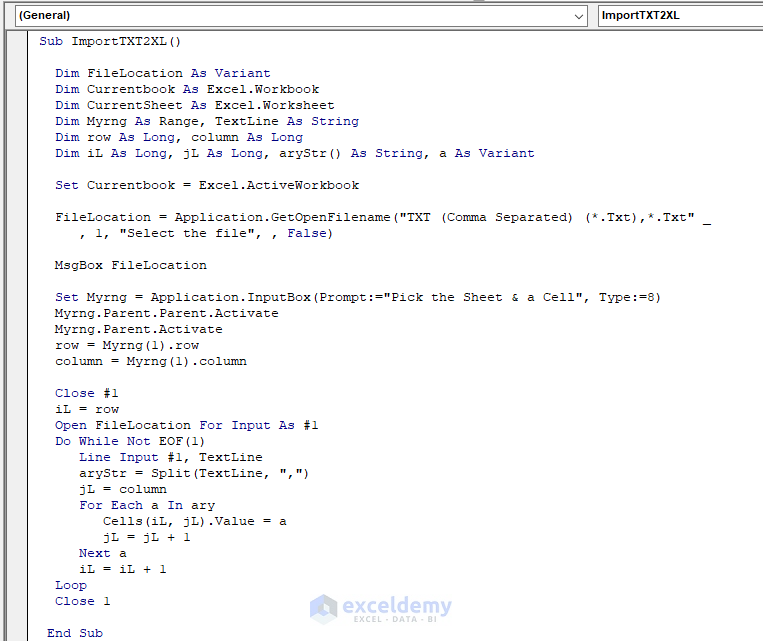
Here, we’ve declared several types of variables to do the task. Then we’ve set the file location using the GetOpenFilename application method.
For providing the cell reference from the user, we’ve used InputBox method.
Our code is in such a way that once it finds the file in the location it goes through the file, split the text before every comma, and stores it within the array to place that into the provided cell. And This entire task is done within the Do While loop.
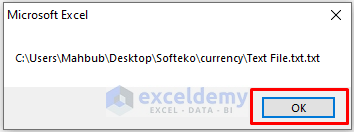
- After that, press the F5 or play button to run the code and a dialogue box will pop and we will select the text file.
- Now, click OK as shown in the image below.
- After, clicking Open another dialogue box will pop up for selecting the location.
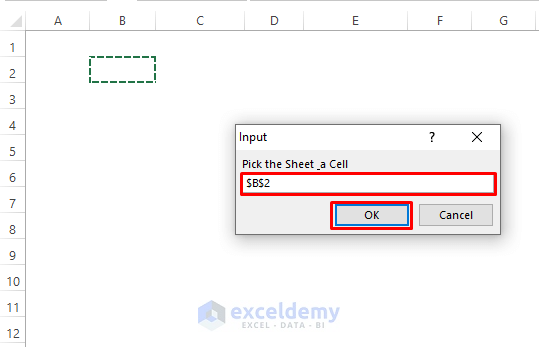
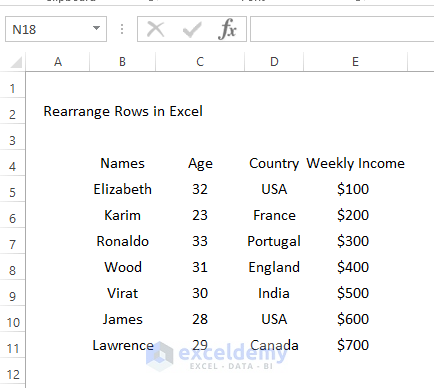
- Finally, click OK and will get the result as follows.
Download Practice Workbook
Conclusion
That’s all for the article. These are 2 different cases in Excel VBA to Import Text File of Comma Delimited. Based on your preferences, you may choose the best alternative. Please leave them in the comments area if you have any questions or feedback.
Related Articles
- Excel VBA: Read a Text File Line by Line
- Excel VBA: Read Text File into String
- VBA Read Text File into Array

