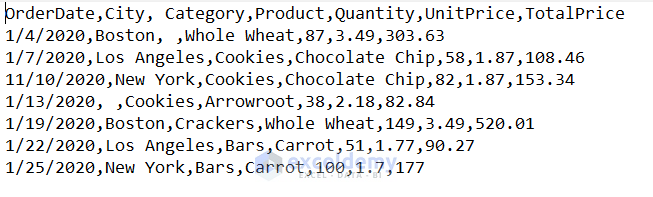
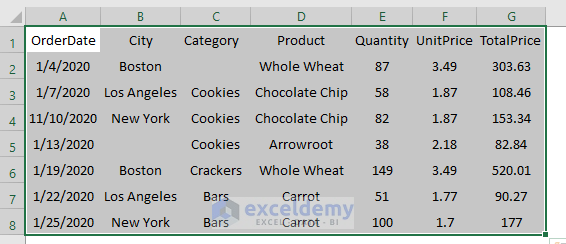
Below, we have a dataset in a comma–separated text file. The dataset represents sale details for a shop. Each piece of data is separated by a comma. We want to import this data from the text file to an Excel spreadsheet.
Introduction to VBA Split and InStr Function:
VBA Split Function: The Split function in Excel VBA is used to split a string into substrings. The function returns a zero-based one-dimensional array. Each element of the array is a substring separated by a predefined delimiter. The syntax of the VBA function is-
Split(expression, [delimiter, [limit, [compare]]])
Here,
expression– This required parameter represents a text string that contains substrings and a delimiter. The function will also return an empty array if the string is empty.
delimiter– A string character that splits the string into substrings. If omitted, the function will use a space character as the delimiter. And if it is an empty string, it’ll return the original string as the output.
limit– It represents the number of substrings to return in the output. If omitted, the function will return all the substrings.
compare—It has several values. In the Split function, we can use vbBinaryCompare for a case-sensitive delimiter and vbTextCompare for a case-insensitive delimiter.
VBA InStr Function: We use the InStr function in Excel VBA to search a specific string within a given string from a predefined position. The syntax is-
InStr([start], string 1, string 2, [compare])
Here,
[start]- The position from which it starts searching. The default is 1 if omitted.
string 1- The given string from which the function searches for the desired string.
string 2- The specific string the function searches within the given string.
[compare]- The type of comparison. The default is Binary Comparison.
Writing Code in Visual Basic Editor
Steps:
- Go to the Developer tab from the Excel Ribbon.
- Click the Visual Basic option.

- In the Visual Basic For Applications window, click the Insert dropdown to select the New Module
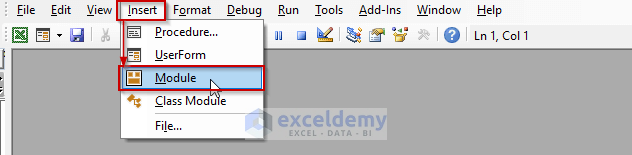
- Enter your code inside the visual code editor and press F5 to run it.
Method 1 – Develop a VBA Code to Import a Text File to Excel with a Specific File Location
Steps:
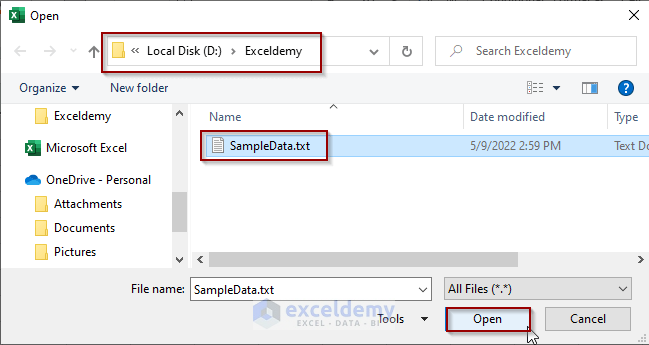
- Go to the text file location.
- Press the Shift key and right–click on the text file.
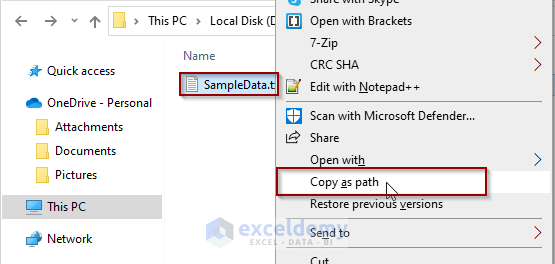
- Paste the location in the textFileLocation variable in the code.
- Insert the following code in the visual basic editor:
- Press F5 to run it.
Sub ImportTextFileToExcel()
Dim textFileNum, rowNum, colNum As Integer
Dim textFileLocation, textDelimiter, textData As String
Dim tArray() As String
Dim sArray() As String
textFileLocation = "D:\Exceldemy\SampleData.txt"
textDelimiter = ","
textFileNum = FreeFile
Open textFileLocation For Input As textFileNum
textData = Input(LOF(textFileNum), textFileNum)
Close textFileNum
tArray() = Split(textData, vbLf)
For rowNum = LBound(tArray) To UBound(tArray) - 1
If Len(Trim(tArray(rowNum))) <> 0 Then
sArray = Split(tArray(rowNum), textDelimiter)
For colNum = LBound(sArray) To UBound(sArray)
ActiveSheet.Cells(rowNum + 1, colNum + 1) = sArray(colNum)
Next colNum
End If
Next rowNum
MsgBox "Data Imported Successfully", vbInformation
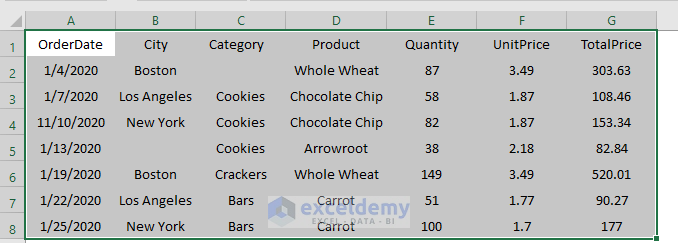
End SubImported Dataset:
Method 2 – Import a Text File to Excel with a File Selection Option Using VBA
Steps:
- Insert the following code in the visual basic editor:
- Press F5 to run it.
Sub ImportTextFileToExcel()
    Dim textFileNum, rowNum, colNum As Integer
    Dim textFileLocation, textDelimiter, textData As String
    Dim tArray() As String
    Dim sArray() As String
    textFileLocation = Application.GetOpenFilename()
    textDelimiter = ","
    textFileNum = FreeFile
    Open textFileLocation For Input As textFileNum
    textData = Input(LOF(textFileNum), textFileNum)
    Close textFileNum
    tArray() = Split(textData, vbLf)
    For rowNum = LBound(tArray) To UBound(tArray) - 1
        If Len(Trim(tArray(rowNum))) <> 0 Then
            sArray = Split(tArray(rowNum), textDelimiter)
            For colNum = LBound(sArray) To UBound(sArray)
                ActiveSheet.Cells(rowNum + 1, colNum + 1) = sArray(colNum)
            Next colNum
        End If
    Next rowNum
    MsgBox "Data Imported Successfully", vbInformation
End Sub
Running the above code will open the file explorer to select the text file.
Imported Dataset:
Read More: Excel VBA: Read Text File into String
Method 3 – Import Text File Data with Multiple Delimiters into an Excel Worksheet
Steps:
- Insert the following code in the visual basic editor:
- Press F5 to run it.
Sub ImportTextFileDatatoExcel()
    Dim fileLocation As String, textData As String
    Dim rowNum As Long
    folderLocation = "D:\Exceldemy"
    Set FSO = CreateObject("Scripting.FileSystemObject")
    Set folder = FSO.GetFolder(folderLocation)
    rowNum = 1
    Close #1
    For Each textFile In folder.Files
        fileLocation = folder & "\" & textFile.Name
        Open fileLocation For Input As #1
        Do While Not EOF(1)
            Line Input #1, textData
            textData = Replace(textData, ";", ",")
            If InStr(textData, ",") = 0 Then
                Cells(rowNum, 1) = textData
            Else
                tArray = Split(textData, ",")
                nColumn = 1
                For Each element In tArray
                    Cells(rowNum, nColumn) = element
                    nColumn = nColumn + 1
                Next element
            End If
            rowNum = rowNum + 1
        Loop
        Close #1
    Next textFile
End Sub
Imported Dataset:

Things to Remember
- The code we used in the third example can import multiple text files into an Excel worksheet from the specified folder.
- If the specified delimiter doesn’t exist in the source string, the Split function will return the string as it is.
- If the compare argument of the Split function is omitted, the default value is
Download the Practice Workbook
Download this workbook to practice.


Great tutorial and it works. I have a comma separated text file that looks like this, and I only need certain data imported into excel.
username,password,,Baltimore,14,Buffalo,12,Kansas City,13,Houston,5,Pittsburgh,1,Miami,6,,,,44,January 4 2024
I only need to import the username, 14,12,13,5,1,6,44
How would I do that using the code you provided in the tutorial?
Hello ANDRES,
Thank you for reaching out to us. It appears that you want to store the username (which is the first column) and only the numeric values in your Excel file from your text file.
To achieve this, you can use the following code:
This code will import multiple rows of data with the username and numeric values from your text file into Excel.
For demonstration, I have created a text file like the image below:
After running the code and choosing the text file, you will get an output like this:
Let me know if you have any questions or if there’s anything else I can help you with!
Regards,
Sishir Roy