Businesses use Excel functions like EDATE for a variety of tasks, including tracking data records, scheduling, and producing analytical reports. If using Excel is part of your job, you should be aware of how to correct frequent issues so you can operate the program efficiently. For instance, errors in the Excel document frequently occur, and whenever an EDATE function issue arises, Excel shows an error message that starts with the hash (#) symbol. Therefore, this article will show you 6 reasons with solutions to fix the issues when EDATE function not working in Excel.
Fix Issues When EDATE Function is Not Working in Excel: 6 Reasons with Solutions
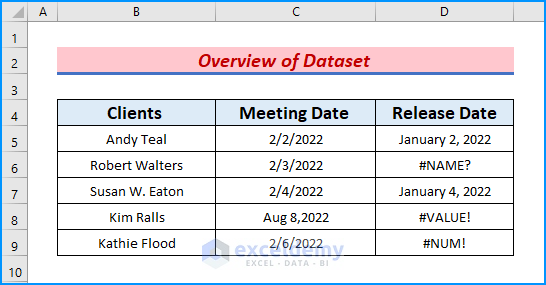
Excel notifies us if there’s a problem with the EDATE function we are using or the data we are referring to when we use formulas to conduct computations. The application can generate several error messages. However, while repairing the faults may initially seem difficult, it is quick and simple once we comprehend them. With that in mind, in this article, we will show you how to fix these issues quickly and effectively. For demonstration, we take a dataset that represents a schedule book with the application of the EDATE function. As we can see in column D, Excel is displaying some errors.
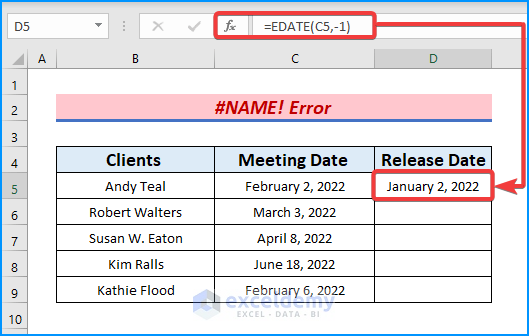
Reason 1: #NAME! Error
The #NAME! error typically results from a non-existent function. This error pops up in our spreadsheet when Excel can’t read some of our calculations. Moreover, this can happen if we spell some formula components incorrectly or if some components are missing.

Solution: Correct Formula Spelling
The simplest way to solve this issue is to meticulously review our formula and check that all of its components are spelled correctly. As an alternative, we can highlight the cells we use for the EDATE formula, then choose the function bar (fx) from the top bar menu. To ensure accurate data entry, we correct the function spelling to have the right output.
Steps:
- Firstly, in cell D5, type
=EDATE(C5,-1)
- Afterward, press the Enter key.
- Later, use the AutoFill icon to drag the formula cell down.
- Thus, we fix the function error.

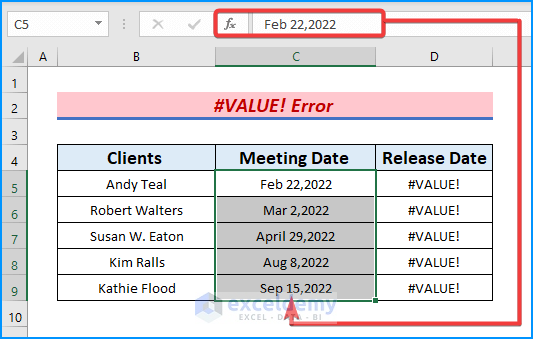
Reason 2: #VALUE! Error
When our formula refers to letters, text, or spaces rather than the number it should be addressing, Excel displays #VALUE! error. Moreover, if the inputs are in Text formats this error pops up. See the picture below for a better understanding.
Solution: Use Format Cells Option to Convert Text Values to Date
The date serial number that EDATE returns, has to be as a date. Also, we check our formula to make sure to refer to the right cell to resolve this issue. If our calculation is accurate, then the cell itself probably contains some incorrect characters. Excel distinguishes between text and numerical values, therefore changing a cell’s format to include numbers rather than text can also fix this issue.
Steps:
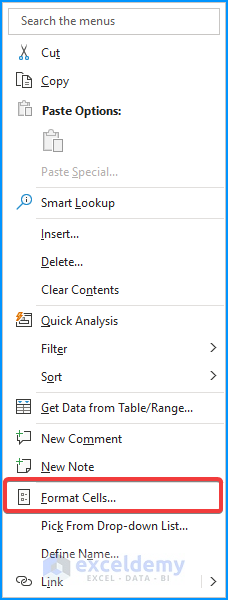
- First, select the range C5:C9 and right-click on it.
- Subsequently, a context menu appears.
- There, select the Format Cells option.
- Consequently, the Format Cells dialog box slides into the display.
- Now, click Number → Date → March 14, 2012 → OK.

- Hence, we format the Text values to Date format.

- After that, we type the following formula in cell D5,
=EDATE(C5,-1)
- By pressing Enter, we display the output.

- Lastly, use the AutoFill tool to display the rest.

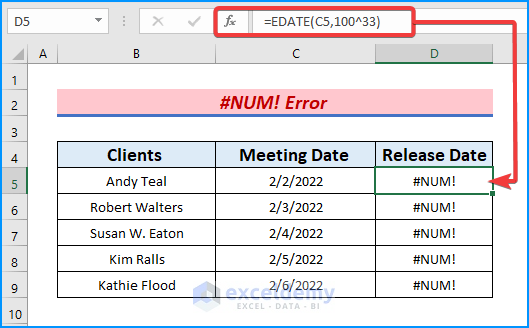
Reason 3: #NUM! Error
When the start date is incorrect, the EDATE function returns the error #NUM! Because the method only accepts dates between 1/1/1900 and 12/31/9999, the formula below in D5 is invalid.
=EDATE(C5, 100^3)
- The function returns a date that is out of the above-mentioned range. As a result, Excel returns a #NUM! error.
Solution: Input Valid Numeric Data
To fix this issue, we can input numeric data that lies in between Excel’s programmed date range.
Steps:
- In cell D5, type:
=EDATE(C5,100)
- After that, tap the Enter key.
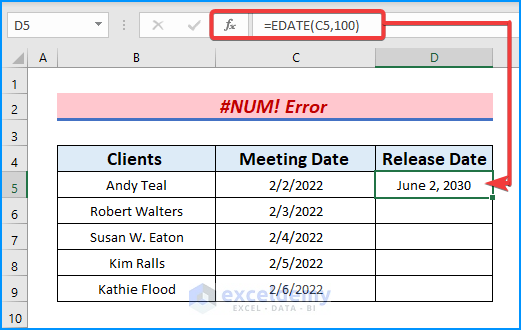
- Next, drag the AutoFill tool down.
- Thus, the errors disappear.

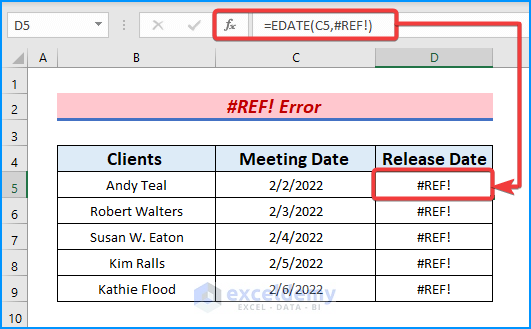
Reason 4: #REF! Error
Our formula encounters the #REF! error when it tries to refer to a deleted cell. The cells we are referring to may be inaccurate even though the formula is correct.
Solution: Use Keyboard Shortcuts to Recover Deleted Cells
To correct this issue, simply use the “Undo” command or a keyboard shortcut. These actions reverse the cell’s deletion, enabling our formula to successfully reference it once more. Additionally, we can check the cell the formula refers to make sure data is being displayed.
Steps:
- To begin with, press the Ctrl + Z keys.
- Eventually, the missing column appears in our dataset.

- Later, type the formula below.
=EDATE(C5,D5)
- Also, use the AutoFill icon to fill the rest of the column.

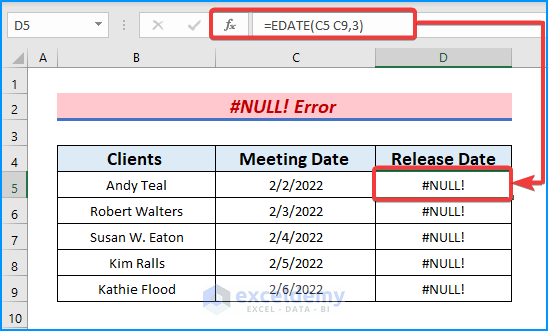
Reason 5: #NULL! Error
The #NULL! errors frequently show up when our formula contains an incorrect space. The problem is typically caused by placing a space where a comma or colon should be. A space represents the Range Intersect operator, while a comma combines two references. Alternatively, a colon refers to a range of cells.
Solution: Add Missing Colons or Commas
Let’s make sure our formula doesn’t contain any unintentional spaces to solve this issue. Also, we have to keep in mind that the cells we are addressing are in accurate space if we are trying to use space to call upon two intersecting cells.
Steps:
- Similarly, in D5, write
=EDATE(C5,33)
- Later, press Enter.

- Finally, hold and drag the AutoFill icon down.
- Thus, we fix the errors perfectly.

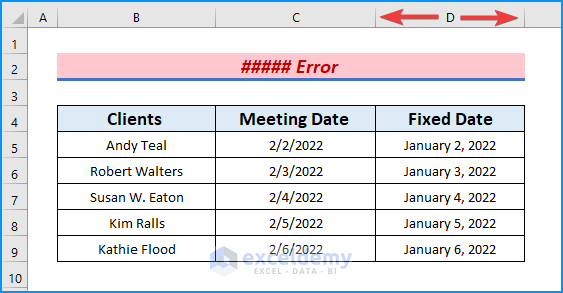
Reason 6: ###### Error
One of the most frequent problems in Excel is the #### error, and it’s simple to repair. When a column’s width is insufficient to display all the characters in a cell, Excel prints this error message. When Excel displays a negative time and date, this mistake might also happen.
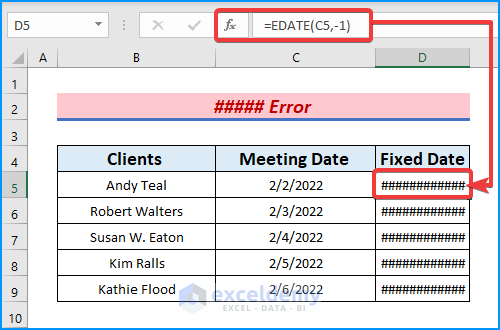
Solution: Expand Column Width
We may easily remedy the occurrence of this problem by enlarging the column width to fit all the characters in a cell. The column’s header can be moved until we fix the problem. If the problem persists, we can also alter the size of each cell separately. Follow the steps to do so.
Steps:
- Drag the right edge of column D.
- Thus, the errors disappear.
Read More: How to Use EDATE Formula for Days
Download Practice Workbook
Download this practice workbook to exercise while reading this article. It contains all the datasets in different spreadsheets for a clear understanding. Try it yourself while you go through the step-by-step process.
Conclusion
In this article, we have thoroughly discussed 6 reasons with solutions to fix issues when the EDATE function is not working in Excel. Please leave any further queries or recommendations in the comment box below.
<< Go Back to Excel EDATE Function | Excel Functions | Learn Excel
Get FREE Advanced Excel Exercises with Solutions!
