Method 1 – Returning Date After Specific Months Using EDATE Formula
We will show the basic use of the EDATE function. Our dataset includes the Date, Months to Add, and Result Date columns.
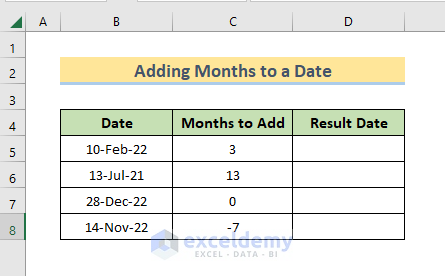
Let’s walk through the procedures for this example.
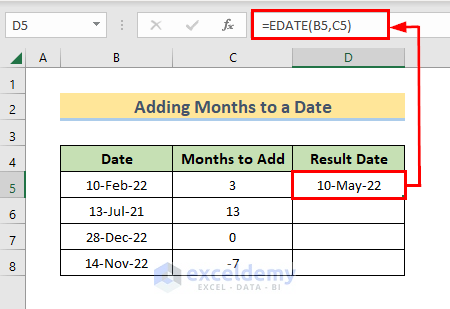
- Write the following formula in cell D5 which will add the month value from cell C5 with the date from cell B5.
=EDATE(B5,C5)
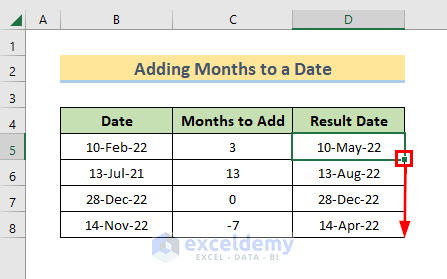
- Use the Fill Handle to copy the formula in the following cells.
- We will see month values from the Months to Add column are added to the dates from the Date column, and the result is displayed in the Result Date column.
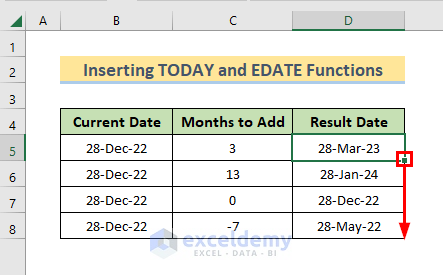
Method 2 – Inserting TODAY Function in EDATE Formula to Get a Date After Certain Days
We will demonstrate the use of the TODAY function with the EDATE function. The TODAY function gives the current date and with that, the EDATE function will add specific months. We are describing the stepwise procedures below for this example.
- Write the following formula in cell D5.
=EDATE(TODAY(),C5)
- Press Enter.

- Use the AutoFill feature of Excel to copy the formula in the following cells.
- See different month values added to our current date.
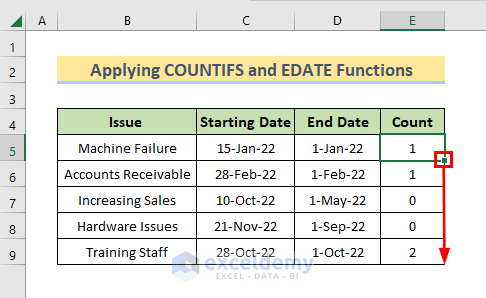
Method 3 – Applying the COUNTIFS Function with the EDATE Function to Count Tasks in Specific Periods of Days
Use the COUNTIFS function with the EDATE function. We included some Issue, Starting Date, End Date, and Count columns. In the Count column, we will count the number of Starting Date between the End Date and the next month of the End Date. Follow the stepwise procedures given below.
- Apply the following formula in cell E5.
=COUNTIFS(($C$5:$C$9),">="&D5,($C$5:$C$9),"<"&EDATE(D5,1))
- Hit Enter.

The COUNTIFS function counts the number of dates from the range $C$5:$C$9 that satisfies the condition “>=”&D5 and “<“&EDATE(D5,1). The EDATE function finds the date after 1 month from the date of cell D5.
- Use the Fill Handle to copy the formula in the cells below.
- See the number of Starting Date between End Date and the next month after End Date in Count column.
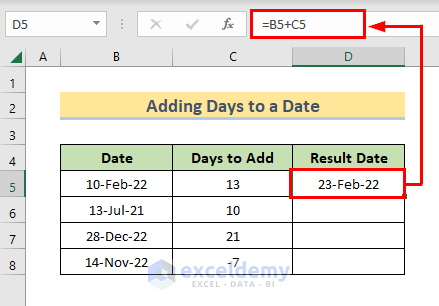
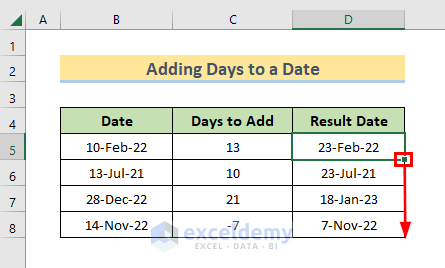
How to Add Days to a Date in Excel
- Write the following formula in cell D5.
=B5+C5
- Press Enter.
- Use the AutoFill feature to copy the formula in the following cells.
- See the number of days from the Days to Add column added to the dates from the Date column and the results are displayed in the Result Date column.
Things to Remember
- The #NUM! error will occur if the date from the calculation is an invalid one.
- Don’t forget to format the cells for dates from the Number Format option in the Excel ribbon.
- If we insert fractional months as the arguments of the EDATE It will discard the fractional value and add the integer part only to the starting date.
Download Practice Workbook
You can download the practice workbook from here.
Conclusion
Hopefully, you will be able to use the EDATE function in various ways following this article. If you have any queries or suggestions, let us know in the comment section.
<< Go Back to Excel EDATE Function | Excel Functions | Learn Excel
Get FREE Advanced Excel Exercises with Solutions!

It would be nice to se your tutorial for counting working days until a future date
Hi RICHARD O’CONNOR,
Thanks for your comment. I am replying to you on behalf of ExcelDemy. You can apply the following formula to calculate working days until a future date. And then, drag the fill handle down to copy the formula in other cells.
=NETWORKDAYS.INTL(C5,D5,1,$G$5:$G$9)Here, Cell C5 is start_date, D5 is end_date, 1 refers to Saturday and Sunday as the weekend, and range $G$5:$G$9 refers to the holidays.
Note: If you skip weekend and holidays arguments in the formula then it will take Saturday and Sunday as weekends and no holidays.
I hope this will help you to solve your problem. Please let us know if you have other queries.
Regards
Mashhura Jahan
ExcelDemy