In this tutorial, I am going to show you the step-by-step procedures to create scenarios in Excel. The Scenario Manager can create simple summaries which is a very important tool for any business. You can use the steps of this tutorial to create and analyze various scenarios of your own business or any other kind of dataset.
What Are Excel Scenarios?
In simple words, you can use Excel scenarios to store different versions of your dataset in a worksheet. Scenarios are very important for business forecasting. Like, you might want to know what the total cost will be if the production cost of any of the components varies. Then you can create and name each possible scenario that you want to analyze.
Read More: Scenario Analysis in Excel
How to Create Scenarios in Excel: Easy Steps
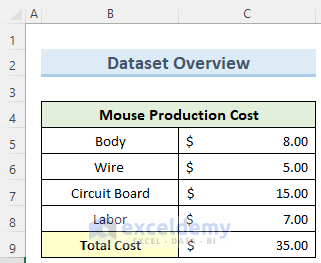
The dataset for this tutorial describes the production cost of the different parts of a computer mouse. We have used some imaginary prices for the individual components for the purpose of clarification. We have also created a Total Cost field which will help us to compare the different scenarios.
Step 1: Opening Scenario Manager
The Scenario Manager allows you to easily create, edit, and enter the values of different scenarios.
- First, go to the Data tab, and under the Forecast section, select What-If Analysis.
- Then, click on Scenario Manager.
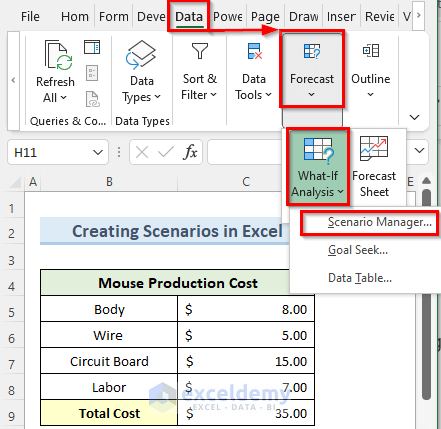
- As a result, the Scenario Manager window will open.

Read More: How to Use Scenario Manager in Excel
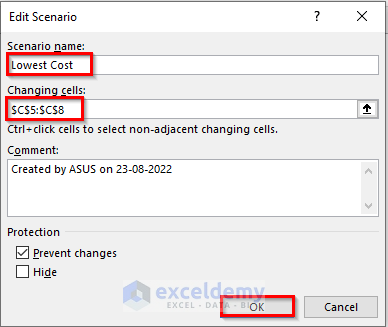
Step 2: Adding Scenario Name and Changing Cells
To compare the variation of the dataset, we need to add them to individual scenarios. We can add as many scenarios as we need.
- To begin this step, click on Add.

- Now, in the new Edit Scenario window, enter the Scenario name and Changing cells as I have shown below.
- Note that, you can enter a comment describing what type of scenario you are adding which will be useful later on.
- Now, click on OK.
Read More: How to Edit Scenarios in Excel
Step 3: Entering Scenario Values
Here, we will insert the value of each cell for our current scenario. The Scenario Manager will store these values under their respective scenario name.
- After that, clicking the OK option, you will see the Scenario Values window.
- Here, enter the value of the different cells of the current scenario and click OK.
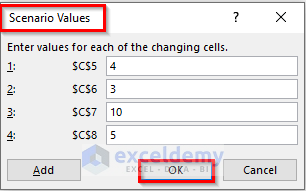
- Then, you should the name of the new scenario in the Scenario Manager.

Read More: How to Create a Scenario with Changing Cells in Excel
Step 4: Creating a Scenario Summary
After we have created all the possible scenarios that our data may have, we can easily create a Scenario Summary to visualize the variation of data for different scenarios.
- In the Scenario Manager window, click on Summary.

- This will open the Scenario Summary window before creating a summary.
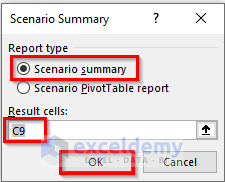
- Here, select Scenario Summary as the Report type and enter the cell number where the total cost is.
- Now, select OK.
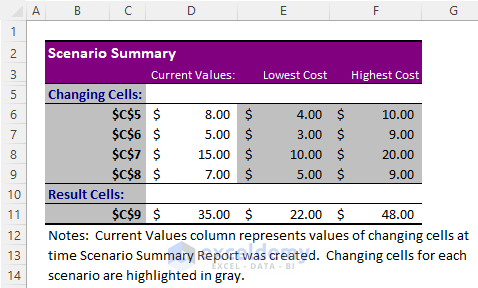
- Finally, you will get a Scenario Summary with the comparison of the values within different scenarios.
Things to Remember
- To see the values of a scenario, click on the Show option in Scenario Manager.
- If you insert a comment for a scenario, try to make it clear what is the scenario about.
- If you edit a scenario, then you will have to create a new Scenario Summary because the current summary will not update automatically.
- You can generate a Scenario Summary even if you do not have any result cell number.
- But you will have to specify Result cells if want to create a Pivot Table.
- When you click OK on the Scenario Summary window, it will automatically create a new worksheet with the name Scenario Summary.
Download Practice Workbook
You can download the practice workbook from here.
Conclusion
I hope that you were able to follow the above steps to create scenarios in Excel. You can follow these same steps to add as many unique possible scenarios as your business might have. If you get stuck in any of the steps, I recommend going through the tutorial a few times. If you have any queries, please let me know in the comments.
Related Articles
<< Go Back to Excel What-If Analysis Scenario Manager | What-If Analysis in Excel | Learn Excel
Get FREE Advanced Excel Exercises with Solutions!
