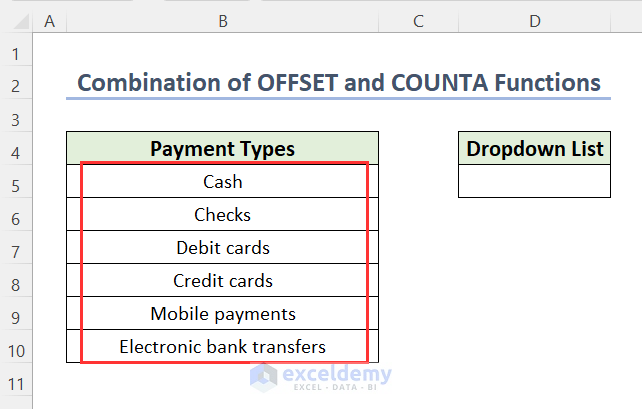
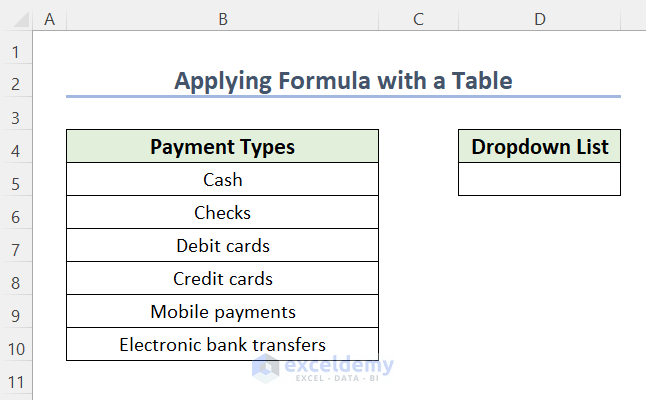
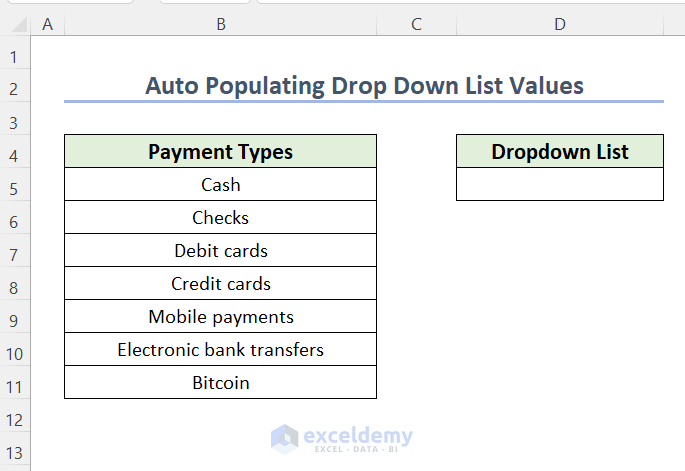
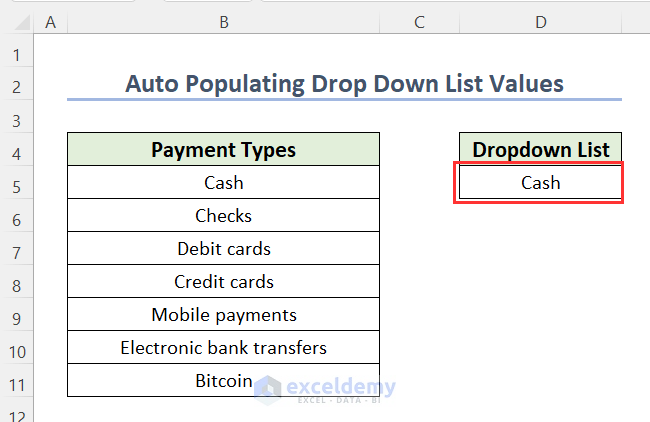
We have a list of payment types for which we want to create a drop-down list. However, to insert any other payment types, we want to update our drop-down list automatically by following the 3 methods below.

Method 1 – Using OFFSET and COUNTA Functions to Auto Update Drop Down List in Excel
We will use the combination of the OFFSET and COUNTA functions for auto-updating the dropdown list consisting of the payment types.
Steps:
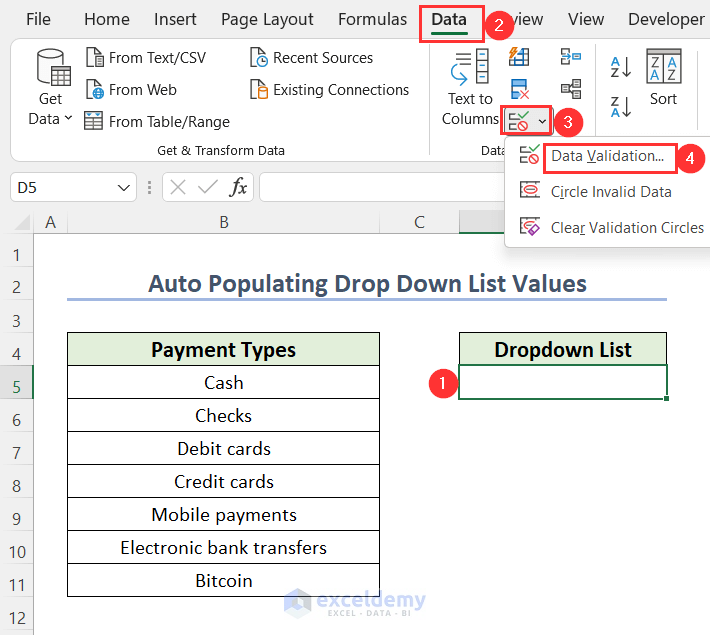
- Select cell D5 and go to the Data tab >> Data Validation group >> Data Validation.
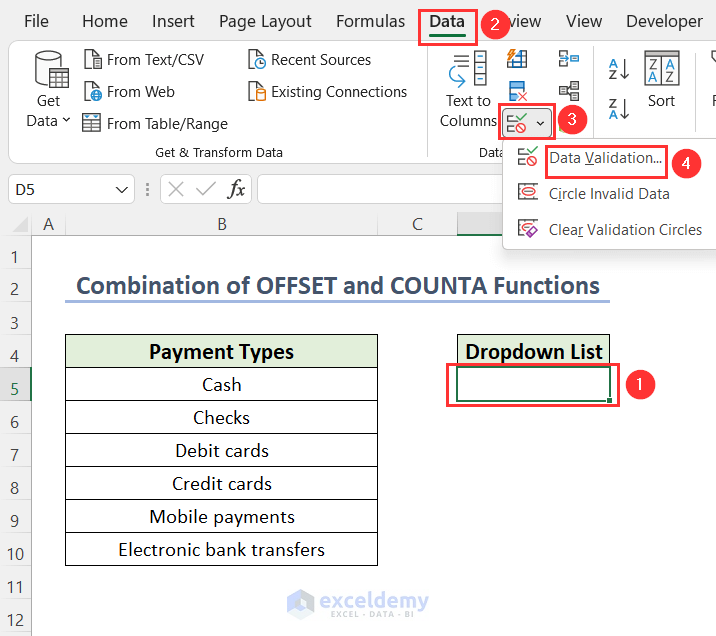
The Data Validation wizard will open up.
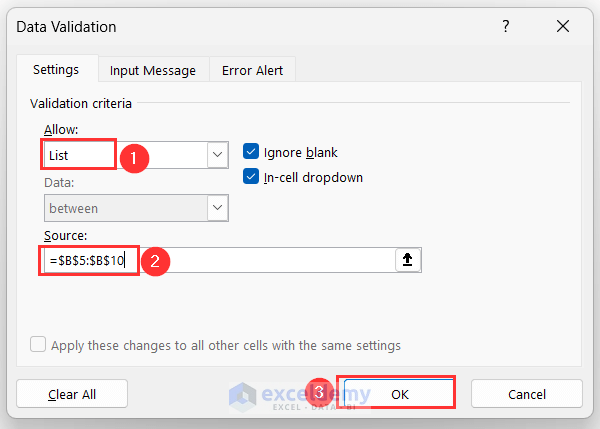
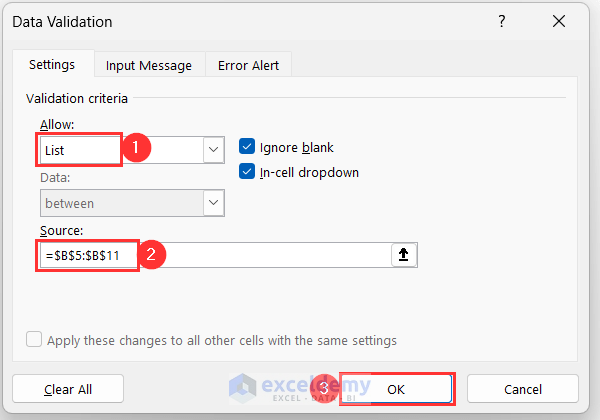
- Select List from different options under Allow and choose the range in the Source.
=$B$5:$B$10It is the range of payment options.
- Press OK.
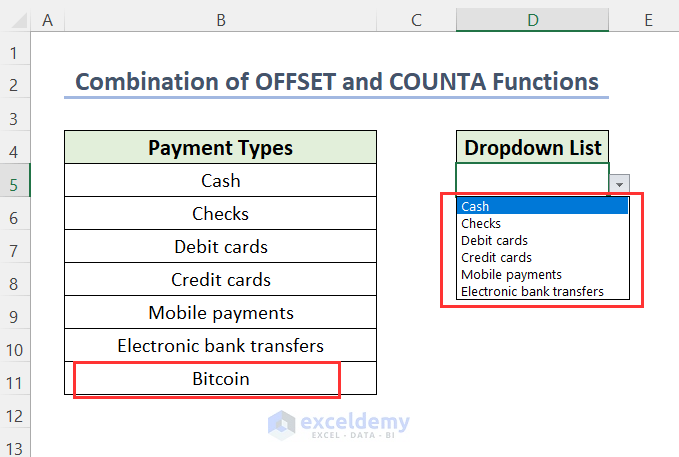
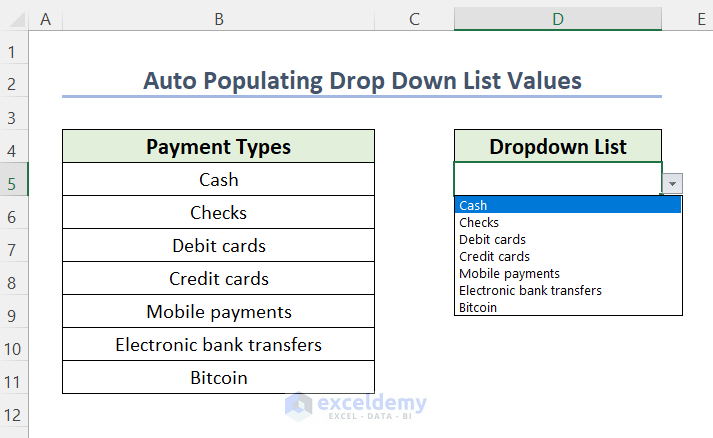
You will get a drop-down list, and if you add another row for another payment option, Bitcoin, you can see that the drop-down list is not updated automatically. This is a newly created option that is not included on our list.
To solve this problem, we will create our list in the following way.
- After opening the Data Validation dialog box, select List from different options under Allow and type the following formula in the Source box.
=OFFSET($B$5,0,0, COUNTA(B: B)-1)The $B$5 is the starting cell of the range, the following 2 zeros are indicating that the cell reference will not move by any row or column number. Finally, COUNTA(B: B)-1 is indicating the height number of the range which will be the number of rows having texts or numbers.
- Press OK.

After entering our data validation formula, we got the following drop-down list:
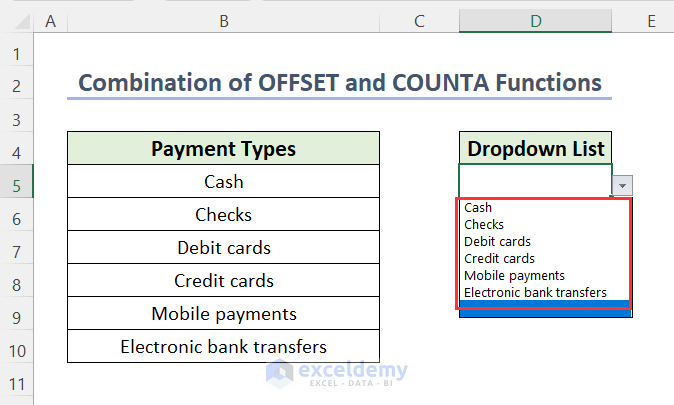
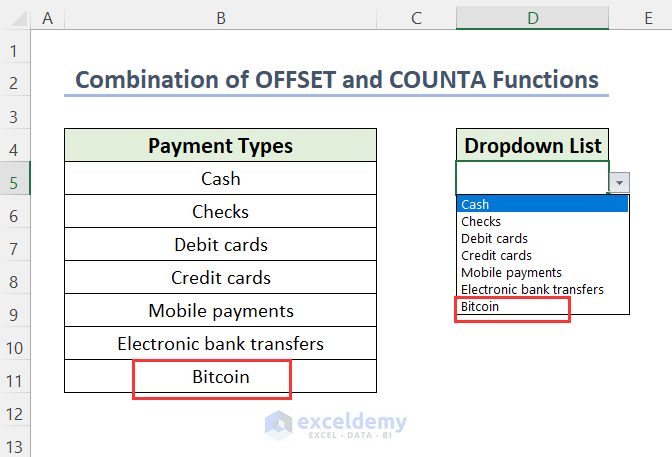
If we add another payment option named Bitcoin, this option will be automatically added.
Method 2 – Defining Name for a Range and Creating Table to Auto Update Drop-Down List
There is another way to create an auto-update drop-down list in Excel: by defining the name and using a table.
Steps:
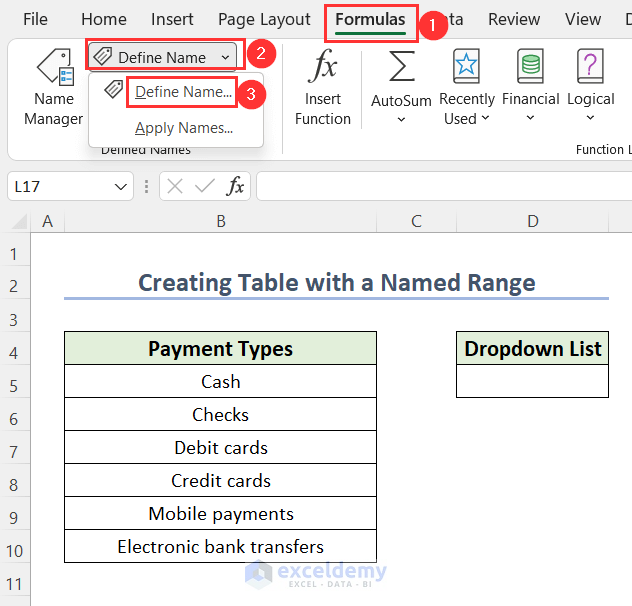
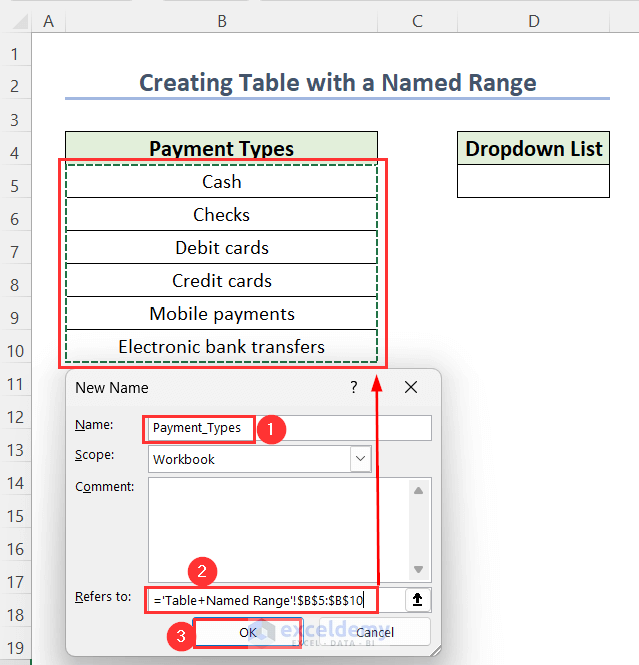
- Go to the Formulas tab >> Define Name group >> Define Name.
You will get the New Name wizard.
- Input a name into the “Name” Text Box. We will input “Payment_Types” and select our payment range in the Refers to.
- Click OK.
Create a table.
- Go to the Insert tab >> Table.
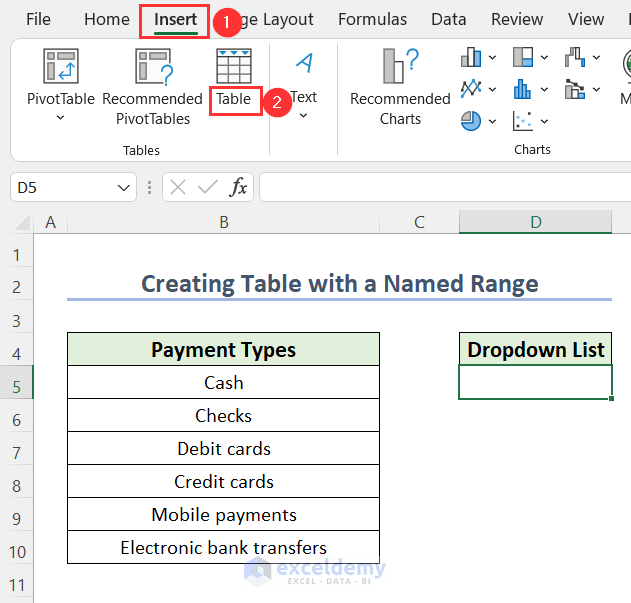
You will be taken to the Create Table dialog box.
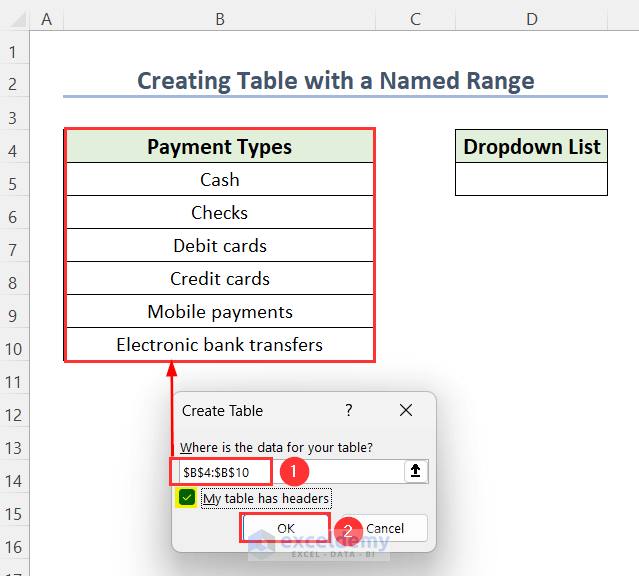
- Select the data range, and check the My table has headers option.
- Press OK.
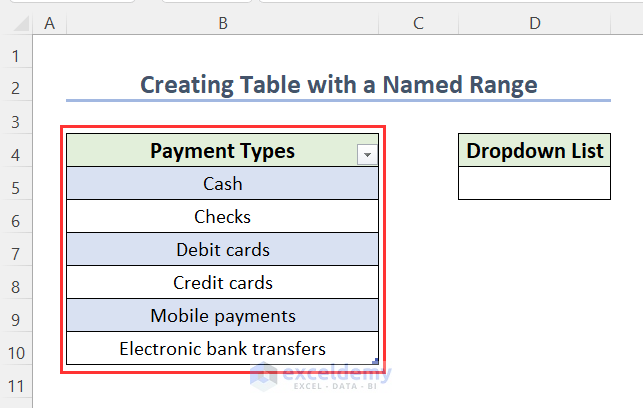
We created the following table.
- Select cell D5 (where we want our dropdown list), and go to the Data tab >> Data Validation group >> Data Validation.
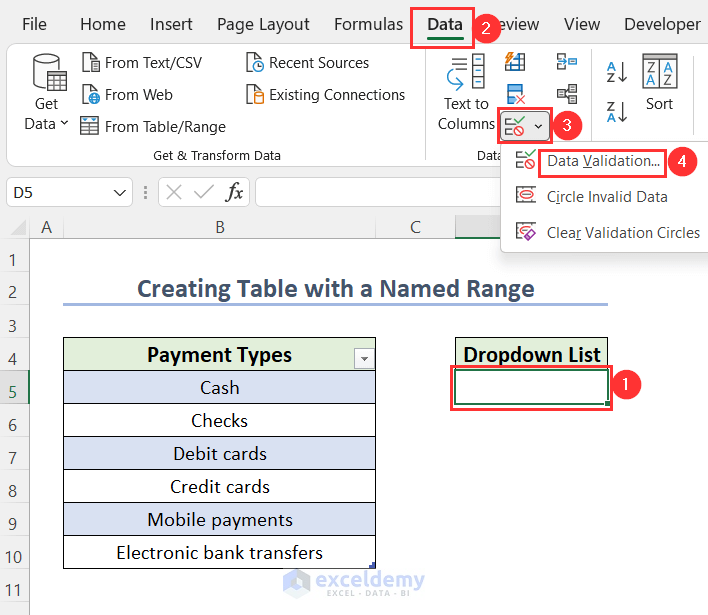
The Data Validation wizard will open up.
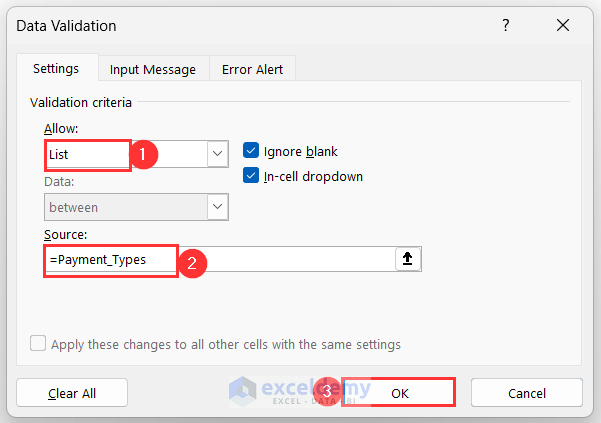
- Select List from different options under Allow and type the named range in the Source box.
=Payment_TypesIt is the range of payment options.
- Press OK.
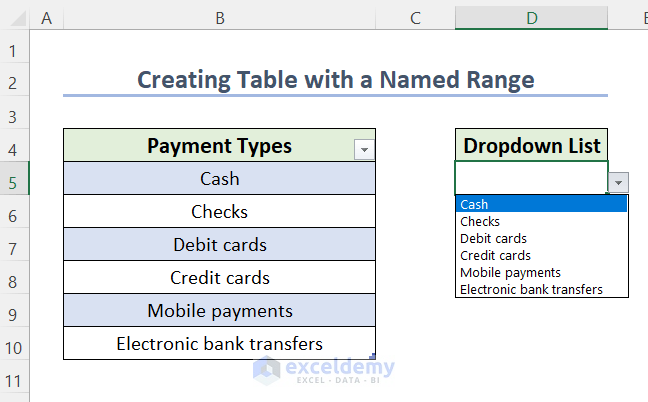
After entering our data validation formula, we have got the following drop-down list.
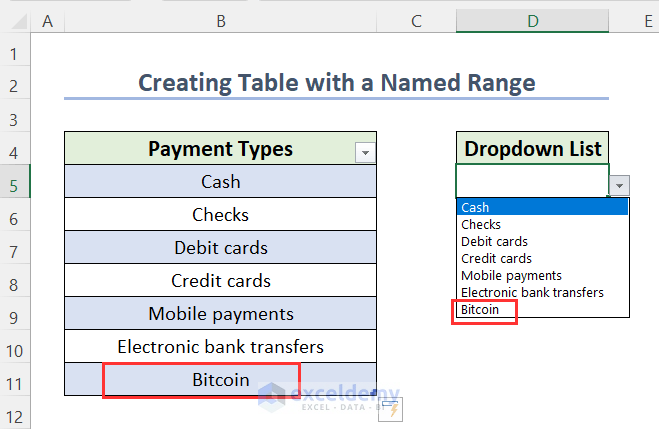
If we add another payment option named Bitcoin, then this option will be automatically added.
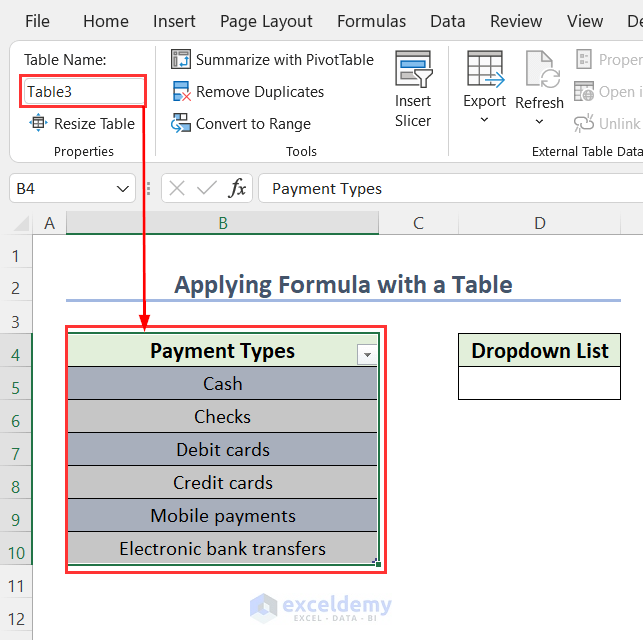
Method 3 – Applying Excel INDIRECT Function with a Table to Auto Update Drop-Down List
Use the INDIRECT function in the Source box and reference the Table name.
Steps:
Convert the data range to a table, and the name of this table is Table3.
- Open up the Data Validation dialog box to add a drop-down list in cell D5.
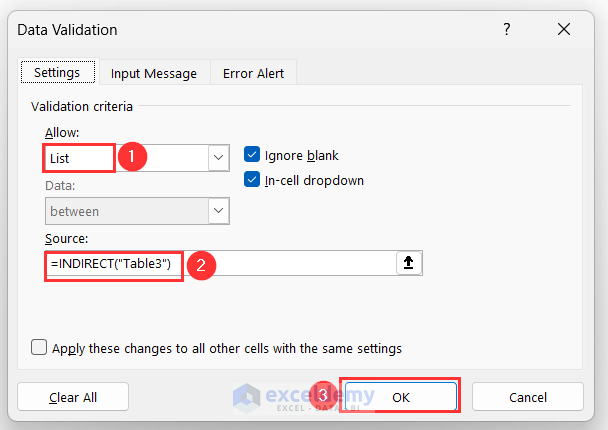
- Select List from different options under Allow and type the following formula in the Source.
=INDIRECT(“Table3”)Table3 is the range of payment options.
- Press OK.
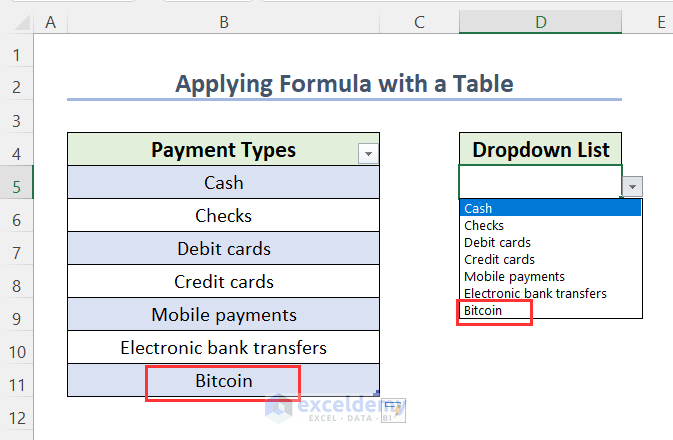
After entering our data validation formula, we got the following drop-down list:

Add another payment option named Bitcoin, then this option will be automatically added to our list.
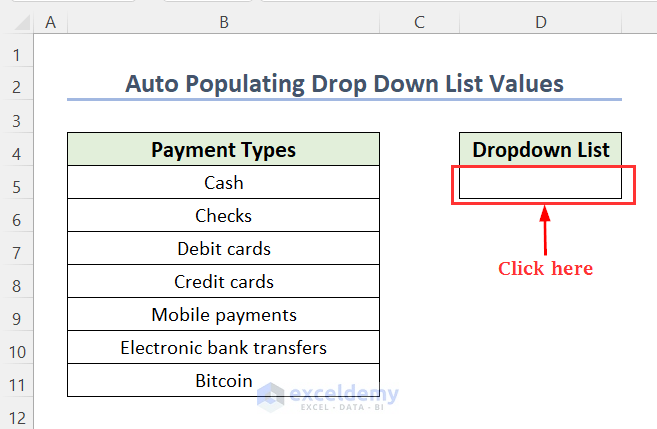
How to Auto Populate Drop-Down List in Excel
With the help of a VBA code, we will auto-populate the texts from a dropdown list in cell D5.
Step-01: Create a Drop-Down List, a Combo Box
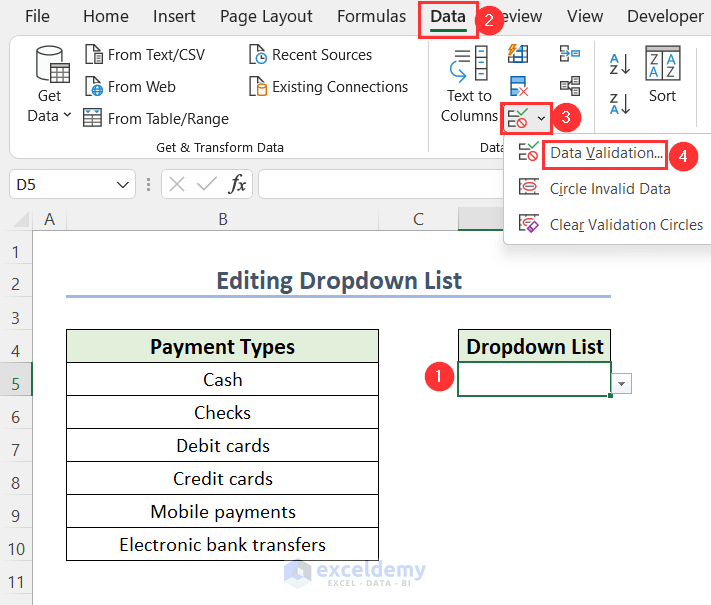
- Select cell D5 and then go to the Data tab >> Data Validation group >> Data Validation.
The Data Validation wizard will open up.
- Select List from different options under Allow and choose the range in the Source.
=$B$5:$B$10It is the range of payment options.
- Press OK.
We have created the drop-down list successfully.
Insert a combo box.
- Go to the Developer tab >> Insert dropdown >> Combo Box (ActiveX Control).
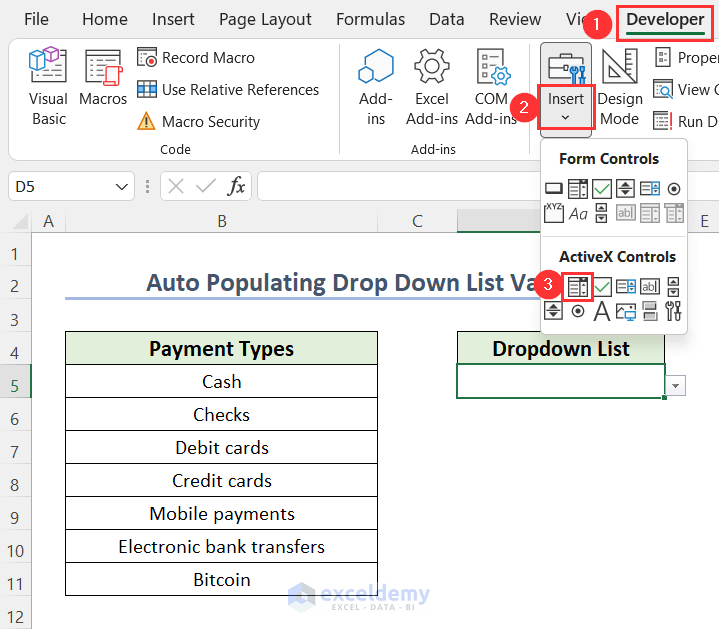
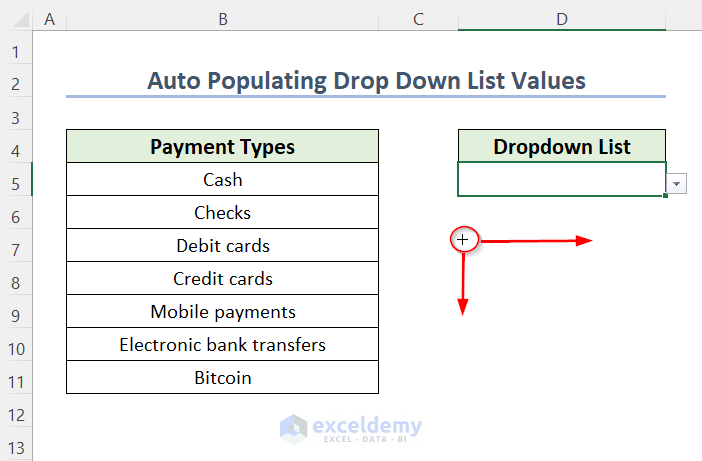
A plus symbol will appear.
- Drag down and to the right the plus symbol.
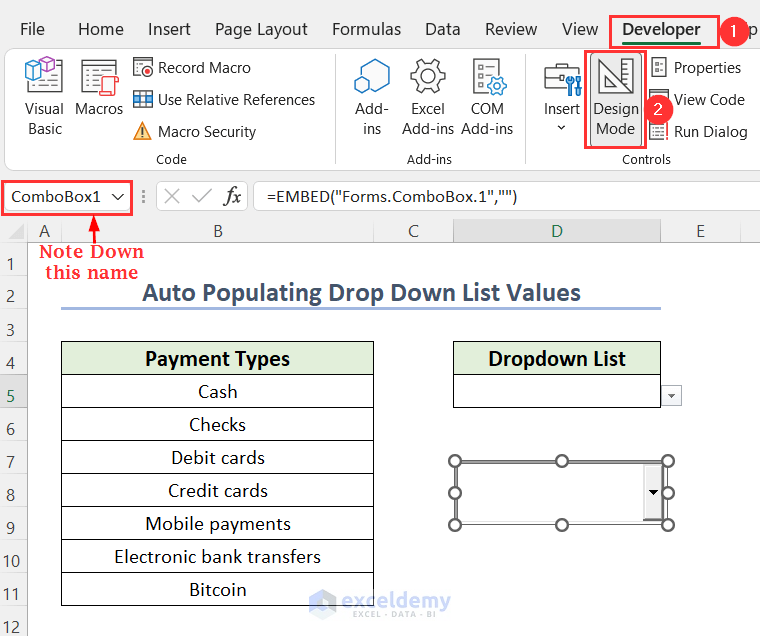
- We have created a combo box; note down its name for use in the code (the name of the combo box is ComboBox1).
- Go to the Developer tab >> Design Mode to deactivate the Design Mode.
Step-02: Write VBA Code
- Right-click on your sheet name and click View Code.
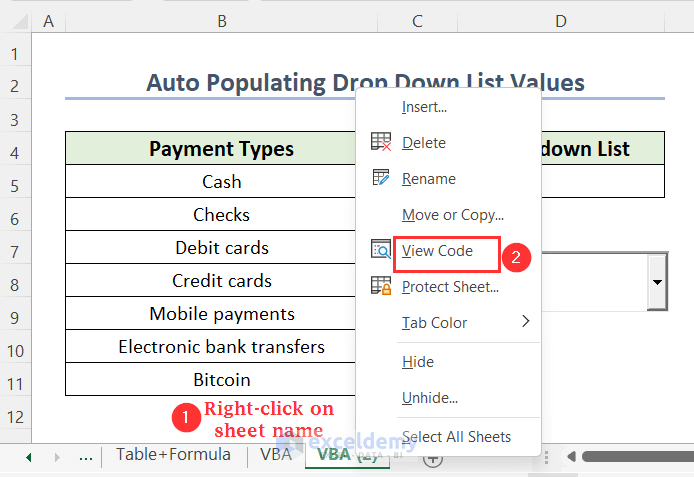
The Visual Basic Editor window will open up to insert our code.
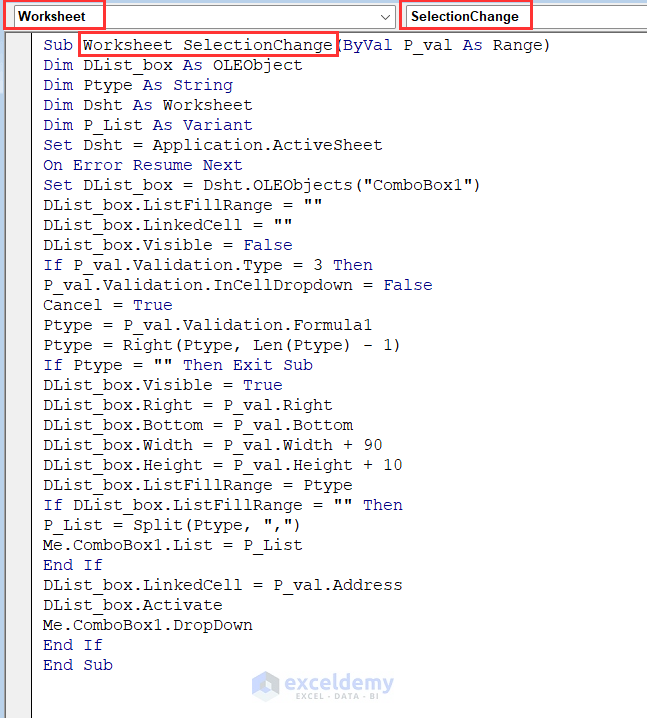
- Type the following code in VBE
Sub Worksheet_SelectionChange(ByVal P_val As Range)
Dim DList_box As OLEObject
Dim Ptype As String
Dim Dsht As Worksheet
Dim P_List As Variant
Set Dsht = Application.ActiveSheet
On Error Resume Next
Set DList_box = Dsht.OLEObjects("ComboBox1")
DList_box.ListFillRange = ""
DList_box.LinkedCell = ""
DList_box.Visible = False
If P_val.Validation.Type = 3 Then
P_val.Validation.InCellDropdown = False
Cancel = True
Ptype = P_val.Validation.Formula1
Ptype = Right(Ptype, Len(Ptype) - 1)
If Ptype = "" Then Exit Sub
DList_box.Visible = True
DList_box.Right = P_val.Right
DList_box.Bottom = P_val.Bottom
DList_box.Width = P_val.Width + 90
DList_box.Height = P_val.Height + 10
DList_box.ListFillRange = Ptype
If DList_box.ListFillRange = "" Then
P_List = Split(Ptype, ",")
Me.ComboBox1.List = P_List
End If
DList_box.LinkedCell = P_val.Address
DList_box.Activate
Me.ComboBox1.DropDown
End If
End Sub
Code Breakdown
- We chose the sub procedure name as Worksheet_SelectionChange, because Worksheet is indicating the sheet and SelectionChange is indicating the event which will run the code. And we classified P_val as Range.
- Declared DList_box as OLEObject, Ptype as String, Dsht as Worksheet, and P_List as Variant.
- Assigned the active sheet to Dsht, and the combo box named ComboBox1 to DList_box.
- The value of the data validation type is selected as 3, which indicates the drop-down
- The Ptype variable will store the formula used for data validation in the active sheet.
- We fixed the position of the drop-down list box and mentioned the size.
Step-03: Get Result While Typing
- Return to the main worksheet and click on cell D5, where we have created our drop-down list.
- Start typing C for Cash, you will notice the Cash name has already appeared in cell D5.
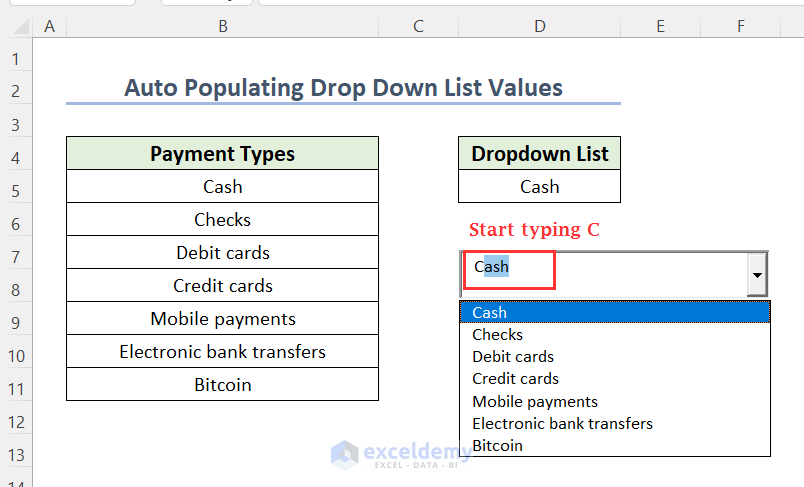
- Put your cursor in another place so the combo box will disappear again.
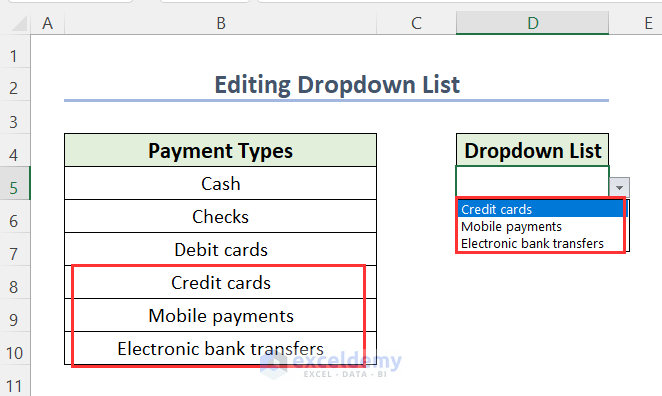
How to Edit a Drop-Down List Based on Excel
Steps:
- Select cell D5 and go to the Data tab >> Data Validation group >> Data Validation.
The Data Validation dialog box will open up.
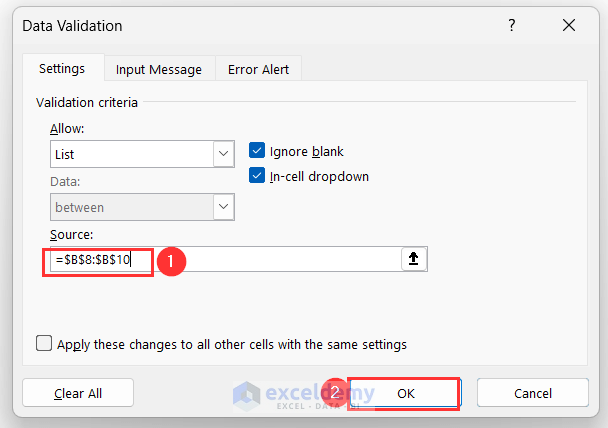
- You can see the following range in the Source box.
=$B$5:$B$10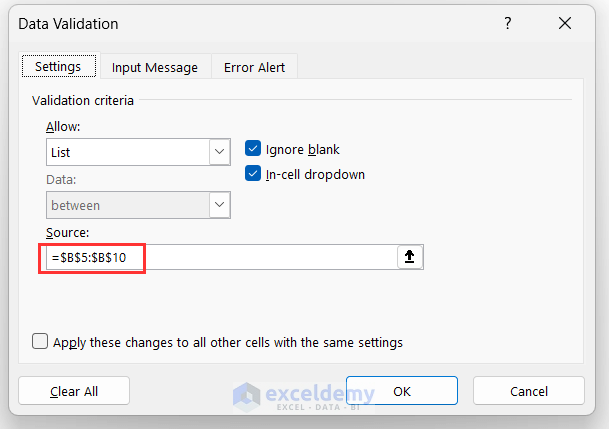
- We have changed it into the following range.
=$B$8:$B$10- Press OK.
We have completed our editing to change the list of options.
Download Practice Workbook
Further Readings
- How to Create a Drop Down List from Another Sheet in Excel
- How to Remove Drop Down List in Excel
- How to Link a Cell Value with a Drop Down List in Excel
- How to Create Excel Drop Down List with Color
- How to Create Drop Down List with Filter in Excel
- How to Create a Drop Down List with Unique Values in Excel
- How to Copy Filter Drop-Down List in Excel
- Excel Drop Down List Not Working
<< Go Back to Edit Drop-Down List in Excel | Excel Drop-Down List | Data Validation in Excel | Learn Excel
Get FREE Advanced Excel Exercises with Solutions!


Sir, 10th October,2021.
I liked this article very much, as shown very neatly and clearly.
I must thank you for taking so much efforts taken by you.
Hoping to receive more and more articles in Excel in future too.
Kanhaiyalal Newaskar.
Hello, KANHAIYALAL NEWASKAR!
Thank you so much for your appreciation.
We also hope to learn and share more and more knowledge with everyone!
Regards,
Tanjim Reza