How to Shift Cells Up in Excel (5 Quick Ways)

Get FREE Advanced Excel Exercises with Solutions!
If you have a list with blank cells, you may wish to move all data up to eliminate the blank cells. This article demonstrates how to delete blank cells and shift cells up in Excel.


How to Shift Cells Up in Excel: 5 Quick Ways

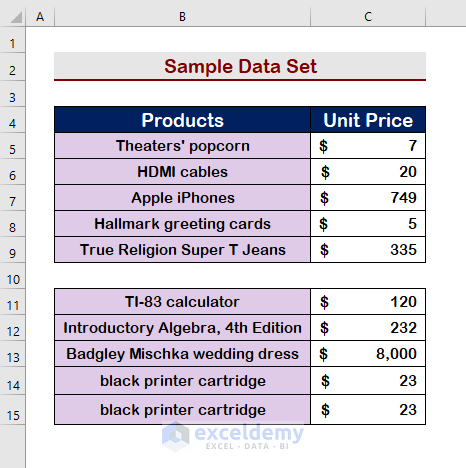
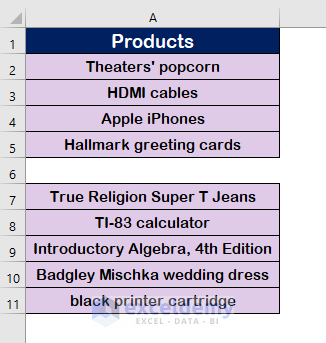
We’ll show you 5 simple techniques to shift cells up in the sections below. Basic Excel commands and VBA codes are used in these procedures. An example data set is shown in the figure below with a blank in row 10. We must shift the cell up to take up the blank location.

Use the Find & Replace Option

1. Apply Drag to Shift Cells Up in Excel

Selecting and dragging cells is the simplest way to shift them around. To rearrange cells by dragging, follow the methods given below.

Step 1:

  • Select the cells you want to shift.

Apply Drag to Shift Cells Up in Excel

Step 2:

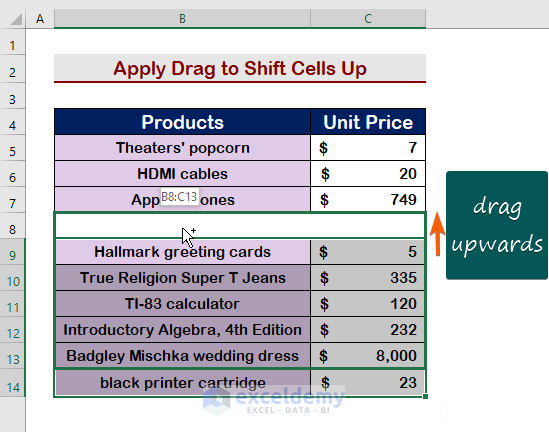
  • Hold the mouse Leftclick, and shift upwards.

Apply Drag to Shift Cells Up in Excel

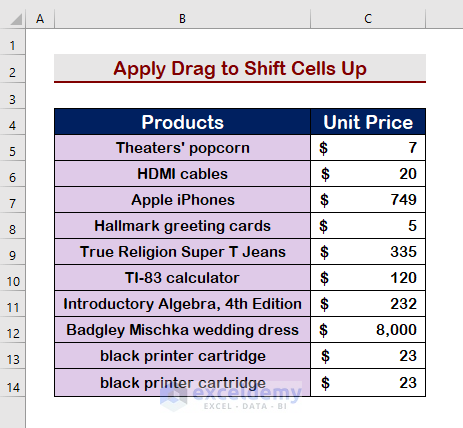
  • Therefore, the cells will be shifted towards up.

Apply Drag to Shift Cells Up in Excel


2. Use the Right-Click to Shift Cells Up in Excel

Rightclicking with the mouse may also be used to move cells up. Follow the instructions below to do so.

Step 1:

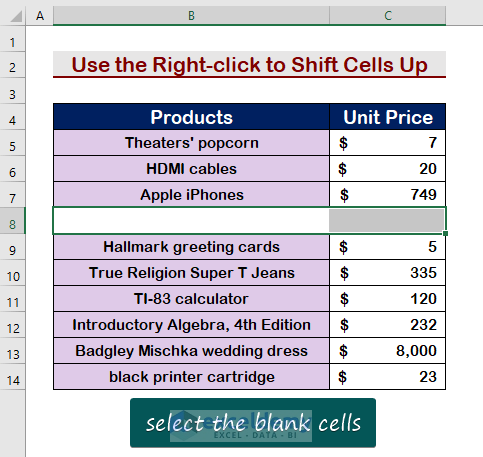
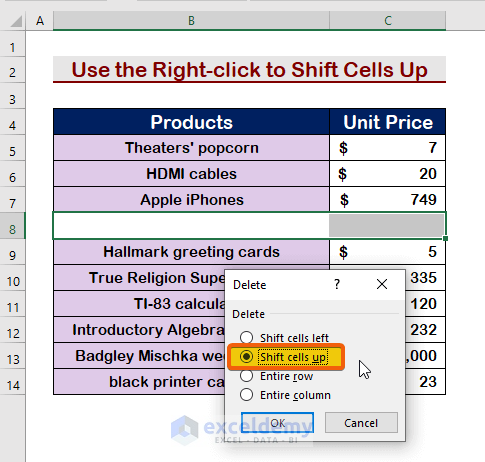
  • Firstly, select the blank cells.

Use the Right-click to Shift Cells Up in Excel

Step 2:

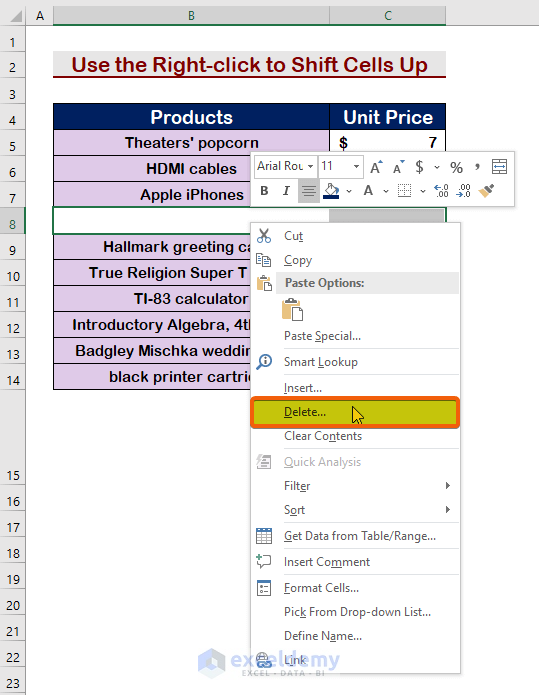
  • Click on the Right-click to show the options.
  • Choose the Delete

Use the Right-click to Shift Cells Up in Excel

Step 3:

  • Finally, select the Shift cell up option.
  • Press Enter.

Use the Right-click to Shift Cells Up in Excel

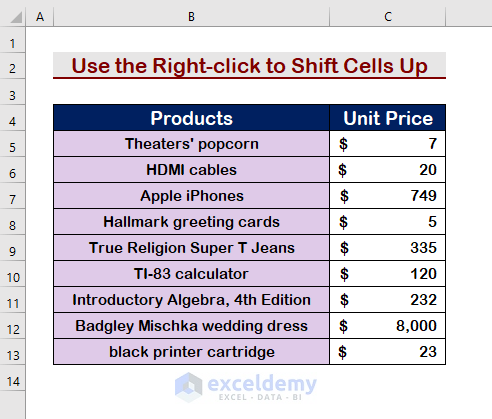
  • As a result, you will see that the cells will be moved upwards

Use the Right-click to Shift Cells Up in Excel

Read More: How to Move a Group of Cells in Excel


Similar Readings


3. Apply the Sort & Filter Command to Shift Cells Up in Excel

You may also be able to shift cells upwards by eliminating blank cells using the Sort & Filter command. Follow the steps below to use the Sort & Filter command to move the cells upwards.

Step 1:

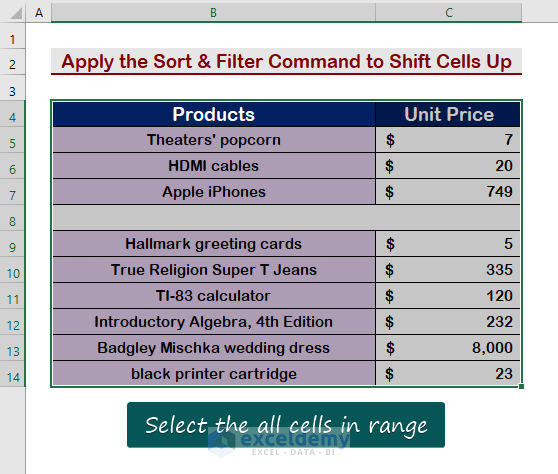
  • First of all, select all cells in the range.

Apply the Sort & Filter Command to Shift Cells Up in Excel

Step 2:

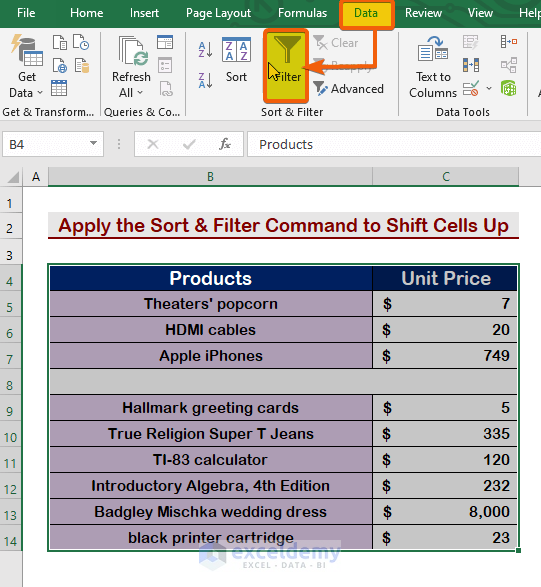
  • From the Data tab, choose the Filter

Apply the Sort & Filter Command to Shift Cells Up in Excel

Step 3:

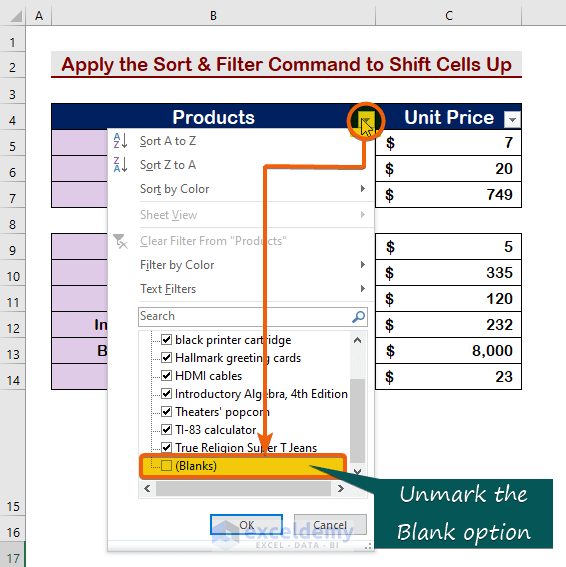
  • Secondly, click on the Icon.
  • Unmark the Blanks
  • Finally, press Enter.

Apply the Sort & Filter Command to Shift Cells Up in Excel

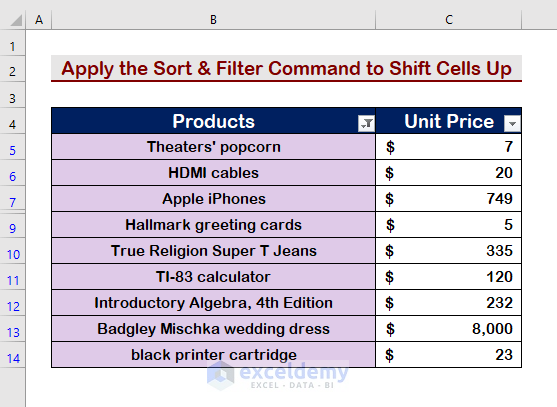
  • Consequently, your all blanks in range will be disappeared and the cell will be moved up.

Apply the Sort & Filter Command to Shift Cells Up in Excel

Read More: How to Shift Cells Down in Excel


4. Use the Find & Replace Option to Shift Cells Up in Excel

To shift the multiple cells up, we may utilize the Find & Replace option, which is similar to the previous way. Follow the steps outlined below to complete it.

Step 1:

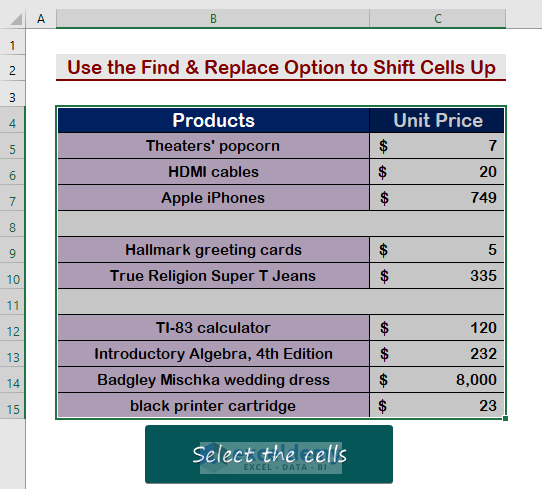
  • Select all the cells.

Use the Find & Replace Option to Shift Cells Up in Excel

Step 2:

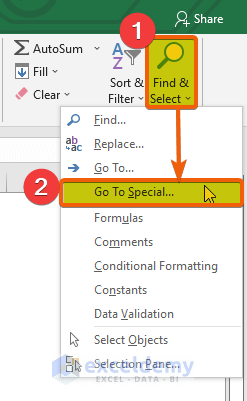
  • Go to the Home tab and choose the Find & Replace
  • Choose the Go To Special

Use the Find & Replace Option to Shift Cells Up in Excel

Step 3:

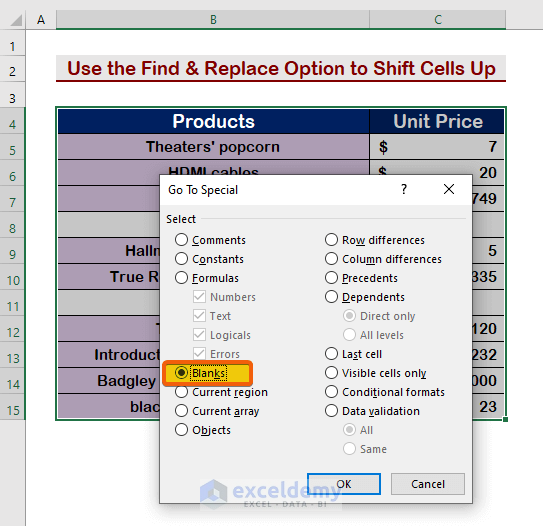
  • Then, select the Blanks
  • Press Enter.

Use the Find & Replace Option to Shift Cells Up in Excel

Step 4:

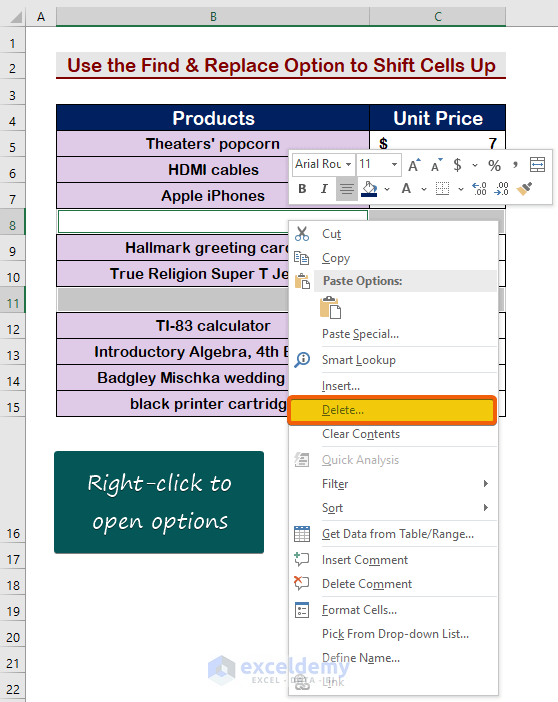
  • Click on a blank cell and click the Right-click.
  • Choose the delete

Use the Find & Replace Option to Shift Cells Up in Excel

Step 5:

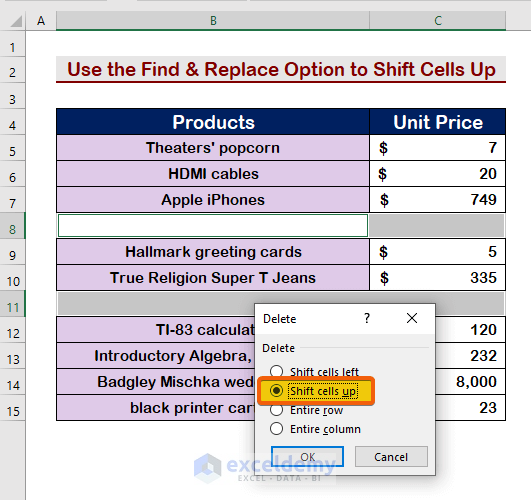
  • Finally, choose the Shift cells up
  • Press Enter to see the results.

Use the Find & Replace Option to Shift Cells Up in Excel

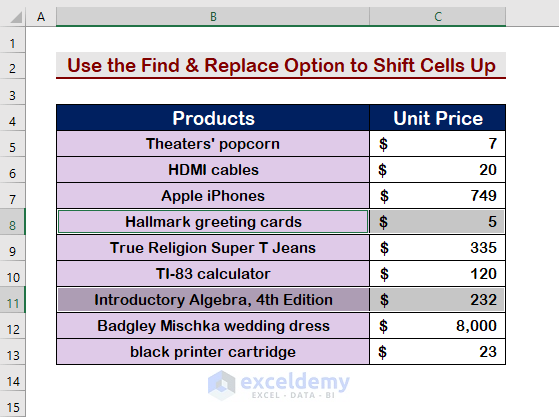
  • As shown in the below image, the cells will be shifted.

Use the Find & Replace Option


5. Run a VBA Code to Shift Cells Up

So, the VBA code is also here to shift or move the cells up. Follow the procedure described here to do so.

Use the Find & Replace Option

Step 1:

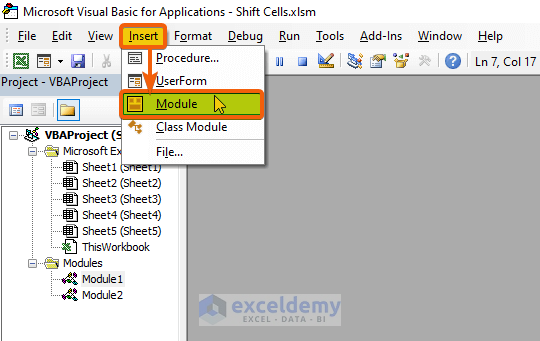
  • Firstly, press  Alt + 11 to open the Macro.
  • Click on the Insert
  • Choose Module from the list.

Use the Find & Replace Option

Step 2:

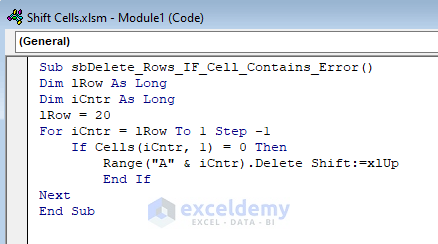
  • Paste the following VBA codes here.
Sub Shift_cells_up
Dim lRow As Long
Dim iCntr As Long
lRow = 20
For iCntr = lRow To 1 Step -1
If Cells(iCntr, 1) = 0 Then
Range("A" & iCntr).Delete Shift:=xlUp
End If
Next
End Sub

Here,

lRow = 20 refers to the total row in the range.

For iCntr = lRow To 1 Step -1 refers to IRow will be checked step by step.

If Cells(iCntr, 1) = 0 refers to the If condition for blank cells.

Range(“A” & iCntr). Is your range column

Delete Shift:=xlUp refers to deleting the rows but not the entire row and shifting cells up

Use the Find & Replace Option

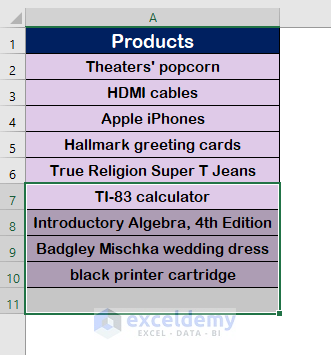
  • Therefore, the final result is being shown in the image below.

Use the Find & Replace Option


Download Practice Workbook

Download this practice workbook to exercise while you are reading this article.


Conclusion

To summarize, I hope this article has shown you how to delete blank cells and shift cells up in Excel. Examine the practice book and put your newfound knowledge to use. Because of your support, we are willing to pay for initiatives like these.

Please do not hesitate to contact us if you have any queries. Please leave a comment below to let me know what you think.


Related Articles

Bhubon Costa
Bhubon Costa

Myself, Bhubon Costa, an engineer, is currently employed with Exceldemy as an Excel & VBA Content Developer. I appreciate solving analytical difficulties, finding practical answers, and, for the most part, I enjoy taking on new tasks. I write articles on Exceldemy about various ways to get out of Microsoft Excel's stuck conditions. My passion is to leave my mark on the world through my work and to have an impact on the community who benefit from it.

We will be happy to hear your thoughts

Leave a reply

Advanced Excel Exercises with Solutions PDF


ExcelDemy
Logo