This article describes 5 ways to remove extra spaces in Excel. Here is an animated overview:
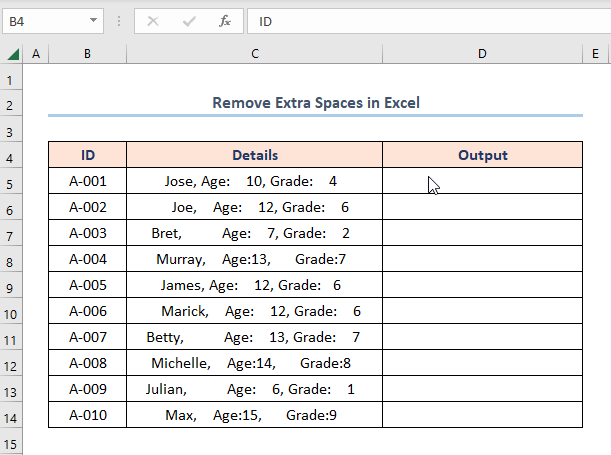
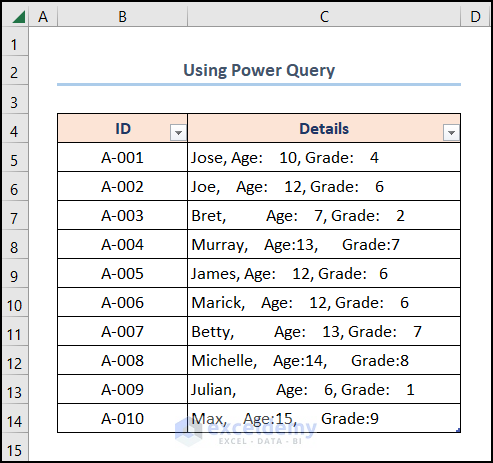
We’ll use the dataset below, and remove the extra spaces present in the “Details” column using Excel functions and features.
Method 1 – Using Excel Functions to Remove Extra Spaces
There are a variety of functions we can use for this purpose.
1.1 – Using the TRIM Function to Remove All Extra Spaces
The TRIM function removes additional spaces from a text value.
Steps:
- In cell D5, enter the following formula and press ENTER:
=TRIM(C5)
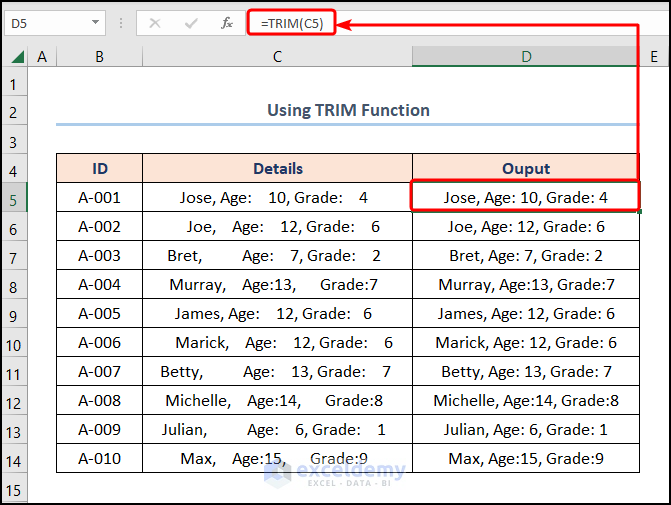
The extra spaces are removed.
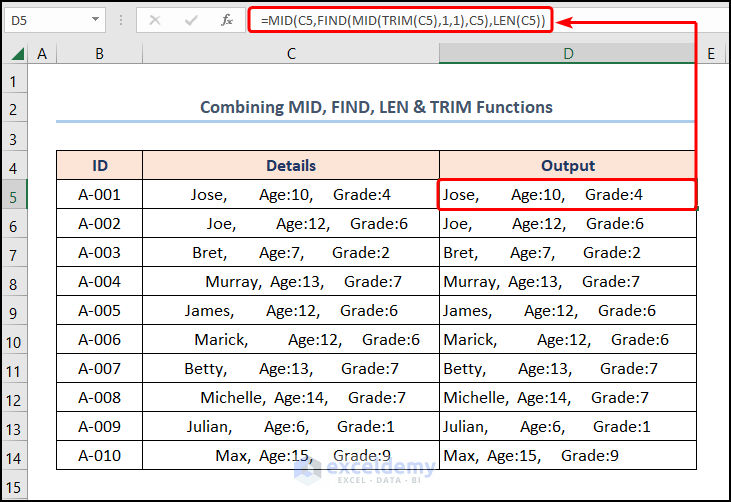
1.2 – Combining the TRIM, MID, FIND & LEN Functions to Remove Only Leading Spaces
Now we’ll combine the TRIM, MID, FIND, and LEN functions to remove the leading spaces from a string of text. The combination of these functions identifies the starting position of the text characters and erases the spaces before them.
Steps:
- In cell D5, enter the formula given below and press ENTER:
=MID(C5,FIND(MID(TRIM(C5),1,1),C5),LEN(C5))
- LEN(C5) → returns the number of characters in a string of text, here, cell C5.
- Output → 32
- MID(TRIM(C5),1,1) → returns the characters from the middle of a text string, given the starting position and length. Here, cell C5 is the text argument, 1 is the start_num argument, and 1 is the num_chars argument, such that the function returns the first character from the left side.
- Output → “J”
- FIND(MID(TRIM(C5),1,1),C5) → becomes
- FIND(“J”,C5) → returns the starting position of one text string within another text string. Here, “J” is the find_text argument while C5 is the within_text argument. The function returns the position of the numeric values in the string of text.
- Output → 1
- MID(C5,FIND(MID(TRIM(C5),1,1),C5),LEN(C5)) → becomes
- MID(C5,1,32) → Here, the C5 cell is the text argument, 1 is the start_num argument, and 32 is the num_chars argument, such that the function returns the first character from the left side.
- Output → “Jose, Age:10, Grade:4”
1.3 – Using the CLEAN, SUBSTITUTE, and CHAR Functions to Eliminate Line Breaks
To eliminate line breaks, we can use the TRIM, CLEAN, SUBSTITUTE, and CHAR functions.
Steps:
- In cell D5, enter the following formula and press ENTER:
=TRIM(CLEAN(SUBSTITUTE(C5,CHAR(160),"")))
- CHAR(160) → returns the character specified by the provided ASCII code. 160 represents the white space character.
- Output → ” “
- SUBSTITUTE(C5,CHAR(160),””) → replaces existing text with new text in a text string. Here, C5 is the text argument, CHAR(160) represents the old_text argument, and the “” is the new_text argument. So, the function substitutes white spaces with blanks.
- Output → “Jose, Age: 10, Grade: 4 “
- CLEAN(SUBSTITUTE(C5,CHAR(160),””)) → becomes
- CLEAN(“Jose, Age: 10, Grade: 4”) → removes all nonprintable characters from text, where “Jose, Age: 10, Grade: 4” is the text argument.
- Output → “Jose, Age: 10, Grade: 4 “
- TRIM(CLEAN(SUBSTITUTE(C5,CHAR(160),””))) → becomes
- TRIM(“Jose, Age: 10, Grade: 4”) → removes excess spaces after the text argument, “Jose, Age: 10, Grade: 4”.
- Output → “Jose, Age: 10, Grade: 4”

Method 2 – Removing Spaces Before Numbers with the Find & Replace Feature
If combining complex formulas and expressions does not suit you, Excel’s Find and Replace command has you covered.
Steps:
- Select the range D5:D14 >> navigate to the Find & Select drop-down on the Home tab >> choose the Replace option.
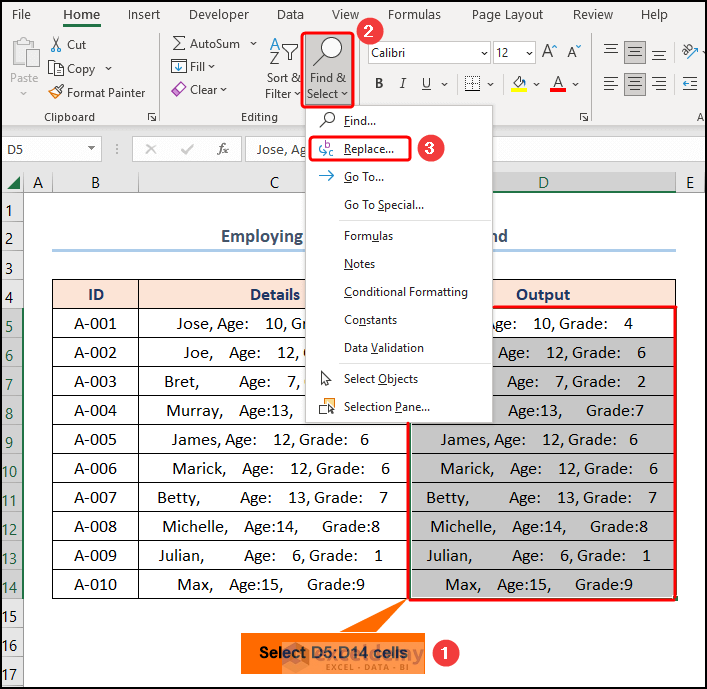
- In the Find what field, type a blank space.
- Leave the Replace with field empty.
- Click the Replace All button.
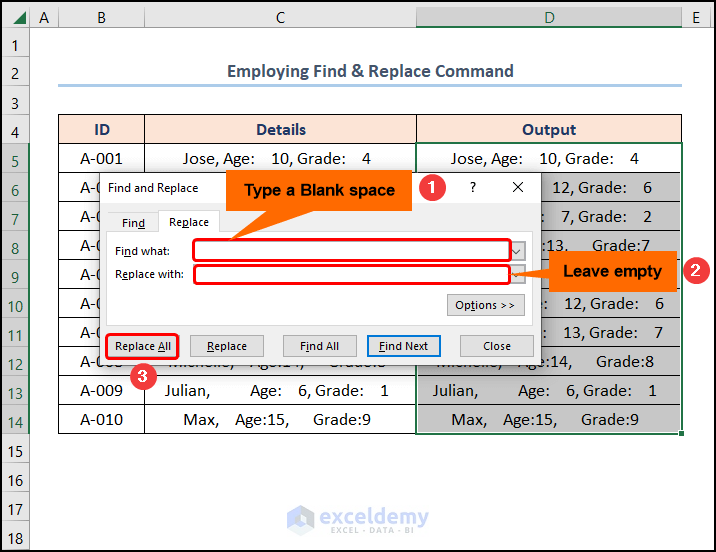
All the spaces are removed.

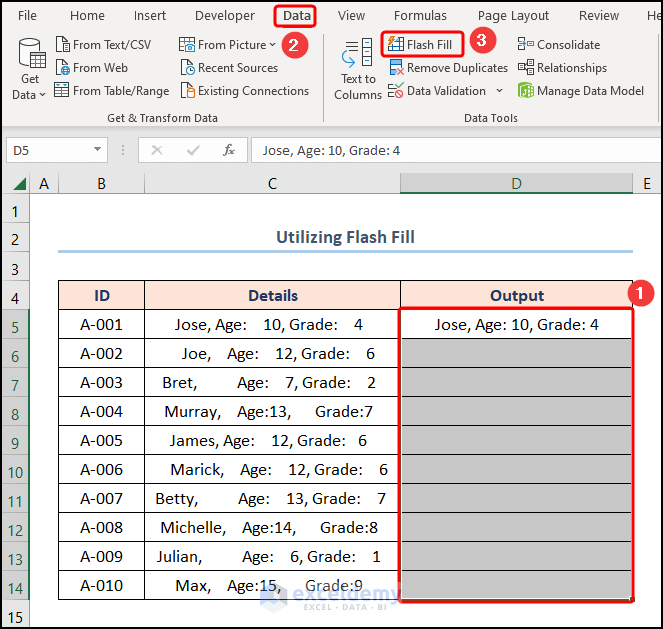
Method 3 – Using Flash Fill to Remove Extra Spaces
The Flash Fill feature recognizes a pattern and auto-fills the rest of the column without any formulas.
Steps:
- Enter the desired output in the D5 cell (i.e. the text with spaces removed).
- Select the range D5:D14.
- Go to the Data tab and click Flash Fill.
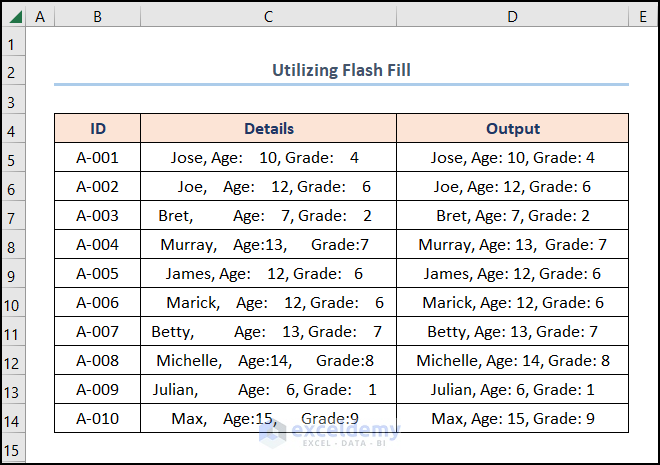
The spaces are removed, just like that.
Method 4 – Using the Power Query Tool to Remove Spaces
The Power Query tool also makes it easy to remove spaces in Excel.
Steps:
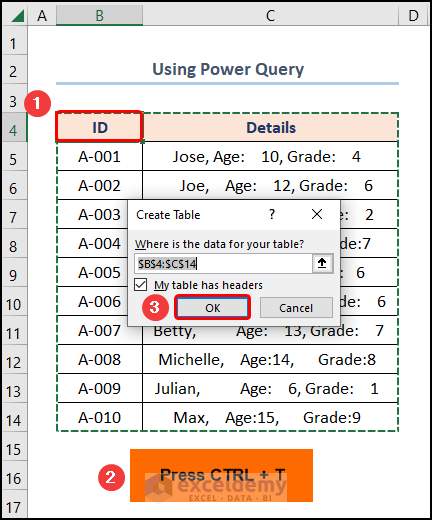
- Select cell B4 and press CTRL + T.
- Click on OK to insert an Excel Table.
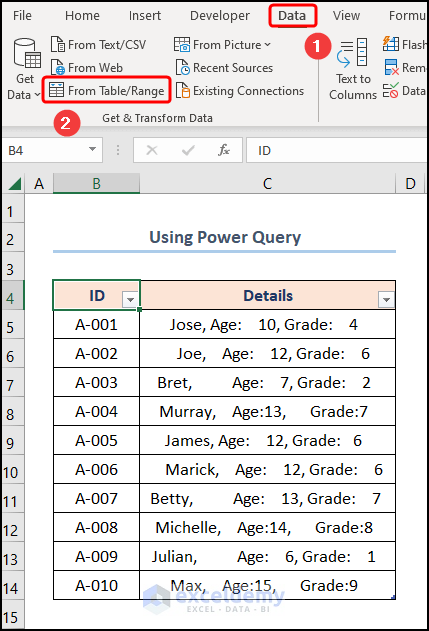
- Go to the Data tab and select From Table/Range.
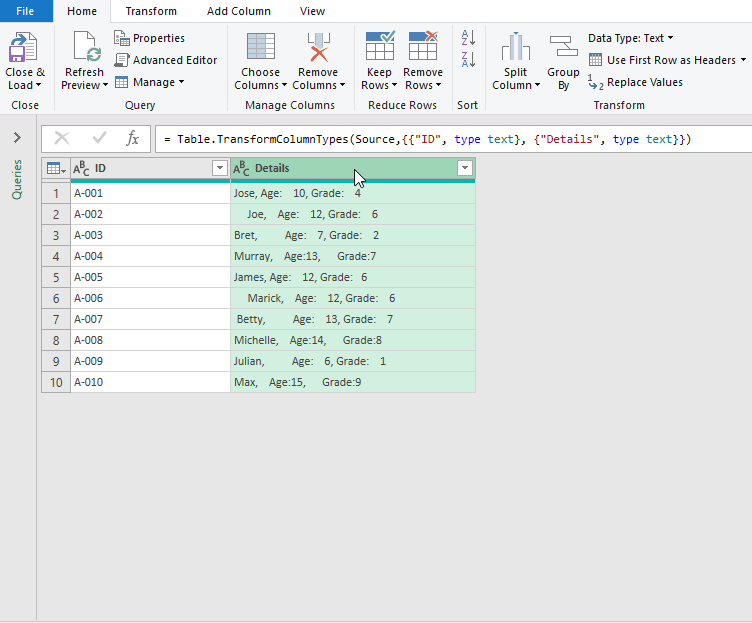
The Power Query editor will open.
- Follow the steps in the GIF below.
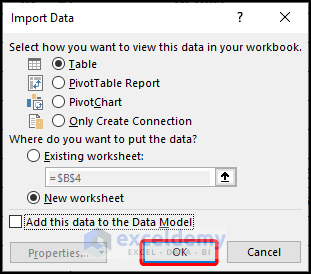
- Click the Close & Load drop-down >> choose the Close & Load To option.
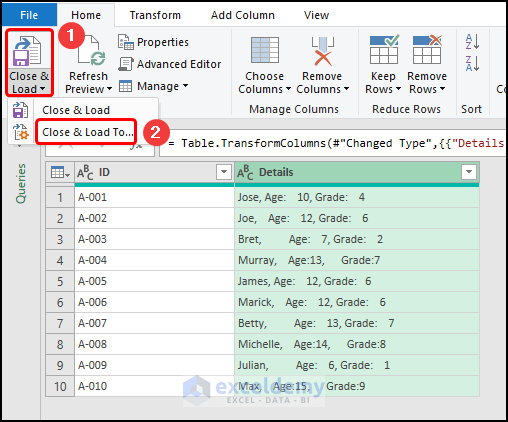
- In the Import Data window, click OK.
The final result should look like the screenshot shown below.
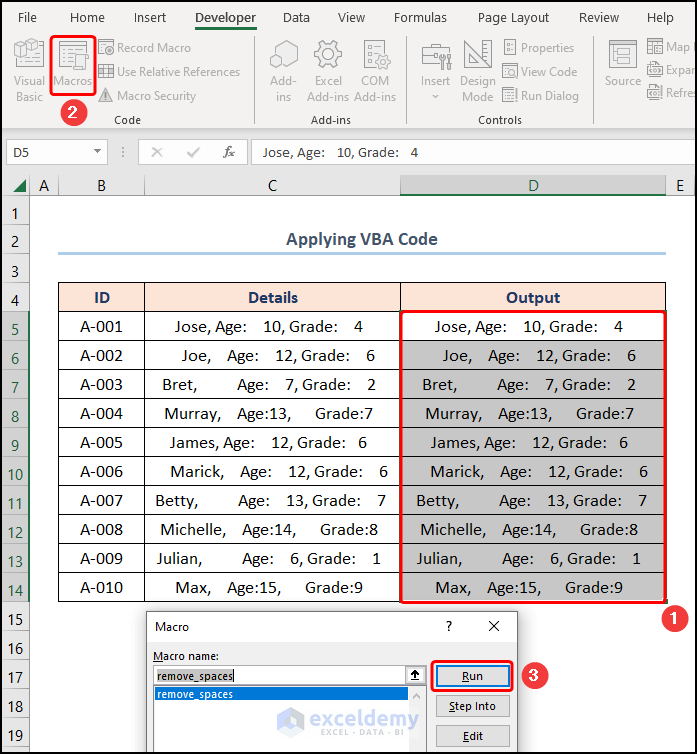
Method 5 – Using VBA Code to Remove Extra Spaces
Last but not least, If you often need to remove extra spaces, consider running the VBA Code below as a macro.
Steps:
- Go to the Developer tab >> click the Visual Basic button.
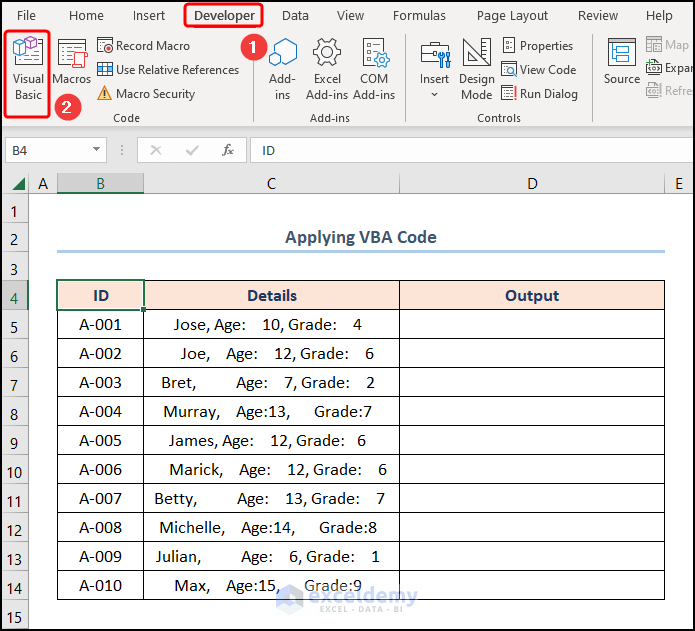
- Go to the Insert tab >> select Module.

- Copy the code below and paste it into the Module window that opens.
Sub remove_spaces()
Dim cell As Range
For Each cell In Selection.Cells
cell.Value = Trim(cell.Value)
Next cell
End Sub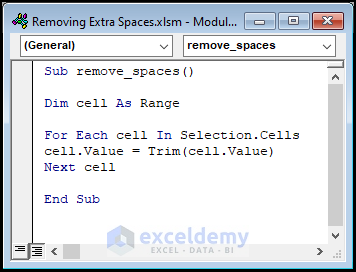
- We start by naming our subroutine remove_spaces().
- We define the variable cell as type Range.
- Then we use a For Loop to iterate through each value and apply the Trim function to get rid of the spaces.

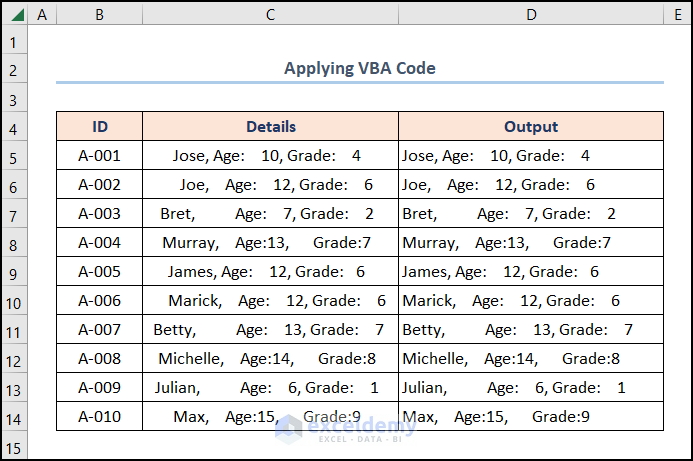
- Copy and paste the “Details” column into the “Output” column.
- Go to the Developer tab.
- Click the Macros button.
- Click Run.
The results should look like the image below.
Download Practice Workbook
Related Articles
- How to Remove White Space in Excel
- How to Remove Space after Number in Excel
- How to Remove Space in Excel after Text
- How to Remove Space between Rows in Excel
- How to Remove Tab Space from Excel
- How to Remove Space in Excel Before Numbers
- Remove the Trailing Spaces in Excel
- How to Find and Replace Space in Excel
- How to Remove Blank Spaces in Excel
- How to Remove Space Before Text in Excel
<< Go Back To Remove Space in Excel | Data Cleaning in Excel | Learn Excel
Get FREE Advanced Excel Exercises with Solutions!

I wanted to trim excess spaces in a column’s data.
There’s an “ugly” way using find-and-replace:
1. Find: Type two space characters
2. Replace: Type one space character
3. Hit “replace all” and it will find every instance of two space characters and substitute only one.
You will have to hit “replace all” repeatedly until there are no more multiple-space characters to replace.
Hello Jim,
That’s actually a very practical workaround. Yes, using Find & Replace with double spaces → single space works, especially when you just need a quick cleanup without formulas.
However, as you mentioned, you may need to click Replace All multiple times until Excel removes all consecutive spaces. This happens because Excel replaces only two spaces at a time — so if there are 4 or 5 spaces, it reduces them step by step.
For a cleaner and more reliable method, you can use:
=TRIM(A1)
The TRIM function automatically:
Removes extra spaces between words
Keeps only single spaces
Removes leading and trailing spaces
If your data also contains non-breaking spaces (often copied from websites), you can use:
If TRIM doesn’t work, try combining TRIM with SUBSTITUTE to replace non-breaking spaces with regular spaces first.
This handles hidden spaces that TRIM alone doesn’t remove.
So your method works, but formulas can save time when working with large datasets.
Regards,
ExcelDemy