The Select Case statement is one of the most commonly used statements in Excel VBA. It allows Excel users to perform different actions based on a specified condition. However, sometimes users may need multiple conditions to make decisions within your VBA code. This is where nested conditions become helpful. In this article, we will discuss how to use nested conditions with Select Case in Excel VBA.

How to Open VBA Macro Editor in Excel
VBA is a programming language that may be used for a variety of tasks, and different types of users can use it for those tasks. Using the Alt + F11 keyboard shortcut, you can launch the VBA editor. In the last section, we will generate VBA code that makes it very easy to perform Vlookup with multiple criteria in Excel. Therefore, you can follow the simple steps accordingly to open the VBA editor.
Steps:
- Firstly, we will open the Developer tab.
- Then, we will select the Visual Basic command.
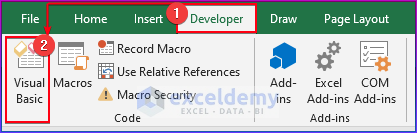
- Here, the Visual Basic window will open.
- After that, from the Insert option, we will choose the new Module to write the VBA code.

How to Use Nested Select Case in Excel VBA: 3 Examples
In this article, we will explain how to use Nested Conditions with Select Case in Excel VBA. Here, we will show some examples with codes and proper illustrations to help you understand the process.
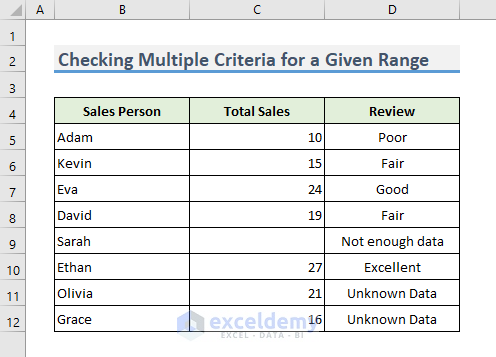
The dataset contains the names of some salespeople in a company. It also contains the number of sales they made of a particular item in a month.
Example 1: Checking Multiple Criteria for Cell Value Within a Given Range with Nested Select Case VBA
Here, we have some salesperson names and their sales data as cell value in a given range. In the code, there are also some number ranges to review the sales. In the dataset, the sales data for Sarah is missing, so it is showing Not enough data to make a review. We also did not put Olivia and Grace on the Select Case list. So these are Unknown Data.
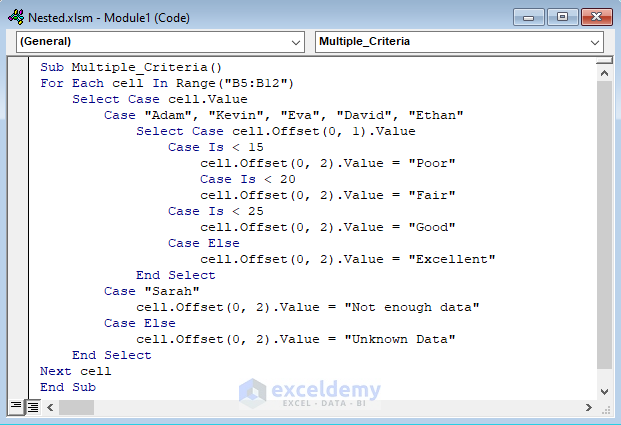
In the above image, you can see the VBA codes to check multiple criteria for cell value within a given range with the nested Select Case in Excel VBA. Copy the following VBA codes and paste them into your module.
Sub Multiple_Criteria()
For Each cell In Range("B5:B12")
    Select Case cell.Value
        Case "Adam", "Kevin", "Eva", "David", "Ethan"
            Select Case cell.Offset(0, 1).Value
                Case Is < 15
                    cell.Offset(0, 2).Value = "Poor"
                    Case Is < 20
                    cell.Offset(0, 2).Value = "Fair"
                Case Is < 25
                    cell.Offset(0, 2).Value = "Good"
                Case Else
                    cell.Offset(0, 2).Value = "Excellent"
            End Select
        Case "Sarah"
            cell.Offset(0, 2).Value = "Not enough data"
        Case Else
            cell.Offset(0, 2).Value = "Unknown Data"
    End Select
Next cell
End Sub
VBA Breakdown:
Sub Multiple_Criteria()The code begins with creating a subprocedure named “Multiple_Criteria”.
For Each cell In Range("B5:B12")Now, it starts a “For Each” loop that iterates over each cell in the range B5:B12.
Select Case cell.ValueThe “Select Case” statement is used to check the value of the current cell in the loop.
Case "Adam", "Kevin", "Eva", "David", "Ethan"Here the case specifies the conditions in the “Select Case” statement. If the value of the current cell is one of the specified names, then the following code will run.
Select Case cell.Offset(0, 1).ValueNow begins a nested “Select Case” statement to check the value of the cell to the right of the current cell (i.e., the cell one column to the right, or offset by (0,1)).
Case Is < 15This line specifies the condition for the first case in the nested “Select Case” statement. If the cell’s value to the right is less than 15, then the following code will be executed.
cell.Offset(0, 2).Value = "Poor"Depending on the value of the cell to the right of the current cell, a corresponding string value (here, “Poor”) is assigned to the cell two columns to the right of the current cell (i.e., the cell offset by (0,2)).
Case ElseAfter that, this is the default condition for the nested “Select Case” statement. If none of the previous conditions are met, the following code will be executed.
cell.Offset(0, 2).Value = "Unknown Data"This line assigns the value “Unknown Data” to the cell two columns to the right of the current cell being evaluated.
End SelectThis line ends the “Select Case” statement.
Next cellThe loop continues until all cells in the range “B5:B12” have been processed.
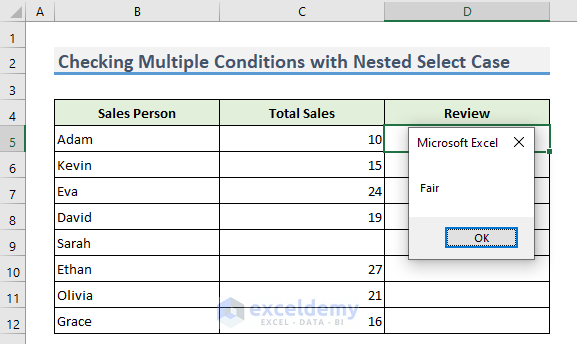
Example 2: Checking Multiple Conditions with Nested Select Case VBA and Show Results in a MsgBox
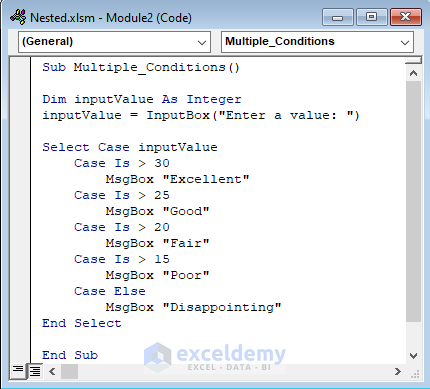
Here, the VBA code will show the review in MsgBox. If we run the code, an entry box will appear, and then we put a sales number. After that, the MsgBox will show the review in MsgBox.
In the above image, you can see the VBA codes to check multiple conditions with the nested Select Case in Excel VBA and show results in a MsgBox. Copy the following VBA codes and paste them into your module.
Sub Multiple_Conditions()
Dim inputValue As Integer
inputValue = InputBox("Enter a value: ")
Select Case inputValue
    Case Is > 30
        MsgBox "Excellent"
    Case Is > 25
        MsgBox "Good"
    Case Is > 20
        MsgBox "Fair"
    Case Is > 15
        MsgBox "Poor"
    Case Else
        MsgBox "Disappointing"
End Select
End Sub
VBA Breakdown
Sub Multiple_Conditions()First, start the code with the subprocedure Multiple_Conditions().
Dim inputValue As IntegerThen, we declare a variable called “inputValue” as an integer data type.
inputValue = InputBox("Enter a value: ")This line will display an input box prompting the user to enter a value and assign the input value to the “inputValue” variable.
Select Case inputValueAfter that, we write a “Select Case” statement that checks the value of the “inputValue” variable.
Case Is > 30It specifies the condition for the first case in the “Select Case” statement. If the value of “inputValue” is greater than 30, then the following code will be executed.
MsgBox "Excellent"The text “Excellent” will be displayed in the message box.
Case ElseIf none of the previous conditions are met, the following code will be executed.
MsgBox "Disappointing"Displays a message box with the text “Disappointing”.
End SelectThis line ends the “Select Case” statement.
End SubEnds the subprocedure.
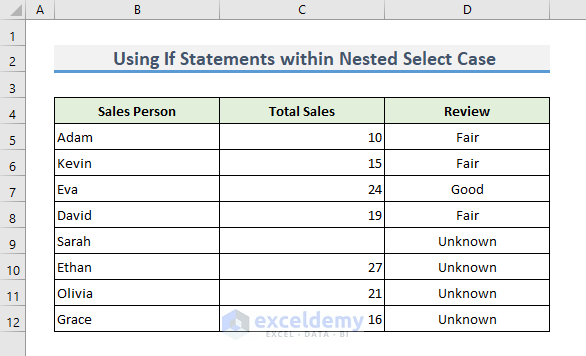
Example 3: Using If Statements With Nested Select Case for Multiple Conditions
Here, in this example, we used the If statements with each nested Select Case statement.
We set some ranges for some cases, and, we also did not add some names as cases in the code. So, the review shows unknown for those names.
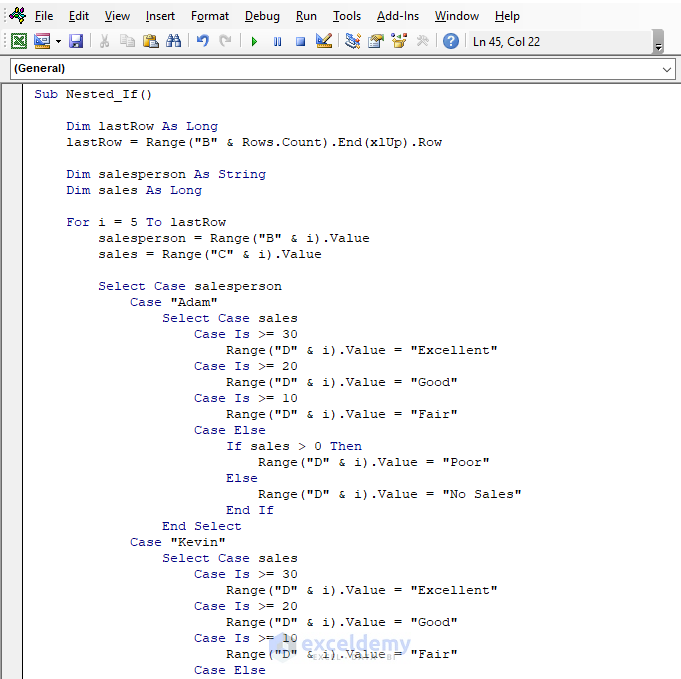
In the above image, you can see the VBA codes for using if statements with each Nested Select Case statement for multiple conditions in Excel VBA. Copy the following VBA codes and paste them into your module.
Sub NestedIf()
    Dim lastRow As Long
    as Row = Range("B" & Rows.Count).End(xlUp).Row
    Dim salesperson As String
    Dim sales As Long
    For i = 5 To lastRow
        salesperson = Range("B" & i).Value
        sales = Range("C" & i).Value
        Select Case salesperson
            Case "Adam"
                Select Case sales
                    Case Is >= 30
                        Range("D" & i).Value = "Excellent"
                    Case Is >= 20
                        Range("D" & i).Value = "Good"
                    Case Is >= 10
                        Range("D" & i).Value = "Fair"
                    Case Else
                        If sales > 0 Then
                            Range("D" & i).Value = "Poor"
                        Else
                            Range("D" & i).Value = "No Sales"
                        End If
                End Select
            Case "Kevin"
                Select Case sales
                    Case Is >= 30
                        Range("D" & i).Value = "Excellent"
                    Case Is >= 20
                        Range("D" & i).Value = "Good"
                    Case Is >= 10
                        Range("D" & i).Value = "Fair"
                    Case Else
                        If sales > 0 Then
                            Range("D" & i).Value = "Poor"
                        Else
                            Range("D" & i).Value = "No Sales"
                        End If
                End Select
            Case Else
                Range("D" & i).Value = "Unknown"
        End Select
    Next i
End Sub
VBA Breakdown
Sub NestedIf()It defines the name of the subprocedure, “NestedIf”.
Dim lastRow As Long
lastRow = Range("B" & Rows.Count).End(xlUp).Row
Now, we declare a variable called “lastRow” as a long data type and set its value to the last row number of data in column B.
Dim salesperson As String
Dim sales As Long
Here, we declare two variables, “salesperson” as a string data type and “sales” as a long data type.
For i = 5 To lastRow
    salesperson = Range("B" & i).Value
    sales = Range("C" & i).Value
Now, this section initiates a for loop that iterates through each row of data from row 5 to the last row number stored in the “lastRow” variable. We assigned the values in columns B and C of each row to the “salesperson” and “sales” variables, respectively.
Select Case salesperson
    Case "Adam"
        Select Case sales
            Case Is >= 30
                Range("D" & i).Value = "Excellent"
            Case Is >= 20
                Range("D" & i).Value = "Good"
            Case Is >= 10
                Range("D" & i).Value = "Fair"
            Case Else
                If sales > 0 Then
                    Range("D" & i).Value = "Poor"
                Else
                    Range("D" & i).Value = "No Sales"
                End If
        End Select
    Case Else
        Range("D" & i).Value = "Unknown"
End Select
These code sections to use a nested “Select Case” statement to check the value of the “salesperson” variable. If the salesperson is “Adam” or “Kevin”, then the code will check the sales value to determine their performance rating, which we stored in column D of the same row. If the salesperson is not “Adam” or “Kevin”, then we set the performance rating to “Unknown”.
Next iThis line ends the for loop.
Read More: Excel VBA Select Case Between Two Values
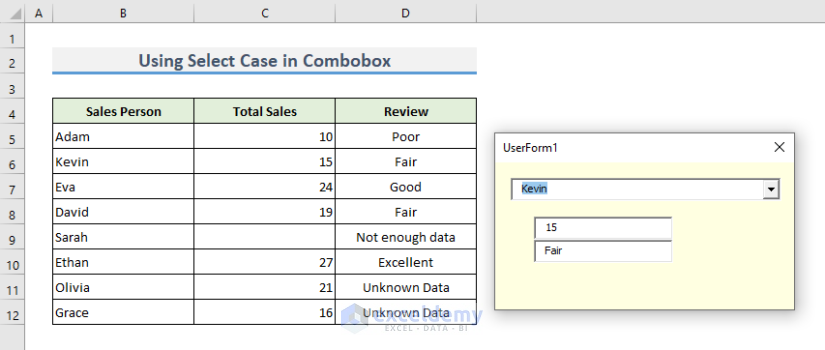
How to Use Select Case with VBA ComboBox in Excel
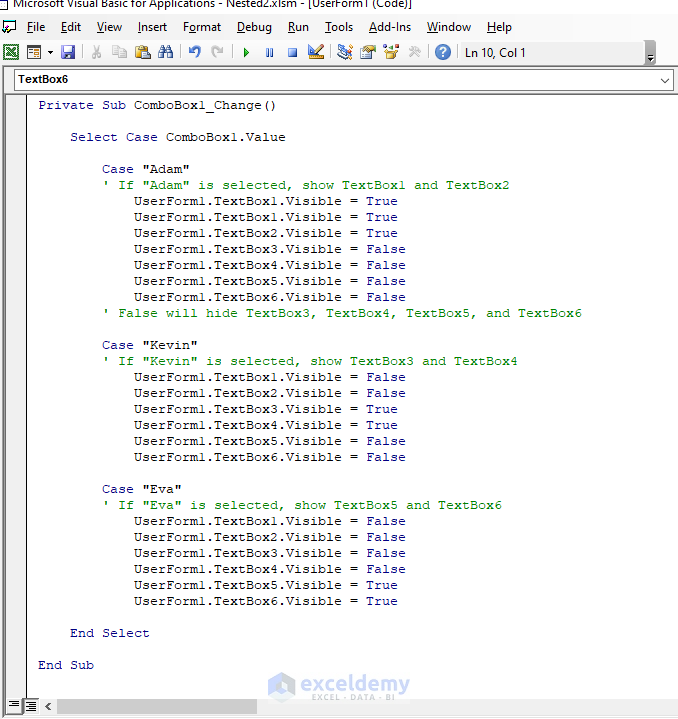
Here, we made a Combobox using Userform in Excel VBA. We used Select Case in this Combobox. In the output image, you can see that for Kevin the Combobox is showing its sales and review in two textboxes.
In the above image, you can see the VBA codes to make a Combobox using Select Case in Excel VBA. Copy the following VBA codes and paste them into your module.
Private Sub UserForm_Initialize()
    'Add options to the combo box
    ComboBox1.AddItem "Adam"
    ComboBox1.AddItem "Kevin"
    ComboBox1.AddItem "Eva"
End Sub
Private Sub ComboBox1_Change()
    Select Case ComboBox1.Value
        Case "Adam"
        ' If "Adam" is selected, show TextBox1 and TextBox2
            UserForm1.TextBox1.Visible = True
            UserForm1.TextBox1.Visible = True
            UserForm1.TextBox2.Visible = True
            UserForm1.TextBox3.Visible = False
            UserForm1.TextBox4.Visible = False
            UserForm1.TextBox5.Visible = False
            UserForm1.TextBox6.Visible = False
        ' False will hide TextBox3, TextBox4, TextBox5, and TextBox6
        Case "Kevin"
        ' If "Kevin" is selected, show TextBox3 and TextBox4
            UserForm1.TextBox1.Visible = False
            UserForm1.TextBox2.Visible = False
            UserForm1.TextBox3.Visible = True
            UserForm1.TextBox4.Visible = True
            UserForm1.TextBox5.Visible = False
            UserForm1.TextBox6.Visible = False
        Case "Eva"
        ' If "Eva" is selected, show TextBox5 and TextBox6
            UserForm1.TextBox1.Visible = False
            UserForm1.TextBox2.Visible = False
            UserForm1.TextBox3.Visible = False
            UserForm1.TextBox4.Visible = False
            UserForm1.TextBox5.Visible = True
            UserForm1.TextBox6.Visible = True
    End Select
End Sub
VBA Breakdown
Private Sub UserForm_Initialize()If you initialize the user form, it will execute a new subroutine.
 ComboBox1.AddItem "Adam"
 ComboBox1.AddItem "Kevin"
 ComboBox1.AddItem "Eva"
These code set add items to the combo box control named ComboBox1. It adds three options: “Adam”, “Kevin”, and “Eva”.
End SubIt ends the UserForm_Initialize subroutine.
Private Sub ComboBox1_Change()This new subroutine that will be executed whenever the user selects a different item in the combo box control named ComboBox1.
Select Case ComboBox1.ValueHere begins a Select Case statement that checks the value of the selected item in the ComboBox1 control.
Case "Adam"initiates the first case of the Select Case statement. If the selected item in the ComboBox1 control is “Adam”, the statement will execute the code that follows.
UserForm1.TextBox1.Visible = True
UserForm1.TextBox2.Visible = True
UserForm1.TextBox3.Visible = False
UserForm1.TextBox4.Visible = False
UserForm1.TextBox5.Visible = False
UserForm1.TextBox6.Visible = False
These six lines change the visibility of six different text box controls (TextBox1 through TextBox6) based on the selected item in the ComboBox1 control. If you select “Adam”, TextBox1 and TextBox2 will show up.
VBA Case Statement vs IF Statement
The Case statement and If statement both control structures in VBA that allow you to execute different blocks of code depending on certain conditions.
The If statement is a conditional statement that evaluates a Boolean expression and executes a block of code if the expression is true. You can also include an optional Else clause that specifies a block of code to execute if the expression is false. Here’s an example of an If statement:
If x > 10 Then
    ' Do something if x is greater than 10
Else
    ' Do something else if x is less than or equal to 10
End If
The Case statement is similar to the If statement but allows you to evaluate a variable or expression against multiple possible cases and execute a different block of code for each case. Here’s an example of a Case statement:
Select Case x
    Case 1
        ' Do something if x equals 1
    Case 2, 3
        ' Do something else if x equals 2 or 3
    Case Is > 10
        ' Do something else if x is greater than 10
    Case Else
        ' Do something else if none of the above cases are true
End Select
The main advantage of the Case statement over the If statement is that it can make your code more concise and easier to read when you have many possible cases to evaluate. It can also be more efficient than using multiple If statements in a row. However, the If statement is more flexible than the Case statement and can handle more complex conditional logic.
In summary, the Case statement and If statement are both powerful control structures in VBA that allow you to execute different blocks of code depending on certain conditions. The choice of which one to use depends on the specific requirements of your program and the complexity of the conditional logic you need to implement.
Download Practice Workbook
You can download the practice Excel workbook from the download button below.
Conclusion
In this article, we showed some examples of how to use nested conditions with Select Case in Excel VBA. We sincerely hope you enjoyed and learned a lot from this article. If you have any questions, comments, or recommendations, kindly leave them in the comment section below.
Related Articles
- How to Use Excel VBA Select Case and Operator
- Excel VBA to Exit Select Case
- VBA Case Vs If in Excel
- Excel VBA Select Case Like
- Excel VBA Select Case True

