The CASE statement is a logical function, which can be used instead of the IF-THEN-ELSE statement.
VBA Case Statement: Syntax & Arguments
⦿ Syntax
Select Case test_expression

Case condition_1
      result_1

Case condition_2
      result_2

Case condition_n
      result_n

Case Else
result_else

End Select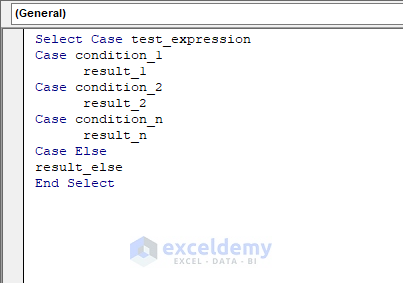
⦿ Arguments
| Argument | Required/Optional | Explanation |
|---|---|---|
| test_expression | Required | A string or numeric value that you want to compare with a set of conditions (condition_1, condition_2,…..,condition_n) |
| condition_1, condition_2,…..,condition_n | Required | Conditions that you want to evaluate. When a condition is true, then the corresponding code will be executed and no further conditions will be evaluated. |
| result_1, result_2,…..,result_n | Required | The code is executed once the condition becomes true. |
| Case Else
result_else |
Optional | When the given conditions are not true, this code will be executed. |
⦿ Return Value
The Case statement executes the corresponding codes when the conditions are met.
⦿ Version
The Case statement was introduced in the Excel 2000 version and is available in all versions after that.
13 Examples of Using VBA Case Statement
In this article, we will demonstrate the uses of the CASE statement with some random examples along with some examples using the following two tables.
We have used Microsoft Excel 365 version here, but you can use any other versions according to your convenience.
Example 1 – Using VBA Case Statement for Some Random Strings
- Go to Developer Tab >> Visual Basic Option.
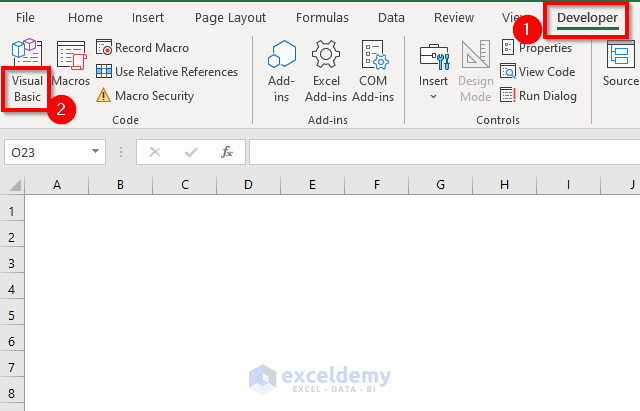
The Visual Basic Editor will open up.
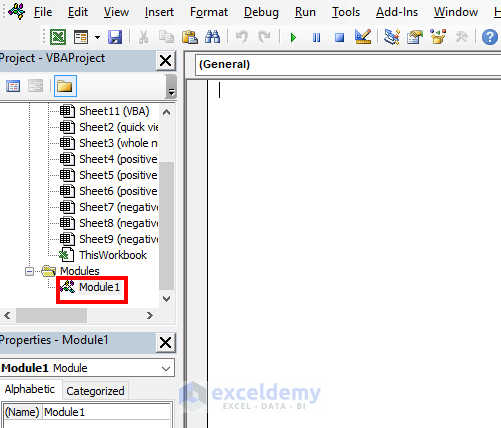
- Go to Insert Tab >> Module Option
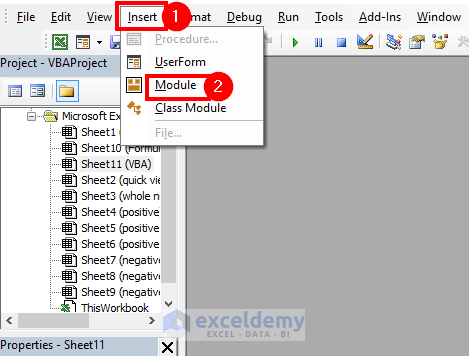
A Module will be created.
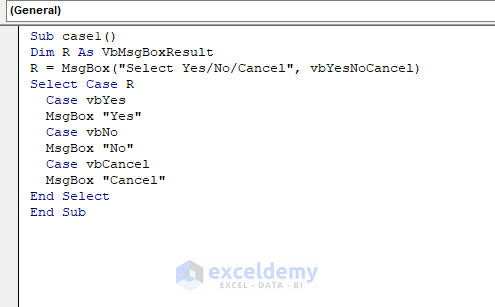
- Enter the following code:
Sub case1()
Dim R As VbMsgBoxResult
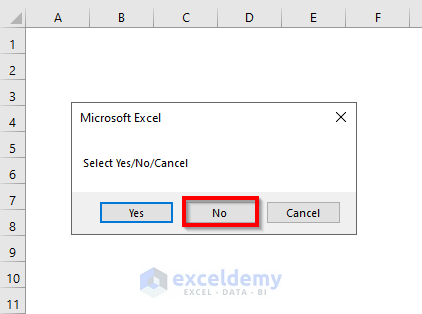
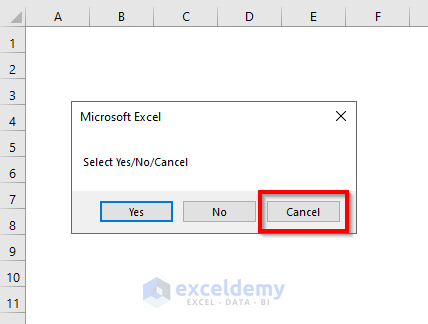
R = MsgBox("Select Yes/No/Cancel", vbYesNoCancel)
Select Case R
Case vbYes
MsgBox "Yes"
Case vbNo
MsgBox "No"
Case vbCancel
MsgBox "Cancel"
End Select
End SubHere, we have declared R as VbMsgBoxResult. In the first message box we can select Yes, No, or Cancel, then depending on our selection we will get the next message box, and so on. For this purpose, we have defined three cases.
- Press F5 to run the code.
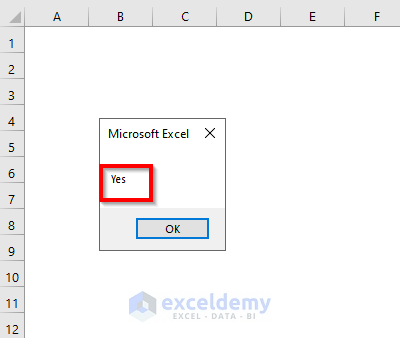
You will get the following message box. If you select Yes,
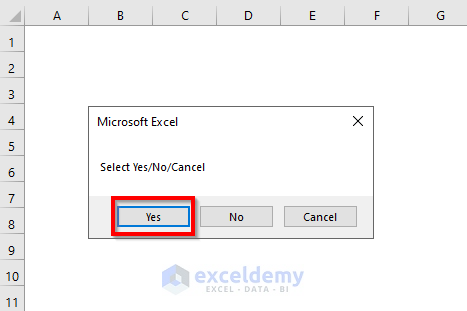
You will get another message box that shows Yes.
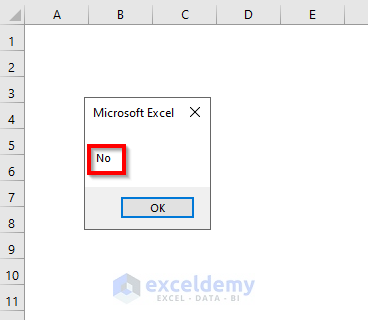
If you select No in the first message box,
You will get another message box that says No.
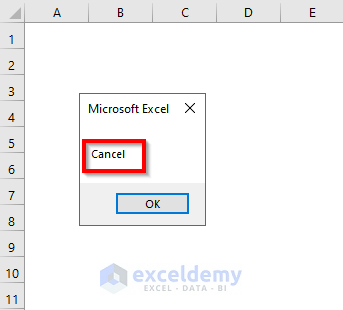
If you select Cancel in the first message box,
You will get Cancel in the second message box.
Example 2 – Using VBA Case Statement for an Exact Match of Numbers
Steps:
- Follow Example 1 to open a new module window.
- In it, enter the following code:
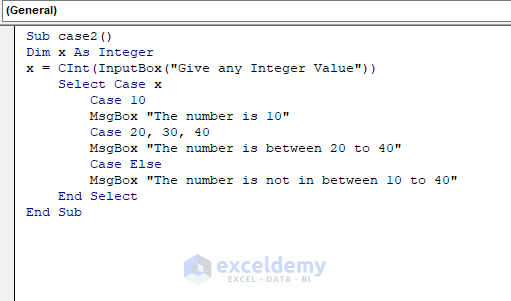
Sub case2()

Dim x As Integer
x = CInt(InputBox("Give any Integer Value"))

Select Case x

Case 10
MsgBox "The number is 10"

Case 20, 30, 40
MsgBox "The number is between 20 to 40"

Case Else
MsgBox "The number is not in between 10 to 40"

End Select

End Sub
We have declared x as Integer, and CINT to convert input data into an integer value.
We have created two cases, the first for the value 10, and the second for the values 20, 30, or 40. For other values, Case Else will run its code.
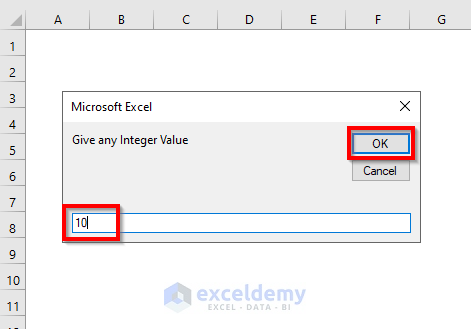
- Press F5.
You will get the following message box.
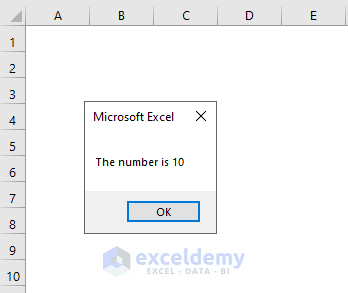
- Enter the value 10 and click OK.
Another message box appears which says “The number is 10”.
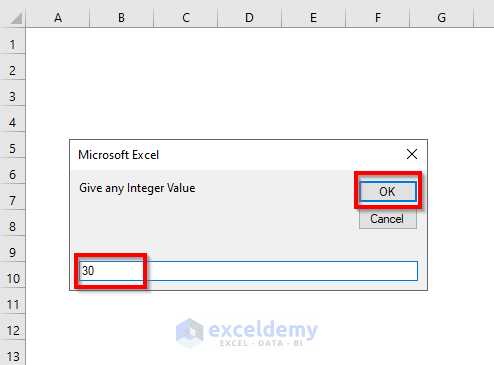
- Enter the value 30 in the first message box and press OK.
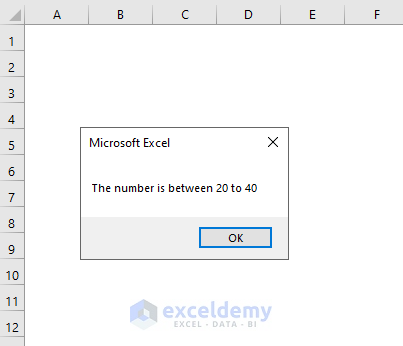
You’ll get a second message box saying “The number is between 20 to 40”.
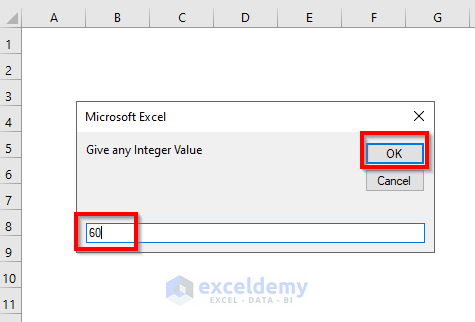
- Enter a value other than 10, 20, 30, or 40, say 60, and press OK.
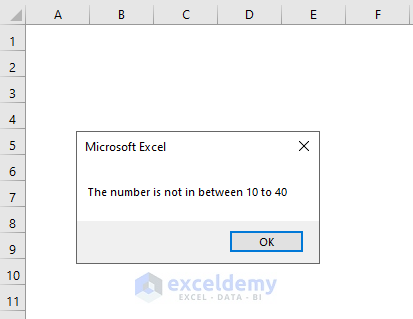
You will get a message box that says “The number is not in between 10 to 40”.
Read More: Excel VBA Select Case Between Two Values
Example 3 – Using VBA Case Statement for a Range of Numbers
Here, we will use a VBA code to give us a grade depending on a range of numbers.
Steps:
- Follow the Steps of Example 1 to open a new module window.
- In it, enter the following code:
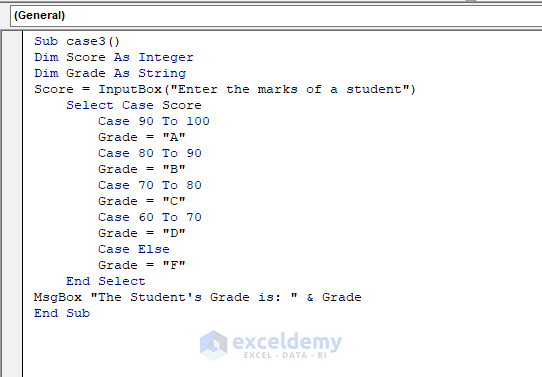
Sub case3()

Dim Score As Integer
Dim Grade As String
Score = InputBox("Enter the marks of a student")

Select Case Score

Case 90 To 100
Grade = "A"

Case 80 To 90
Grade = "B"

Case 70 To 80
Grade = "C"

Case 60 To 70
Grade = "D"

Case Else
Grade = "F"

End Select

MsgBox "The Student's Grade is: " & Grade

End Sub
Here, we have declared Score as Integer and Grade as String, and for different ranges of marks we have defined different cases, which will return different grades depending on our given input number. For declaring ranges we have used the TO operator, as in Case 90 To 100.
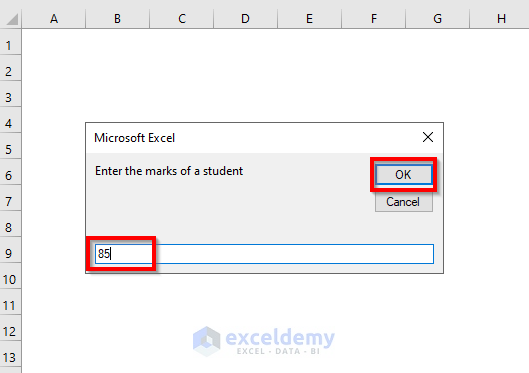
- Press F5.
- Enter the marks of a student (here, we have used 85) in the input box that opens.
- Click OK.
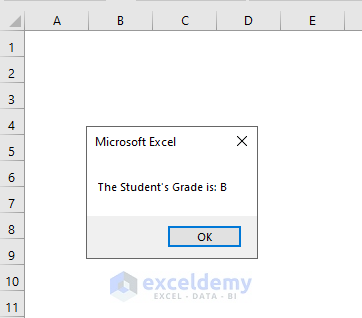
We get a message box saying “The student’s Grade is: B”.
Example 4 – Using VBA Case Statement with IS Keyword for Comparing Values
To perform the task in Example 3, we can use the IS keyword instead of the TO operator.
Steps:
- Follow the Steps of Example 1 to open a new module window.
- Enter the following code:
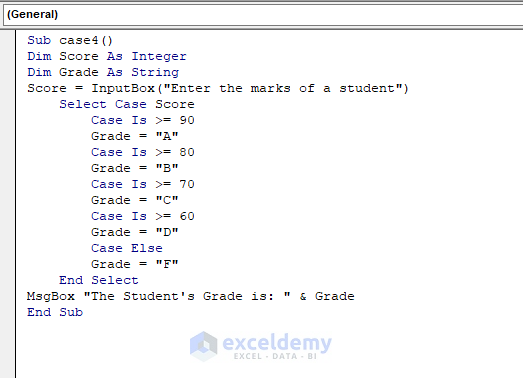
Sub case4()

Dim Score As Integer
Dim Grade As String
Score = InputBox("Enter the marks of a student")

Select Case Score

Case Is >= 90
Grade = "A"

Case Is >= 80
Grade = "B"

Case Is >= 70
Grade = "C"

Case Is >= 60
Grade = "D"

Case Else
Grade = "F"

End Select

MsgBox "The Student's Grade is: " & Grade

End Sub
Here, we have declared Score as Integer and Grade as String, and for different ranges of marks we have defined different cases, which will return different grades depending on our given input number. For declaring ranges we have used the IS keyword, as in Case Is >= 90.
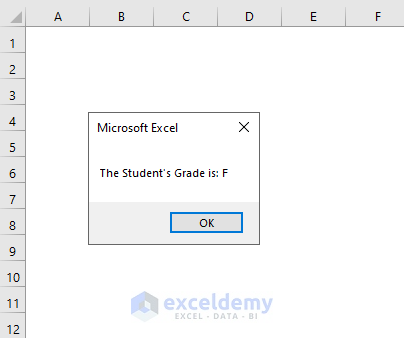
- Press F5.
- Into the input box that appears, enter the marks of a student (here, we have used 50).
- Click OK.
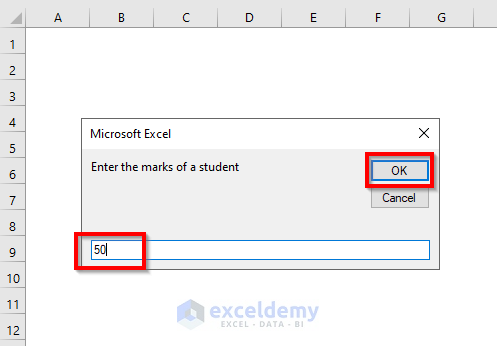
A message box appears saying “The student’s Grade is: F”.
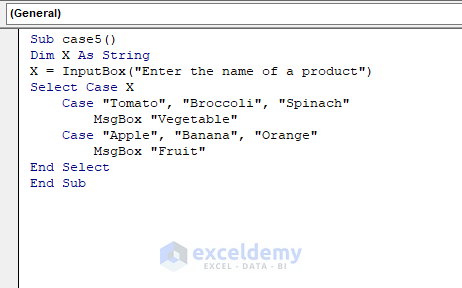
Example 5 – Using VBA Case Statement for Checking for an Exact Match of Texts
Steps:
- Follow the Steps of Example 1 to open a new module window.
- Enter the following code:
Sub case5()

Dim X As String
X = InputBox("Enter the name of a product")

Select Case X

Case "Tomato", "Broccoli", "Spinach"
MsgBox "Vegetable"

Case "Apple", "Banana", "Orange"
MsgBox "Fruit"

End Select

End Sub
Here, we have declared X as String and X will be assigned to a value which we will enter as an input. For vegetables we have created a case that will return a message box saying “Vegetable“, and for fruits another case which will show “Fruit” in the message box.
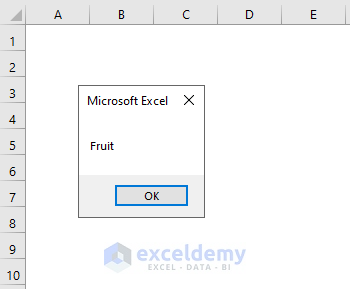
- Press F5.
- Enter Orange in the input box that opens (note – the function is case-sensitive, so “orange” or “ORANGE” will not return the desired result).
- Click OK.
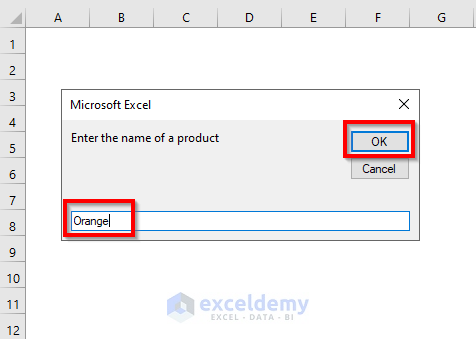
A message box saying “Fruit” is returned.
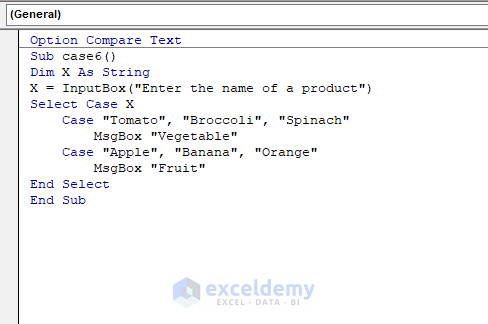
Example 6 – Using VBA Case Statement for Case Insensitive Texts
Steps:
- Follow the Steps of Example 1 to open a new module window.
- Enter the following code:
Option Compare Text

Sub case6()

Dim X As String
X = InputBox("Enter the name of a product")

Select Case X

Case "Tomato", "Broccoli", "Spinach"
MsgBox "Vegetable"

Case "Apple", "Banana", "Orange"
MsgBox "Fruit"

End Select

End Sub
Here, we have used Option Compare Text to enable matching the input in any case format, and then we have declared X as String where X will be assigned to a value which we will enter as an input. We have created a case for vegetables that will return a message box saying “Vegetable“, and another for fruits which will show “Fruit” in the message box.
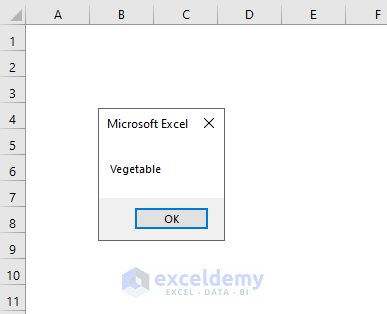
- Press F5.
- Enter broccoli in the input box.
- Click OK.

Returned is a message box saying “Vegetable”.
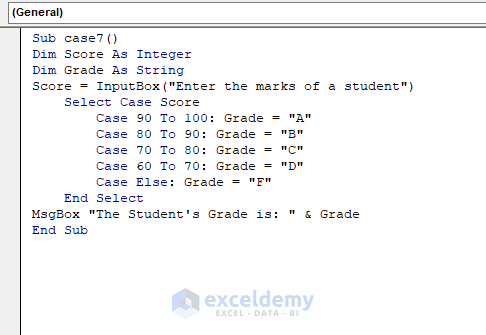
Example 7 – Using VBA Case Statement with Colon Operator
The Colon operator, when applied with the CASE statement, is used for defining different ranges of numbers.
Steps:
- Follow the Steps of Example 1 to open a new module window.
- Enter the following code:
Sub case7()

Dim Score As Integer
Dim Grade As String
Score = InputBox("Enter the marks of a student")

Select Case Score

Case 90 To 100: Grade = "A"

Case 80 To 90: Grade = "B"

Case 70 To 80: Grade = "C"

Case 60 To 70: Grade = "D"

Case Else: Grade = "F"

End Select

MsgBox "The Student's Grade is: " & Grade

End Sub
Here, we have declared Score as Integer and Grade as String, and for different ranges of marks we have defined different cases which will return different grades depending on our given input number. For declaring ranges we have used the “:” operator, as in Case 90 To 100: Grade = “A” in which the part before the “:” operator is the condition and the part after this operator will be executed when the condition becomes true.
- Press F5.
- Enter the marks of a student into the input box that appears (here, we have used 96) and click OK.
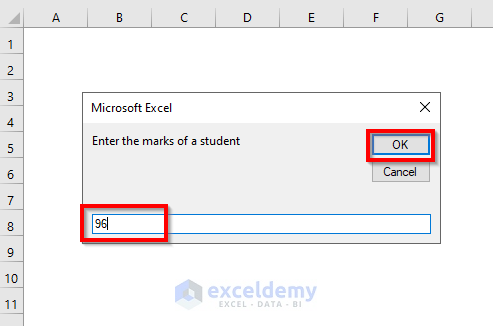
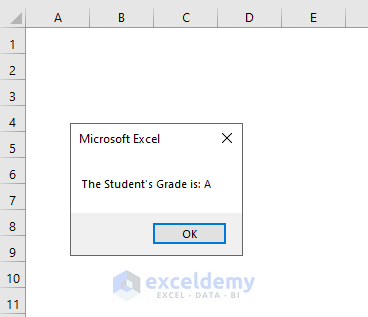
Another message box opens saying “The student’s Grade is: A”.
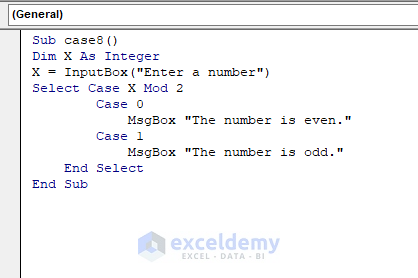
Example 8 – Using VBA Case Statement to Check If a Number Is Even or Odd
Steps:
- Follow the Steps of Example 1 to open a new module window.
- Enter the following code:
Sub case8()

Dim X As Integer
X = InputBox("Enter a number")

Select Case X Mod 2

Case 0
MsgBox "The number is even."

Case 1
MsgBox "The number is odd."

End Select

End Sub
We have declared X as Integer and it will store the value that will be input. The MOD operator will return the remainder of a division, and when the value of this remainder is 0 the number will be even otherwise it will be odd.
- Press F5.
- Enter a number into the input box that appears (here, we have used 20) and click OK.
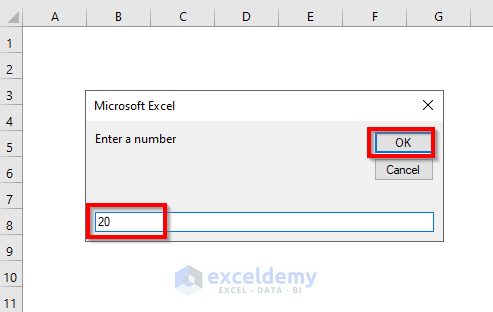
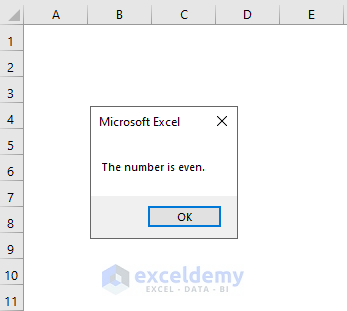
A message box appears saying “The number is even”.
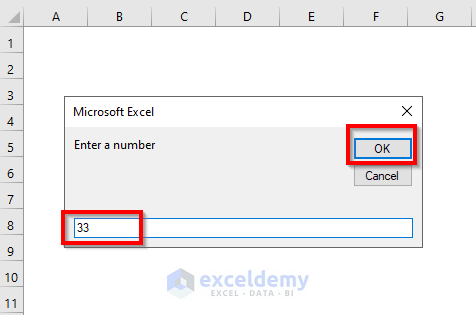
- Enter 33 and click OK.
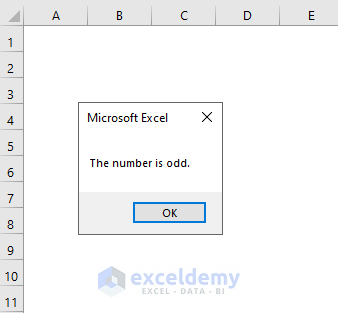
The message box now says “The number is odd”.
Example 9 – Using VBA Case Statement for Multiple Conditions
For multiple conditions, we can use nested CASE statements.
Steps:
- Follow the Steps of Example 1 to open a new module window.
- Enter the following code:
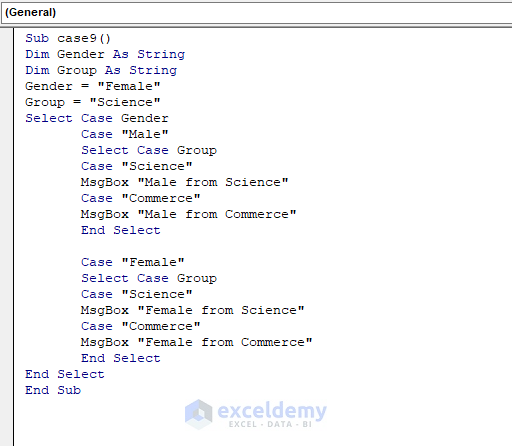
Sub case9()
Dim Gender As String
Dim Group As String
Gender = "Female"
Group = "Science"
Select Case Gender
Case "Male"
Select Case Group
Case "Science"
MsgBox "Male from Science"
Case "Commerce"
MsgBox "Male from Commerce"
End Select
Case "Female"
Select Case Group
Case "Science"
MsgBox "Female from Science"
Case "Commerce"
MsgBox "Female from Commerce"
End Select
End Select
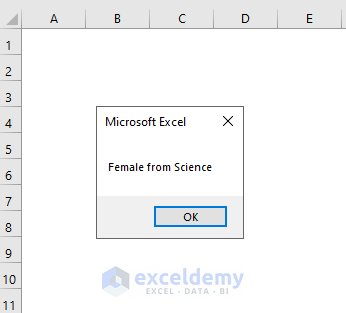
End SubHere, we declared Gender, Group as String, and set Female for Gender and Science for Group. The CASE Group is nested inside the CASE Gender.
- Press F5.
A message box appears which says “Female from Science”.
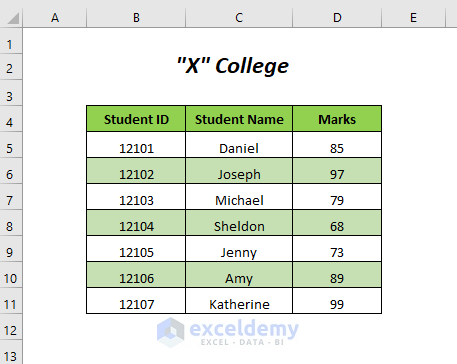
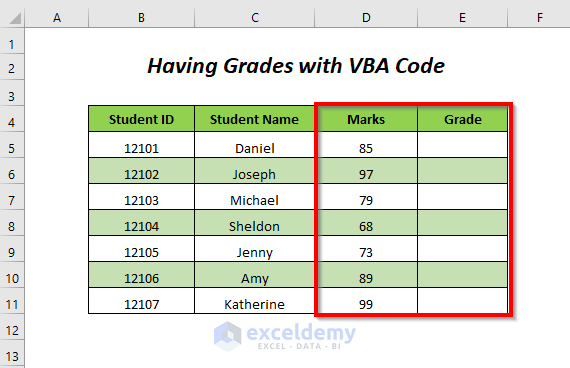
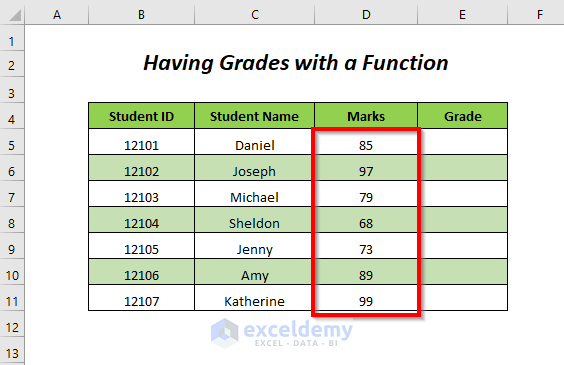
Example 10 – Using VBA Case Statement with Cell Value
In this example we will grade the marks of the students in the Marks column.
Steps:
- Follow the Steps of Example 1 to open a new module window.
- Enter the following code:
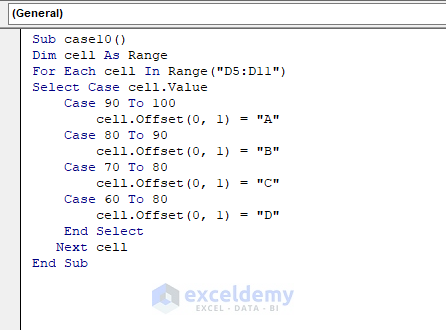
Sub case10()

Dim cell As Range

For Each cell In Range("D5:D11")

Select Case cell.Value

Case 90 To 100
cell.Offset(0, 1) = "A"

Case 80 To 90
cell.Offset(0, 1) = "B"

Case 70 To 80
cell.Offset(0, 1) = "C"

Case 60 To 80
cell.Offset(0, 1) = "D"

End Select

Next cell

End Sub
We have declared the cell as Range and used a FOR loop for the cells of the range “D5:D11”. For different ranges of marks we have defined different cases which will return different grades depending on the numbers in the range. For declaring ranges we have used the TO operator, as in Case 90 To 100, and cell.Offset(0, 1) will return the output values one column after the input column.
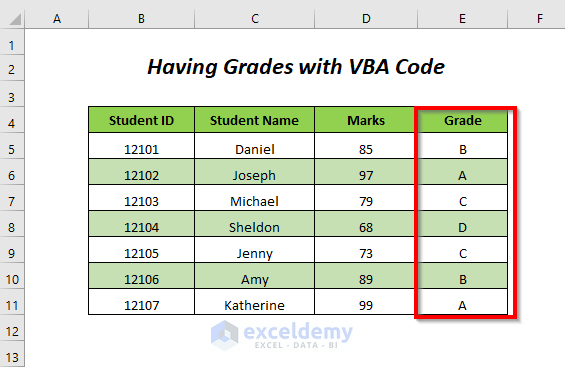
- Press F5.
The grades are returned in the Grade column.
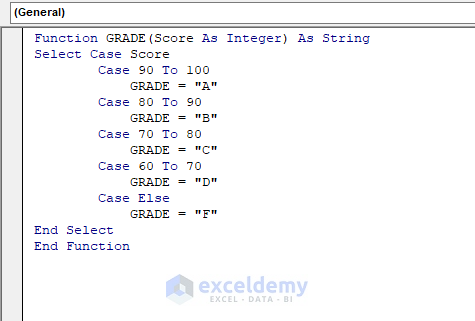
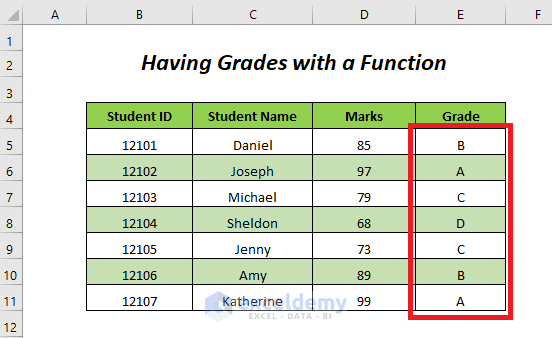
Example 11 – Using VBA Case Statement to Create a Function
Now we will grade the marks of the students in the Marks column by creating a function.
Steps:
- Follow the Steps of Example 1 to open a new module window.
- Enter the following code:
Function GRADE(Score As Integer) As String

Select Case Score

Case 90 To 100
GRADE = "A"

Case 80 To 90
GRADE = "B"

Case 70 To 80
GRADE = "C"

Case 60 To 70
GRADE = "D"

Case Else
GRADE = "F"

End Select

End Function
This code will create a function named GRADE.
For different ranges of marks, we have defined different cases which will return different grades depending on the numbers in the range, and for declaring ranges we have used the TO operator, as in Case 90 To 100.
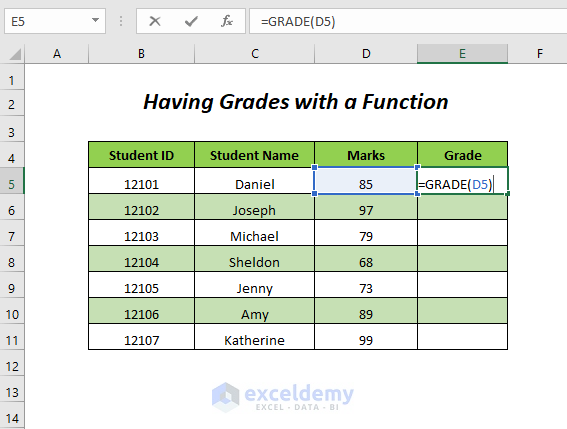
- Return to the main sheet and enter the following formula in the cell E5:
=GRADE(D5)D5 is the Mark of a student and GRADE will return the corresponding grade of this mark.
- Press ENTER and drag down the Fill Handle tool to copy the formula to the cells below.
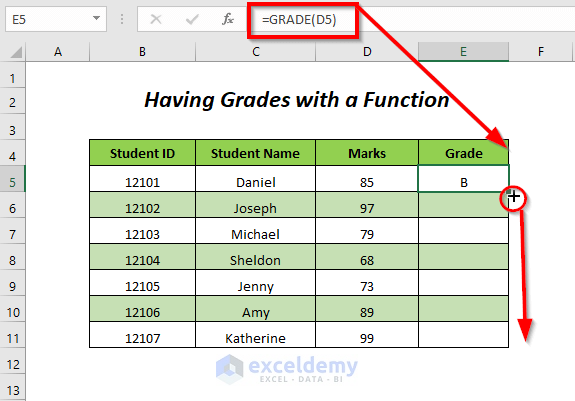
We now have the grades for all the different students in the Grade column.
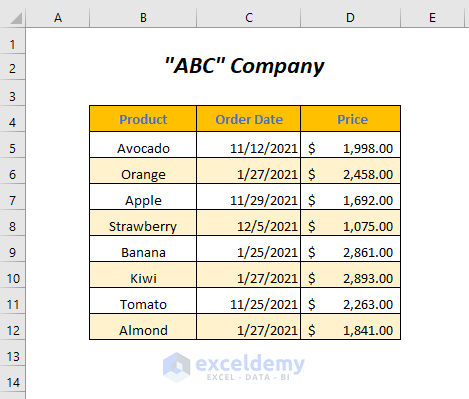
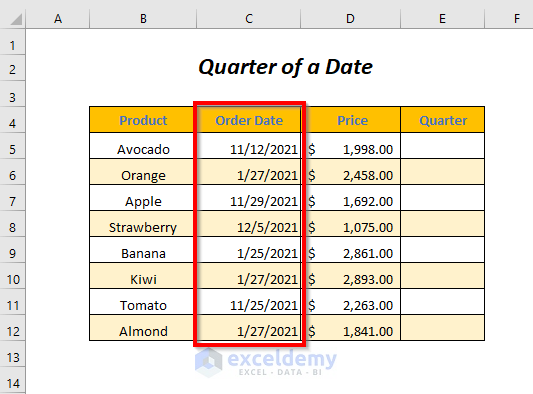
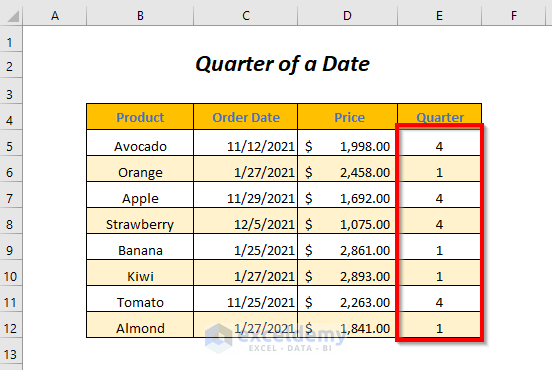
Example 12 – Using VBA Case Statement for Dates
Suppose we want to know in which quarter of the year the dates in the Order Dates fall. We can do this by creating a function with VBA code.
Steps:
- Follow the Steps of Example 1 to open a new module window.
- Enter the following code:
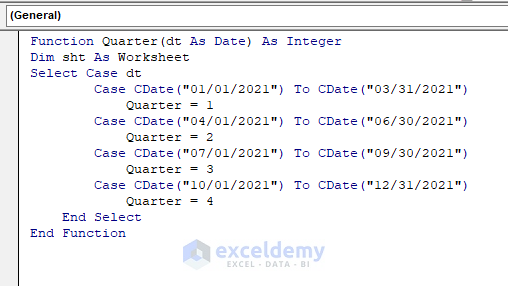
Function Quarter(dt As Date) As Integer

Dim sht As Worksheet

Select Case dt

Case CDate("01/01/2021") To CDate("03/31/2021")
Quarter = 1

Case CDate("04/01/2021") To CDate("06/30/2021")
Quarter = 2

Case CDate("07/01/2021") To CDate("09/30/2021")
Quarter = 3

Case CDate("10/01/2021") To CDate("12/31/2021")
Quarter = 4

End Select

End Function
This code will create a function named Quarter where we have used 4 CASE statements defining the ranges of dates for the 4 quarters of the year 2021.
- Return to the main sheet and type the following formula in the cell E5:
=Quarter(C5)C5 is the Order Date, and Quarter will return a value depending on which quarter of the year this date falls into.
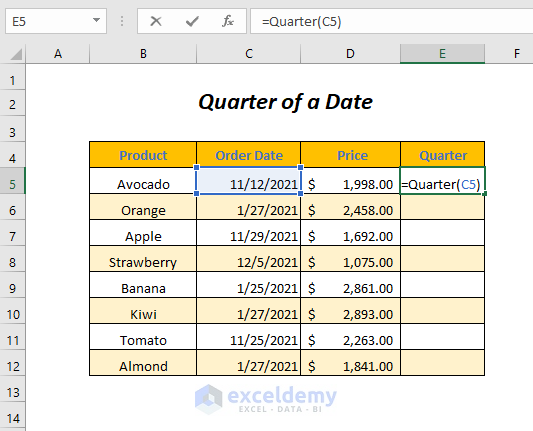
- Press ENTER and drag down the Fill Handle tool.
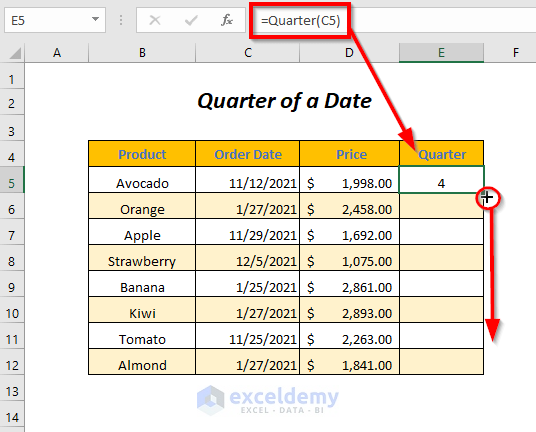
The quarter numbers of the Order Dates are filled.
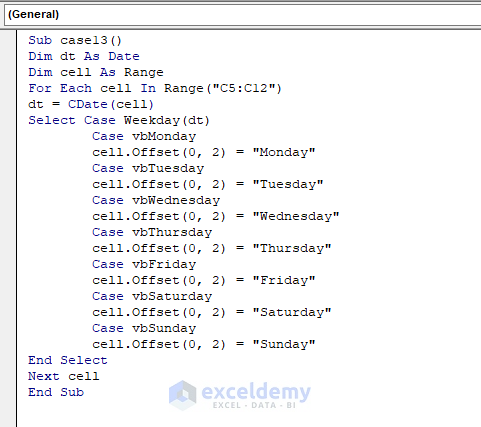
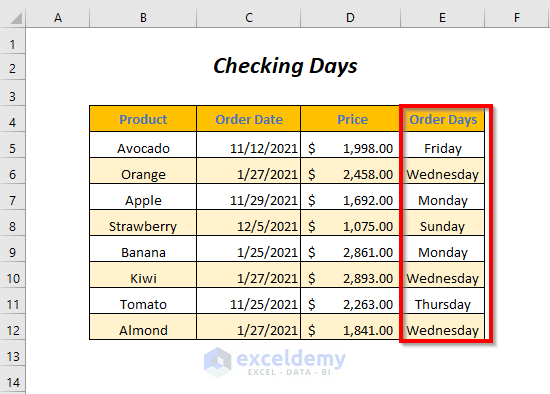
Example 13 – Using VBA Case Statement to Check Days
Using the VBA CASE statement, we will define the days of the corresponding Order Dates.

Steps:
- Follow the Steps of Example 1 to open a new module window.
- Enter the following code:
Sub case13()

Dim dt As Date
Dim cell As Range

For Each cell In Range("C5:C12")

dt = CDate(cell)

Select Case Weekday(dt)

Case vbMonday
cell.Offset(0, 2) = "Monday"

Case vbTuesday
cell.Offset(0, 2) = "Tuesday"

Case vbWednesday
cell.Offset(0, 2) = "Wednesday"

Case vbThursday
cell.Offset(0, 2) = "Thursday"

Case vbFriday
cell.Offset(0, 2) = "Friday"

Case vbSaturday
cell.Offset(0, 2) = "Saturday"

Case vbSunday
cell.Offset(0, 2) = "Sunday"

End Select

Next cell

End Sub
Here, we have declared dt, cell as Date, Range and used a FOR loop on the cells of the range “C5:C12”. For the seven days of a week, we have set seven conditions with CASE statements, and cell.Offset(0, 2) will return the output values two columns after the input column.
- Press F5.
The Order Days for the different Order Dates are filled in the Order Days column.
Case Statement vs IF-THEN-ELSE Statement
For testing multiple conditions, it is easier to write a code using the CASE statement rather than the IF-ELSE-THEN statement.
Consider the following two functions:
Sub casevsif()

Dim x As Integer
x = CInt(InputBox("Give any Integer Value"))

Select Case x

Case 10
MsgBox "The number is 10"

Case 20
MsgBox "The number is between 20"

Case Else
MsgBox "The number is not in between 10 to 20"

End Select

End Sub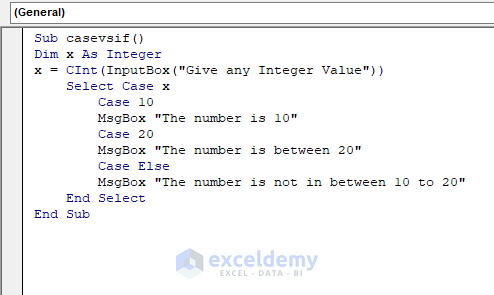
Sub casevsif1()

Dim x As Integer
x = CInt(InputBox("Give any Integer Value"))

If x = 10 Then
MsgBox "The number is 10"
End If

If x = 20 Then
MsgBox "The number is 20"

Else
MsgBox "The number is not in between 10 to 20"

End If

End Sub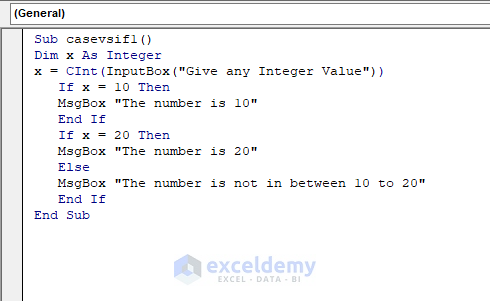
These two codes will give the same results, but the CASE statement is simpler than the IF-THEN-ELSE statement, particularly if changes to the conditions need to be made later.
Download Workbook
Related Articles
- Excel VBA to Exit Select Case
- How to Use Excel VBA Select Case and Operator
- Excel VBA Select Case Like

