Indenting twice the data refers to adding a double gap at the start of a cell’s content. Indentation makes it easier to read and understand long documents. By default, Excel aligns all the texts to the left. You can add extra spacing using the space bar, but this is time-consuming, and you may forget how many spaces to use for the indentation. So instead, you can use Excel’s features to save time and effort while achieving uniform indentation in your document.
In this Excel tutorial, you will learn to indent twice the data in Excel.
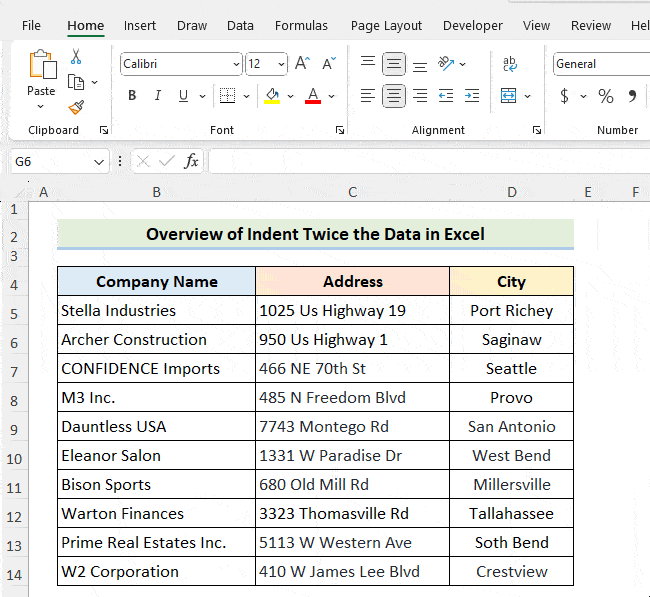
Consider a clientele dataset with company names, addresses, and cities. As you can see in the below GIF, we have indented the data twice.
There are 2 methods to indent the data twice in Excel:
1. Using Increase Indent Command
By using the Increase Indent command, you can easily indent data in Excel. You will find this indent command in the Alignment group of the Home tab. The Alignment group allows you to control how texts are displayed horizontally or vertically in Excel cells.
To indent twice the data in Excel, follow the steps below:
- Select your data.
Here, we have selected range B5:C14. - Go to the Alignment group.
- Click on the Increase Indent command twice.
 Finally, the result should look like the picture shown below.

Note: Press the Alt + H + 6 keys to increase the indent. This shortcut is the same as the Increase Indent command.
2. Using Format Cells Dialog Box
Another way to indent the data twice in Excel is to use the Format Cells dialog box. The advantage of this approach is that it allows you to set the indent number according to your preference. Here is how:
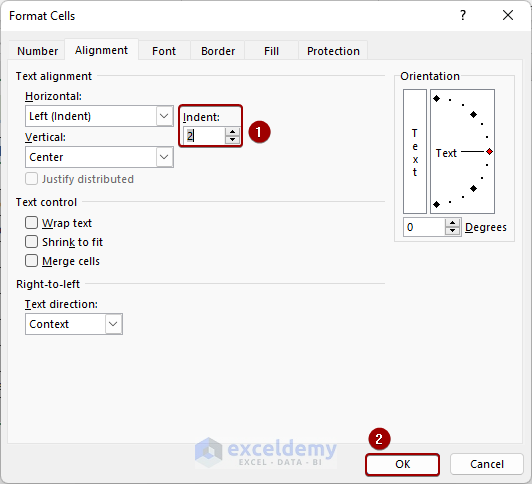
- Select your data and click the Alignment Settings arrow. Or, press the CTRL + 1 keys.

- As a result, the Format Cells dialog box appears.
- Now, from the Alignment tab, enter 2 in the Indent field since we want to indent twice.
- Click the OK command.
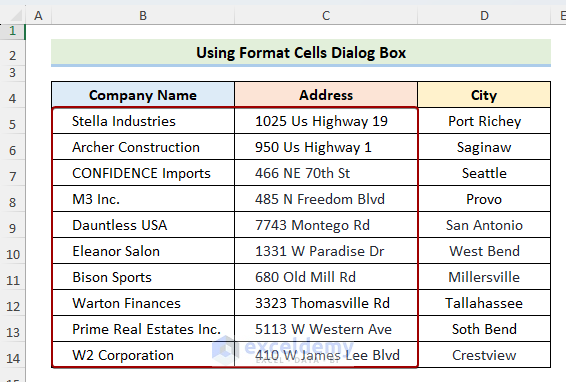
 Finally, you will be able to indent your data twice.
Note: You can also use the Space Bar to manually indent any place in Excel cells. To increase the indent, double-click on a cell to get into editing mode, then press the Space Bar as often as you like. Additionally, you can use the Space Bar key and Alt + Enter to indent the second line of a cell.
Read More: How to Indent Second Line in Excel Cell
Download Practice Workbook
You can download the practice workbook from the link below.
Conclusion
This article explained how to indent the data twice in Excel using quick and easy ways. You can use the Increase Indent command or the Format Cells dialog box to indent twice in Excel. Moreover, you can indent in an Excel cell manually.
Feel free to share your insights, suggestions, and queries in the comment section.
Frequently Asked Questions
How do I remove indents in Excel?
To remove indents in Excel, follow the steps: Select your range > Alignment group> Decrease Indent command. Or, simply press the Alt + H + 5 keys.
Will indenting affect the data in Excel cells?
No, indenting only changes the visual appearance of the data by adjusting its alignment. It does not modify the actual content of the cells.
Related Articles
<< Go Back to Indentation in Excel | Excel Cell Format | Learn Excel
Get FREE Advanced Excel Exercises with Solutions!
