Excel VBA provides various methods to wrap text in cells, ranges, and entire worksheets. Knowing these methods can help you customize the appearance of your data and improve the readability of your spreadsheets. In this article, we will explore the different ways of using Excel VBA to Wrap Text.
We’ll cover examples of wrapping text in a cell, in different ranges, in an entire worksheet, and an entire workbook. Plus 2 different methods for disabling wrap text; in a cell and an entire worksheet.
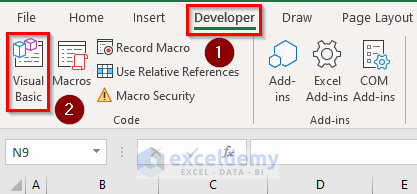
How to Launch Visual Basic Editor in Excel
To launch the Visual Basic Editor, click on Visual Basic under the Developer tab.
Then, Insert a Module, in which we write the code. This process must be repeated for each new Macro.
If you are using VBA for the first time, you may need to enable the Developer tab inside the ribbon in Excel.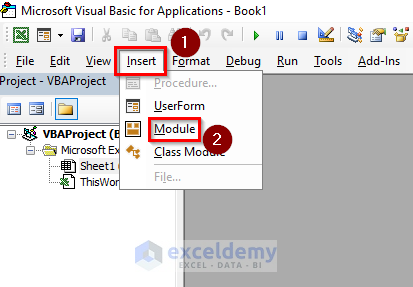
Excel VBA to Wrap Text: 3 Practical Examples
We can use the Wrap Text feature to wrap text in Excel cells. But VBA can simplify and automate the task. Here are some some practical examples.
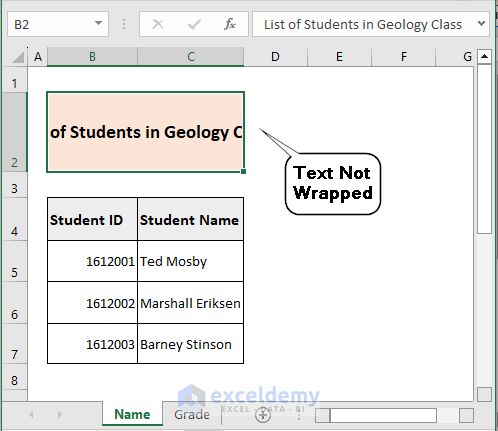
Example 1 – Wrap Text in a Cell Using VBA
Consider the following data table, where the title is unwrapped.
We can wrap the text inside the title cell using the following code:
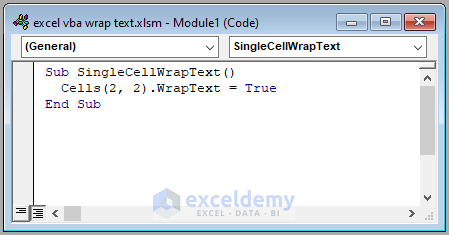
Code Syntax:
Sub SingleCellWrapText()
  Cells(2, 2).WrapText = True
End Sub
Code Breakdown:
Sub SingleCellWrapText()- Begins the VBA sub-routine and provides it with the name “SingleCellWrapText“.
Cells(2, 2).WrapText = True- Specifies the cell to be wrapped by using the Cells method and sets the WrapText property to True. In this case, it refers to cell B2 (2nd row, 2nd column) of the active worksheet.
End Sub- Ends the sub-routine.
After entering the code inside the module, run it by pressing F5. The text inside cell B2 will be wrapped.

Example 2 – Wrap Text in a Range of Cells
There are several ways to apply the wrap text feature inside a range of cells.
2.1 – Using UsedRange in the Active Sheet
Consider the following data table, where no cell inside the data table is wrapped.
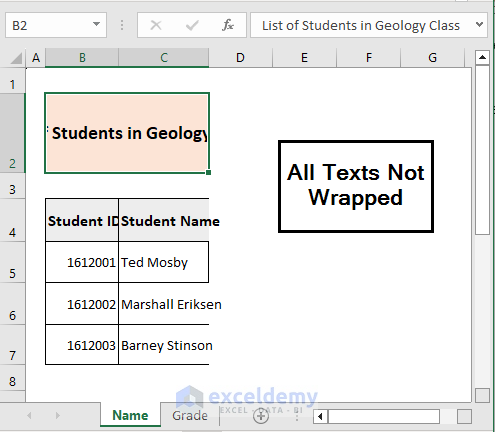
We can wrap the text in the used range of cells using the following code:
Code Syntax:
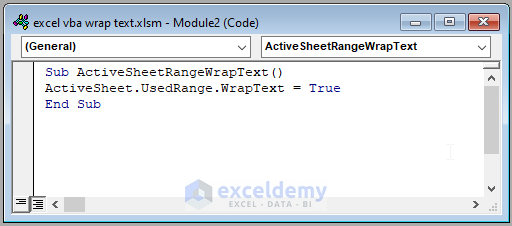
Sub ActiveSheetRangeWrapText()
ActiveSheet.UsedRange.WrapText = True
End Sub
Code Breakdown:
Sub ActiveSheetRangeWrapText()- Begins the VBA sub-routine and provides it with the name “ActiveSheetRangeWrapText“.
UsedRange.WrapText = True- Wraps the text of all the cells within the used range of the active worksheet. It first identifies the active worksheet using the ActiveSheet property, then accesses the used range of the worksheet using the UsedRange property, and finally sets the WrapText property to True for all the cells within that range.
End Sub- Ends the sub-routine.
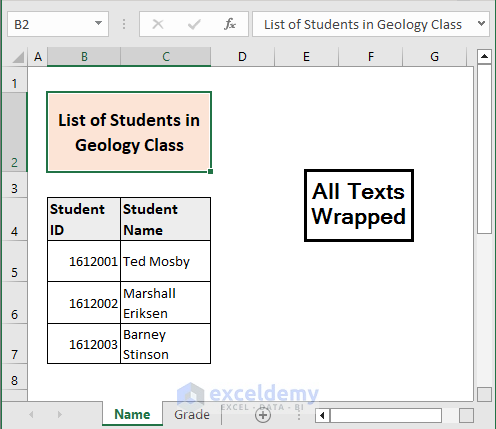
After running the code, all the text inside the used range of cells will be wrapped.
2.2 – Using UsedRange in a Specific Sheet
Here we will carry out the same task, but instead of wrapping text in the active sheet, we’ll wrap the text in the used range of cells inside a selected worksheet.
Consider the following data table, where again no cell inside the data table is wrapped.

Now we’ll wrap the text in the used range of cells in this specific worksheet using the following code:
Code Syntax:
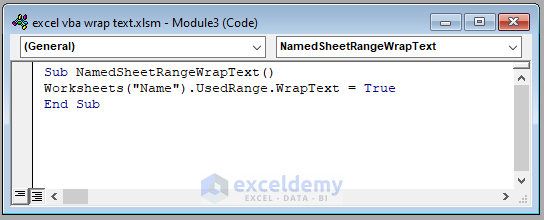
Sub NamedSheetRangeWrapText()
Worksheets("Name").UsedRange.WrapText = True
End Sub
Code Breakdown:
Sub NamedSheetRangeWrapText()- Begins the VBA sub-routine and provides it with the name “NamedSheetRangeWrapText“.
Worksheets("Name").UsedRange.WrapText = True- Wraps the text of all the cells within the used range of a specific worksheet named “Name“. It first identifies the worksheet using the Worksheets property and the name of the worksheet in quotes, then accesses the used range of the worksheet using the UsedRange property, and finally sets the WrapText property to True for all the cells within that range.
End Sub- Ends the sub-routine.
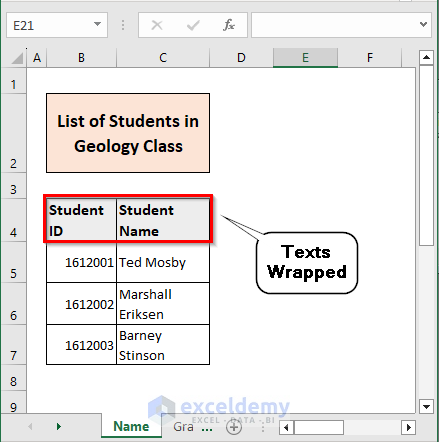
After running the code, all the text in the used range of cells in the sheet named “Name” will be wrapped.
2.3 – Wrapping Text in Specific Range
Now, let’s wrap text inside a specific range of cells.
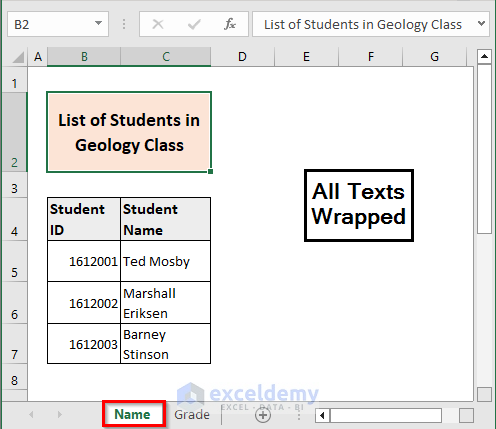
Consider the following data table, where no cell inside the range B2:C4 is wrapped.
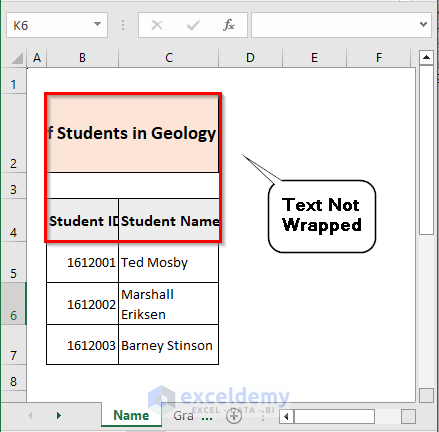
We’ll wrap text inside the range B2:C4 using the following code:
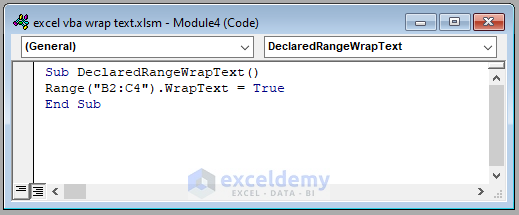
Code Syntax:
Sub DeclaredRangeWrapText()
Range("B2:C4").WrapText = True
End Sub
Code Breakdown:
Sub DeclaredRangeWrapText()- Begins the VBA sub-routine and provides it with the name “DeclaredRangeWrapText“.
Range("B2:C4").WrapText = True- Wraps the text of all the cells within a specific range of cells. It first identifies the range of cells using the Range property and the cell range in quotes, then sets the WrapText property to True for all the cells within that range.
End Sub- Ends the sub-routine.
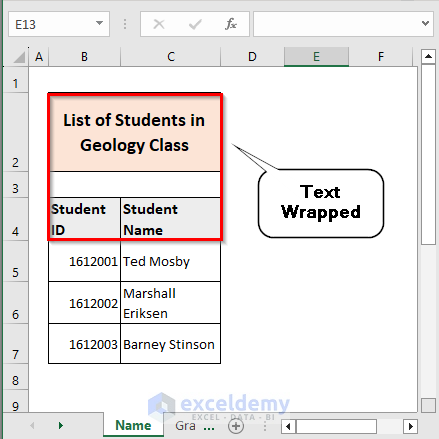
After running the code, all the text in the range B2:C4 will be wrapped.
2.4 – Wrapping Text in a Discontinuous Range
In this case, we will be wrapping text inside a discontinuous range of cells.
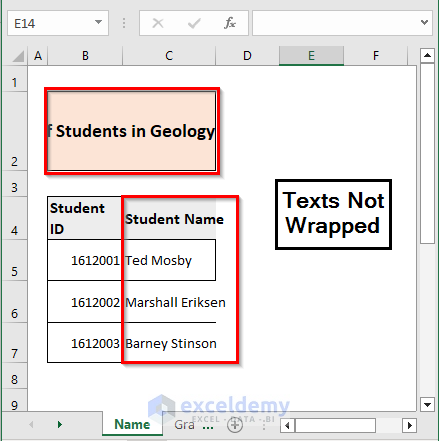
Consider the following data table, where the cells B2, C4, C5, C6, and C7 are not wrapped.
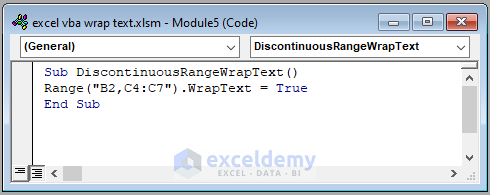
We’ll wrap text inside the discontinuous range B2 and C4:C7 using the following code:
Code Syntax:
Sub DiscontinuousRangeWrapText()
Range("B2,C4:C7").WrapText = True
End Sub
Code Breakdown:
Sub DiscontinuousRangeWrapText()- Begins the VBA sub-routine and provides it with the name “DiscontinuousRangeWrapText“.
Range("B2,C4:C7").WrapText = True- Wraps the text of cells within a discontinuous range of cells. It first identifies the range of cells using the Range property and specifies two separate cell ranges, “B2” and “C4:C7“, separated by a comma. The WrapText property is then set to True for all the cells in those ranges.
End Sub- Ends the sub-routine.
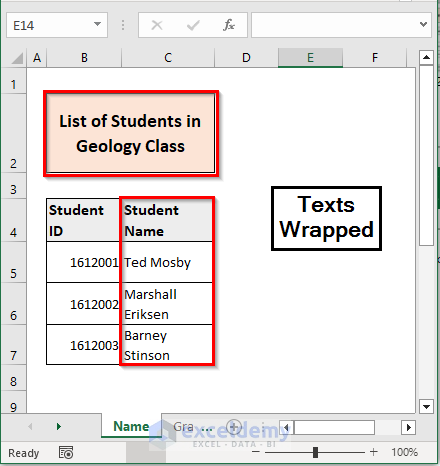
After running the code, all the text in the range B2 and C4:C7 will be wrapped.
Example 3 – Wrap Text in an Entire Worksheet
Now, instead of wrapping text in a cell or range, we’ll wrap text inside an entire worksheet or worksheets.
3.1 – Wrapping Text in the Active Sheet
Consider the following data table, where the cells are not wrapped.
We’ll wrap the text in the ActiveSheet using the following code:
Code Syntax:
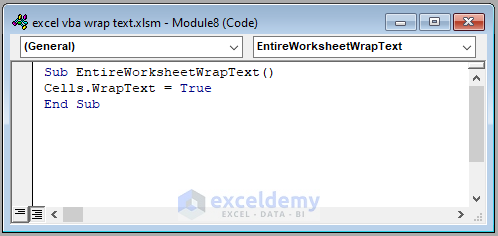
Sub EntireWorksheetWrapText()
Cells.WrapText = True
End Sub
Code Breakdown:
Sub EntireWorksheetWrapText()- Begins the VBA sub-routine and provides it with the name “EntireWorksheetWrapText“.
WrapText = True- Wraps the text in all cells in the active worksheet. The Cells property refers to all cells in the worksheet, and the WrapText property is set to True for all cells.
End Sub- Ends the sub-routine.
After running the code, all the text in the ActiveSheet will be wrapped.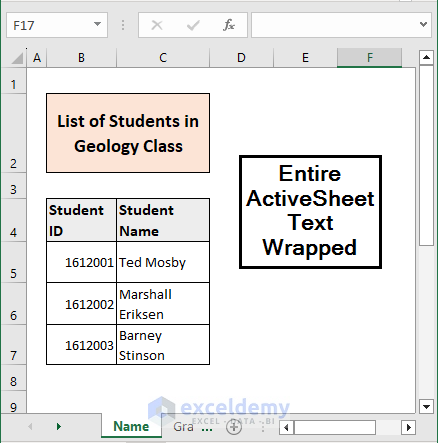
3.2 – Wrapping Text in Specific Sheet
Now we’ll wrap all the text in a specific worksheet instead of ActiveSheet.
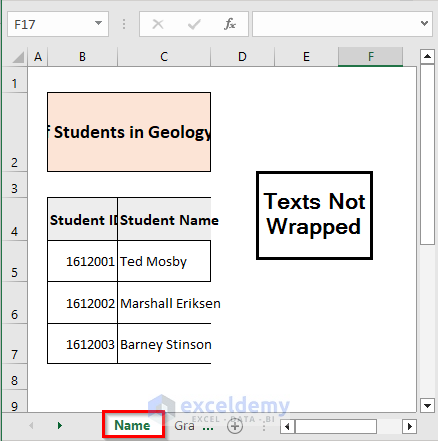
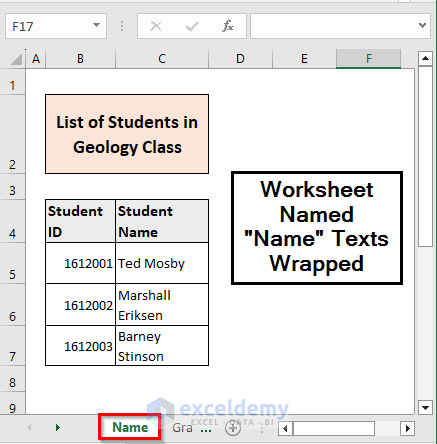
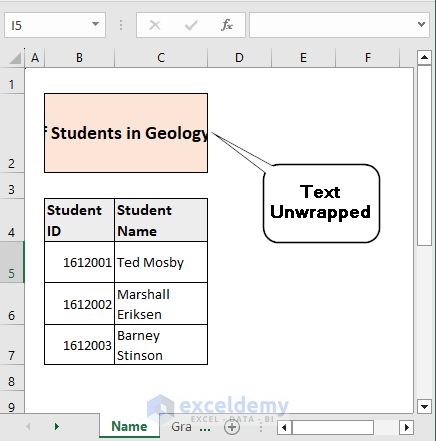
Consider the following data table in the worksheet named “Name”, where the cells are not wrapped.
We’ll wrap all the text in this sheet using the following code:
Code Syntax:
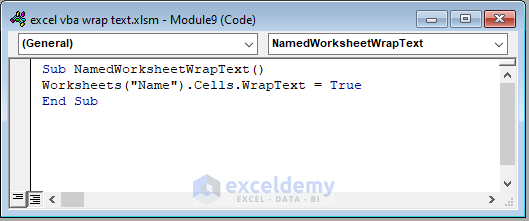
Sub NamedWorksheetWrapText()
Worksheets("Name").Cells.WrapText = True
End Sub
Code Breakdown:
Sub NamedWorksheetWrapText()- Begins the VBA sub-routine and provides it with the name “NamedWorksheetWrapText“.
Worksheets("Name").Cells.WrapText = True- Wraps the text of all cells in the worksheet named “Name“. The Worksheets property refers to all the worksheets in the workbook, and the argument “Name” specifies the name of the worksheet. The Cells property refers to all cells in the worksheet, and the WrapText property is set to True for all cells.
End Sub
- Ends the sub-routine.
After running the code, all the text in the specified worksheet will be wrapped.
3.3 – Wrapping Text in All Worksheets
Now we’ll wrap all the text inside all the worksheets present in the active workbook using the following code:
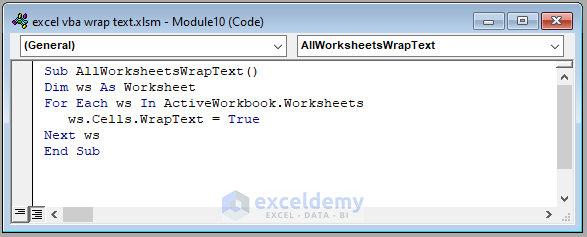
Code Syntax:
Sub AllWorksheetsWrapText()
Dim ws As Worksheet
For Each ws In ActiveWorkbook.Worksheets
ws.Cells.WrapText = True
Next ws
End Sub
Code Breakdown:
Sub AllWorksheetsWrapText()- Indicates the start of a new VBA sub-procedure named “AllWorksheetsWrapText“.
Dim ws As Worksheet- Declares a variable “ws” as a Worksheet object.
For Each ws In ActiveWorkbook.Worksheets- Initiates a loop through all the worksheets in the active workbook and assigns each worksheet to the “ws” variable in turn.
Cells.WrapText = True- Sets the WrapText property of all cells in the current worksheet (“ws“) to True, which enables text wrapping in those cells.
Next ws- Signals the end of the loop.
End Sub- Marks the end of the sub-procedure.
After running the code, all the worksheets inside the workbook will be formatted as wrap text.
How to Turn Off Wrap Text in a Cell Using Excel VBA
To turn off Wrap Text inside a single cell, enter the following code inside a module:
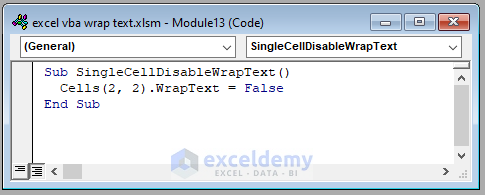
Code Syntax:
Sub SingleCellDisableWrapText ()
Cells(2, 2).WrapText = False
End Sub
Code Breakdown:
Sub SingleCellDisableWrapText()- Begins the declaration of a subroutine named “SingleCellDisableWrapText“.
Cells(2, 2).WrapText = False- Accesses the cell in the second row and second column (i.e., B2) and disables the WrapText property by setting it to False.
End Sub- Marks the end of the sub-procedure.
After running the code, the text inside cell B2 will be unwrapped.
How to Turn Off Wrap Text in an Entire Worksheet Using Excel VBA
To turn off wrap text inside an entire worksheet, enter the following code inside a module:
Code Syntax:
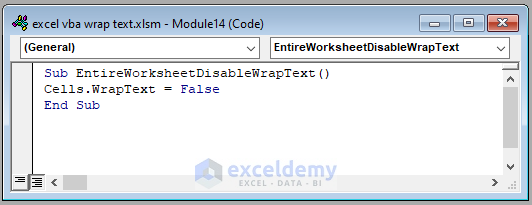
Sub EntireWorksheetDisableWrapText()
Cells.WrapText = False
End Sub
Code Breakdown:
Sub EntireWorksheetDisableWrapText()- Begins the VBA code block and declares the name of the sub-procedure.
WrapText = False- Disables Wrap Text for all cells in the active worksheet by setting the WrapText property to False.
End Sub- Marks the end of the sub-procedure.
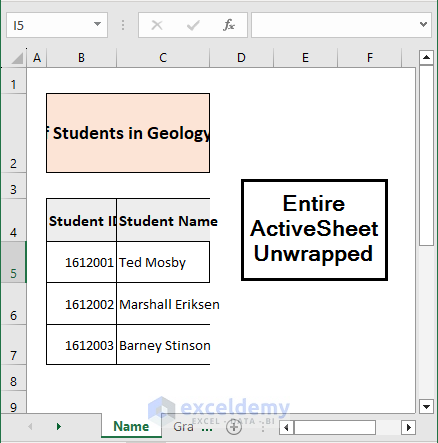
After running the code, all the cells in the ActiveSheet will be unwrapped.
How to Turn Off Wrap Text in an Entire Workbook Using Excel VBA
To turn off wrap text inside an entire workbook, that is inside all the present worksheets, enter the following code inside a module:
Code Syntax:
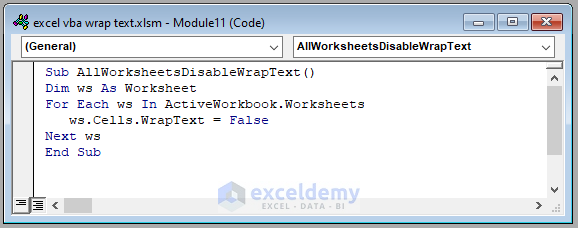
Sub AllWorksheetsDisableWrapText()
Dim ws As Worksheet
For Each ws In ActiveWorkbook.Worksheets
ws.Cells.WrapText = False
Next ws
End Sub
Code Breakdown:
Sub AllWorksheetsDisableWrapText()- Defines the name of the Subroutine.
Dim ws As Worksheet- Declares a variable ws as a Worksheet data type.
For Each ws In ActiveWorkbook.Worksheets- Starts a For Each loop to iterate through each worksheet in the ActiveWorkbook and assign each worksheet to the variable ws.
Cells.WrapText = False- Sets the WrapText property of all cells in the current worksheet (represented by the variable ws) to False.
Next ws- Ends the loop and moves to the next worksheet.
End Sub- Marks the end of the sub-procedure.
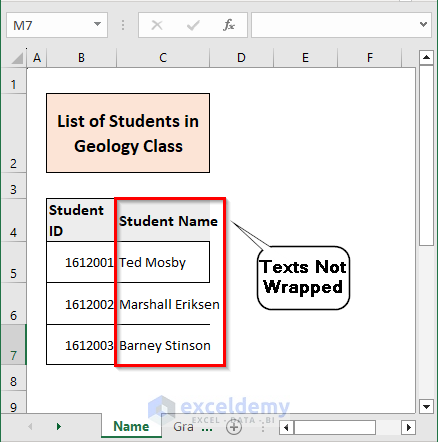
After running the code, in each of the worksheets of the workbook all the text will be unwrapped.
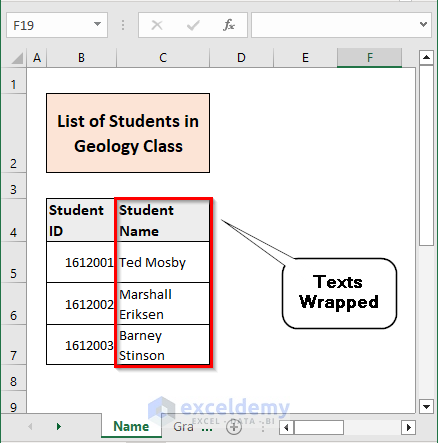
Excel VBA to Wrap Text in an Entire Column
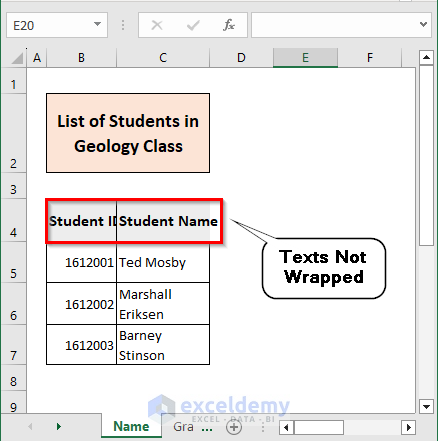
In the “Name” worksheet, the cells in column C are not wrapped.
To wrap an entire column in the data table or the worksheet, enter the following code inside a module:
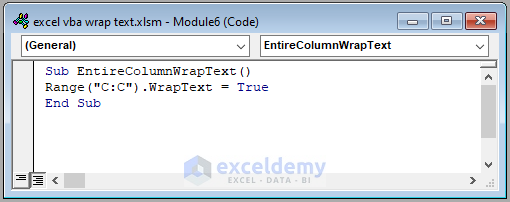
Code Syntax:
Sub EntireColumnWrapText()
Range("C:C").WrapText = True
End Sub
Code Breakdown:
Sub EntireColumnWrapText()- Begins the declaration of a new sub procedure called “EntireColumnWrapText“.
Range("C:C").WrapText = True- Sets the WrapText property to True for all cells in column C of the currently active worksheet. It achieves this by referencing the range of cells in column C using the Range method, and then setting the WrapText property of this range to True.
End Sub- Marks the end of the sub-procedure.
After running the code, all the cells in column C will be wrapped.
Excel VBA to Wrap Text in an Entire Row
In the “Name” worksheet, the cells in row 4 are not wrapped.
To wrap an entire row of the data table or the worksheet, enter the following code inside a module:
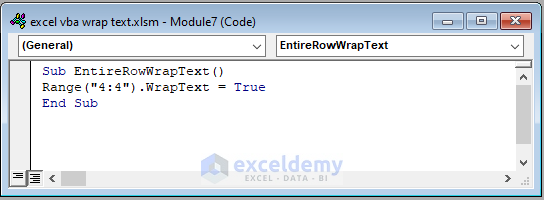
Code Syntax:
Sub EntireRowWrapText()
Range("4:4").WrapText = True
End Sub
Code Breakdown:
Sub EntireRowWrapText()- Declares the name of the subroutine that will wrap the text for the entire row.
Range("4:4").WrapText = True- Selects the fourth row and sets the WrapText property to True.
End Sub
- Marks the end of the sub-procedure.
After running the code, all the cells in Row 4 will be wrapped.
Things to Remember
- If you are wrapping text in a large range of cells, consider using the Autofit feature to adjust the column widths automatically. This can help prevent your text from being cut off or overlapping with adjacent cells.
- It is always good practice to test your code on a sample dataset before applying it to a large and important workbook.
Download Practice Workbook
Related Articles
- How to Wrap Text in Merged Cells in Excel
- How to Wrap Text across Multiple Cells without Merging in Excel
- Excel Auto Fit Row Height for Wrap Text
- How to Write a Paragraph in Excel Cell
- [Solution:] Excel Wrap Text Not Working for Merged Cell
<< Go Back to Wrap Text | Text Formatting | Learn Excel
Get FREE Advanced Excel Exercises with Solutions!
