Excel VBA provides a powerful solution for converting text to columns with multiple delimiters. By leveraging VBA macros, you can automate the process of splitting text into separate columns based on specific delimiters, making data manipulation more efficient. In this tutorial, we will guide you through various methods to effectively use Excel VBA text to columns with multiple delimiters.
In the following, you will find an overview of using Excel VBA for converting text to columns with multiple delimiters.

Excel VBA Text to Columns with Multiple Delimiters: 4 Suitable Cases
In the following, I have shared 4 cases to convert text to columns with multiple delimiters.
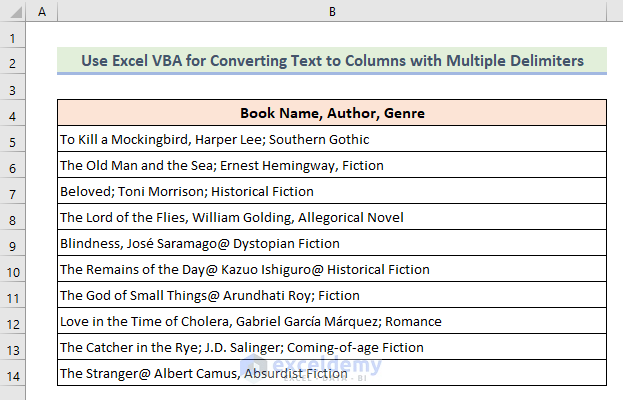
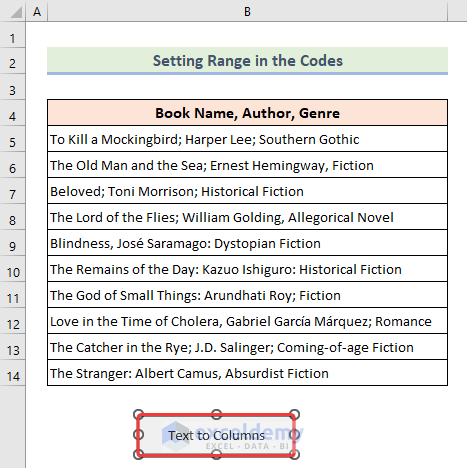
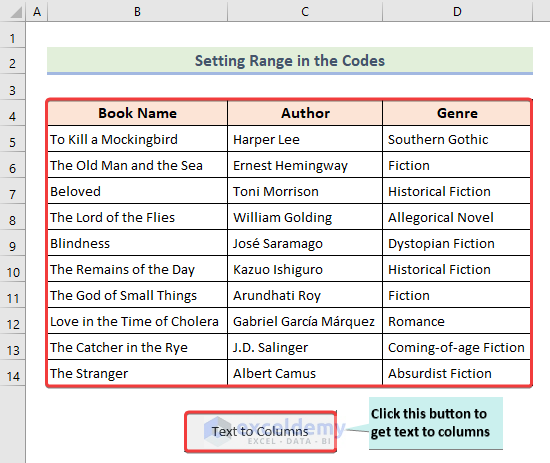
Suppose we have a dataset of some Book Name, Author, and Genre in a single column separated by multiple delimiters like comma(,), semicolon(;), commercial at(@), etc. Now we will apply the VBA code to convert text to columns. Stay tuned!
Case 1: Convert Text to Columns with Multiple Delimiters by Selecting Range Manually
In this part, we will show you a tremendous feature that allows you to split the text into separate columns based on multiple delimiters. Simply, select the desired range to transform unstructured data into structured columns, enabling more accessible analysis. This method is helpful if you want to convert text to columns for your own desired selection of data and need to change the selection frequently. You just need to choose your desired range and then run the code to convert. It’s that simple.
Steps:
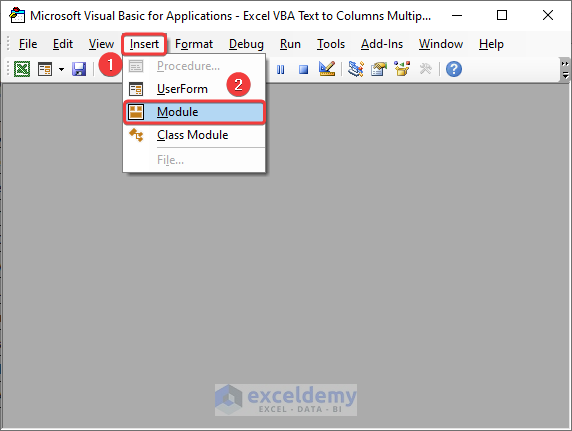
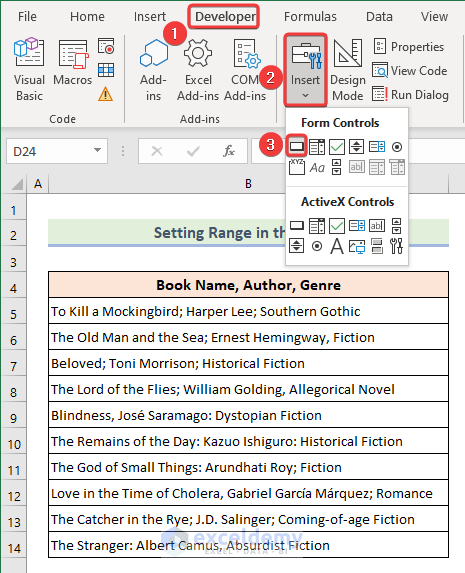
- While in the workbook visit the Visual Basic option from the Developer tab.

- After that, open a new module by clicking the Module option from the Insert tab.
- Inside the module place the following code and save it.
Sub Text_to_Columns_Manual_Selection()
Set rangeToSplit = Selection
rangeToSplit.TextToColumns _
Destination:=rangeToSplit, _
DataType:=xlDelimited, _
TextQualifier:=xlDoubleQuote, _
ConsecutiveDelimiter:=False, _
Tab:=False, _
Semicolon:=True, _
Comma:=True, _
Space:=False, _
Other:=True, _
OtherChar:="@", _
FieldInfo:=Array(Array(1, 1), Array(2, 1), Array(3, 1))
End Sub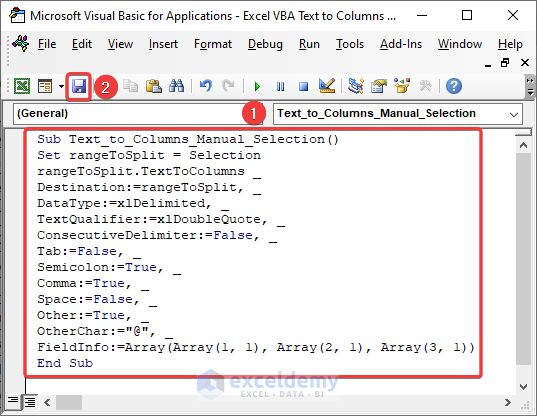
- Hence, returning to the worksheet select your desired cell range and press the F5 key to run the VBA code.

- Finally, you will get your desired text-to-column output for multiple delimiters.

Case 2: Setting Range in Codes for Converting Text to Columns with Multiple Delimiters
For working advantages, you can also set your desired cell range inside the VBA code for converting text to columns with multiple delimiters. When you have a fixed range of cells and need to change data only and you want to convert text to columns immediately then you can try the below code to work smoothly.
Steps:
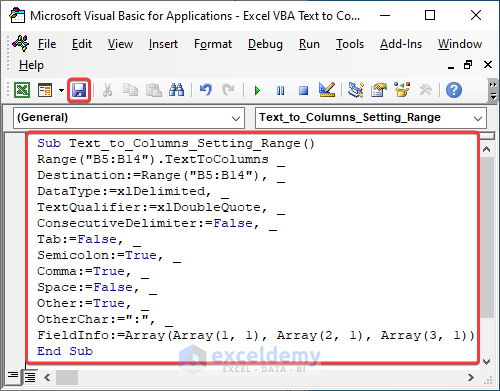
- Start with opening a module, putting the code, and saving it just like the previous method.
Sub Text_to_Columns_Setting_Range()
Range("B5:B14").TextToColumns _
Destination:=Range("B5:B14"), _
DataType:=xlDelimited, _
TextQualifier:=xlDoubleQuote, _
ConsecutiveDelimiter:=False, _
Tab:=False, _
Semicolon:=True, _
Comma:=True, _
Space:=False, _
Other:=True, _
OtherChar:=":", _
FieldInfo:=Array(Array(1, 1), Array(2, 1), Array(3, 1))
End Sub
If you want, you can change your desired input and destination range from the code.
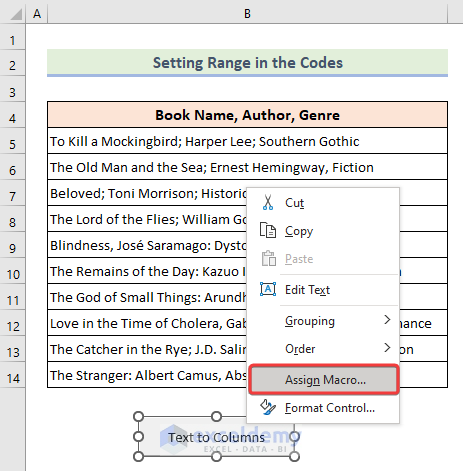
- Then, create a button for running the code by choosing a macro button from the Insert section of the Developer tab.
- Therefore, draw a button by dragging your mouse inside the worksheet and name it.
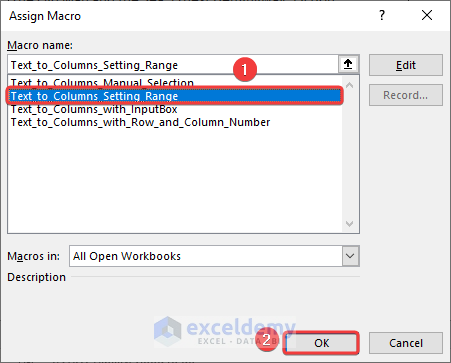
- From the advanced options after right-clicking on the button choose Assign Macro to apply a code for the created button.
- Select your saved macro code and hit OK.
- Finally, click the button and get your result converting text to columns with multiple delimiters.
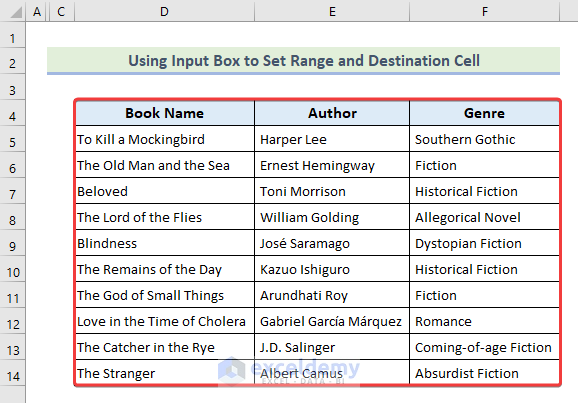
Case 3: Convert Text to Columns with Multiple Delimiters by Using InputBox
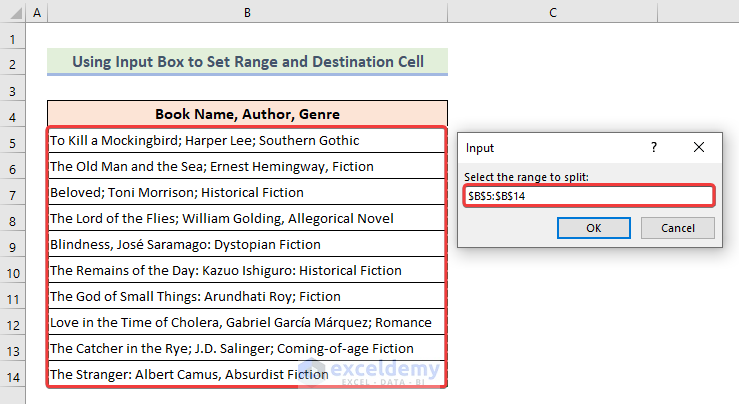
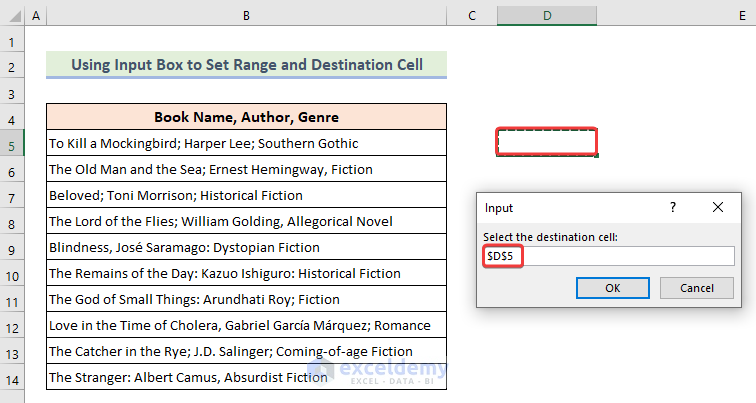
Utilizing an input box, users can dynamically select the desired range and destination cell for the converted data. In the first method, you cannot choose a destination cell for your final result. In this part, I have added an input box where you can choose your desired cell range and a destination cell for the output. Go through the steps below to learn this technique.
Steps:
- Similar to the previous method, open a module, write the following code, and run it by hitting the Run icon.
Sub Text_to_Columns_with_InputBox()
Set rangeToSplit = Application.InputBox("Select the range to split: ", Type:=8)
Set destinationCell = Application.InputBox("Select the destination cell: ", Type:=8)
rangeToSplit.TextToColumns _
Destination:=destinationCell, _
DataType:=xlDelimited, _
TextQualifier:=xlDoubleQuote, _
ConsecutiveDelimiter:=False, _
Tab:=False, _
Semicolon:=True, _
Comma:=True, _
Space:=False, _
Other:=True, _
OtherChar:=":", _
FieldInfo:=Array(Array(1, 1), Array(2, 1), Array(3, 1))
End Sub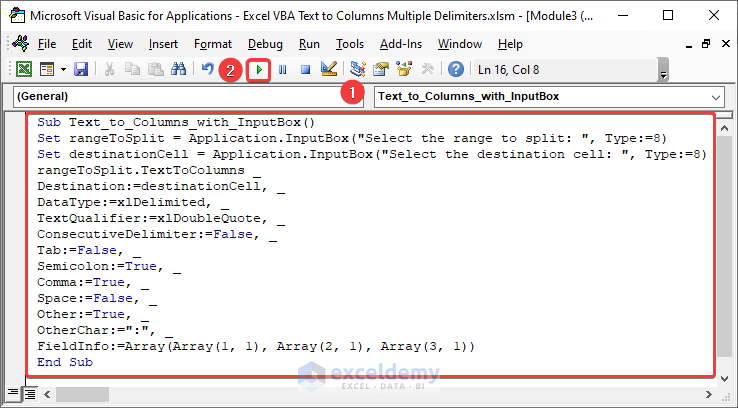
- Immediately, a MsgBox will pop up where you can select your desired cell range.
- After selecting click OK.
- Then, another MsgBox will ask for the cell location where you want to put your final result.
- Choose your own choice of cell and press OK.
- As a result, we have successfully converted text to columns with multiple delimiters.
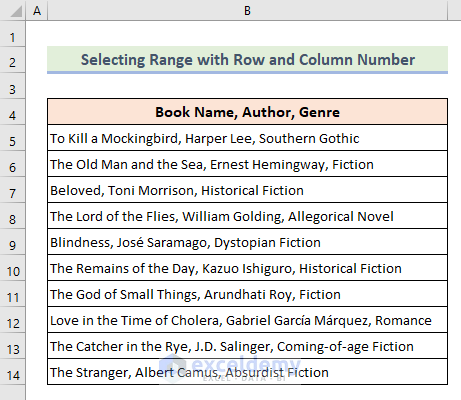
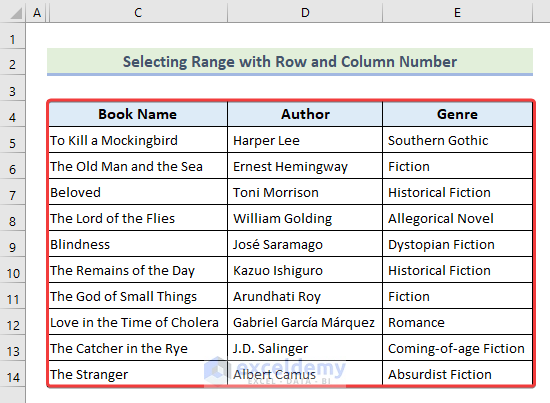
Case 4: Selecting Range for Converting Text to Columns with Multiple Delimiters
If you are looking for a simple way to convert your text to columns for only one type of delimiter then you are at the right place. In this part, we will show you a simple code for only one delimiter(,) placed into multiple locations. Here we have used the Split function to split text into columns. In addition, you can choose your input and destination cell by using row and column numbers inside the code directly.
Suppose we have a dataset with some Book Name, Author, and Genre separated with a comma (,). Now we will convert text to columns using VBA code.
Steps:
- In the same fashion, open a module, put the below code, and run it by hitting the F5 key from the keyboard.
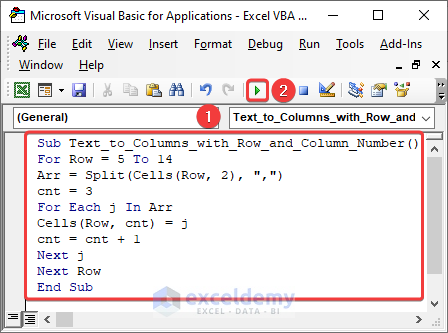
Sub Text_to_Columns_with_Row_and_Column_Number()
For Row = 5 To 14
Arr = Split(Cells(Row, 2), ",")
cnt = 3
For Each j In Arr
Cells(Row, cnt) = j
cnt = cnt + 1
Next j
Next Row
End Sub
In the following, I have split cells starting from rows number 5 to 14. You can change the numbers for your desired brown and column number.
- In conclusion, you will get your text into columns separated with multiple delimiters. Simple isn’t it? We hid the input range to show the output clearly.
Things to Remember
- While determining the delimiter make sure you have a clear understanding of the delimiter present in the text.
- Before manipulating data it’s always a good practice to create a backup of the original data.
Frequently Asked Questions
- Can I convert text to columns with multiple delimiters using Excel’s built-in features?
Excel’s standard “Text to Columns” feature allows you to split data based on a single delimiter. However, for multiple delimiters, you would need to use a VBA macro to achieve the desired result.
- How do I specify multiple delimiters in VBA?
To specify multiple delimiters, you can use the “|” (pipe) character to separate the delimiters within the Split function.
- Can I undo the text-to-column conversion performed using VBA?
Unfortunately, there is no direct undo functionality for VBA code. Once the text-to-column conversion is performed using VBA, it cannot be undone using the typical undo command (Ctrl+Z).
Download Practice Workbook
You can download our practice workbook from here for free!
Conclusion
In conclusion, Excel VBA provides a robust solution for converting text to columns with multiple delimiters. With the proper utilization of appropriate coding techniques, you can automate and customize the process. This empowers you to efficiently handle complex text structures and achieve accurate column conversions in Excel. I hope this article has given you enough knowledge about Excel VBA text to columns with multiple delimiters. Take a tour of the practice workbook and download the file to practice by yourself. Please inform us in the comment section about your experience. Stay tuned and keep learning.

