In this article, we will demonstrate the use of Excel VBA to perform text to columns operations on fixed-width data types using the TextToColumns method. The video below provides an overview.
Overview of VBA TextToColumns Method
TextToColumns Syntax:
expression.TextToColumns (Destination, DataType, TextQualifier, ConsecutiveDelimiter, Tab, Semicolon, Comma, Space, Other, OtherChar, FieldInfo, DecimalSeparator, ThousandsSeparator, TrailingMinusNumbers)TextToColumns is used to split text in a range and return the split text or values in separate columns. The text can be either of delimited or fixed-width type. For the fixed-width data type, the width of each column must be set.
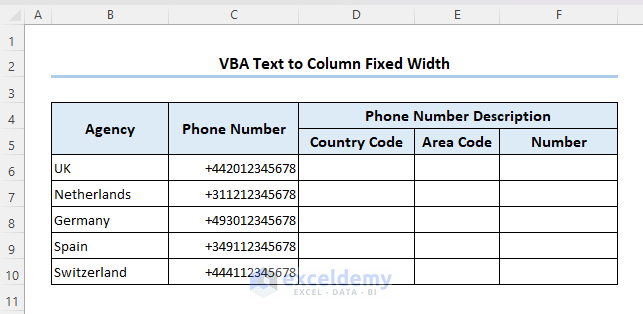
Excel VBA Text to Columns for Fixed Width: A Suitable Example
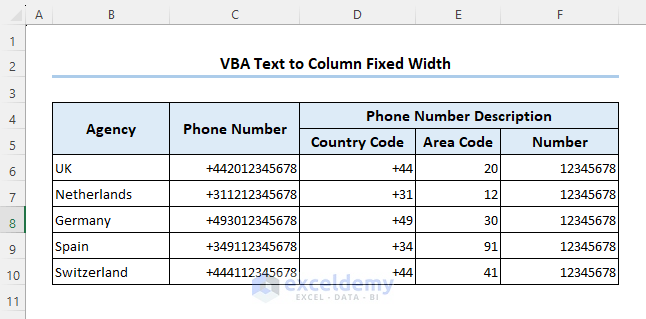
To illustrate our methods, we’ll use the following dataset, which represents some phone numbers in different countries in general form. The country code, area code, and number are all combined into one string.
Steps:
- Go to the Developer tab in the ribbon >> select the Visual Basic tab.
The Visual Basic window will open.
- Go to the Insert tab, click on Module, and paste the following code in the Module 1 section:
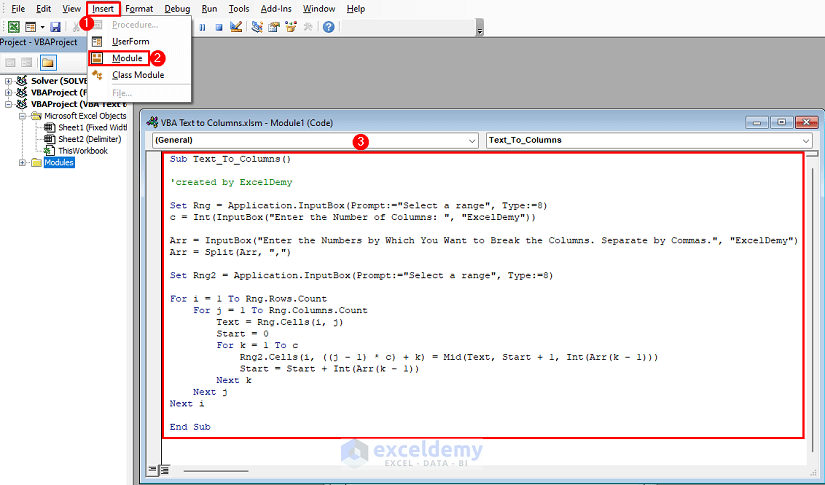
Sub Text_To_Columns()
'created by ExcelDemy
Set Rng = Application.InputBox(Prompt:="Select a range", Type:=8)
c = Int(InputBox("Enter the Number of Columns: ", "ExcelDemy"))
Arr = InputBox("Enter the Numbers by Which You Want to Break the Columns. Separate by Commas.", "ExcelDemy")
Arr = Split(Arr, ",")
Set Rng2 = Application.InputBox(Prompt:="Select a range", Type:=8)
For i = 1 To Rng.Rows.Count
    For j = 1 To Rng.Columns.Count
        Text = Rng.Cells(i, j)
        Start = 0
        For k = 1 To c
            Rng2.Cells(i, ((j - 1) * c) + k) = Mid(Text, Start + 1, Int(Arr(k - 1)))
            Start = Start + Int(Arr(k - 1))
        Next k
    Next j
Next i
End Sub
VBA Breakdown
Set Rng = Application.InputBox(Prompt:="Select a range", Type:=8) - Asks the user to choose a range of cells from the worksheet, and assigns that selection to the variable “Rng“.
c = Int(InputBox("Enter the Number of Columns: ", "ExcelDemy")) - Asks the user how many columns they want to divide the text into, and puts that value in variable “c“.
Arr = InputBox("Enter the Numbers by Which You Want to Break the Columns. Separate by Commas.", "ExcelDemy") - Asks the user to define the length of each column in a list of integers separated by commas, and assigns this value to the variable “Arr“.
Arr = Split(Arr, ",") - Divides the user’s string of numbers into an array of distinct values based on the comma using the Split function.
Set Rng2 = Application.InputBox(Prompt:="Select a range", Type:=8) - In order to insert the split text in this range of cells, the user is prompted, and the split text range is then assigned to the variable “Rng2“.
For i = 1 To Rng.Rows.Count
    For j = 1 To Rng.Columns.Count
        Text =Rng.Cells(i, j)
Start = 0- Starts a loop that repeatedly iterates through each row in the user-selected range. The value of i starts from 1 to the row number of Rng.
- Another For loop will run, where the value of j ranges from 1 to column number of Rng. The current cell’s value is then evaluated for the variable “Text“. The “Start” variable, used to monitor the starting point of each new column, is then initialized to zero.
For k = 1 To c
            Rng2.Cells(i,((j - 1) * c) + k) = Mid(Text, Start + 1, Int(Arr(k - 1)))
            Start= Start + Int(Arr(k - 1))
Next k- Another For loop starts considering the value of k from 1 to c. The “Text” variable is used to extract a substring starting at the “Start” location and having a length determined by the value at the “k-1” index of the “Arr” array using the Mid function. Next, the value of Start is considered to be the sum of Start and the integer value of Arr.
Next j - Ends the loop that iterates through each column in the range the user selects.
Next i - Ends the loop that iterates through each row in the range the user selects.
- Press F5 on your keyboard to run the code.
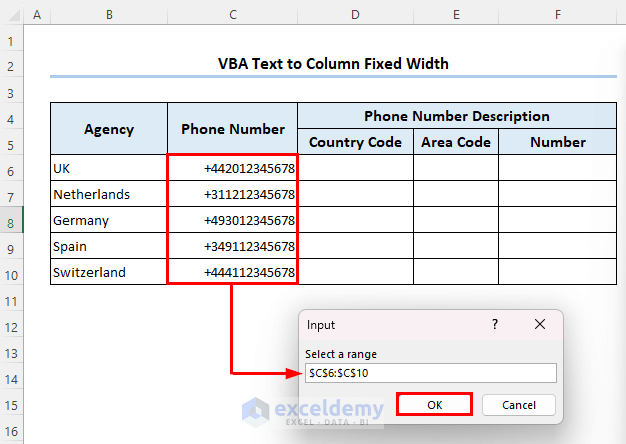
A dialog box called Input will appear on your worksheet, in which you will be asked to select the range from where you want the texts to be split.
- Select range C6:C10 and click on OK.
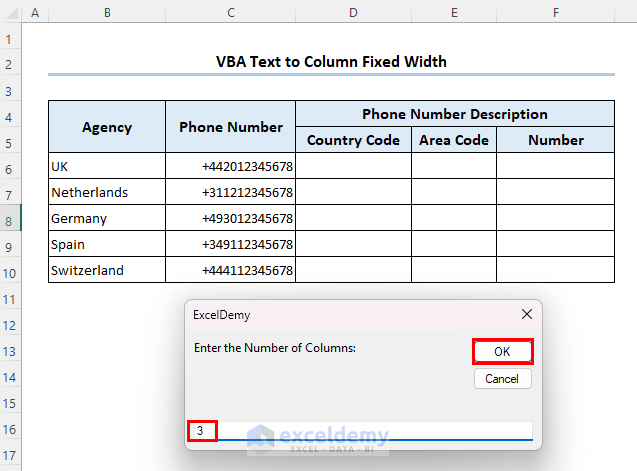
- Enter the number of columns (here, 3) and click on OK.
Now we have to set the number of characters for each column. The country code, area, and phone numbers consist of 2,2 and 8 characters respectively.
- Enter 2,2,8 and click on OK.

Then you will be asked for the output range.
- Select cell D6, and click on OK.

The final output is as in the image below.
Excel VBA Text to Columns with Delimiter
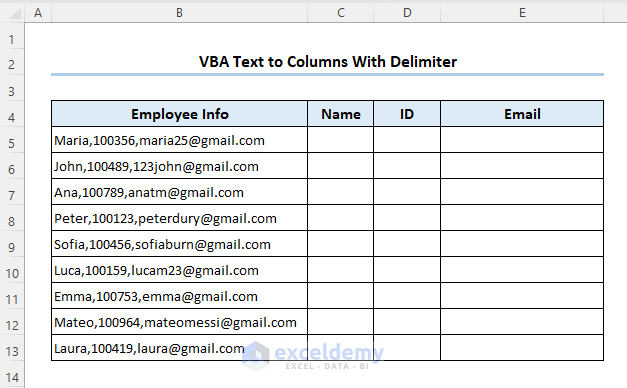
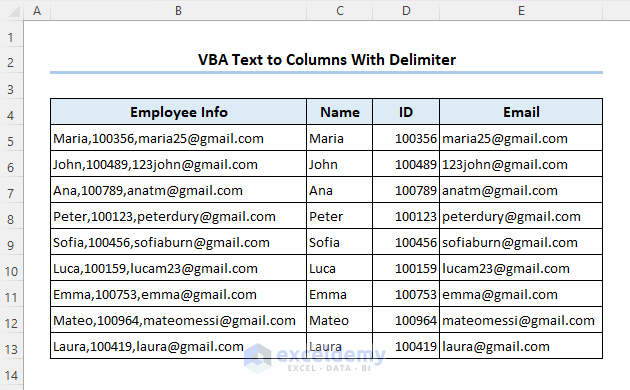
As mentioned above, you can use Excel VBA text to columns for delimited type data too. Let’s separate the name, id, and email address based on the delimiter comma (,) in the dataset below.
Steps:
- Open a new Module window as described above.
- Copy and paste the following code into it:
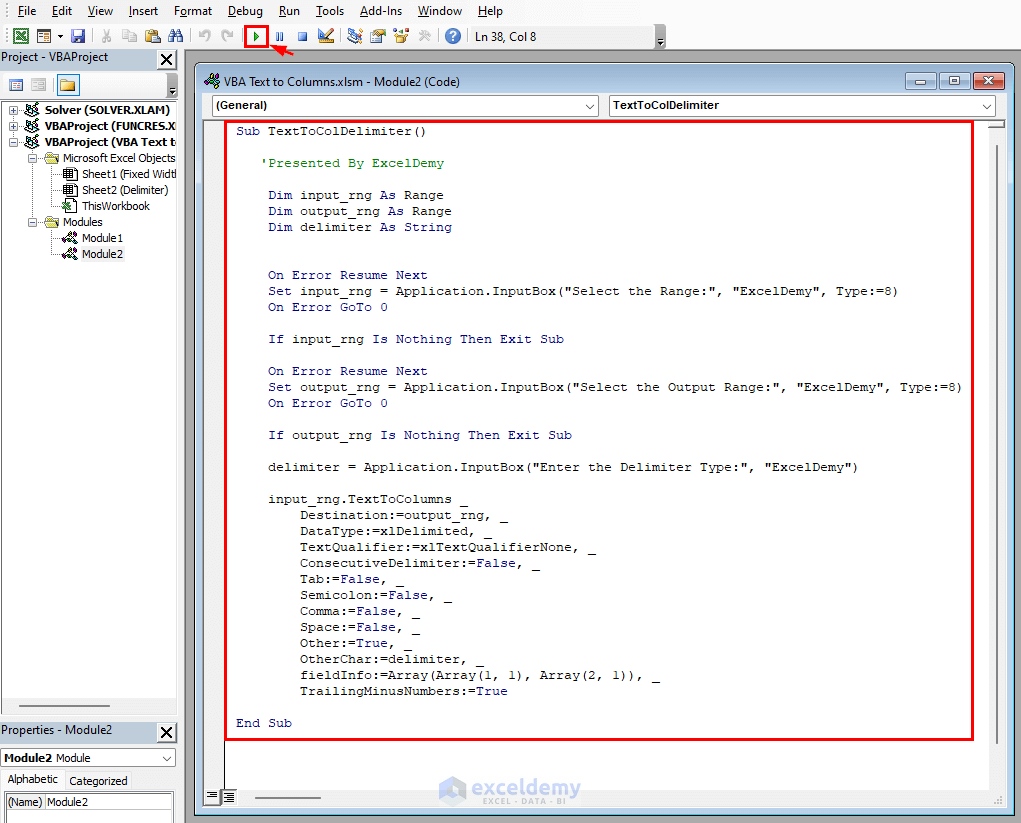
Sub TextToColDelimiter()
   'Presented By ExcelDemy
    Dim input_rng As Range
    Dim output_rng As Range
    Dim delimiter As String
    On Error Resume Next
    Set input_rng = Application.InputBox("Select the Range:", "ExcelDemy", Type:=8)
    On Error GoTo 0
    If input_rng Is Nothing Then Exit Sub
    On Error Resume Next
    Set output_rng = Application.InputBox("Select the Output Range:", "ExcelDemy", Type:=8)
    On Error GoTo 0
    If output_rng Is Nothing Then Exit Sub
    delimiter = Application.InputBox("Enter the Delimiter Type:", "ExcelDemy")
    input_rng.TextToColumns _
        Destination:=output_rng, _
        DataType:=xlDelimited, _
        TextQualifier:=xlTextQualifierNone, _
        ConsecutiveDelimiter:=False, _
        Tab:=False, _
        Semicolon:=False, _
        Comma:=False, _
        Space:=False, _
        Other:=True, _
        OtherChar:=delimiter, _
        fieldInfo:=Array(Array(1, 1), Array(2, 1)), _
        TrailingMinusNumbers:=True
End Sub
VBA Breakdown
Sub TextToColDelimiter()- Defines the “TextToColDelimiter” subroutine.
Dim input_rng As Range
Dim output_rng As Range
Dim delimiter As String- Input_rng and output_rng are Range type objects that will be used to hold the input and output ranges, respectively, and delimiter is a String variable that will contain the delimiter character.
On Error Resume Next
Set input_rng = Application.InputBox("Select the Range:", "ExcelDemy", Type:=8)
On Error GoTo 0- Displays an Excel dialog box which asks the user to choose a set of cells using the InputBox function. To handle any mistakes that might arise during the user’s selection process, we use the “On Error Resume Next” and “On Error GoTo 0” statements.
If input_rng Is Nothing Then Exit Sub- Determines if input_rng has a value. If not, the procedure terminates right away.
On Error Resume Next
Set output_rng = Application.InputBox("Select the Output Range:", "ExcelDemy", Type:=8)
On Error GoTo 0- Creates a different dialog box and asks the user to choose an output range of cells in Excel using the InputBox function.
If output_rng Is Nothing Then Exit Sub- Determines whether output_rng has a value. If not, the procedure terminates right away.
delimiter = Application.InputBox("Enter the Delimiter Type:", "ExcelDemy")- Displays a dialog box and asks the user to type a delimiter character using the InputBox function. The delimiter variable will be updated with the character entered.
input_rng.TextToColumns _
    Destination:=output_rng, _
    DataType:=xlDelimited, _
    TextQualifier:=xlTextQualifierNone, _
    ConsecutiveDelimiter:=False, _
    Tab:=False, _
    Semicolon:=False, _
    Comma:=False, _
    Space:=False, _
    Other:=True, _
    OtherChar:=delimiter, _
    fieldInfo:=Array(Array(1, 1), Array(2, 1)), _
TrailingMinusNumbers:=True- input_rng.TextToColumns, divides the text in the input range into distinct columns.
- Destination:=output_rng is the range to which the output should be written.
- DataType:=xlDelimited indicates that a particular character serves as the text’s delimiter.
- TextQualifier:=xlTextQualifierNone instructs Excel to ignore any text qualifiers that may be present, such as quotes.
- ConsecutiveDelimiter:=False instructs Excel to treat multiple delimiters as one delimiter.
- Tab:=False, Semicolon:=False, Comma:=False, and Space:=False arguments specify that Excel should not treat these specific characters as delimiters (i.e. only the OtherChar delimiter should be used).
- Other:=True specifies that Excel should use the delimiter character specified in the OtherChar argument.
- OtherChar:=delimiter specifies the delimiter character.
- fieldInfo:=Array(Array(1, 1), Array(2, 1)) specifies how the columns should be split. In this case, it specifies that the first column in the input range should be split into two columns in the output range.
- TrailingMinusNumbers:=True specifies that Excel should treat any minus sign at the end of a cell as a negative number.
- Run the code by pressing F5.
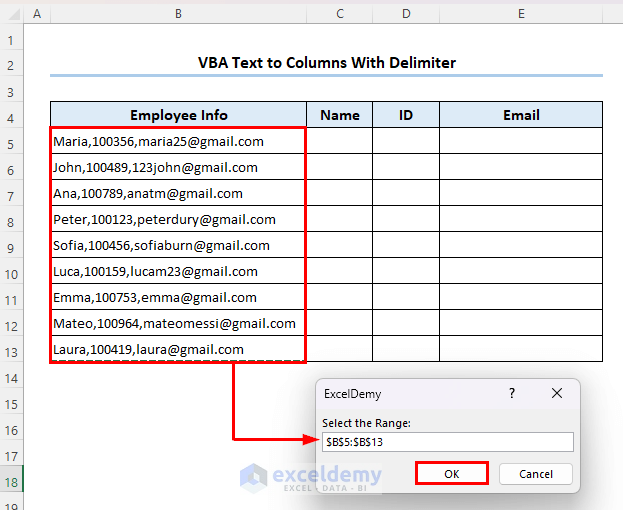
An input box opens asking for the input range.
- Select range B5:B13 and click on OK.
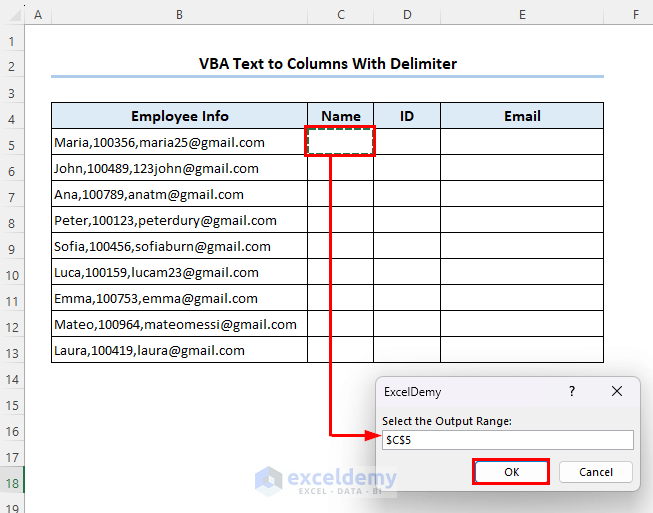
It wants an output range.
- Select cell C5 and click on OK.
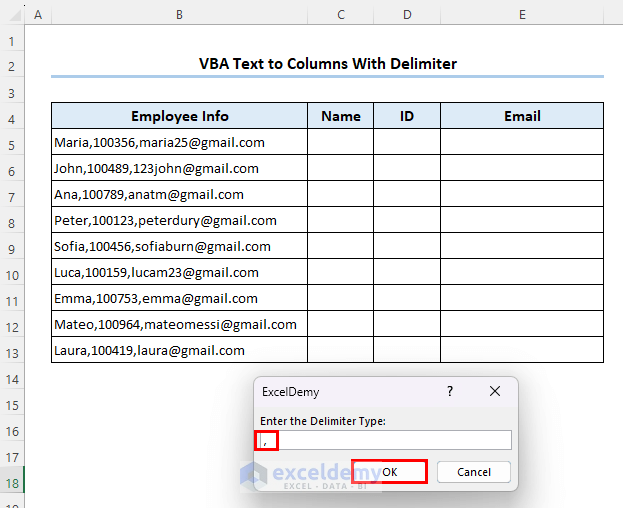
And finally, it needs a delimiter type.
- Since our major delimiter is the comma (,). Insert a comma (,) and click on OK.
The final output is as follows:
Read More: Excel VBA Text to Columns with Multiple Delimiters
Download Practice Workbook

