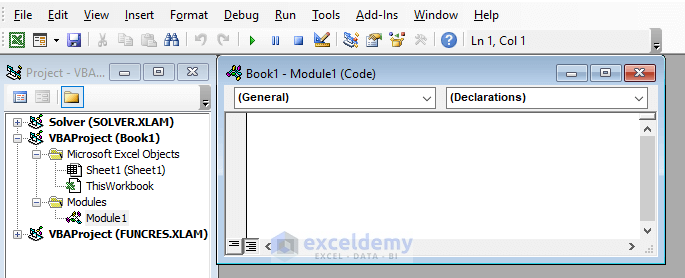
Learn all about VBA macros and practice the examples to make yourself more productive and break the limitations of Excel. Consider the below overview image where we auto-fill Order No. column by running a macro from Visual Basic Editor.
Note: We have used Microsoft 365 to prepare this tutorial. However, all methods and examples demonstrated in this tutorial apply to Excel 2021, Excel 2019, Excel 2016, Excel 2013, and Excel 2010 versions as well.
⏷ What Are VBA Macros?
⏷ Why Use VBA Macros in Excel?
⏷ Enable Developer Tab
⏷ Key Features of Visual Basic Editor Interface
⏷ Create Excel VBA Macros
⏵ Recording Macros in Excel VBA
⏵ Writing Macros in Visual Basic Editor
⏷ Run Macros in Excel VBA
⏵ Using Visual Basic Editor to Run Macros in Excel VBA
⏵ Running VBA Macros From Excel Worksheet
⏵ Running Macros in Excel VBA with Custom Launch
⏷ Run a Macro Using a Command Button
⏷ Save Macros in Excel VBA
⏷ Enable Macros in Excel VBA
⏷ Change Macro Settings in Excel VBA
⏷ Copy VBA Macros to Another Excel Workbook
⏵ Dragging Module Containing Macros
⏵ Copying Source Codes of Macros
⏷ Export & Import Macros in Excel VBA
⏵ Exporting Macros
⏵ Importing Macros
⏷ Protect Macros in Excel VBA
⏵ Locking Macros for Viewing Only
⏵ Password-Protecting Macros from Running
⏷ Delete Macros in Excel VBA
⏷ Macro Tips in Excel VBA
⏵ Splitting VBA Code into Multiple Line Codes
⏵ Making Macros Accessible from Any Workbook
⏵ Undoing a Macro Action
⏷ Examples of Macros in Excel VBA
What Are VBA Macros?
A VBA Macro is a set of commands stored in a workbook as VBA code. It functions like a small program, executing a predefined sequence of actions.
When you break down the term VBA Macro into VBA and Macro, you will see a clear distinction. A macro represents a piece of code, whereas Visual Basic for Applications (VBA) is the programming language crafted by Microsoft specifically for creating macros.
For instance, macros can handle repetitive tasks like creating a daily report for your employees in just one click.
Why Use VBA Macros in Excel?
In Excel, VBA Macros use the Visual Basic Application language to make custom functions and speed up tasks. Their main purpose is to customize the user interface, creating personalized toolbars, menus, dialog boxes, and forms. Running a macro triggers the commands within it. Creating a macro might initially require some time, but once set up, the VBA code can execute tasks quickly and flawlessly. This also reduces errors and saves time on repetitive tasks.
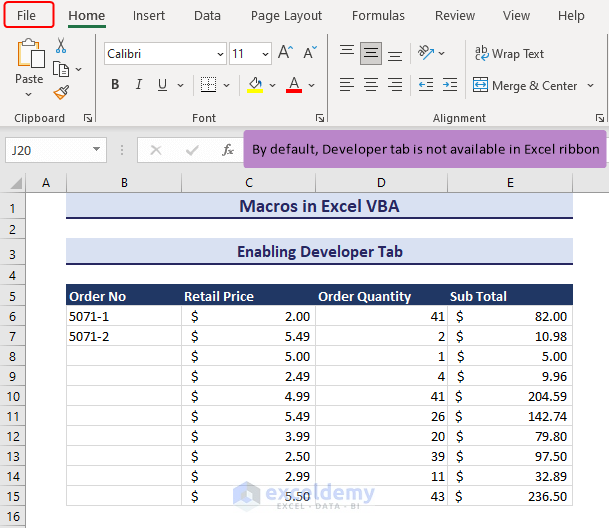
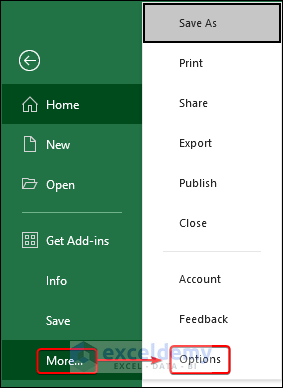
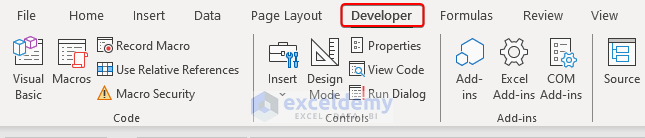
How to Enable the Developer Tab in Excel
To access various VBA macros in Excel, Add-ins, Controls, and XML features, we need to go to the Developer tab.
- Go to the File tab.
- Click on Options (it might be under More at the bottom).
- Go to the Customize Ribbon tab in the Excel Options dialog window.
- Enable the Developer option under the Main Tabs.
- Click OK.
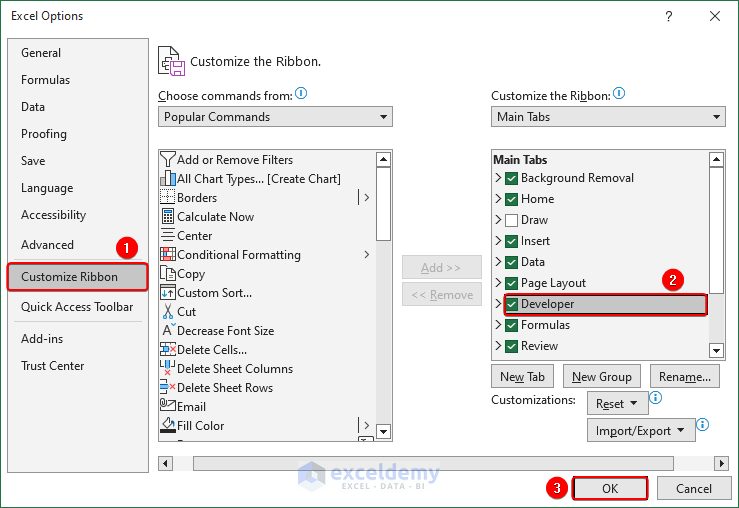
- The Developer tab should appear in the ribbon.
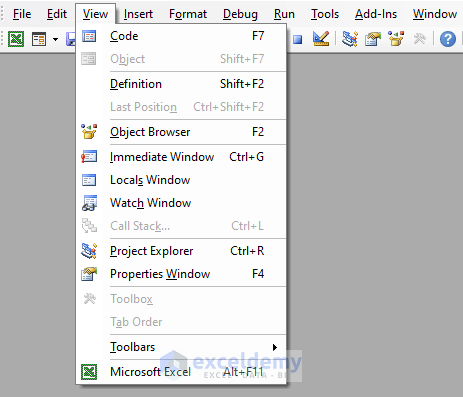
What Are the Key Components of a Visual Basic Editor Interface?
The main components of the Visual Basic Editor interface are Procedures, Module, Properties Window, and Immediate Window.
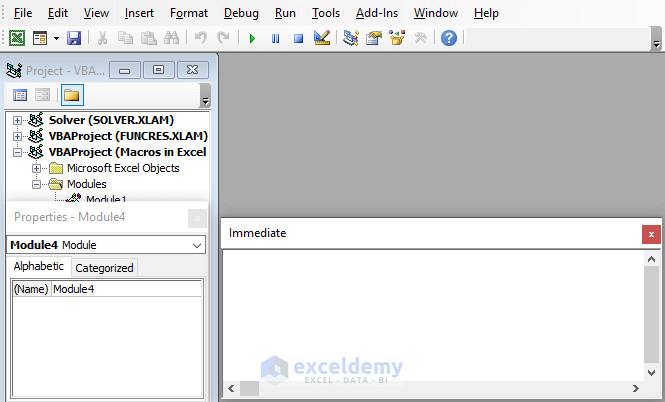
They are under the following tabs where you can access them:
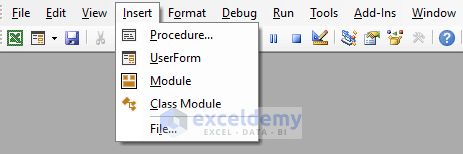
1. Insert tab:
- Procedure: It allows you to insert different types of procedures such as Sub procedures, Function procedures, and Property procedures to define actions or calculations in your code.
- UserForm: It lets you insert a UserForm with a platform to create customized dialog boxes or forms for user interaction.
- Module: This inserts a new module where you can write and store your VBA code.
- Class Module: It helps to define custom objects with their properties, methods, and events for advanced code structuring.
- File: It gives you options related to files and file operations within the Visual Basic Editor.
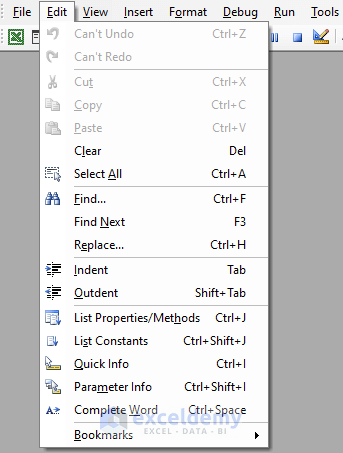
2. Edit tab:
- Indent: It increases the indentation level of the selected code block. This is useful for improving code readability and organizing nested structures.
- Outdent: This decreases the indentation level to help align code properly and adjust the structure of nested elements.
- List Properties/Methods: This feature provides a quick reference to available properties and methods, assisting in efficient coding by reducing the need to consult external documentation.
3. View tab:
- Properties Window: This allows you to view and modify the properties of selected objects or controls.
- Immediate Window: It enables you to execute single lines of code or evaluate expressions interactively. It is important for testing and debugging.
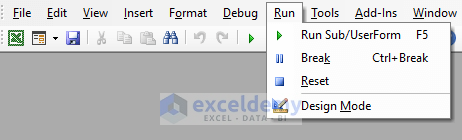
4. Run tab:
- Run: This button initiates the execution of the currently selected subroutine (Sub procedure) or UserForm in the VBA project.
- Reset: This stops the execution of code that is currently running.
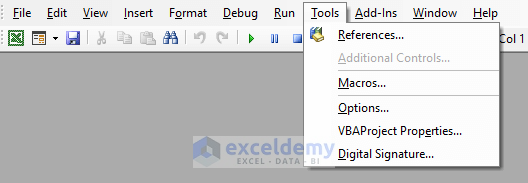
5. Tools tab:
An important element of the Tools tab is References. It allows you to manage references to external libraries or components in your VBA project.
How to Create Excel VBA Macros
You can use two ways to create macros in Excel VBA- by Macro Recorder and using Visual Basic Editor.
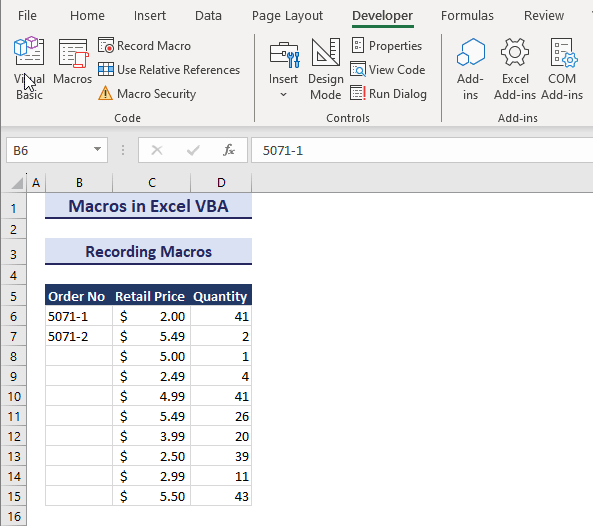
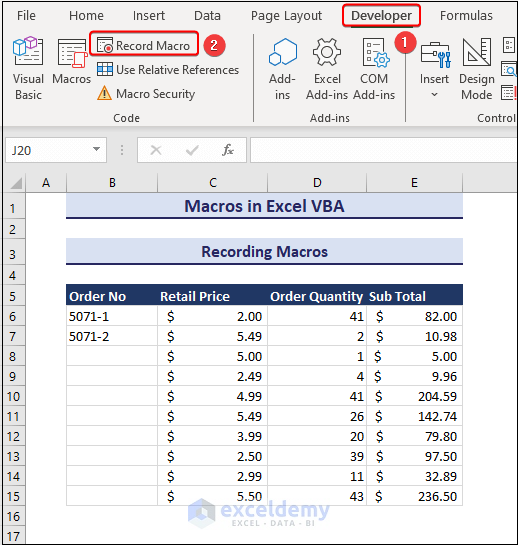
Case 1 – Recording Macros in Excel VBA
Even if you’re not familiar with VBA programming, you can automate tasks by using the Macro Recorder in Excel. It records your actions, like mouse clicks and keystrokes, in the VBA language. The recorded macro contains detailed code that you can view and modify in the Visual Basic Editor. After saving the macro, running it executes the same actions as recorded.
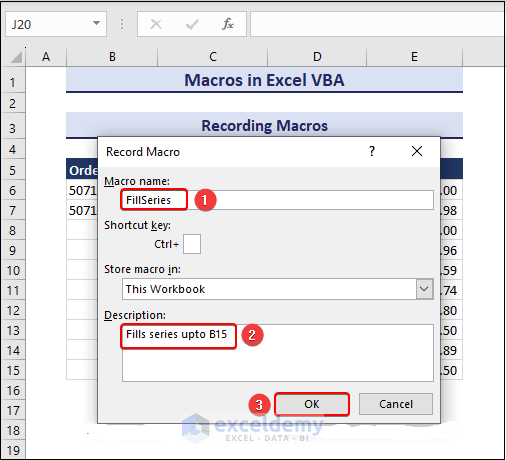
We will fill the series B6:B10 using the Fill Handle tool manually while the macro is recording:
- Go to the Developer tab and choose Record Macro in the Code group.
- The Record Macro dialog shows up.
- Write a macro name in the Macro Name box and a description of your macro in Description.
- Click OK.
- The macro recording starts.
- Select B6:B7 and drag down the Fill Handle icon.

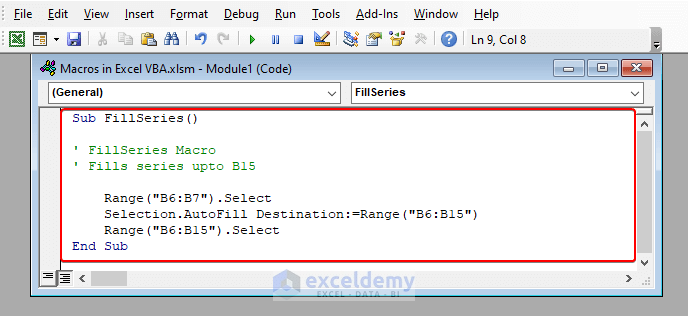
- Click on Stop Recording and go to Visual Basic.
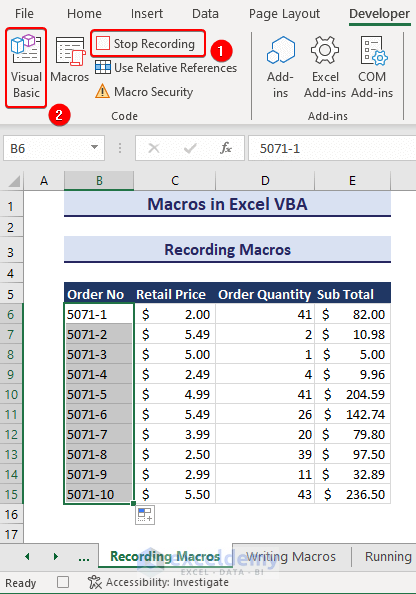
- This will show you the desired macro.
Case 2 – Writing Macros in the Visual Basic Editor
- To write a macro in the Visual Basic Editor, click on the Insert tab and go to Module.
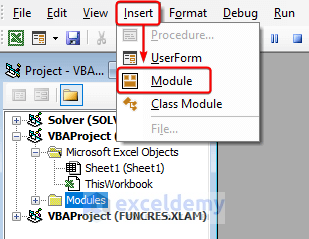
- A module appears in the display.
- Write or paste VBA code in the module box.
Sub Date_Format()
Selection.NumberFormat = “dd / mm / yy”
End Sub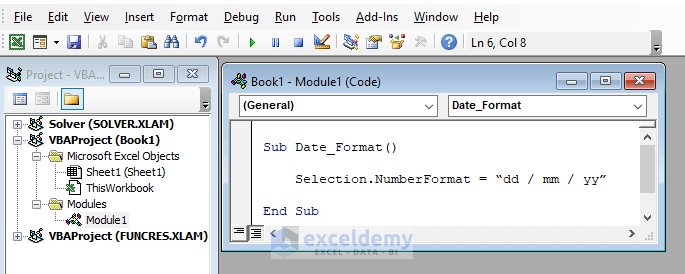
The macro needs to be assigned a unique name. This name must not match other macros and typically should not coincide with the names of other properties, functions, or tools in Excel. The macro’s name is what you will use to execute the macro. For example,
Sub Date_Format()To define a macro name, you need to type the name with a pair of parentheses and press Enter in the coding window of the editor. So, it will automatically populate the window with the general format of an Excel macro.
End SubThe End Sub denotes the conclusion of the macro. If the user wishes, they can create a second new macro by writing a new Sub Name line below the first End Sub.
How to Run Macros in Excel VBA
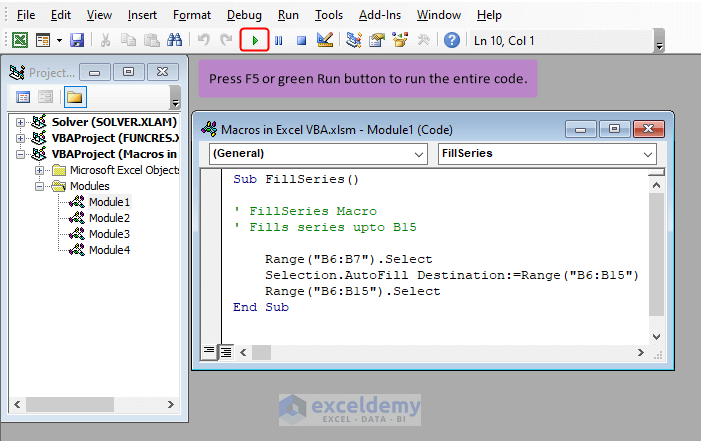
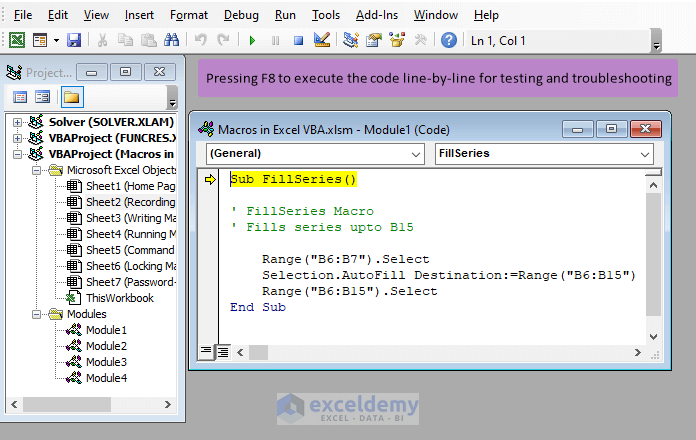
Case 1 – Using the Visual Basic Editor to Run Macros in Excel VBA
- Press the F5 key or Run button to directly run the entire code.
- Or, press F8 to execute the code line-by-line for testing and troubleshooting.
Case 2 – Running VBA Macros from the Excel Worksheet
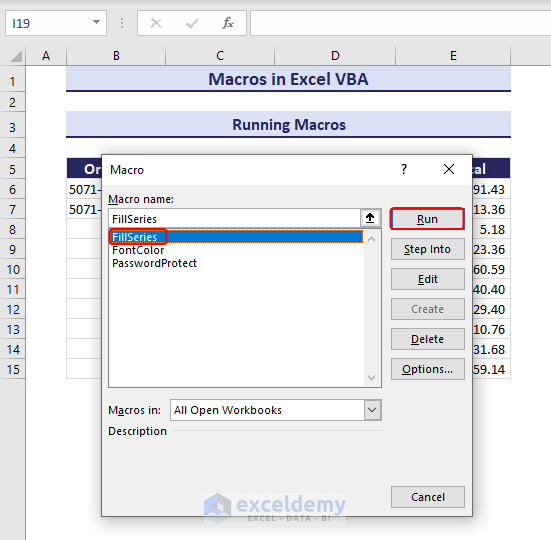
- Click the Macros button on the Developer tab or press the Alt + F8 keys.
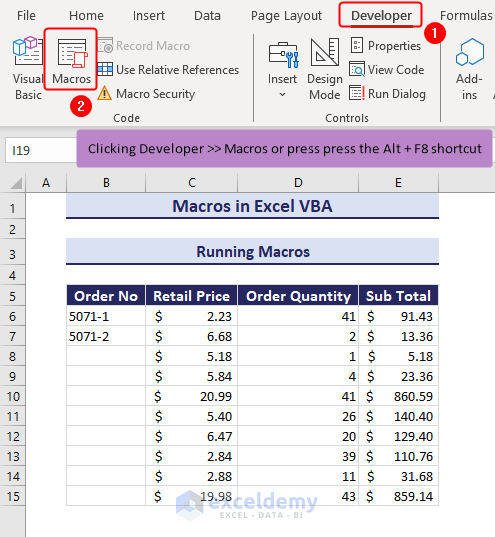
- Select the function you want to run in the Macro dialog and click Run.
Case 3 – Running Macros in Excel VBA with Custom Launch
Initiating a macro by clicking a custom button allows quick activation of macros without navigating through menus. Clicking the command button will initiate the macros assigned to the button, making it a very user-friendly method. For details, go to the next section.
How to Run a Macro Using a Command Button in Excel
- Go to the Developer tab.
- Click on Insert and choose the Command Button in the ActiveX Controls group.
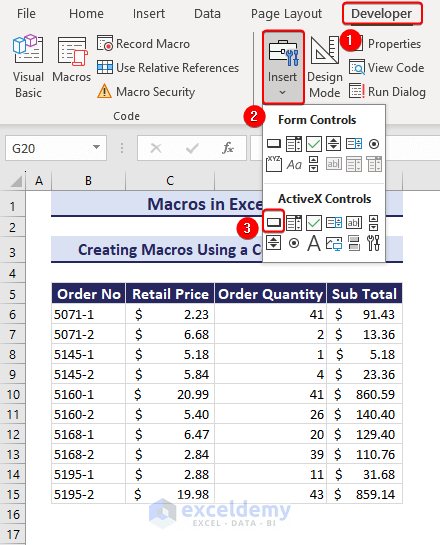
- Move your cursor below your dataset and drag it to place the command button.

- Right-click on the command button and go to View Code.
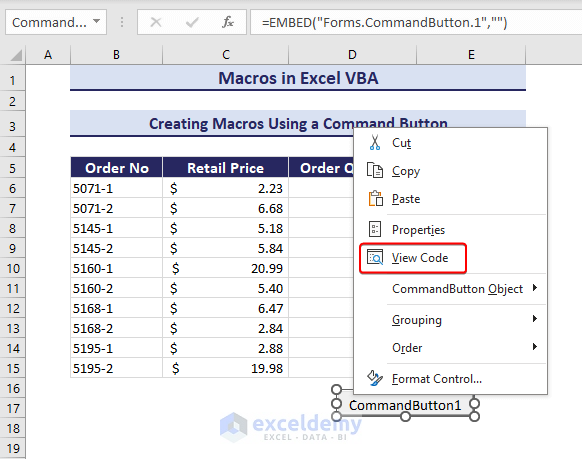
- The sub-procedure outline will display.
- Insert your VBA code there.
Private Sub CommandButton_Click ()
Selection.Interior.ColorIndex = 37
End Sub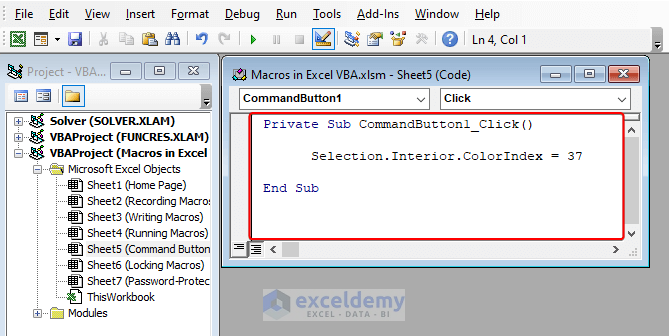
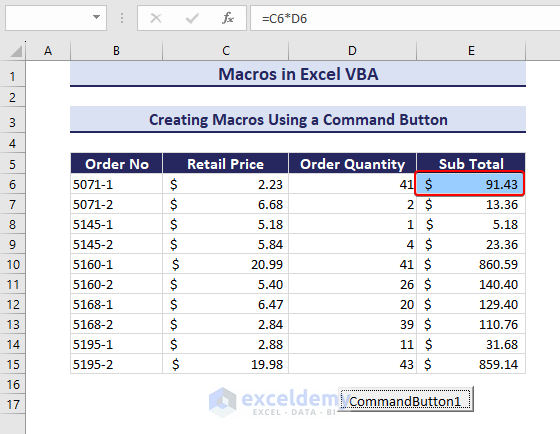
- Click on Design Mode to get out of the design mode.
- Select cell E6 and choose the custom command button.

- In our example, clicking the command button will change the fill color in E6.
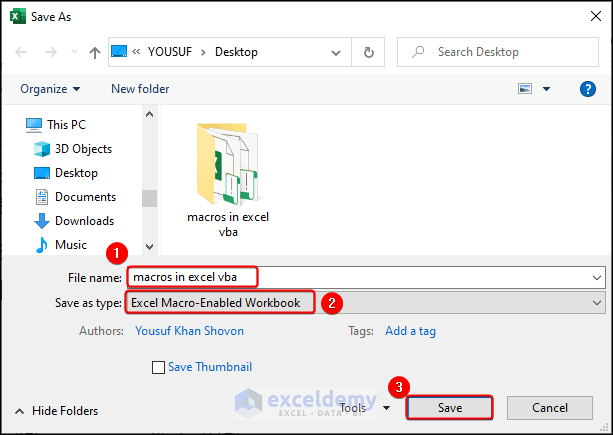
How to Save Macros in Excel VBA via the .XLSM Extension
- Find the Save button as marked or press Ctrl + S in the file containing the macro.

- The Save As dialog appears. Give your macro a name in the File name box.
- Select Excel Macro-Enabled Workbook from the Save as type drop-down list.
- Click Save to save the macros in your workbook.
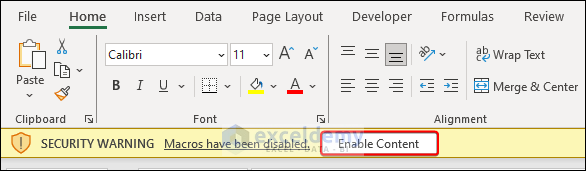
How to Enable Macros in Excel VBA
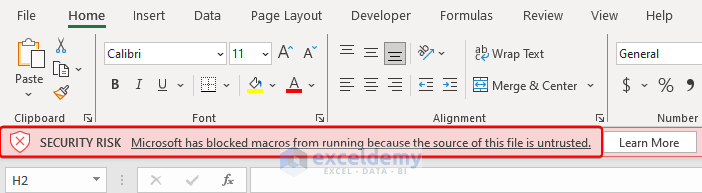
- After opening the workbook, you will get a warning message like the following. Click the Enable Content button in the yellow security warning bar.
- If the source of the Macro-Enabled Excel Workbook is not trusted, Excel will send a Security Risk warning message as given below. This warning usually appears when you open a Macro-Enabled Excel file after downloading it.
- To prevent that from happening, you can right-click on the .xlsm file and move to Properties.
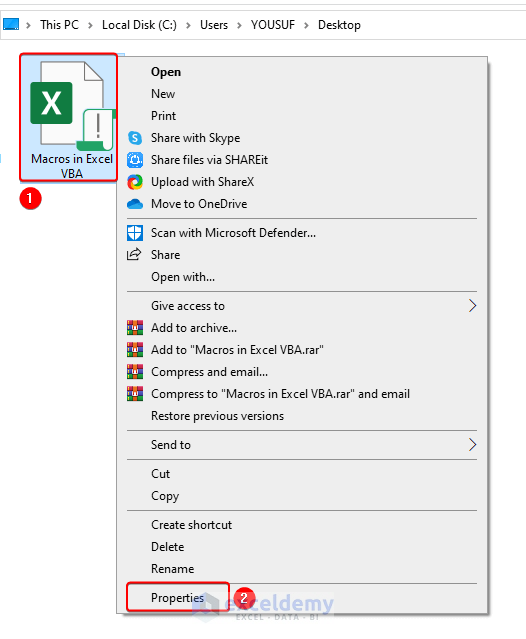
- After clicking Properties, check the Unblock box under the General tab and click OK.
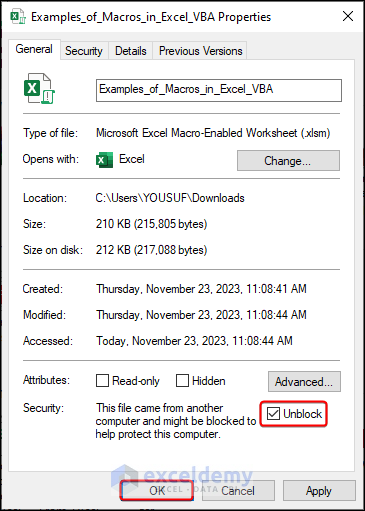
- Now, if you open the file again, there will be no Security Risk warning.
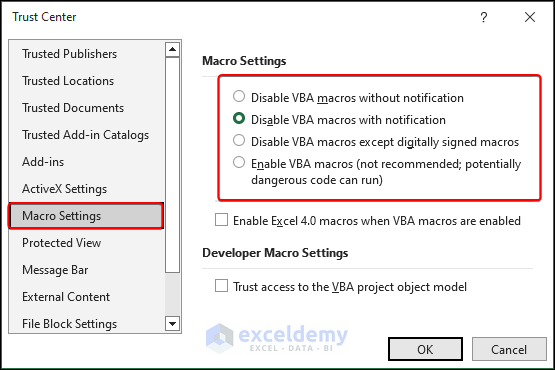
How to Change Macro Settings in Excel VBA
- Open the Excel Options dialog window as mentioned earlier.
- Go to Trust Center and navigate to Trust Center Settings.
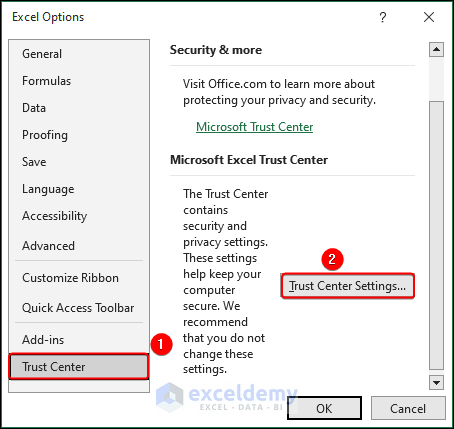
- The Trust Center dialog will pop up.
- Click Macro Settings and you will have several options:
Disable VBA macros without notification: If you select this option, you will get no notification. If a macro is not stored in trusted locations, selecting this option also ceases your ability to run such macros.
Disable VBA macros with notification: When macros are disabled with this default option, you have to enable macros in individual workbooks.
Disable VBA macros except digitally signed macros: Selecting this option disables all unsigned macros with notifications in Excel. However, we can digitally sign macros with a special certificate from a trusted publisher to get permission to run.
Enable VBA macros: It allows all macros to run even if it has potential risk.
- After selecting the desired option, click the OK button.
How to Copy VBA Macros to Another Excel Workbook
You can copy VBA macros from the created file to another file for reuse in two ways:
- Directly dragging the module containing macros
- Copying the source codes only
Method 1 – Dragging the Module Containing Macros
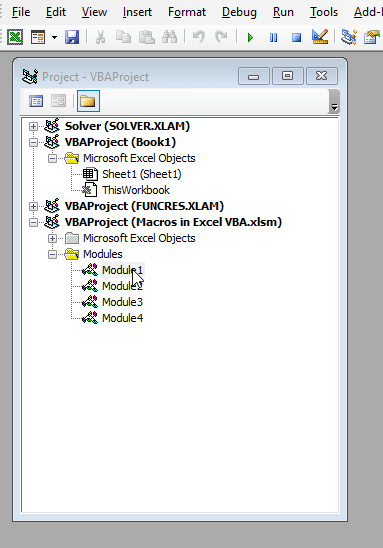
- Open the files with the target module and destination module.
- In the Project Explorer pane within the Visual Basic Editor, locate the module containing the macro.
- Drag the module from the source workbook and drop it into the destination workbook.
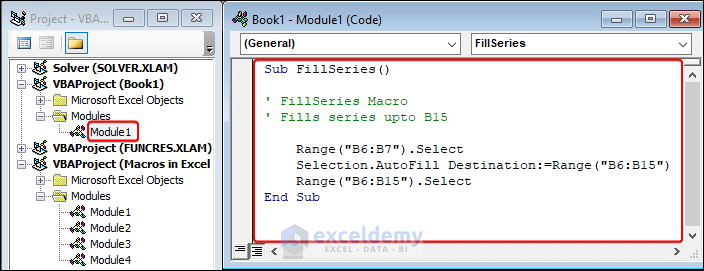
Method 2 – Copying the Source Code of Macros
- Open both files.
- Double-click the target module.
- Select the code and copy it.
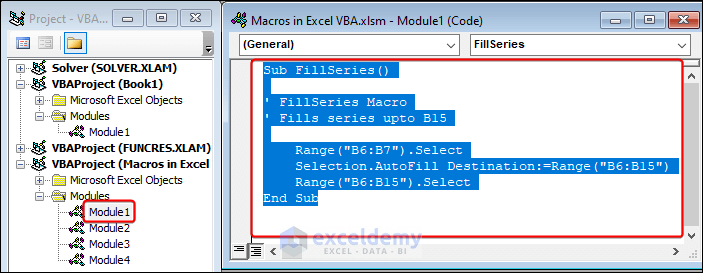
- Double-click on the destination module and paste the copied code there.
How to Export and Import Macros in Excel VBA
You can import or export macros to share or move macros by converting them as .bas files.
Case 1 – Exporting Macros
- In the Project Explorer pane, right-click the Module containing the desired macros.
- Go to the Export File button.
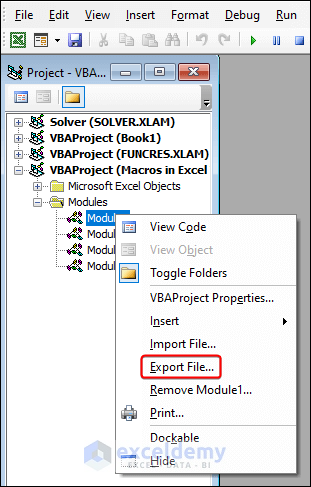
- Clicking the Export File option will open the Export File dialog.
- Give your new file a name in File Name and click Save.

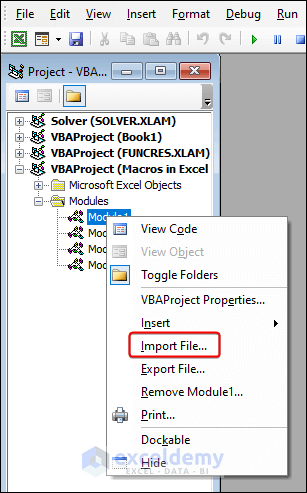
Case 2 – Importing Macros
- Right-click the module containing the desired macros in the Project Explorer pane.
- Choose the Import File option.
- In the Import File window, navigate to the desired .bas file and click Open.
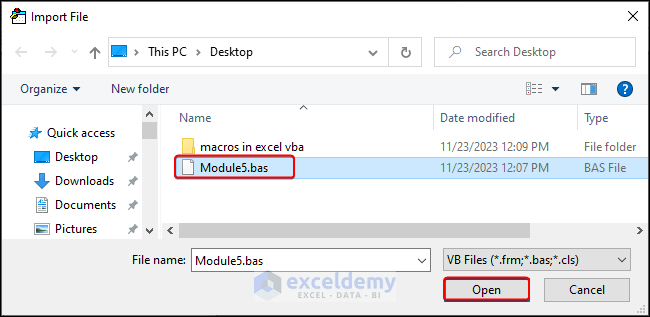
- Clicking the Open option will import the module to your workbook.
How to Protect Macros in Excel VBA
There are two ways to protect macros in Excel VBA: locking macros and setting password protection to prevent macros from unauthorized or accidental running.
Method 1 – Locking Macros for Viewing Only
You can lock your macros from unauthorized viewing or editing with the following steps:
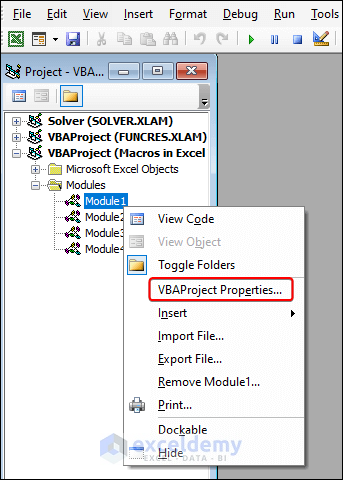
- In the Project Explorer pane, right-click the desired module to lock and select VBAProject Properties.
- In the Project Properties dialog box, check the Lock project for viewing box on the Protection tab.
- Enter the password twice and click OK.
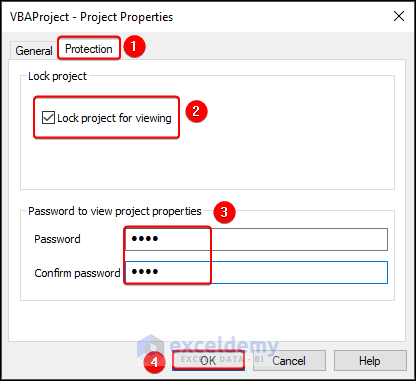
- After clicking OK, save your file.
- Whenever you click to view the code in Visual Basic Editor, a dialog box will pop up.
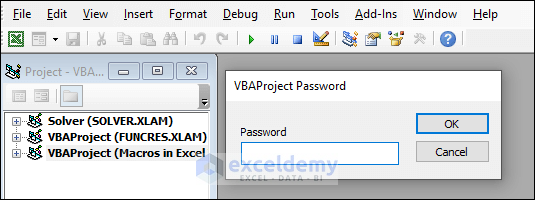
- To unlock it, open the Project Properties dialog box and uncheck the Lock project for viewing box.
Locking macros protects the code from being viewed and edited, but it doesn’t prevent the code from being executed.
Method 2 – Password-Protecting Macros from Running
You can protect your macro with a password so that it only runs when the correct password is used. Here is an example to do so:
Sub PasswordProtect()
Dim pass As Variant
pass = Application.InputBox("Enter Your Password", "Protected Macro")
Select Case pass
Case Is = False
Case Is = "1234"
Selection.Interior.ColorIndex = 37
Case Else
MsgBox "Incorrect Password"
End Select
End Sub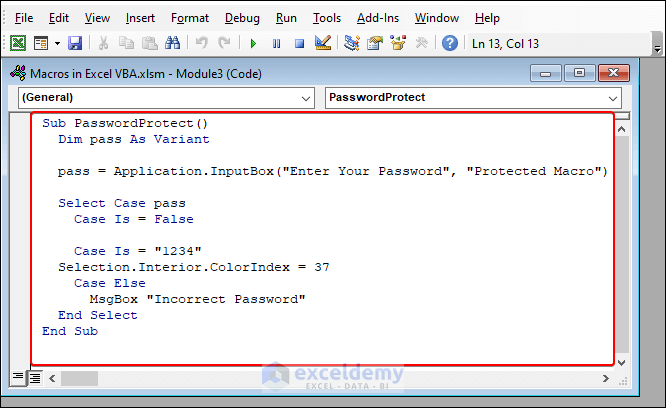
- Running the code will return the following message box.
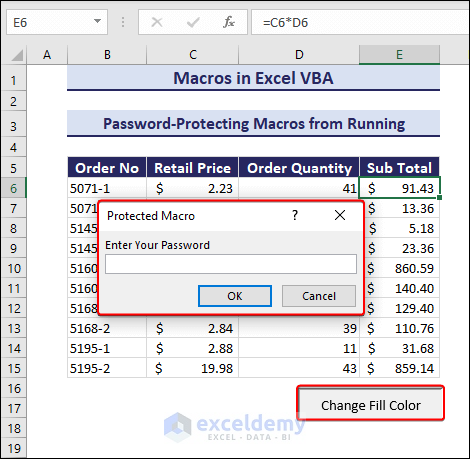
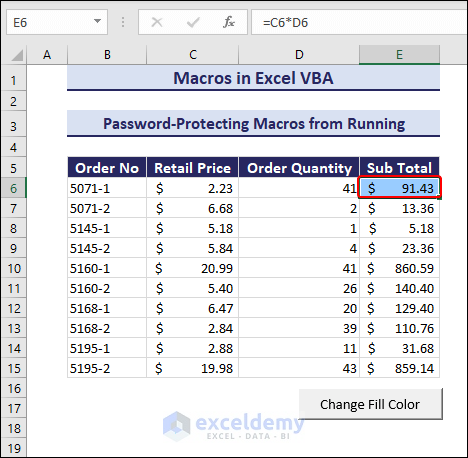
- Enter your password and click OK.
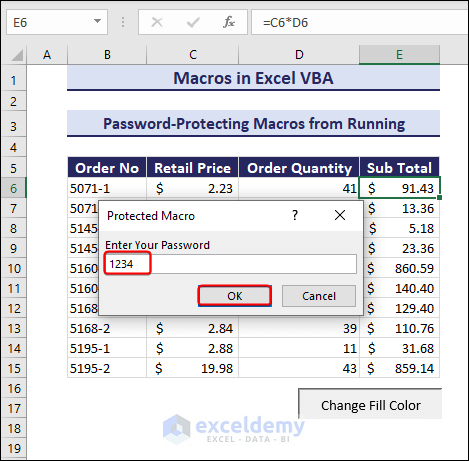
- Clicking OK will execute the code.
- To avoid password peeping in the Visual Basic Editor, make sure to also lock the macro for viewing or editing.
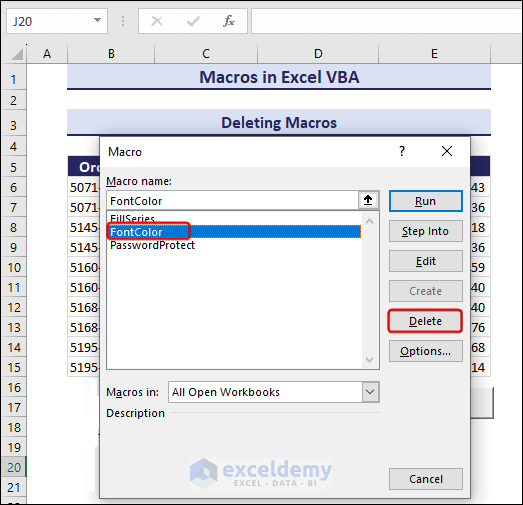
How to Delete Macros in Excel VBA
- Go to the Developer tab.
- Choose Macros in the Code group.
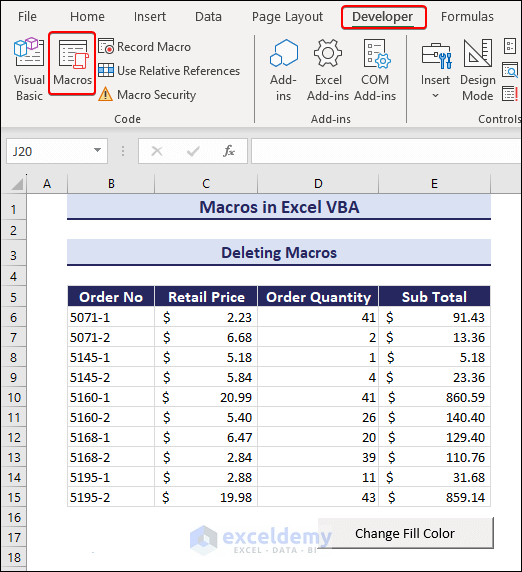
- The Macro dialog box shows up.
- Select the macro you want to delete and click the Delete button. This will remove the selected macro from the workbook.
Some Pro Macro Tips in Excel VBA
Tip 1 – Splitting VBA Code into Multiple Line Codes
To break a long statement into several lines, you can use the line-continuation character, which is a space followed by an Underscore (_) at the point where you want the line to break. It is effective when you have lengthy statements.
The below code line uses underscores to split the statement into multiple lines:
w.SaveAsFilename:="C:\Users\YOUSUF\Desktop\Sales_Data.xlsx", _
FileFormat:=xlWorkbookDefault, _
ReadOnlyRecommended:=False, CreateBackup:=False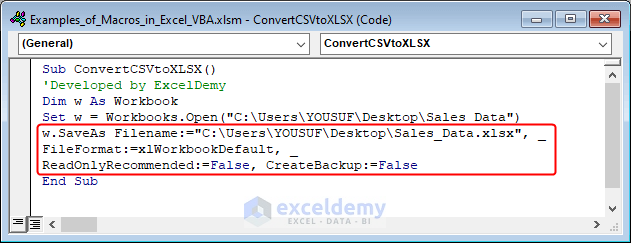
Tip 2 – Making Macros Accessible from Any Workbook
When you create or record a macro in Excel, it’s typically accessible only within that specific workbook. If you want to use the same code in other workbooks, save it to the Personal Macro Workbook. As a result, the macro is available to you every time you open Excel.
Tip 3 – Undoing a Macro Action
To undo a macro action, you won’t have the Undo button and can’t use the Ctrl + Z keys. Add the following line in the code before letting your macro take any action:
ActiveWorkbook.SaveThis way, you can save the active workbook from within the macro code. Later, you can just close and reopen the file to get back to before the macro action.
Top 50 Useful Examples of Macros in Excel VBA
Basic VBA Codes
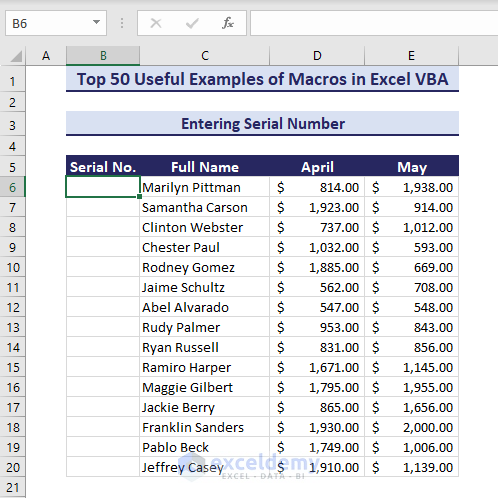
Example 1 – Enter Serial Numbers
Consider the below dataset where we will add the serial numbers in the range B6:B20.
To do this with VBA, apply the following steps:
- Insert the following code in a module and click the Run button.
Sub EnterSerialNumber()
'Developed by ExcelDemy
Dim serial_num As Integer
On Error GoTo exit_cmd
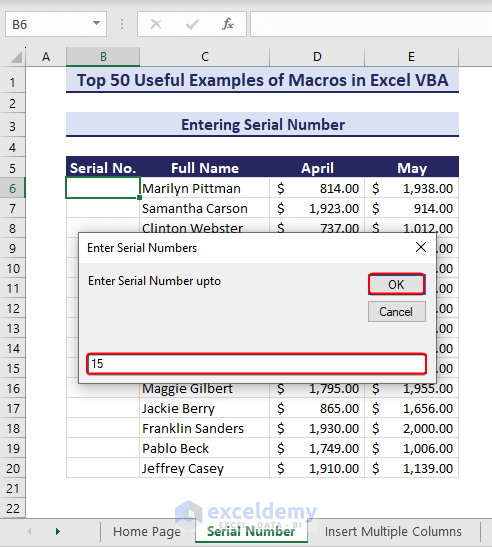
serial_num = InputBox("Enter Serial Number upto:")
For sn = 1 To serial_num
ActiveCell.Value = sn
ActiveCell.Offset(1, 0).Activate
Next sn
exit_cmd: Exit Sub
End Sub
- As a result, the below input box appears. Enter the number of digits you want to apply and click OK.
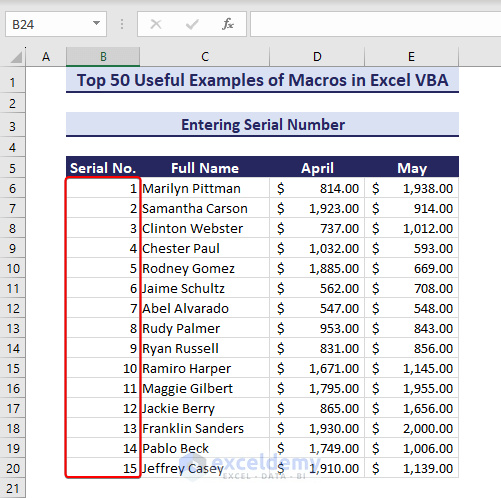
- The serial numbers appear in the range.
Example 2 – Insert Multiple Columns
Consider below dataset where we want to add 2 columns before the selected cell in column D.
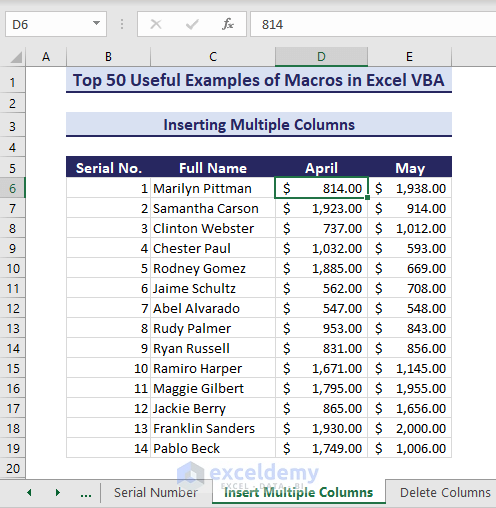
- Run the below macro.
Sub InsertMultipleColumns()
'Developed by ExcelDemy
Dim i As Integer
Dim j As Integer
ActiveCell.EntireColumn.Select
On Error GoTo Last
i = InputBox("Enter the number of columns:", "Insert Multiple Columns")
For j = 1 To i
Selection.Insert shift:=xlToLeft, CopyOrigin:=xlFormatFromRightorAbove
Next j
Last: Exit Sub
End Sub- As a result, you will get the following input box. Enter the number of columns you want to add and click OK. Here, we have entered 2.
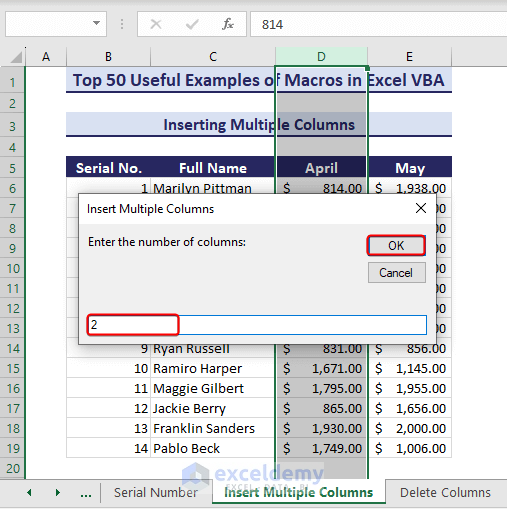
- As you can see, 2 columns have been inserted in the target location.

Example 3 – Delete Columns in Excel
Now, let’s see how to use VBA to delete an entire column in the below dataset quickly.
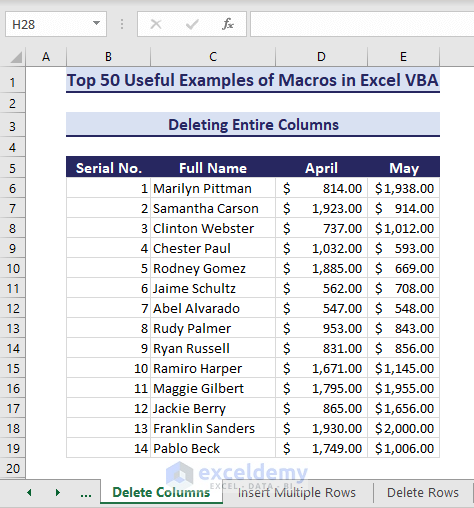
- Insert the code in a module and Run it.
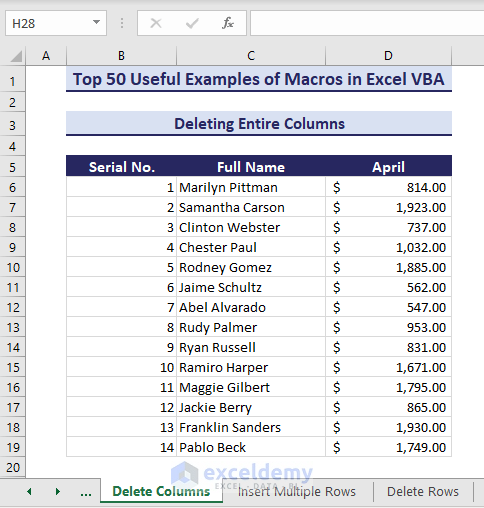
Sub DeleteEntireColumn()
' Developed by ExcelDemy
Dim fixedColumn As range
' Change to the desired column
Set fixedColumn = Columns("E")
If fixedColumn Is Nothing Then
MsgBox "Invalid column", vbExclamation
Exit Sub
End If
fixedColumn.Delete
End Sub- As you can see, column E is now deleted.
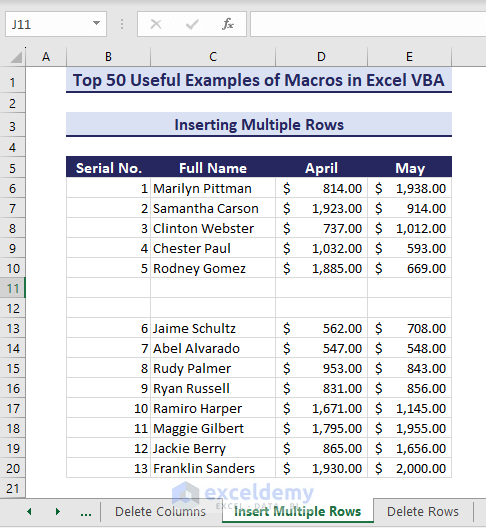
Example 4 – Insert Multiple Rows
Consider the below dataset where we want to add 2 rows before the selected cell in row 11.
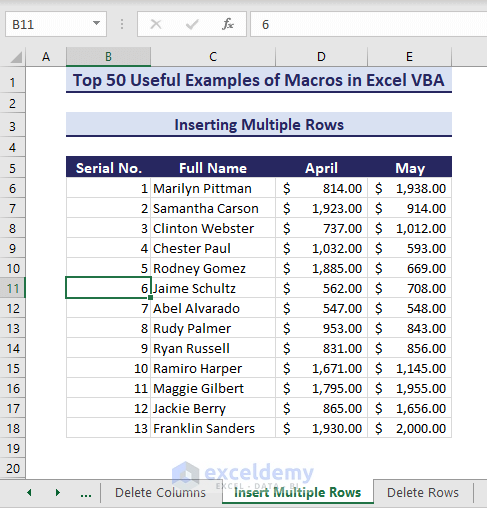
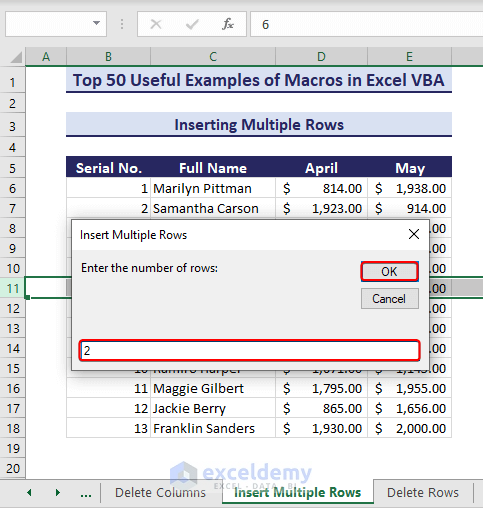
- Run the following code to add rows:
Sub InsertMultipleRows()
'Developed by ExcelDemy
Dim i As Integer
Dim j As Integer
ActiveCell.EntireRow.Select
On Error GoTo Last
i = InputBox("Enter the number of rows:", "Insert Multiple Rows")
For j = 1 To i
Selection.Insert shift:=xlToUp, CopyOrigin:=xlFormatFromLeftorBelow
Next j
Last: Exit Sub
End Sub- The code returns an input box. Enter the number of rows you want to add and click OK.
- Two rows appear accordingly.
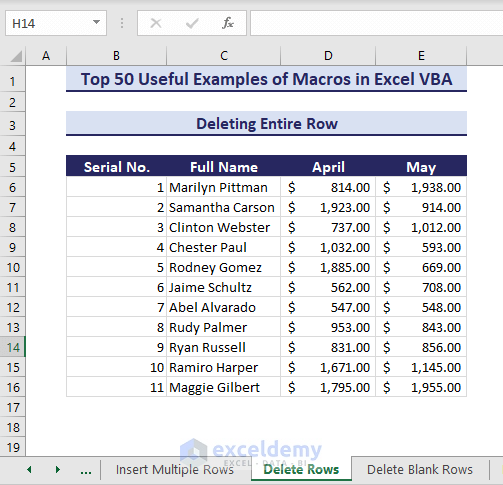
Example 5 – Delete Rows in Excel
Let’s say you want to delete rows 17 and 18 from your dataset.
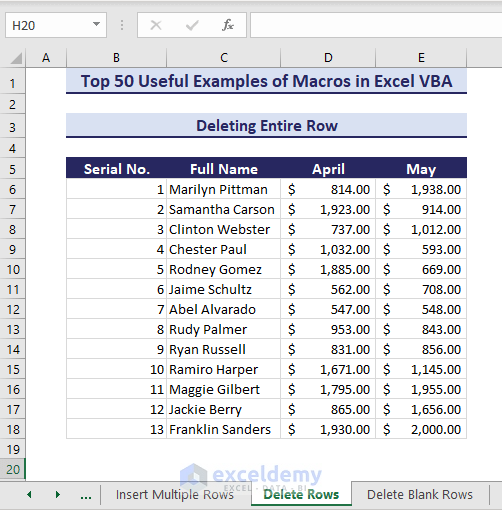
- Using the following code can easily delete them.
Sub DeleteEntireRow()
' Developed by ExcelDemy
Dim row As range
' Change to the desired row number
Set row = Rows("17:18")
If row Is Nothing Then
MsgBox "Invalid row.", vbExclamation
Exit Sub
End If
row.Delete
End Sub- After running the above code, rows 17 and 18 are deleted.
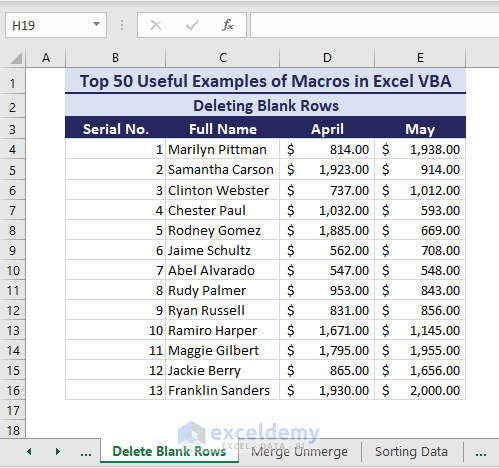
Example 6 – Delete Blank Rows
Consider the following dataset with unnecessary empty rows that you want to delete. Manually deleting these empty rows will take a long time.

- You can run the below code to delete the empty rows.
Sub DeleteBlankRows()
'Developed by ExcelDemy
Dim i As Long
Dim dlrng As range
On Error GoTo alerts
Application.ScreenUpdating = False
For i = 1 To 50
If Application.WorksheetFunction.CountA(range("A" & i & ":" & "Z" & i)) = 0 Then
If dlrng Is Nothing Then
Set dlrng = range("A" & i & ":" & "Z" & i)
Else
Set dlrng = Union(dlrng, range("A" & i & ":" & "Z" & i))
End If
End If
Next i
If Not dlrng Is Nothing Then dlrng.Delete shift:=xlUp
LetsContinue:
Application.ScreenUpdating = True
Exit Sub
alerts:
MsgBox Err.Description
Resume LetsContinue
End Sub- Running the code removes the empty or blank rows.
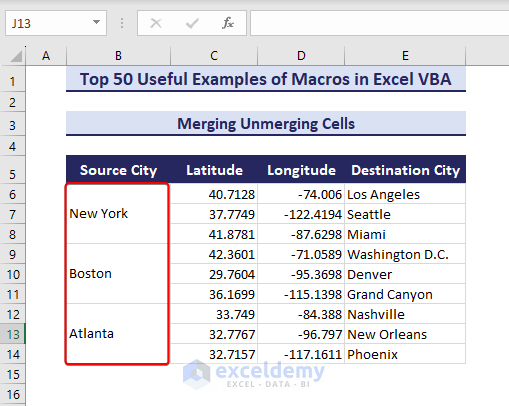
Example 7 – Merge or Unmerge Cells
Suppose you have similar data like in the Source City column that you want to merge.
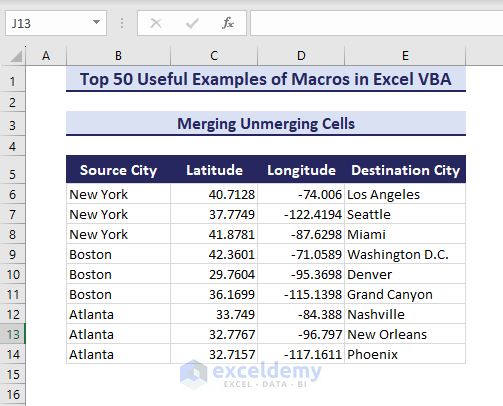
- Run the VBA code to merge the cells with similar data:
Sub MergeUnmergeCell()
'Developed by ExcelDemy
Application.DisplayAlerts = False
range("B6:B8, B9:B11, B12:B14").Merge
Application.DisplayAlerts = True
End Sub- The code merges the mentioned cells as shown in the below picture.
- To unmerge the merged cells, change this line in the code:
range("B6:B8, B9:B11, B12:B14").UnMergeExample 8 – Sort Data in Ascending Order
Consider the below dataset where we want to sort the range B8:G18 based on the percentages in column G.
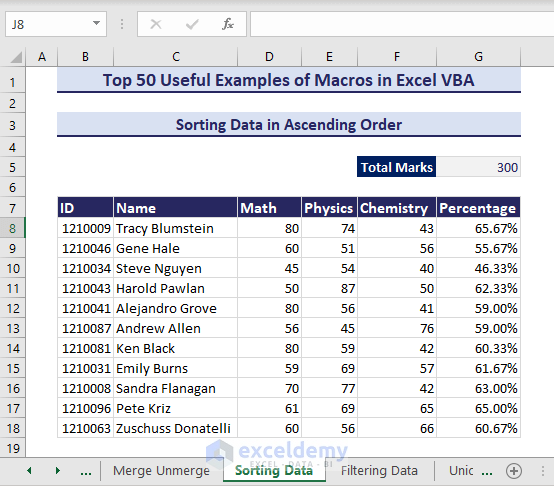
- Insert the following code in a module and click the Run
Sub SortingDatainAscendingOrder()
'Developed by ExcelDemy
Dim rngToSort As range
Set rngToSort = Worksheets("Sorting Data").range("B7:G18")
rngToSort.Sort key1:=rngToSort.Columns(6), order1:=xlAscending, Header:=xlYes
End Sub- We’ll obtain the mark percentages sorted in ascending order.
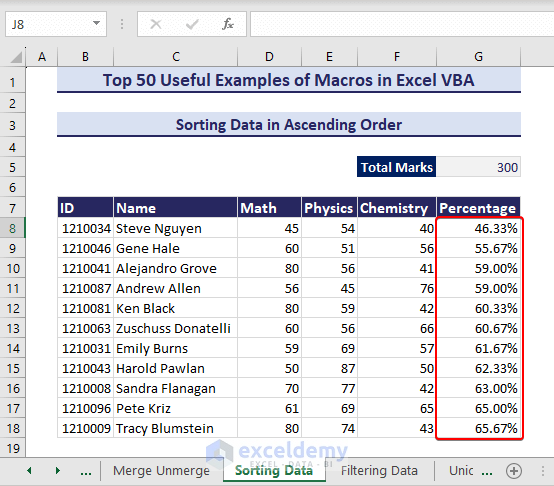
- To sort data in descending order, use the following code line:
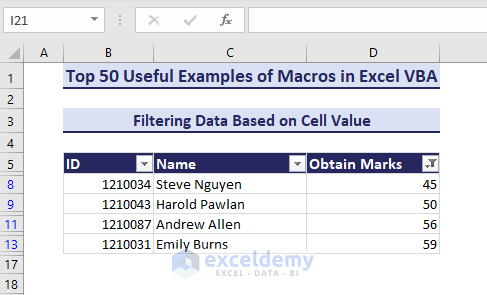
rngToSort.Sort key1:=rngToSort.Columns(6), order1:=xlDescending, Header:=xlYesExample 9 – Filter Data Based on Cell Value
See the below dataset where we want to filter the obtained marks that are below 60.
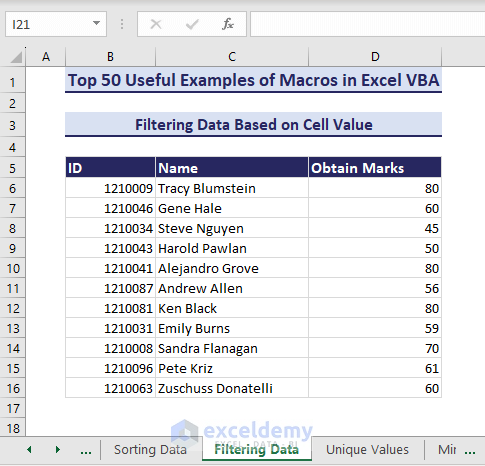
- Run the following VBA code:
Sub FilteringDataBasedonCellValue()
'Developed by ExcelDemy
range("B5:D16").AutoFilter Field:=3, Criteria1:="<60"
End Sub- The code filters data that are below 60.
Formatting Related VBA Codes
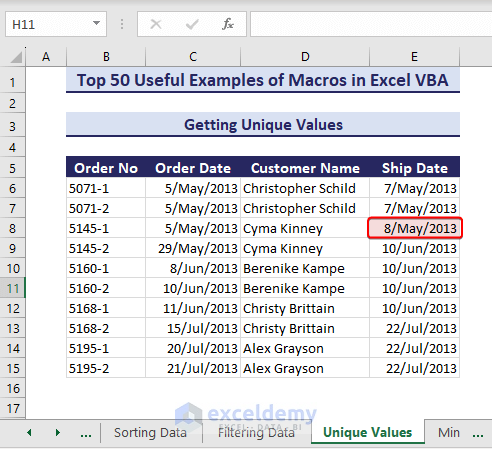
Example 10 – Finding Unique Values
Consider a dataset where you want to find the unique values in the range E6:E15.
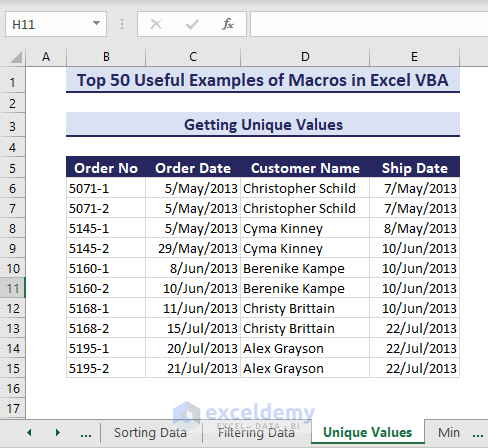
- Enter the below VBA code in a module and Run it.
Sub GetUniqueValues()
'Developed by ExcelDemy
Dim rng As range
Dim cell As range
Set rng = range("E6:E15")
rng.Interior.ColorIndex = xlNone
For Each cell In rng
If Application.WorksheetFunction.CountIf(rng, cell.Value) = 1 Then
cell.Interior.Color = RGB(245, 220, 220)
End If
Next cell
End Sub- We get the unique value highlighted as desired.
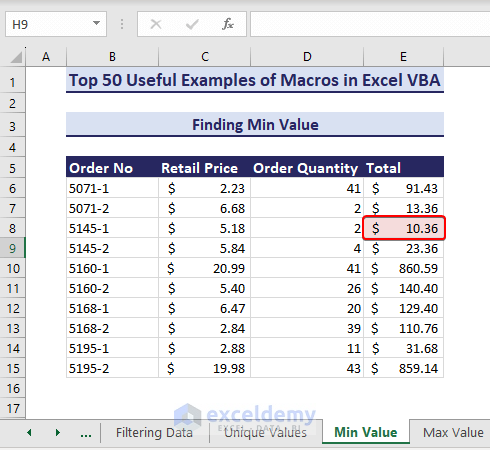
Example 11 – Find the Lowest Value in the Range
Let’s find the lowest value in the range E6:E15.
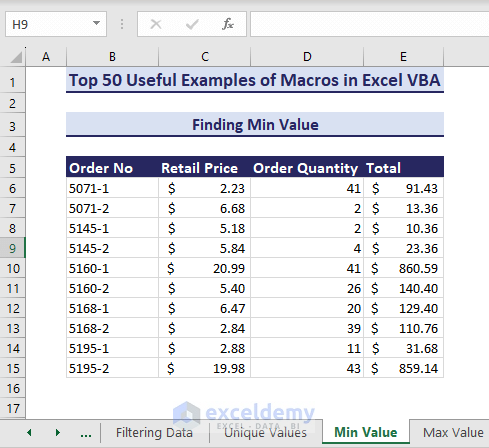
- Here’s the VBA code:
Sub FindMinValue()
' Developed by ExcelDemy
Dim rng As range
Dim targetRange As range
Dim minVal As Double
Set targetRange = range("E6:E15")
minVal = WorksheetFunction.Min(targetRange)
For Each rng In targetRange
If rng.Value = minVal Then
rng.Interior.Color = RGB(245, 220, 220)
End If
Next rng
End Sub- After running the above code, the minimum value is highlighted in cell E8.
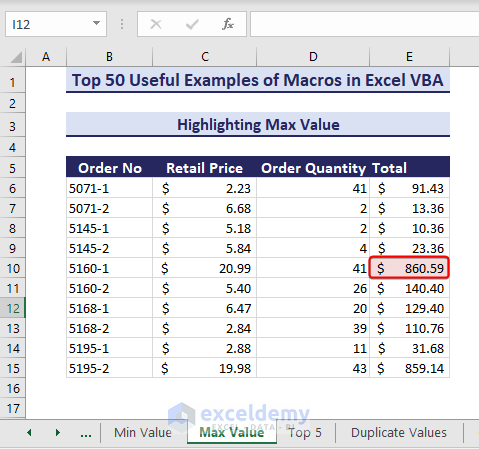
Example 12 – Highlight the Max Value in the Range
Likewise, let’s highlight the highest value in the range E6:E15.
- Here is the VBA code:
Sub HighlightMaxValue()
' Developed by ExcelDemy
Dim rng As range
Dim targetRange As range
Dim maxVal As Double
Set targetRange = range("E6:E15")
maxVal = WorksheetFunction.Max(targetRange)
For Each rng In targetRange
If rng.Value = maxVal Then
rng.Interior.Color = RGB(245, 220, 220)
End If
Next rng
End Sub- Running the code highlights the maximum value in cell E10.
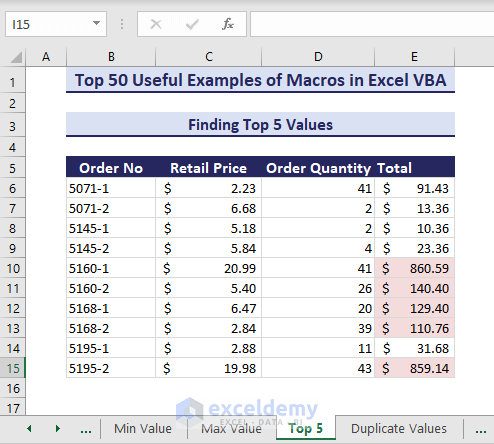
Example 13 – Find the Top 5 Values
- If you want the top 5 values instead of just the maximum value, you can apply the following code:
Sub FindTopFiveValues()
' Developed by ExcelDemy
Dim targetRange As range
Set targetRange = range("E6:E15")
targetRange.FormatConditions.Delete
targetRange.FormatConditions.AddTop10
With targetRange.FormatConditions(1)
.TopBottom = xlTop10Top
.Rank = 5
.Percent = False
End With
With targetRange.FormatConditions(1).Interior
.PatternColorIndex = xlAutomatic
.Color = RGB(245, 220, 220)
.TintAndShade = 0
End With
targetRange.FormatConditions(1).StopIfTrue = False
End Sub- After running the above code, the top 5 values are highlighted.
Example 14 – Find Duplicates Values
Suppose you want to find the duplicate values (i.e. the values that appear more than once) in the range E6:E15.
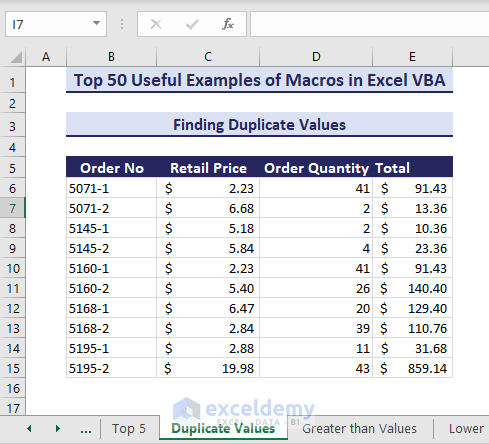
- Enter the following VBA code in a module.
Sub FindDuplicateValues()
'Developed by ExcelDemy
Dim myRng As range
Dim myCel As range
Set myRng = range("E6:E15")
For Each myCel In myRng
If WorksheetFunction.CountIf(myRng, myCel.Value) > 1 Then
myCel.Interior.Color = RGB(245, 220, 220)
End If
Next myCel
End Sub- After running the code, the duplicate values are now highlighted.

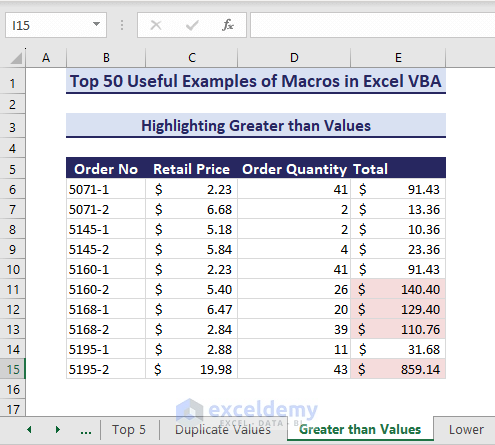
Example 15 – Highlight Greater than a Specific Value
Suppose you want to find the values that are greater than a specific number from the range E6:E15.
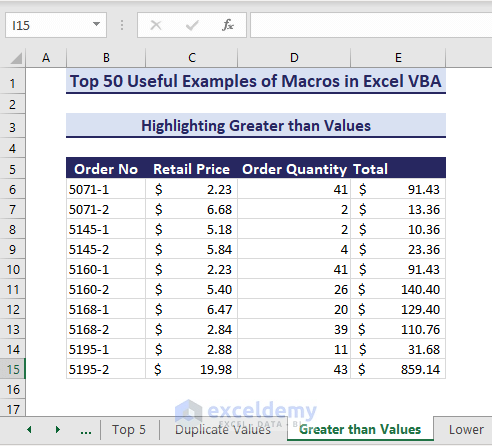
- Use the below VBA code to find numbers that are greater than 100:
Sub HighlightGreaterThanValues()
' Developed by ExcelDemy
Dim targetRange As range
Dim i As Double
Set targetRange = range("E6:E15")
i = 100
targetRange.FormatConditions.Delete
targetRange.FormatConditions.Add Type:=xlCellValue, _
Operator:=xlGreater, Formula1:=i
targetRange.FormatConditions(targetRange.FormatConditions.Count).SetFirstPriority
With targetRange.FormatConditions(1).Interior
.Color = RGB(245, 220, 220)
End With
End Sub- Running the code finds the cells that have values higher than 100.
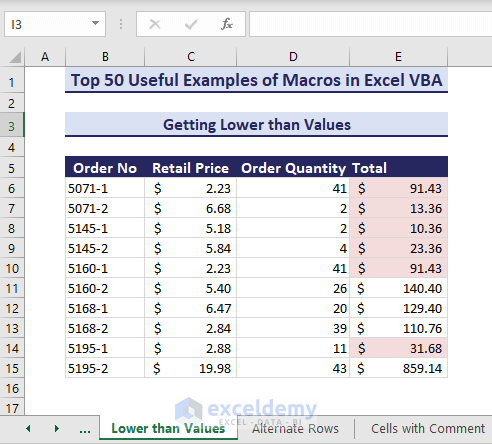
Example 16 – Highlight Lower Than a Specific Value
You can highlight the cells that are lower than a specific value.
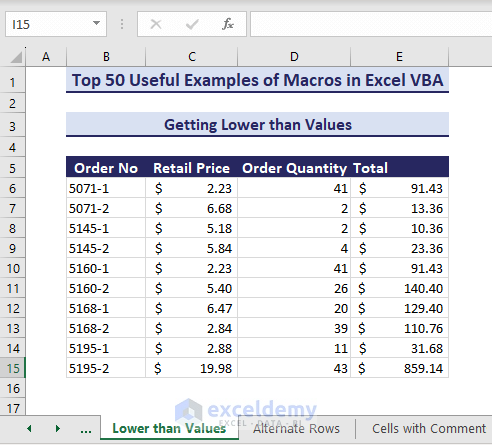
- The VBA code will highlight the cells in the range E6:E15 that are smaller than 100.
Sub HighlightLowerThanValues()
'Developed by ExcelDemy
Dim targetRange As range
Dim i As Double
Set targetRange = range("E6:E15")
i = 100
targetRange.FormatConditions.Delete
targetRange.FormatConditions.Add Type:=xlCellValue, _
Operator:=xlLess, Formula1:=i
targetRange.FormatConditions(targetRange.FormatConditions.Count).SetFirstPriority
With targetRange.FormatConditions(1).Interior
.Color = RGB(245, 220, 220)
End With
End Sub- The values get highlighted consequently.
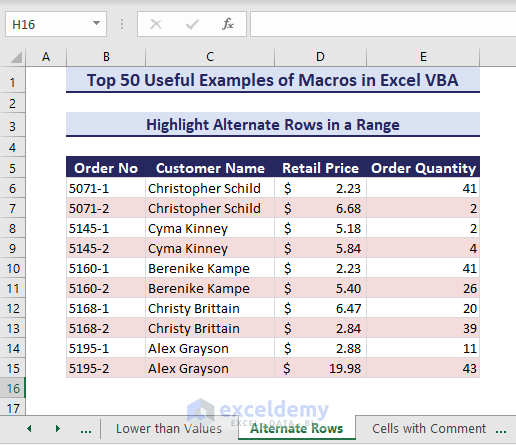
Example 17 – Highlight Alternate Rows in a Range
You can highlight the alternate rows to make your data more readable.
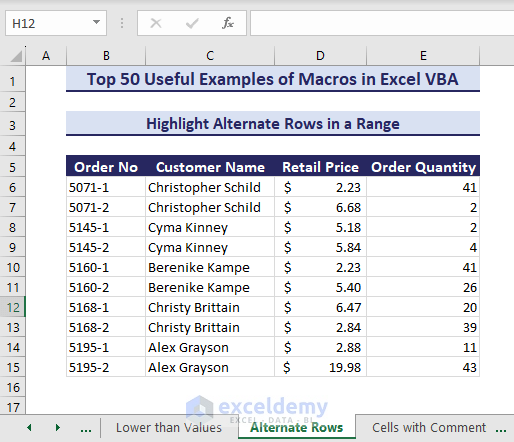
- The following VBA code highlights the alternate rows:
Sub HighlightAlternateRowsfromRange()
' Developed by ExcelDemy
Dim targetRange As range
Dim rng As range
Set targetRange = range("B6:E15")
For Each rng In targetRange.Rows
If rng.row Mod 2 = 1 Then
rng.Interior.Color = RGB(245, 220, 220)
Else
rng.Interior.ColorIndex = xlNone
End If
Next rng
End Sub- Running the code returns the highlighted alternate rows.
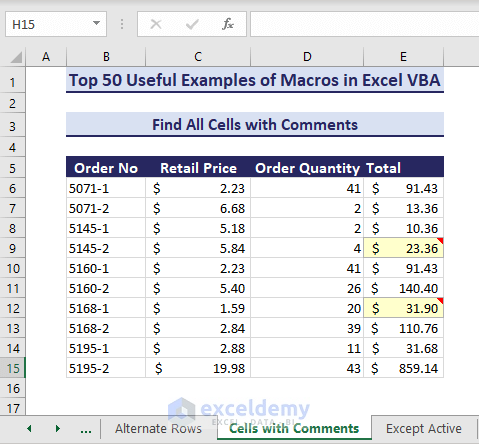
Example 18 – Find All Cells With Comments
In a large dataset, it is hard to find all the cells that have comments.
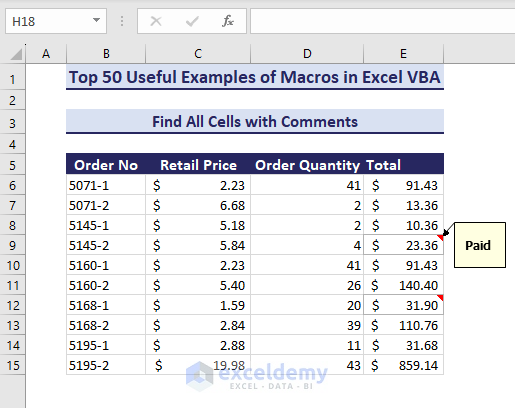
- Here is the VBA code to highlight cells with comments:
Sub FindAllCellsWithComments()
' Developed by ExcelDemy
Dim targetRange As range
Dim cell As range
Set targetRange = range("B6:E15")
For Each cell In targetRange
If Not cell.Comment Is Nothing Then
cell.Style = "Note"
End If
Next cell
End Sub- Running the code highlights the cells with comments.
Worksheet Related VBA Codes
Example 19 – Hide All Except Active Worksheet
Suppose you want to hide all sheets except the active worksheet in your workbook. Consider the below workbook where you want to hide every sheet except the active sheet which is named “Except Active”.

- Insert the following code in a module and click the Run button.
Sub HideWorksheetExceptActiveSheet()
'Developed by ExcelDemy
Dim ws As Worksheet
For Each ws In ThisWorkbook.Worksheets
If ws.Name <> ThisWorkbook.ActiveSheet.Name Then
ws.Visible = xlSheetHidden
End If
Next ws
End Sub- Except for the active sheet, all sheets are now hidden.

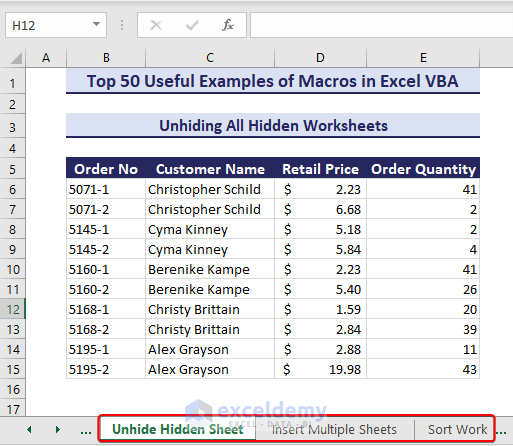
Example 20 – Unhide All Hidden Worksheets
Let’s unhide the hidden worksheets which could take a lot of time if done manually.
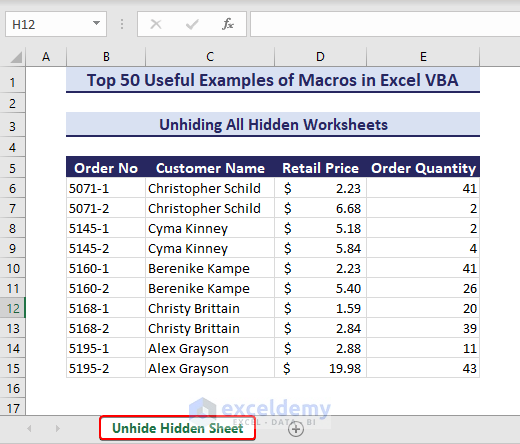
- The VBA code below can do the task.
Sub UnhideAllHiddenWorksheets()
'Developed by ExcelDemy
Dim ws As Worksheet
For Each ws In ActiveWorkbook.Worksheets
ws.Visible = xlSheetVisible
Next ws
End Sub- After running the code, we get the hidden sheets appearing in the workbook again.
Example 21 – Insert Multiple Worksheets
Let’s say you need to insert multiple worksheets at once.
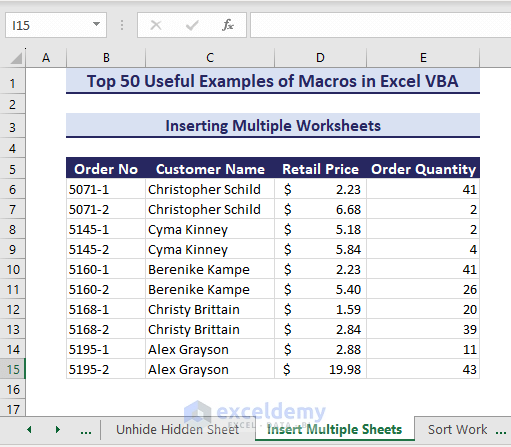
- Run this VBA code:
Sub InsertMultipleWorkSheets()
'Developed by ExcelDemy
Dim i As Integer
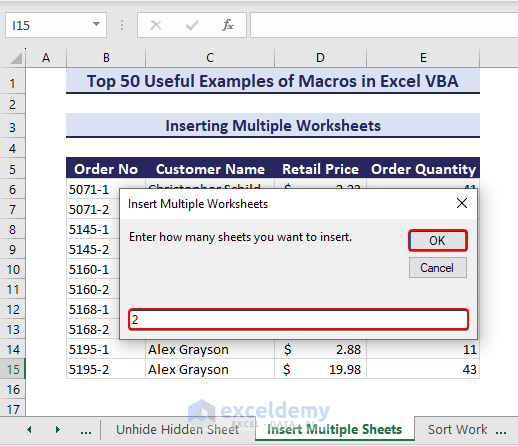
i = InputBox("Enter how many sheets you want to insert.", "Insert Multiple Worksheets")
Sheets.Add After:=ActiveSheet, Count:=i
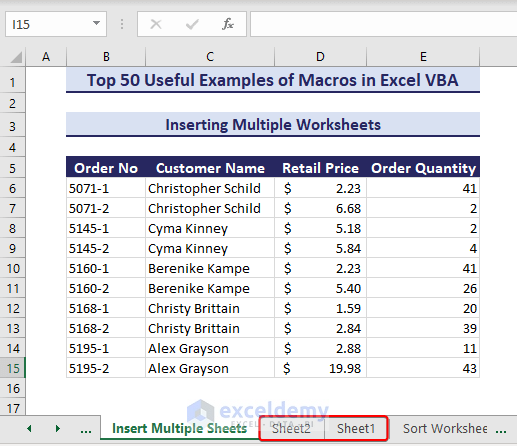
End Sub- The following input box appears. Put the number of worksheets you want to add and click OK. We have entered 2.
- As a result, two new worksheets appear after the active sheet.
Example 22 – Sort Worksheets in Alphabetical Order
In this picture, we can see the data are in random order.
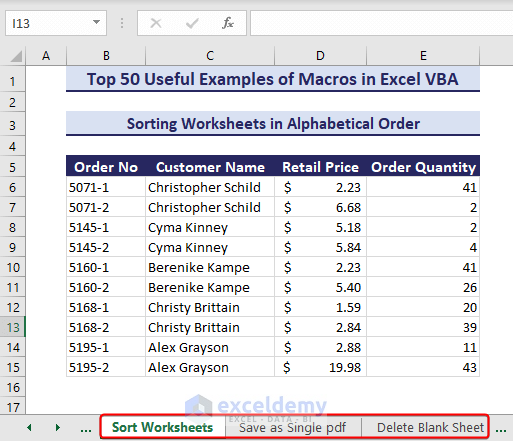
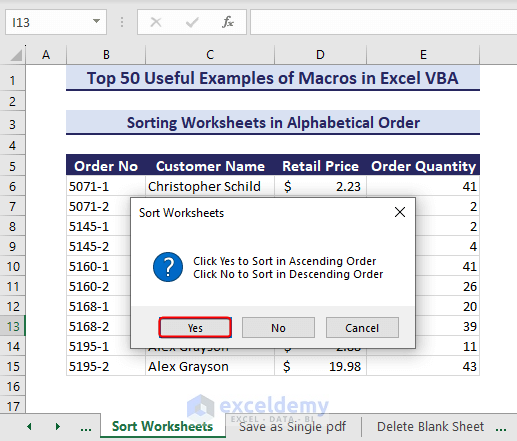
- Run the VBA code to sort worksheets in ascending or descending alphabetical order.
Sub SortingWorksheetsinAlphabeticalOrder()
'Developed by ExcelDemy
    Set wb = ThisWorkbook
    Dim m As Integer
    Dim n As Integer
    Dim sheetOrder As VbMsgBoxResult
    sheetOrder = MsgBox("Click Yes to Sort in Ascending Order" & vbCrLf _
    & "Click No to Sort in Descending Order", vbYesNoCancel + vbQuestion + vbDefaultButton1)

    For m = 1 To wb.Sheets.Count
        For n = 1 To wb.Sheets.Count - 1
            If sheetOrder = vbYes Then
                If StrComp(wb.Sheets(n).Name, wb.Sheets(n + 1).Name) > 0 Then
                    wb.Sheets(n).Move After:=wb.Sheets(n + 1)
                End If
            ElseIf sheetOrder = vbNo Then
                If StrComp(wb.Sheets(n).Name, wb.Sheets(n + 1).Name) < 0 Then
                    wb.Sheets(n).Move After:=wb.Sheets(n + 1)
                End If
            End If
        Next n
    Next m
End Sub
- Click the Yes button to sort in ascending order or the No button to sort in Descending order.
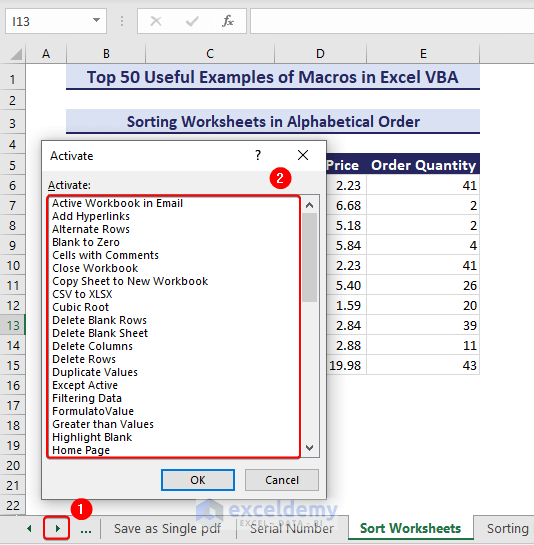
- If you right-click on the green toggle button, you will see the worksheets get sorted in ascending alphabetical order.
Example 23 – Save Each Worksheet as a Separate PDF
Here, we have 51 sheets in the following workbook. Saving them into separate PDFs would take too long.
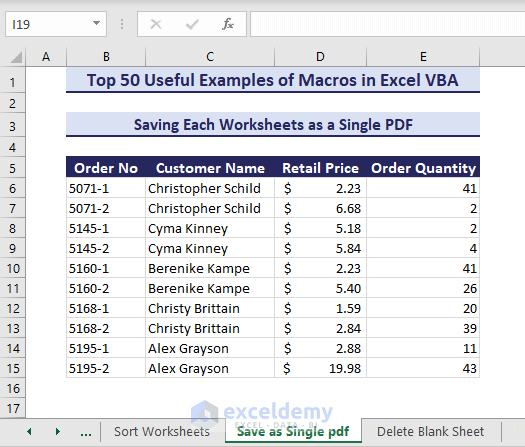
- Enter the following code in a module.
Sub SavingWorksheetsasSinglePDF()
'Developed by ExcelDemy
Dim ws As Worksheet
Dim savePath As String
' Set the path where PDFs will be saved
savePath = "C:\Users\YOUSUF\Desktop\"
For Each ws In Worksheets
ws.ExportAsFixedFormat Type:=xlTypePDF, Filename:=savePath & ws.Name & ".pdf"
Next ws
MsgBox "PDFs saved successfully.", vbInformation
End Sub- You will get this message box.
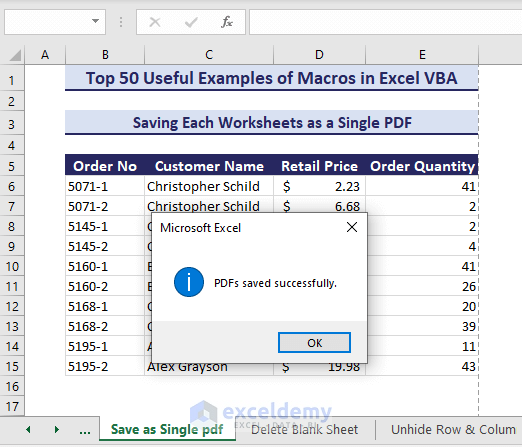
- If you go to the file path location mentioned in the code, you will find 51 PDF files.

Example 24 – Delete all Blank Worksheets
For an Excel file with a large number of worksheets, finding blank sheets annually can take a long time. The Delete Blank Sheet in the below picture is a blank worksheet which we will delete here.
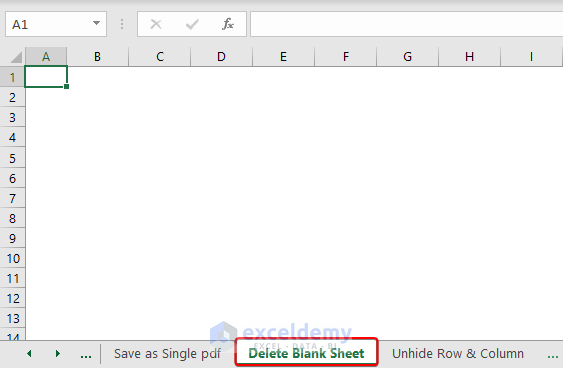
- You can use the following VBA code to delete all blank sheets in a workbook:
Sub RemoveBlankWorksheets()
'Developed by ExcelDemy
Dim wrk_sheet As Worksheet
Application.ScreenUpdating = False
Application.DisplayAlerts = False
Dim count As Integer
For Each wrk_sheet In ThisWorkbook.Sheets
count = 0
For Each cell In wrk_sheet.UsedRange.Cells
If cell.Value <> "" Then
count = count + 1
Exit For
End If
Next cell
If count = 0 Then
wrk_sheet.Delete
End If
Next wrk_sheet
Application.DisplayAlerts = True
Application.ScreenUpdating = True
End Sub
- Running the code deletes the blank worksheet.

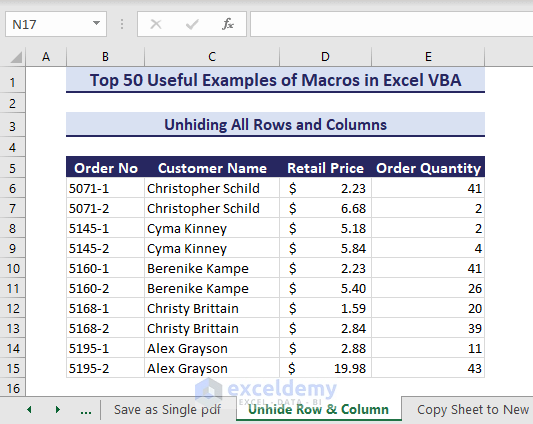
Example 25 – Unhide all Rows and Columns
If your worksheet has hidden columns and rows as shown in the picture below, you can unhide them with VBA macros.
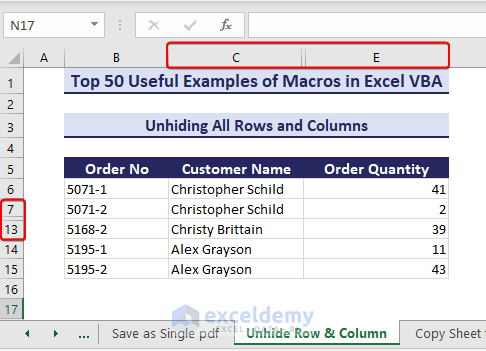
- Run the below VBA code.
Sub UnhideRowColumn()
Columns.EntireColumn.Hidden = False
Rows.EntireRow.Hidden = False
End Sub- After running the code, the hidden rows and columns get unhidden.
Workbook-Related VBA Codes
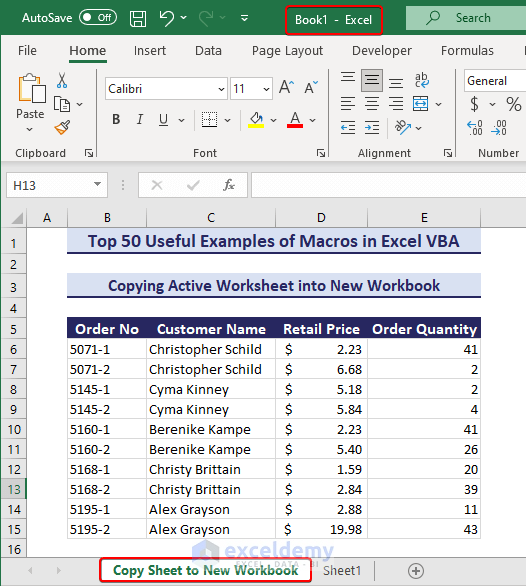
Example 26 – Copy the Active Worksheet into a New Workbook
Let’s consider the sheet named Copy Sheet to New Workbook as the active sheet and we want to copy the entire sheet in a new Excel workbook.
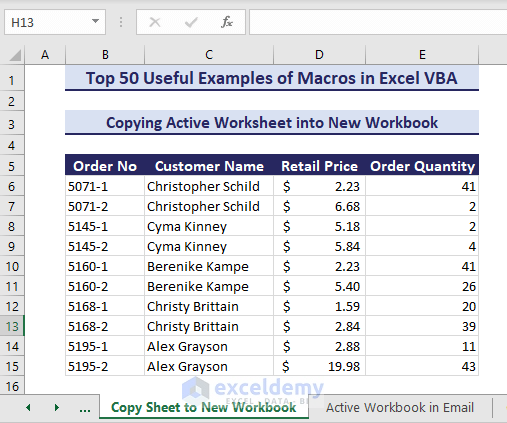
- Here’s VBA code:
Sub CopyActiveWorksheetintoNewWorkbook()
'Developed by ExcelDemy
ThisWorkbook.ActiveSheet.Copy _
Before:=Workbooks.Add.Worksheets(1)
End Sub- Running the code copies the sheet in the new workbook named Book1.
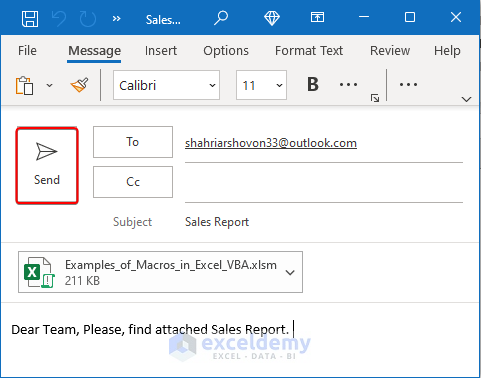
Example 27 – Send the Active Workbook in an Email
Let’s consider you have a report in Excel and you want to send the report to your team members via email.
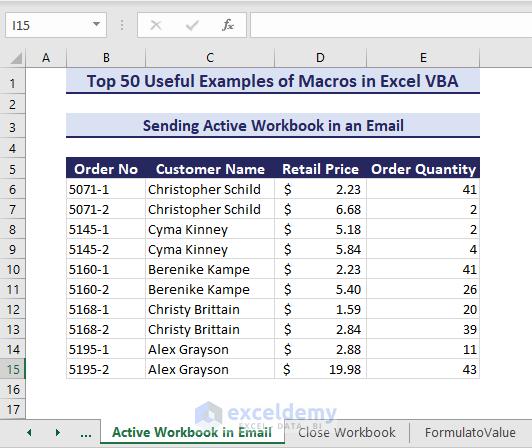
- Run the below VBA code:
Sub SendActiveWorkbookinEmail()
'Developed by ExcelDemy
Dim outlool_app As Object
Dim outlook_mail As Object
Set outlook_app = CreateObject("Outlook.Application")
Set outlook_mail = outlook_app.CreateItem(0)
With outlook_mail
.To = "[email protected]"
.Subject = "Sales Report"
.Body = "Hello Seemanto. Please, find attached Sales Report."
.Attachments.Add ThisWorkbook.FullName
.display
End With
Set outlook_mail = Nothing
Set outlook_app = Nothing
End Sub
- The workbook is attached to your email. Press the Send button to send the mail.
Example 28 – Close a Workbook with or Without Saving
You can close a workbook with or without saving using VBA macro. The below code will close a workbook after saving it first:
Sub CloseWorkbooks()
'Developed by ExcelDemy
Dim wb As Workbook
Set wb = Workbooks("WorkbookName.xlsx")
wb.Close SaveChanges:=True
End Sub
If you want to close this workbook without saving it, change this line to:
wb.Close SaveChanges:=FalseFormula Related VBA Codes
Example 29 – Convert All Formulas into Values
The range E6:E15 in the below picture is a formula range. We want to only leave values in the sheet so they become static.

- Run the below VBA code:
Sub ConvertFormulasintoValues()
'Developed by ExcelDemy
Dim targetRange As range
Dim targetCell As range
Set targetRange = range("E6:E15")
For Each targetCell In targetRange
If targetCell.HasFormula Then
targetCell.Formula = targetCell.Value
End If
Next targetCell
End Sub- After running the code, the formula range converts into a value range.

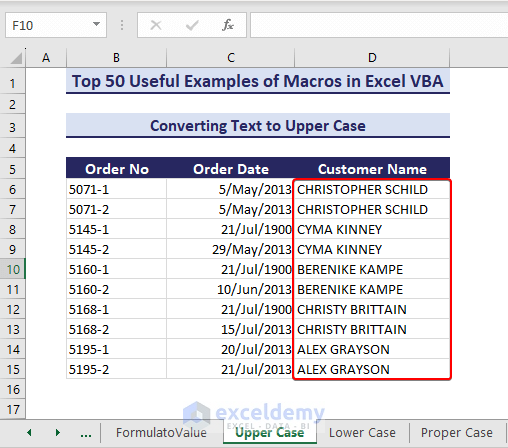
Example 30 – Convert Text to Upper Case
We have a list of names in D6:D15 that we want to convert to upper-case using VBA.
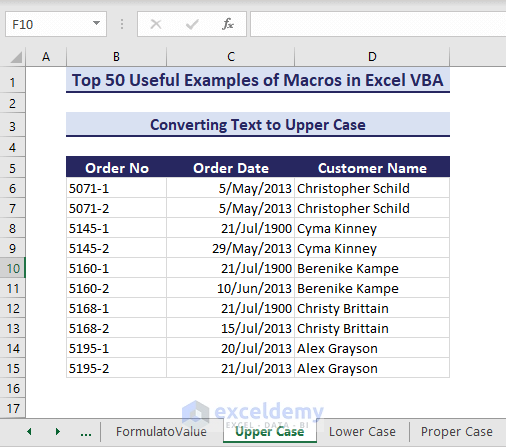
- Insert the following code in a module and click Run.
Sub ConvertTextToUpperCase()
' Developed by ExcelDemy
Dim targetRange As range
Dim cell As range
Set targetRange = range("D5:D15")
For Each cell In targetRange
If Application.WorksheetFunction.IsText(cell.Value) Then
cell.Value = UCase(cell.Value)
End If
Next cell
End Sub- After running the VBA code, the texts in range E6:E15 are converted into upper-case.
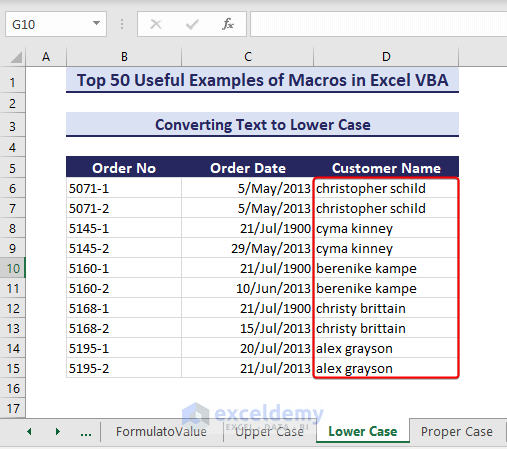
Example 31 – Convert to Lower Case
We can also convert the same range into the lower-case.
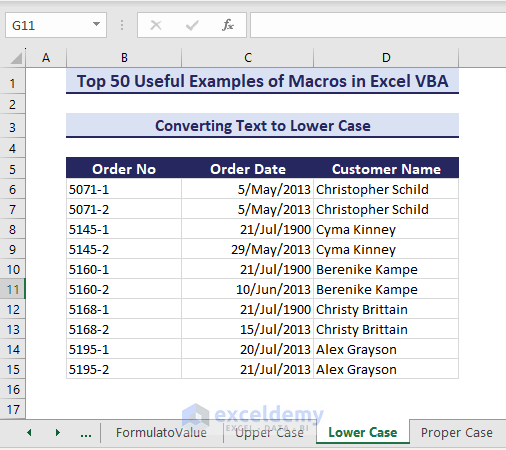
- Run the below VBA code:
Sub ConvertTexttoLowerCase()
'Developed by ExcelDemy
Dim targetRange As range
Dim cell As range
Set targetRange = range("D5:D15")
For Each cell In targetRange
If Application.WorksheetFunction.IsText(cell.Value) Then
cell.Value = LCase(cell.Value)
End If
Next cell
End Sub- The texts in range D6:D15 convert into lower-case.
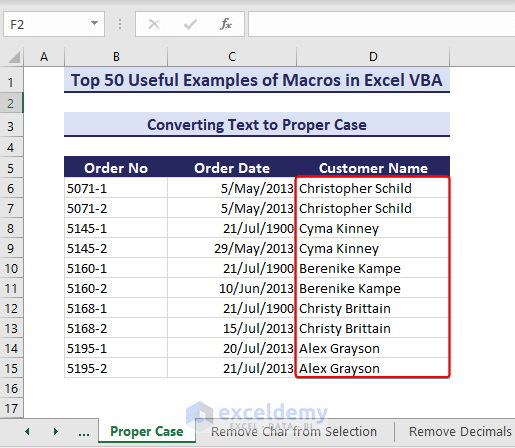
Example 32 – Convert to Proper Case
We will convert any texts to the proper cases using VBA macros. In this case, we have the characters in lowercase.
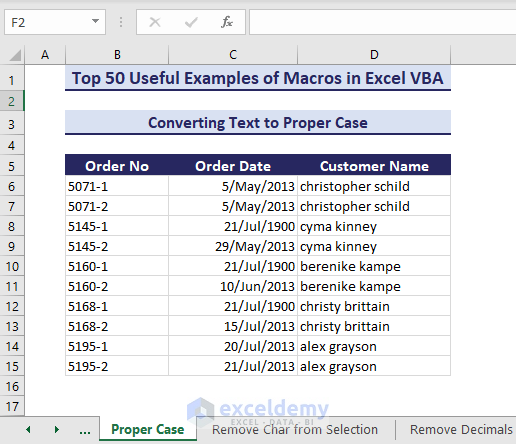
- Run the below VBA code in your workbook:
Sub ConvertTextToProperCase()
' Developed by ExcelDemy
Dim targetRange As range
Dim cell As range
Set targetRange = range("D6:D16")
For Each cell In targetRange
If WorksheetFunction.IsText(cell) Then
cell.Value = WorksheetFunction.Proper(cell.Value)
End If
Next cell
End Sub- After running the code, it successfully converts the texts into the proper case.
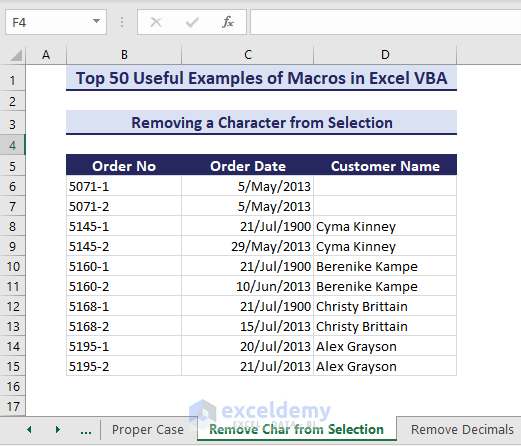
Example 33 – Remove a Character from Selection
Let’s say we have selected the range D6:D15 where we want to remove a character.
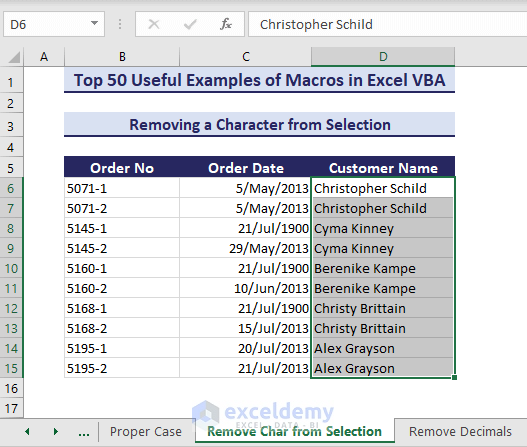
- Run the following code after selecting the desired range.
Sub RemoveCharfromSelection()
'Developed by ExcelDemy
Dim target_range As range
Set target_range = Selection
Dim rem_char As String
rem_char = InputBox("Enter the characters that you want to replace", "Enter Characters to Replace")
For Each cell In target_range.Cells
cell.Replace What:=rem_char, Replacement:=""
Next
End Sub
- An input box appears. Type the character you want to remove from the selected range and click OK.
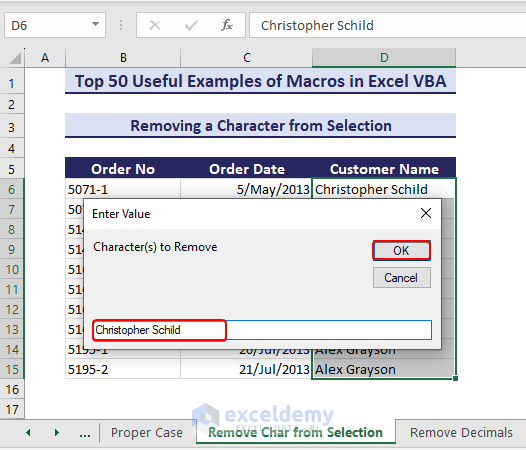
- The VBA code removes the characters successfully.
Example 34 – Remove Decimals from Numbers
Let’s remove the decimals from the numbers in the range D6:D15 using VBA.
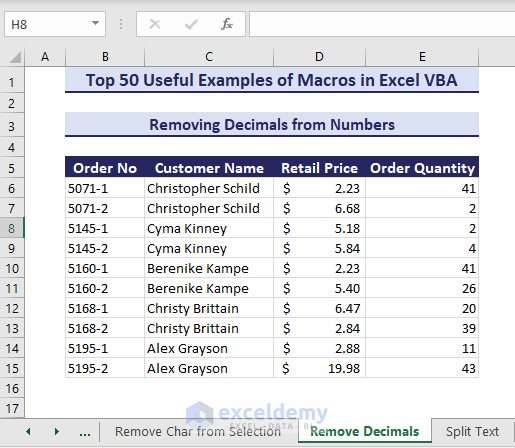
- Run the below VBA code:
Sub RemoveDecimalsFromNumbers()
' Developed by ExcelDemy
Dim targetRange As range
Dim cell As range
Set targetRange = range("D6:D15")
For Each cell In targetRange
If IsNumeric(cell.Value) Then
cell.Value = Int(cell.Value)
cell.NumberFormat = "0"
End If
Next cell
End Sub- Executing the code removes the decimals and returns integer numbers in the Retail Price column.

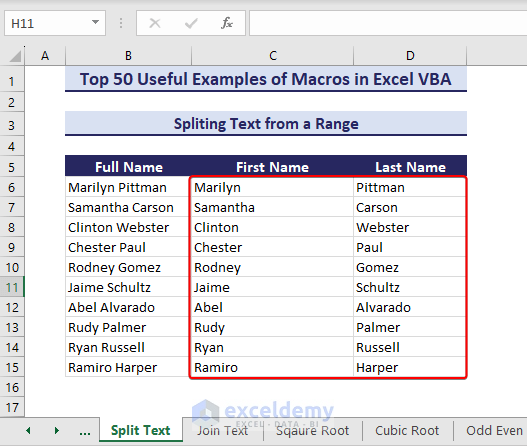
Example 35 – Splitting Text from a Range
Consider the following dataset. We have a List of Full Names. We will split these full names into first and last names in columns First Name and Last Name, respectively.
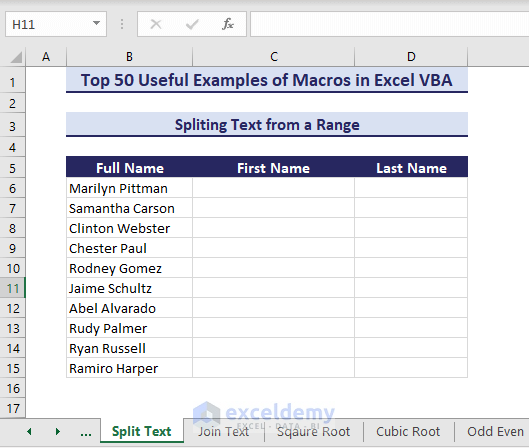
- Copy and run the below VBA code:
Sub SplitTextFromRange()
' Developed by ExcelDemy
Dim sourceRange As range
Dim cell As range
Dim textString As String
Dim result() As String
Set sourceRange = range("B6:B16")
For Each cell In sourceRange
If Not IsEmpty(cell.Value) Then
textString = cell.Value
result = Split(textString)
cell.Offset(0, 1).Resize(1, UBound(result) + 1).Value = result
End If
Next cell
End Sub- We get our first and last names.
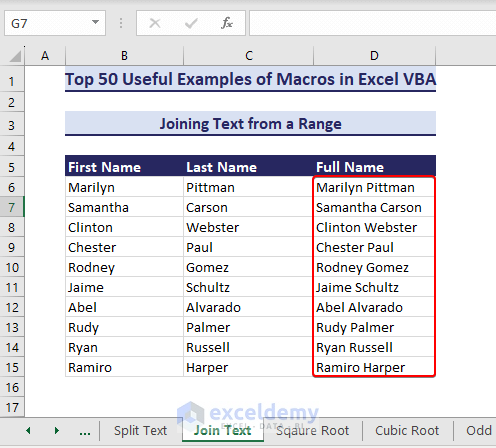
Example 36 – Joining Text from a Range
We can join multiple texts such as first and last names and show the full names using VBA macros.
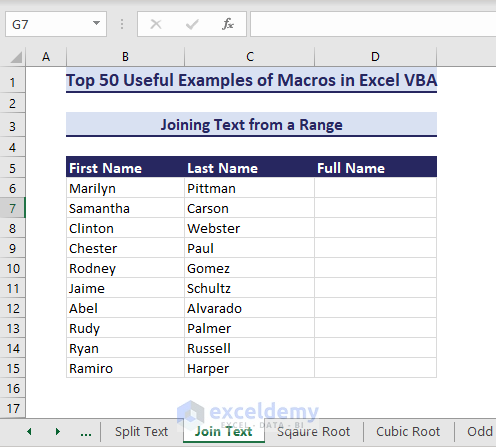
- This VBA code can join the texts in columns First Name and Last Name and make a full name in column Full Name:
Sub JoinTextFromRange()
' Developed by ExcelDemy
Dim firstNames As range
Dim lastNames As range
Dim joinedTextRange As range
Dim cellFirstName As range
Dim cellLastName As range
Dim targetCell As range
Dim joinedText As String
Set firstNames = range("B6:B15")
Set lastNames = range("C6:C15")
Set joinedTextRange = range("D6:D15")
For Each cellFirstName In firstNames
Set cellLastName = lastNames.Cells(cellFirstName.row - firstNames.Cells(1, 1).row + 1, 1)
If Not IsEmpty(cellFirstName.Value) And Not IsEmpty(cellLastName.Value) Then
joinedText = cellFirstName.Value & " " & cellLastName.Value
joinedTextRange.Cells(cellFirstName.row - firstNames.Cells(1, 1).row + 1, 1).Value = joinedText
End If
Next cellFirstName
End Sub- After running the code, we get the joined texts in the range D6:D15.
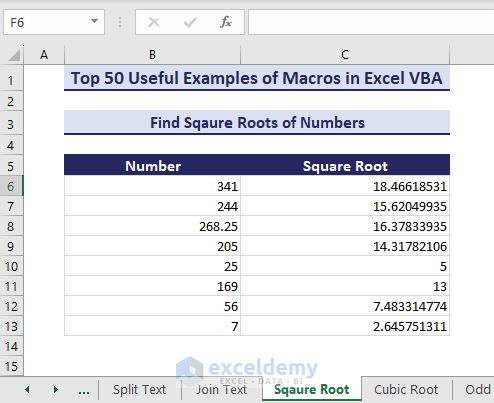
Example 37 – Calculate the Square Root
We can write a VBA code that calculates the square root of each cell value in a given range.
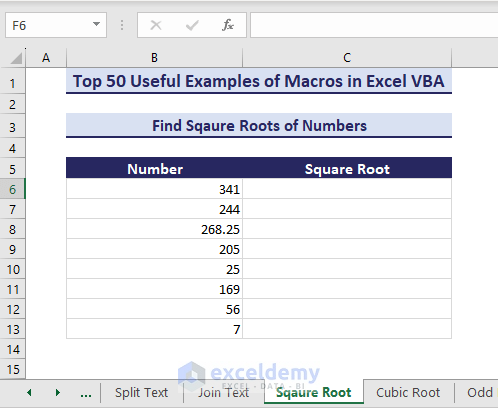
- Here is the code to calculate square roots.
Sub FindSquareRoot()
' Developed by ExcelDemy
Dim numbersRange As range
Dim cell As range
Set numbersRange = range("B6:B15")
If numbersRange Is Nothing Then
MsgBox "Invalid source range.", vbExclamation
Exit Sub
End If
For Each cell In numbersRange
If WorksheetFunction.IsNumber(cell.Value) Then
cell.Offset(0, 1).Value = Sqr(cell.Value)
End If
Next cell
End Sub- After running the code, the square roots of the given range B6:B15 will appear in the Square Root column.
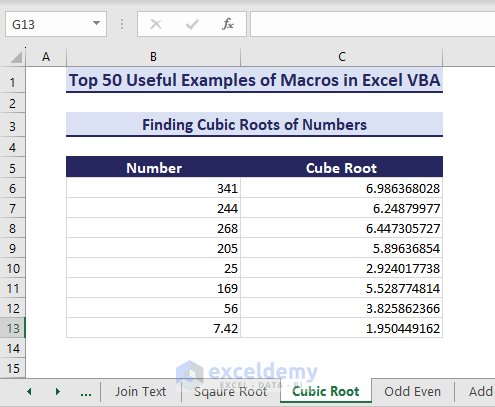
Example 38 – Calculate the Cube Root
Similarly, we can calculate the cube root of a range of numbers using VBA.
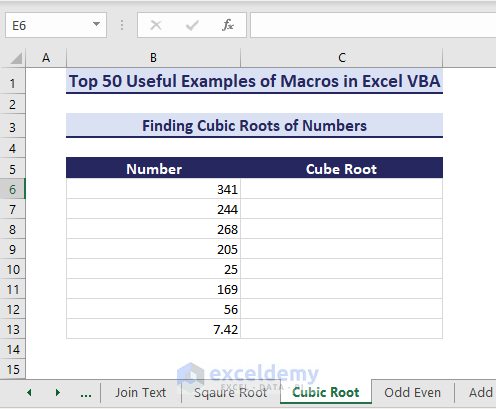
- The VBA code to calculate the cubic root of numbers is:
Sub FindCubicRoot()
' Developed by ExcelDemy
Dim numbersRange As range
Dim cell As range
Set numbersRange = range("B6:B15")
If numbersRange Is Nothing Then
MsgBox "Invalid source range.", vbExclamation
Exit Sub
End If
For Each cell In numbersRange
If WorksheetFunction.IsNumber(cell.Value) Then
cell.Offset(0, 1).Value = cell.Value ^ (1 / 3)
End If
Next cell
End Sub- After executing the code, you will get the cube root values as shown in the following image.
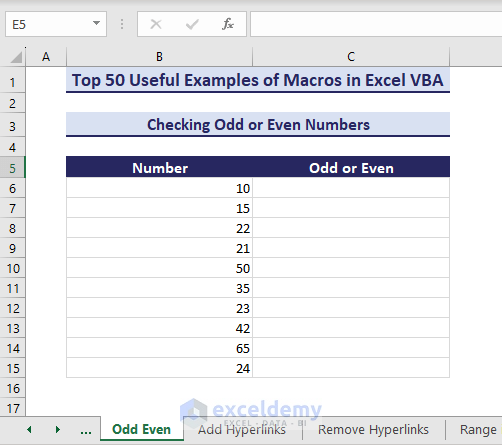
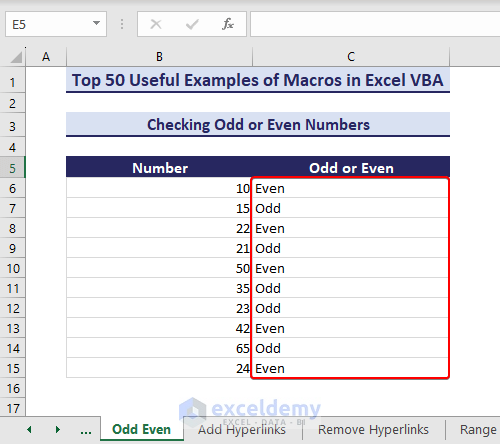
Example 39 – Check for Even or Odd Values
Consider the following dataset with numbers and you want to check whether these numbers are odd or even.
- Run this VBA code:
Sub CheckOddOrEven()
'Developed by ExcelDemy
Dim numbersRange As range
Dim cell As range
Set numbersRange = range("B6:B15")
For Each cell In numbersRange
If IsNumeric(cell.Value) Then
If cell.Value Mod 2 = 0 Then
cell.Offset(0, 1).Value = "Even"
Else
cell.Offset(0, 1).Value = "Odd"
End If
Else
MsgBox "The value in a cell is not a valid number.", vbExclamation
End If
Next cell
End Sub- The code verifies whether the digits are odd or even and shows them in column C.
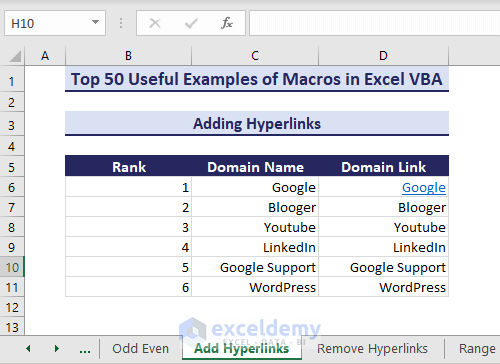
Example 40 – Adding Hyperlinks
Hyperlinking data is important to make a report or list of browsers.

- Use the VBA code to create a hyperlink in cell D6:
Sub AddHyperlinks()
Dim targetRange As range
On Error Resume Next
Set targetRange = range("D6")
Dim i As Long
Dim link As String
For i = targetRange.Rows.Count To 1 Step -1
If targetRange.Cells(i, 1).Value <> "" Then
link = "https://google.com/" & CStr(targetRange.Cells(i, 1).Value)
targetRange.Cells(i, 1).Hyperlinks.Add Anchor:=targetRange.Cells(i, 1), Address:=link, TextToDisplay:=CStr(targetRange.Cells(i, 1).Value)
End If
Next i
End Sub- We get the desired hyperlink in cell D6.
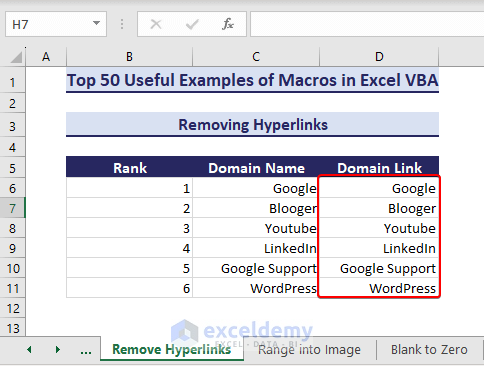
Example 41 – Removing Hyperlinks
You may want to remove hyperlinks from hyperlinked cells.
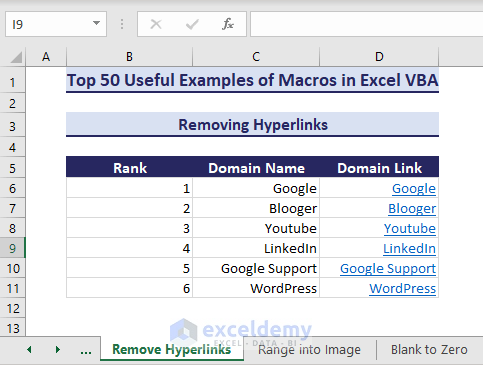
- Run the below VBA code:
Sub RemoveHyperlink()
'Developed by ExcelDemy
Dim ws As range
Set ws = range("D6:D11")
ws.Hyperlinks.Delete
End Sub- After running the code, the hyperlinks in the range D6:D11 are removed.
Some Advanced VBA Codes
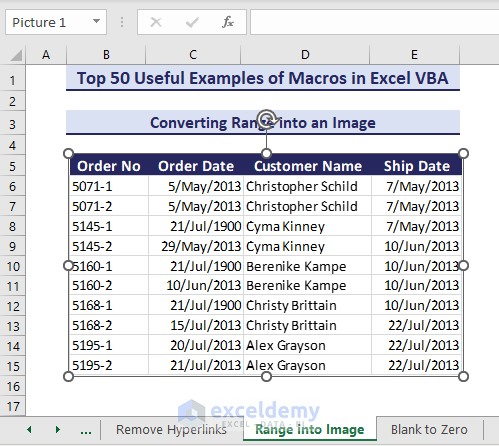
Example 42 – Convert a Range into an Image
Suppose you have a selected range and you need it in image format.
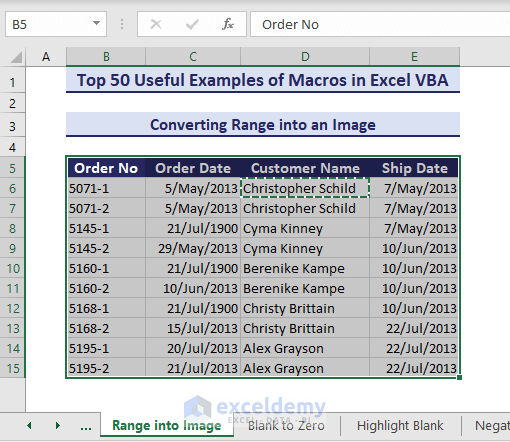
- Use the below VBA code:
Sub InsertRangeinPicture()
'Developed by ExcelDemy
Application.CutCopyMode = False
Selection.Copy
ActiveSheet.Pictures.Paste.Select
End Sub- The selected range converts into a picture.
Example 43 – Replace Blank Cells with Zeros
In the below dataset, we can see blank cells in the Order Quantity column that need to be replaced with zeros.
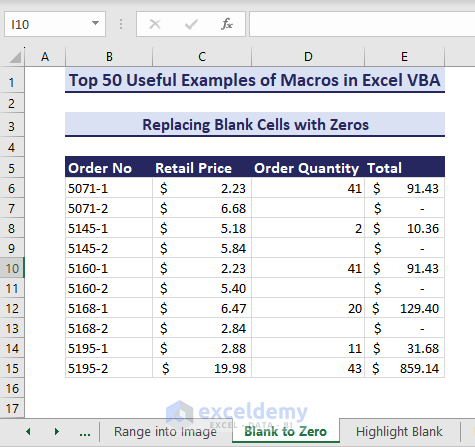
- Use the below VBA code to replace blank cells with zeros.
Sub ReplaceBlankCellswithZeros()
'Developed by ExcelDemy
Dim rng As range
Set rng = range("D6:D15")
rng.Value = rng.Value
For Each rng In rng
If rng = "" Or rng = " " Then
rng.Value = "0"
Else
End If
Next rng
End Sub- After running the VBA code, zeros appear replacing the blank cells in the target range.

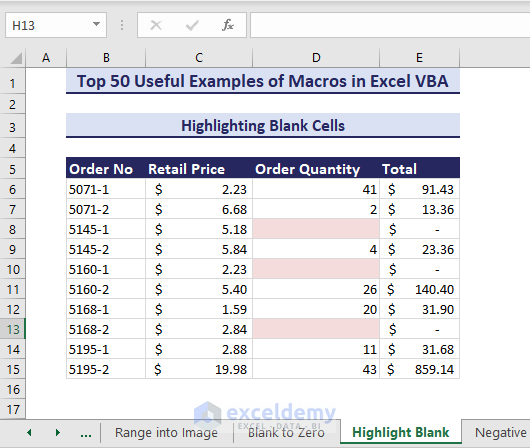
Example 44 – Highlight Blank Cells With VBA
- Use this VBA code:
Sub HighlightBlankCells()
'Developed by ExcelDemy
Dim ds As range
Set ds = range("D6:D15")
ds.SpecialCells(xlCellTypeBlanks).Interior.Color = RGB(245, 220, 220)
End Sub- Running the VBA code highlights the blank cells in the range D6:D15.
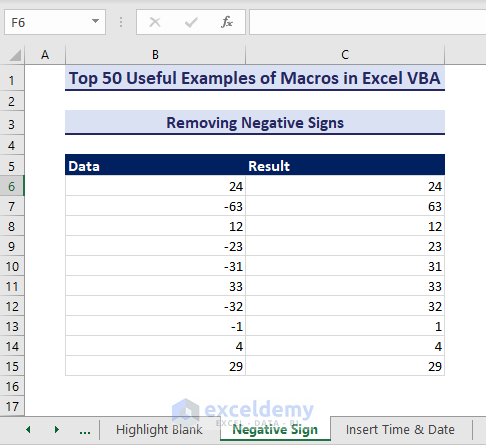
Example 45 – Remove Negative Signs
You might want to remove the negative signs on your dataset.

- Run the VBA code:
Sub RemoveNegativeSigns()
'Developed by ExcelDemy
Dim numbersRange As range
Dim cell As range
Set numbersRange = range("B6:B15")
numbersRange.Value = numbersRange.Value
For Each cell In numbersRange
If WorksheetFunction.IsNumber(cell.Value) Then
cell.Offset(0, 1).Value = Abs(cell.Value)
End If
Next cell
End Sub- The code removes the negative signs from the range and places the converted values in the Result column.
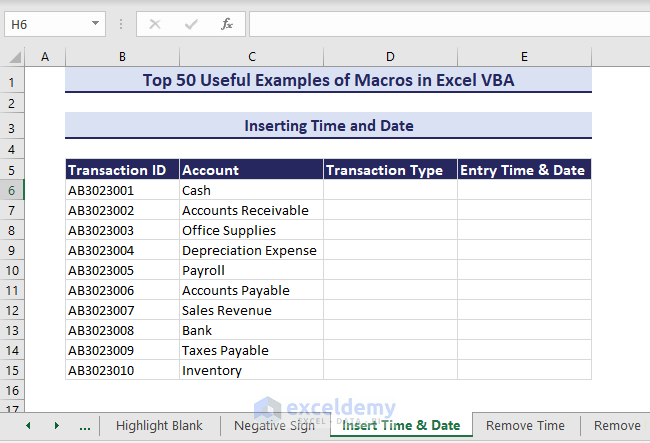
Example 46 – Insert the Date and Time
If you are working with data entry, you might want to show the entry time and date along with your data. We want to insert the time and date in the Entry Time & Date column when the subsequent cell in the Transaction Type column is changed.
- Right-click on your worksheet tab name to View Code.
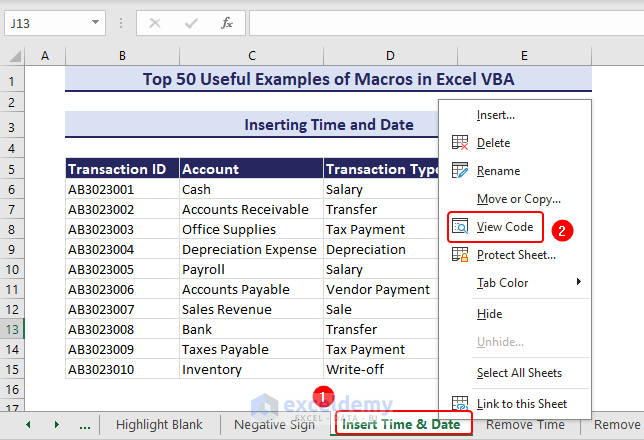
- Copy the following VBA code to the module:
Private Sub Worksheet_Change(ByVal Target As range)
'Developed by ExcelDemy
If Not Intersect(Target, range("D:D")) Is Nothing Then
On Error Resume Next
If Target.Value <> "" Then
Target.Offset(0, 1).Value = Format(Now, "mm/dd/yyyy HH:mm:ss")
Else
Target.Offset(0, 1).Value = ""
End If
On Error GoTo 0
End If
End Sub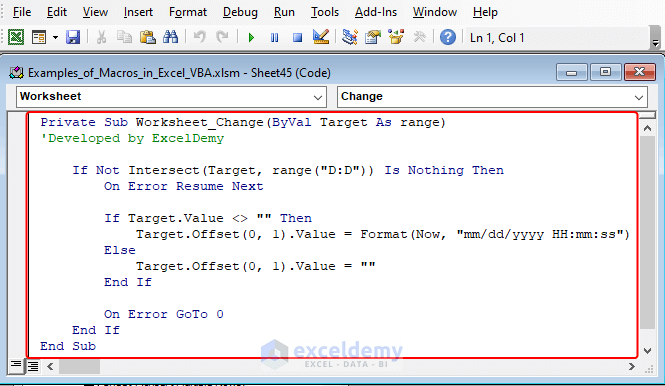
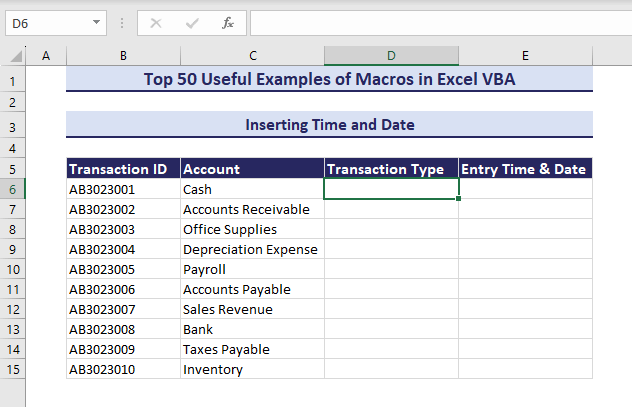
- Enter data in column D and the VBA will automatically insert time and date in column E.
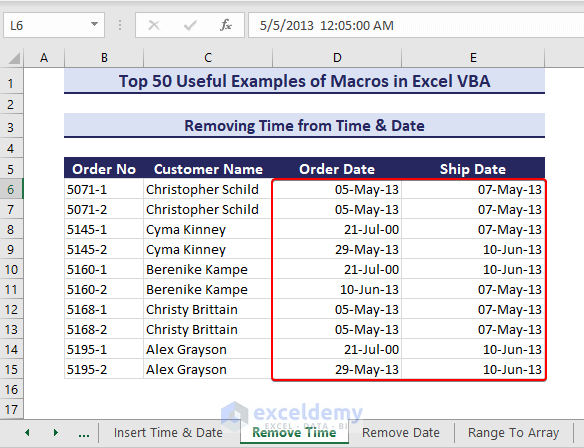
Example 47 – Remove Time from Time and Date
We have the date and time in the Order Date and Shipment Date columns. We will remove the time values from here and keep the date only.
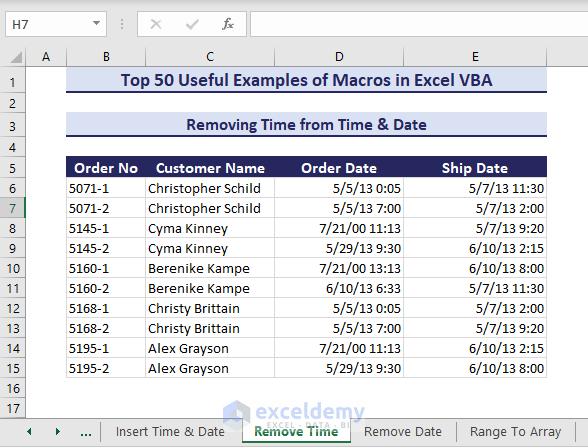
- Insert the following code in a module.
Sub RemoveTimefromTimeDate()
'Developed by ExcelDemy
Dim timeRange As range
Dim cell As range
Set timeRange = range("D6:E15")
For Each cell In timeRange
If IsDate(cell.Value) Then
cell.Value = VBA.Int(cell.Value)
End If
Next cell
timeRange.NumberFormat = "dd-mmm-yy"
End Sub- After running the code, we get the date only.
Example 48 – Remove Date from Time and Date
- Enter the following code in a module and click the Run
Sub RemoveDatefromTimeDate()
Dim dateTimeRange As range
Dim cell As range
Set dateTimeRange = range("D6:E15")
For Each cell In dateTimeRange
If IsDate(cell.Value) Then
cell.Value = cell.Value - VBA.Fix(cell.Value)
End If
Next cell
dateTimeRange.NumberFormat = "hh:mm:ss am/pm"
End Sub- As a result, the dates will be removed from the range D6:E15 and only time valued will remain.

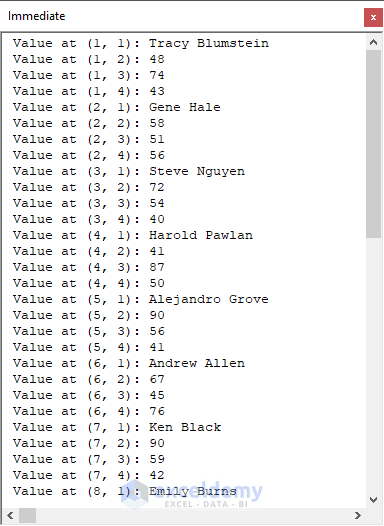
Example 49 – Convert a Range to an Array
In this example, we will convert the range C8:F18 into an array using VBA macros and display it in the Immediate Window.
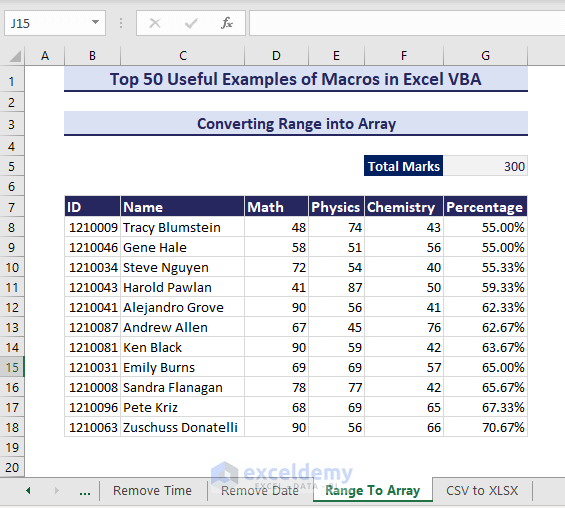
- Run the below VBA code:
Sub ConvertRangeToArray()
'Developed by ExcelDemy
Dim myRange As range
Dim dataArray As Variant
Dim i As Long, j As Long
Set myRange = range("C8:F18")
dataArray = myRange.Value
For i = LBound(dataArray, 1) To UBound(dataArray, 1)
For j = LBound(dataArray, 2) To UBound(dataArray, 2)
Debug.Print "Value at (" & i & ", " & j & "): " & dataArray(i, j)
Next j
Next i
End Sub- The range converts into this array and pops up in the Immediate Window.
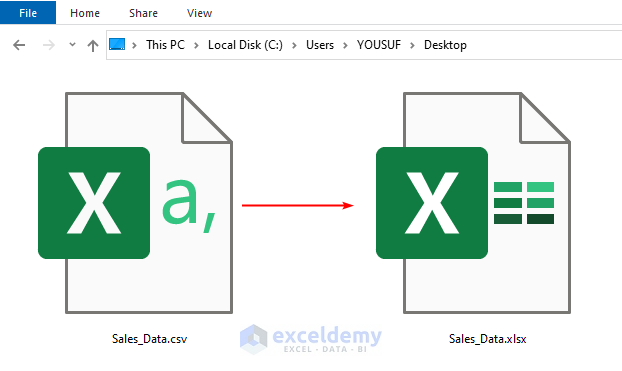
Example 50 – Convert a CSV to an XLSX
- Use the following VBA code:
Sub ConvertCSVtoXLSX()
'Developed by ExcelDemy
Dim w As Workbook
Set w = Workbooks.Open("C:\Users\YOUSUF\Desktop\Sales_Data")
w.SaveAs Filename:="C:\Users\YOUSUF\Desktop\Sales_Data.xlsx", _
FileFormat:=xlWorkbookDefault, _
ReadOnlyRecommended:=False, CreateBackup:=False
End Sub- After running the code, the .csv file will be turned into an .xlsx file.
Example 51 – Using an Advanced Filter to a Range
If you want to filter your below sales data based on certain categories given in the range G5:H6, use the AdvancedFilter method in VBA macros.
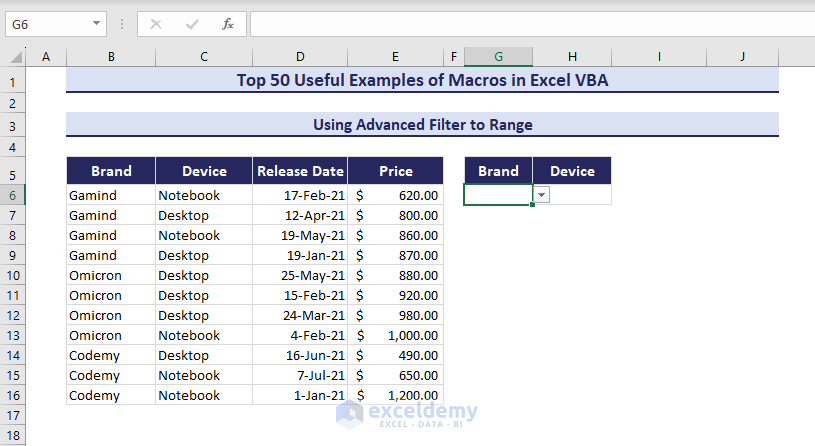
Click the image to enlarge it
- You can use the below code to filter the data and copy the filtered range to another location.
Sub UsingAdvancedFiltertoRange()
'Developed by ExcelDemy
range("B5:E16").AdvancedFilter _
Action:=xlFilterCopy, _
CriteriaRange:=range("G5:H6"), _
CopyToRange:=range("G8")
End Sub- The macro filters the range based on the given criteria and copies the filtered range to cell G8.
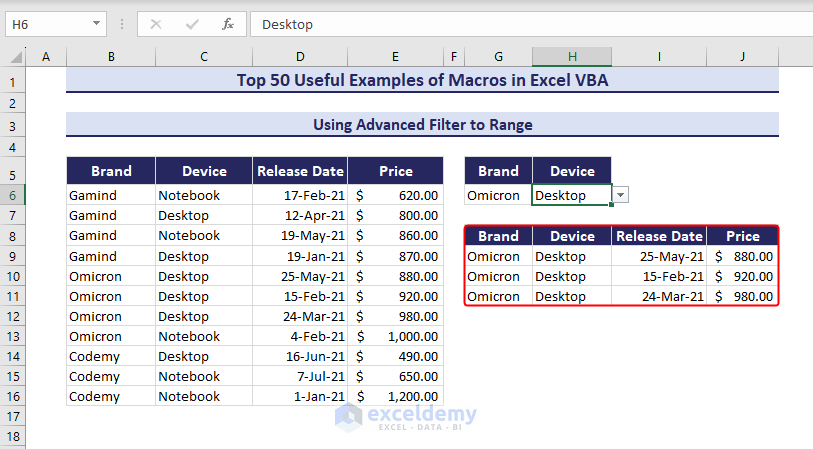
Click the image to enlarge it
Example 52 – Extracting Comments from a Range
We have notes and comments pinned to our data for evaluations or suggestions like the below picture. Let’s extract them in a column.

- Use this VBA code:
Sub ExtractCommentsfromRange()
'Developed by ExcelDemy
Dim input_range As range
Set input_range = Worksheets("Extract Comments").range("E6:E15")
For i = 1 To input_range.Rows.Count
If Not input_range.Cells(i, 1).Comment Is Nothing Then
input_range.Cells(i, 2).Value = input_range.Cells(i, 1).Comment.Text
input_range.Cells(i, 1).Comment.Delete
End If
Next i
End Sub- The macro removes the comments from the range and places them in the Comments column.

In Excel for Microsoft 365, we have two separate options for providing instructions or including explanations in cells – Comment and Note. But in earlier versions, there was only the Comment option. The above code can extract Note in Excel for Microsoft 365 and Comment in earlier versions of Excel.
Download the Practice Workbooks
Get FREE Advanced Excel Exercises with Solutions!

Excellent tutorials. so easy to follow and learn. simple way of teaching. Thanks
Mohammed Hussain,
Thanks for the comments 🙂
I have a database in one folder. Plz Unzip and see all excel files shown datewise. Can anyone help me in extracting day wise data of parameters in format shown in Monthly tracker sheet.
Please check the format. It should be like if i select one workbook data from only that one will be extracted, if selected 2 data from one and two both so on and so forth till 31 days. i am uploading the the database and monthly tracker.
please help …. iam in urgent need…
thanks in advance
plz tell where to post the database zip file
Praveen,
Would you please mail me the database and other resources using the mail in the contact me page?
Thanks.
I’m interested in Daniel’s course for $10, but when I click the link it comes up as $80. Is there a coupon code I need to enter to discount it to the advertised $10 price by Aug. 30?
Cindy,
Millions of thanks for correcting me. It was a grand mistake. Sorry for that. You can buy the course now for just $10 using the above link.
Best regards
Same situation here, a wanted to buy the The Ultimate Excel Programmer Course. but the coupon expired.
is there any way to have it back?
greetings
Good day Kawser. I like to download the “1200+ Excel VBA Code Snippets”.
If I click the button it forwards me to “subscribe to my blog and get the …….”
Since I am all ready a subscriber of your blog and don’t like to subscribe again : Where I can access this or even other useful PDF’s and “Tons of Excel Recsources” ?
Thanks for info.. Regards Roger
Roger, please check your email.
Thanks.
Sir, I am a mail subscriber to your blog. How will i download Learn Excel VBA Programming & Macros [Free Tutorials, Download PDF & Course]
Dear Sir,
I want spin button in my excel sheet to change the items like mango, banana, pattato, ice, tree, cow etc…(it is for teaching in the school)..there are 50 to 55 items ………but it should change in the particular cell not in combobox……..because i have to give the value of that cell to another cell……so will you help me to do this for me……….Please sir ………and please give me the link to my mail id i.e. [email protected] ……………………please sir
Good morning, I have created a worksheet with columns A through AB. Some columns contain the formulas needed for processing the information that is input and these are summed at the bottom of the columns. Three columns contain checkboxes which are used to activate a particluar column for a calculation. The checkboxes begin on row 3 and exist in column B, C and D. The checkboxes are linked to their respective row in columns Z, AA and AB which is used to test for the state of the checkbox. Periodically, the number of rows with the same layout has to be increased a larger amount of data. I have been trying to find a VBA solution that after clicking a button on the worksheet, a new row is added with all of the relevant formulas and link the 3 checkboxes to the new row at columns A, AA and AB. Since I just discovered your site, am in the process of reading through your material but there is just so much of it and am in need of this solution right away. Can you help?
Dear Sir,
Would you please advise how can I exclude specific cells from range copying in VBA?
For example, how to copy data in Cell No. A1 and A4 (without copying data in A2 and A3)?
A1 Value 1
A2 Value 2
A3 Value 3
A4 Value 4
Thanks in advance
Kind regards,
Mohamed Aref
Good day Kawser. I like to download the “1200+ Excel VBA Code Snippets”.
If I click the button it forwards me to “subscribe to my blog. I checked my email but nothing came through. I am already a subscriber
Thanks
Ken
You can collect it from our resource page. The resource page is shared with every subscriber, every day.
Best regards
Kawser Ahmed
Thanks,
I was able to find VBA Code Snippets from the Resource page.
Thanks Again
You’re welcome.