Looking for ways to know how to close a workbook at a specific time using VBA in Excel? Sometimes, we want to close our workbook at a specific time for privacy issues or maybe when several people are using the same workbook and we want to give access to only one person at a time. We can do it by using VBA. Here, you will find 4 ways to close a workbook at a specific time using VBA in Excel.
4 Ways to Close Workbook at Specific Time Using Excel VBA
Here, we have 4 Excel workbooks. Now, we will show you how you can close a workbook at a specific time using these workbooks in 4 different ways using VBA.
1. Using VBA OnTime and Time Value Functions to Close Workbook at Specific Time
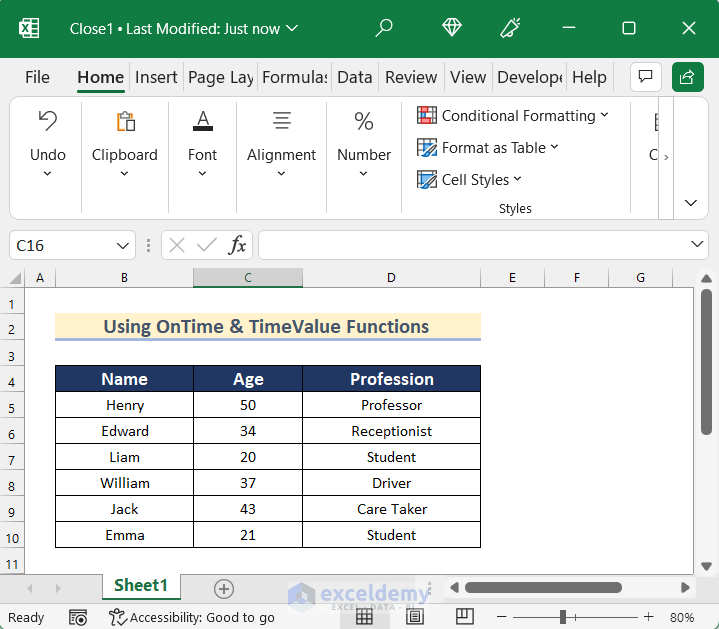
In the first method, we will use VBA OnTime and Time Value functions to close a workbook at a specific time. Here, we have the 1st workbook containing Name, Age, and Profession of some people on a sheet.
Go through the steps given below to close your own workbook.
Steps:
- Firstly, go to the Developer tab >> click on Visual Basic.

Remember you have to write the code in two steps.
-
- First, write the Procedure in any Module.
- Secondly, call the Procedure in This workbook
- Now, Microsoft Visual Basic for Application box will open.
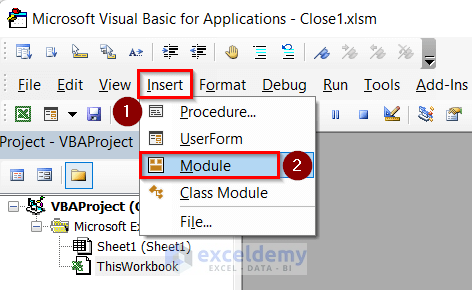
- Then, click on Insert >> select Module.
- After that, write the following code in your Module.
Sub Closing_at_Specific_Time()
    ThisWorkbook.Close SaveChanges:=True
End Sub
Code Breakdown
- Firstly, we created a Sub Procedure as Closing_at_Specific_Time().
- Then, we used the Close method to close ThisWorkbook and set the Savechanges as True.
- After that, click on ThisWorkbook.

- Then, write the following code in ThisWorkbook.
Private Sub Workbook_Open()
On Error Resume Next
Application.OnTime VBA.TimeValue("13:52:00"), "Closing_at_Specific_Time", , True
End Sub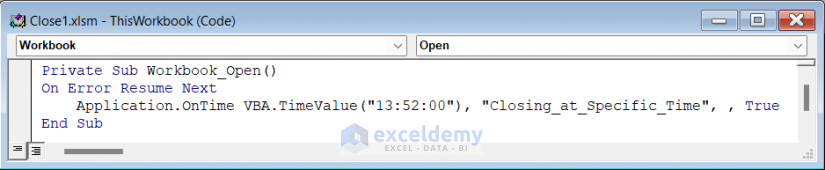
Code Breakdown
- Firstly, select Workbook from General then automatically Open will come from Declarations as an event. So that, whenever anyone opens the workbook the code will run.
- Then, we instructed it to resume Next on Error.
- After that, we used the OnTime and TimeValue functions to close the workbook. You can use any specific time in the TimeValue function. Here, we inserted “13:52:00” as EarliestTime and closing_at_Specific_Time as Procedure that we created in our Module.
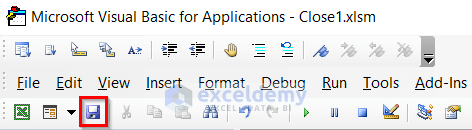
- Next, Save the code.
- Finally, you can see that the workbook has been closed at the specific time you have provided.
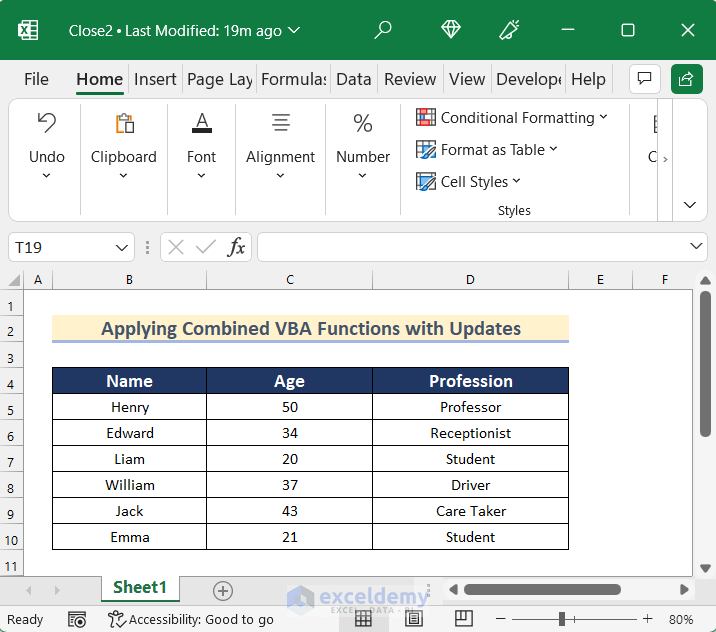
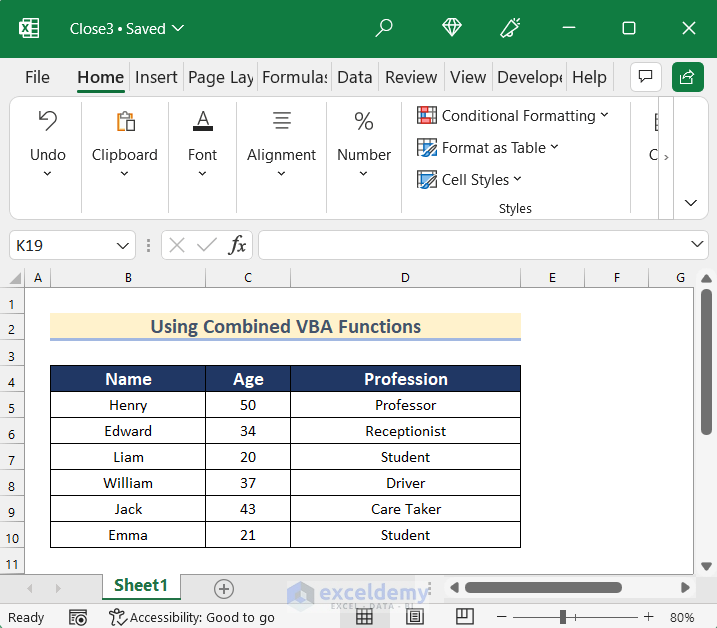
2. Applying Combined VBA Functions with Updates at Specific Time in Excel
Now, we will show you how to close a workbook using OnTime, Now, and TimeValue functions and also remove some data using the 2nd workbook.
Follow the steps given below to do it on your own.
Steps:
- In the beginning, go to the Developer tab >> click on Visual Basic.

- Then, insert a module going through the step shown in Method 1.
- After that, write the following code in your Module.
Option Explicit
Sub Closing_workbook()
    Application.OnTime Now + TimeValue("00:1:00"), "close_at_specific_time"
End Sub
Sub close_at_specific_time()
    Application.DisplayAlerts = False
    With ThisWorkbook
        .Worksheets("Sheet1").Activate
        .Worksheets("Sheet1").Range("B5:D10").ClearContents
        .Save
        .Close savechanges:=False
    End With
End Sub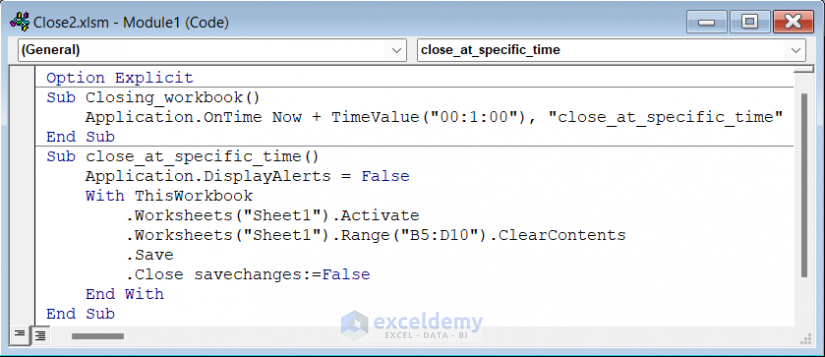
Code Breakdown
- Firstly, we created a Sub Procedure as Closing_workbook().
- After that, we used the OnTime, Now and TimeValue functions to close the workbook. You can use any specific time in the TimeValue function. Here, we inserted “00:01:00” in the TimeValue and added this value with the Now function which returns the current Date and Time.
- Then, we used this value as EarliestTime and closing_at_specific_time as Procedure.
- Next, we created another Sub Procedure as closing_at_specific_time.
- Now, we set DisplayAlerts as False.
- Then, we activated Sheet1 with the Activate method.
- After that, we cleared Cell range B5:D10 from Sheet1 using the ClearContents method.
- Finally, we closed the workbook using the Close method and set savechanges as False.
- Next, save the code by going through the same steps shown in Method 1.
- Afterward, go to the Developer tab >> click on Macros.
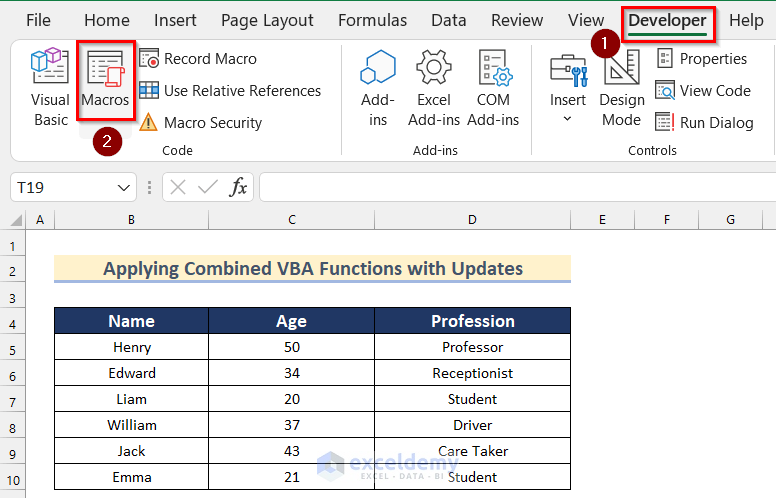
- Now, the Macro box will appear.
- Then, select Closing_workbook.
- After that, click on Run.

- Finally, the workbook will close at the specific time we have instructed.

- Now, if you again open the workbook, you will see that Cell range B5:D10 has been cleared.

3. Using Combined VBA Functions to Close Workbook in Excel
Next, we will show you how to use combined VBA functions to close a workbook at a specific time in Excel. Here, we will use the OnTime, Now and TimeValue VBA functions to close the 3rd workbook.
Go through the steps given below to do it on your own.
Steps:
- Firstly, go to the Developer tab >> click on Visual Basic.

Remember you have to write the code in two steps.
- First, write the Procedure in any Module.
- Secondly, call the Procedure in Thisworkbook.
- Now, the Microsoft Visual Basic for Application box will open.
- Afterward, insert a module going through the same steps shown in Method 1.
- Then, write the following code in your module.
Dim ClosingTime As Date
Sub Set_Time()
    ClosingTime = Now + TimeValue("00:01:00")
    On Error Resume Next
    Application.OnTime EarliestTime:=ClosingTime, Procedure:="SaveAndClose", Schedule:=True
End Sub
Sub Stop_Time()
    On Error Resume Next
    Application.OnTime EarliestTime:=ClosingTime, Procedure:="SaveAndClose", Schedule:=False
End Sub
Sub SaveAndClose()
    ActiveWorkbook.Close SaveChanges:=True
End Sub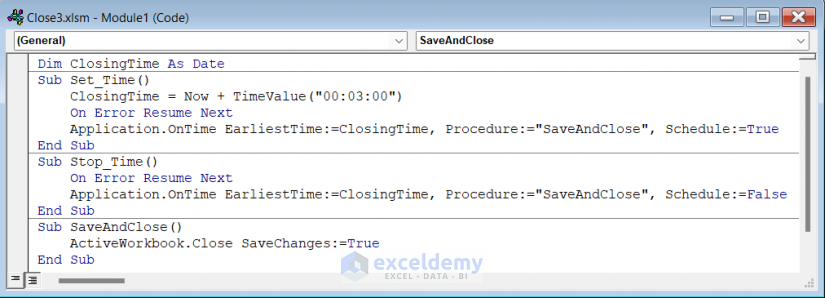
Code Breakdown
- Firstly, we declared ClosingTime as Date.
- Next, we created a Sub Procedure as Set_Time().
- After that, we added the Now function and TimeValue where we inserted “00:03:00” in the TimeValue function and set this value as ClosingTime.
- Then, we instructed it to resume Next on Error.
- Afterward, we used the OnTime method where we put ClosingTime as EarliestTime, SaveAndClose as Procedure, and set Schedule as True.
- Next, we created a Sub Procedure as Stop_Time().
- Then, we instructed it to resume Next on Error.
- After that, we used the OnTime method where we put ClosingTime as EarliestTime, SaveAndClose as Procedure, and set Schedule as False.
- Again, we created a Sub Procedure as SaveAndClose().
- Finally, we used the Close method to close the workbook and set SaveChanges as True.

- After that, write the following code in ThisWorkbook.
Private Sub Workbook_BeforeClose(Cancel As Boolean)
    Call Stop_Time
End Sub
Private Sub Workbook_Open()
    Call Set_Time
End Sub
Private Sub Workbook_SheetChange(ByVal Sh As Object, ByVal Target As Range)
    Call Stop_Time
    Call Set_Time
End Sub
Code Breakdown
- Firstly, we selected Workbook from General and BeforeClose from Declarations as an event to execute the code before closing.
- Then, we called the Sub Procedure named Stop_Time.
- After that, we selected Workbook from General then automatically Open will come from Declarations as an event. So that, whenever anyone opens the workbook the code will run.
- Next, we called the Sub Procedure named Set_Time.
- Afterward, we selected a Workbook from General and SheetChange from Declarations as an event. This code will execute whenever any changes occurs in sheet.
- Finally, we called the Sub Procedures named Stop_Time and Set_Time.
- After that, save the code as you did above.
- Finally, the workbook will close at the specific time we have instructed.
Read More: Excel VBA: Close Workbook Without Saving
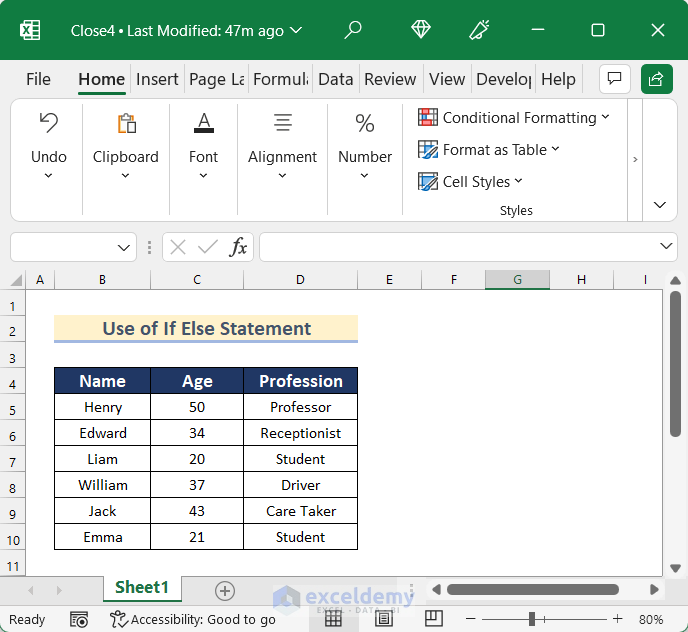
4. Use of If Else Statement to Close Workbook at Specific Time
In the last method, we will show you how to use the If Else statement to close a workbook at a specific time in Excel VBA. Here, we will use the 4th workbook to show you the process.
Follow the steps given below to do it on your own.
Steps:
- In the beginning, go to the Developer tab >> click on Visual Basic.

- After that, the Microsoft Visual Basic for Application box will open.
- Then, click open ThisWorkbook going through the steps shown in Method 3.
- Next, write the following code in ThisWorkbook.
Private Sub Workbook_Open()
Dim starting_time, Finishing_time, total_time_spend, total_time_spend_in_min, time_in_min
Application.DisplayAlerts = True
time_in_min = 5
If time_in_min > 2 Then
total_time_spend_in_min = (time_in_min * 60) - (2 * 60)
starting_time = Timer
Do While Timer < starting_time + total_time_spend_in_min
DoEvents
Loop
Finishing_time = Timer
total_time_spend = Finishing_time - starting_time
Application.DisplayAlerts = False
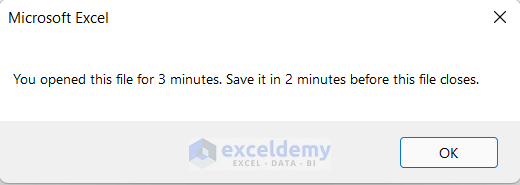
MsgBox "You opened this file for " & total_time_spend / 60 & " minutes. Save it in 2 minutes before this file closes."
End If
starting_time = Timer
Do While Timer < starting_time + (2 * 60)
DoEvents
Loop
Finishing_time = Timer
total_time_spend = Finishing_time - starting_time
Application.DisplayAlerts = False
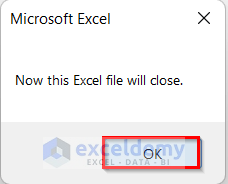
MsgBox "Now this Excel file will close."
Application.Quit
End Sub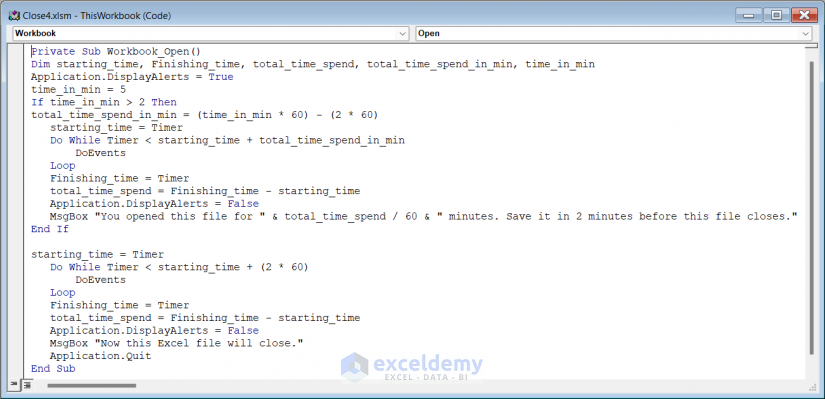
Code Breakdown
- Firstly, select Workbook from General then automatically Open will come from Declarations as an event. So that, whenever anyone opens the workbook the code will run.
- Then, we declared starting_time, Finishing_time, total_time_spend, total_time_spend_in_min and time_in_min.
- After that, we set DisplayAlerts as True.
- Next, we set time_in_min as 5.
- Afterward, we used the If Else statement to check if time_in_min is greater than 2 Then set total_time_in_min as the subtracted value of time_in_min multiplied by 60 and 2 multiplied by 60.
- Then, we set starting_time as Timer.
- Next, we used the Do While loop to DoEvents until Timer is less than the added value of starting_time and total_time_in_min.
- After that, we set Finishing_time as Timer and total_time_spend equal to the subtracted value of Finishing_time and starting_time.
- Then, we set the DisplayAlerts as False.
- Afterward, we added a MsgBox to inform the user about the closing time in 2 minutes.
- Again, we set starting_time as Timer.
- Next, we used the Do While loop to DoEvents until Timer is less than the added value of starting_time and 2 multiplied by 60.
- After that, we set Finishing_time as Timer and total_time_spend equal to the subtracted value of Finishing_time and starting_time.
- Again, we set the DisplayAlerts as False.
- Finally, we added a MsgBox to inform the user that the workbook will close now.
- Now, save the code.
- Then, when 3 minutes have passed you will see a MsgBox as instructed.
- Finally, at the specific time, we provided a MsgBox will appear, and if you press OK the Excel workbook will close.
Read More: Excel VBA: Check If Workbook Is Open and Close It
Download Practice Workbook
As we applied different VBA codes in ThisWorkbook that’s why used several workbooks.
Conclusion
So, in this article, you will find 4 ways to close a workbook at a specific time using VBA in Excel. Use any of these ways to accomplish the result in this regard. Hope you find this article helpful and informative. Feel free to comment if something seems difficult to understand. Let us know any other approaches which we might have missed here.

