Whenever you need to change some setting of Excel, the go-to place is the Excel Options dialog box. In short, this is where all the important settings that govern how Excel works are stored. So, it’s crucial to be careful when making changes using the Excel Options dialog box.
In this Excel tutorial, you will learn how to open the Excel Options dialog box and the setting features it offers.
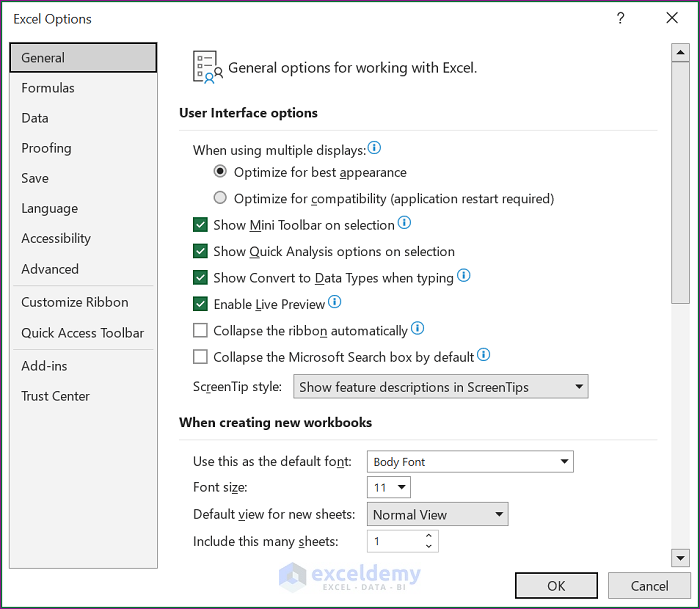
Here is an overview image of all the setting options available in the Excel Options dialog box.

How to Open Excel Options Dialog Box?
If you want to personalize user experience, like adjusting default fonts, worksheet views, or other general preferences, heading to the Excel Options dialog box is the right step. There are two ways you can access the Excel Options dialog box.
Here are the two ways to open the Excel Options dialog box:
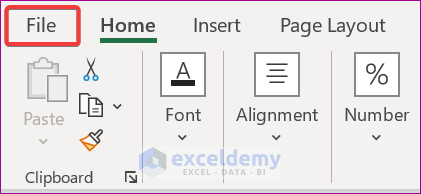
1. Using File Tab
Check the following steps to use the File tab to access the Excel Options dialog box:
- Go to the File tab.
- Select More… > Options.
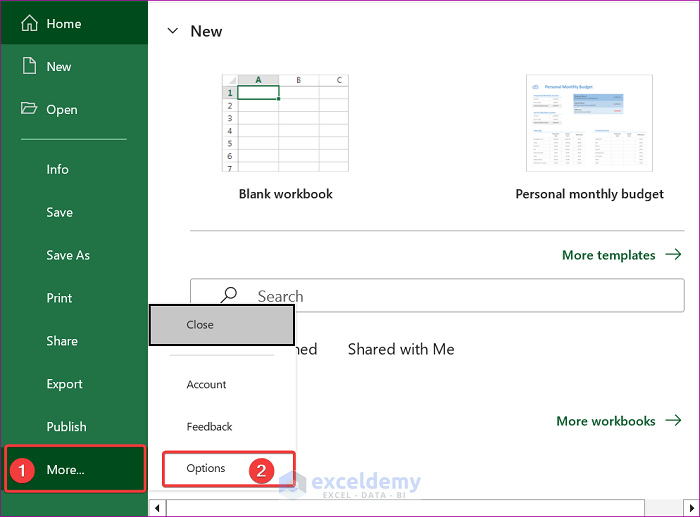
Then, the Excel Options window will pop up.
2. Using VBA Code
To use the VBA code for the Excel Options dialog box, check the following steps:
- Go to the Developer tab > Code group >Visual Basic.
 This will open the Microsoft Visual Basic for Applications window.
 - Head to Insert tab > Select Module.

- In the module box apply the following code.
Sub DisplayExcelOptionsWindow() Application.CommandBars.ExecuteMso ("ApplicationOptionsDialog") End Sub - Now, press Ctrl + S and hit the Run button.

The Excel Options window will appear subsequently.
Read More: How to Create a Dialog Box in Excel
Settings Categories in Excel Options Dialog Box
The Excel Options Dialog Box was introduced with Microsoft Office 2007. Before that Microsoft Office applications used a traditional menu and toolbar system for user interface navigation and customization. Now users can navigate through this dialog box to find various commands and options related to formatting, calculations, preferences, and other aspects of Excel functionality. This is where you can customize and make Excel work just the way you want it to.
The Excel Options dialog box has the following tabs in the left panel to represent different categories of settings.
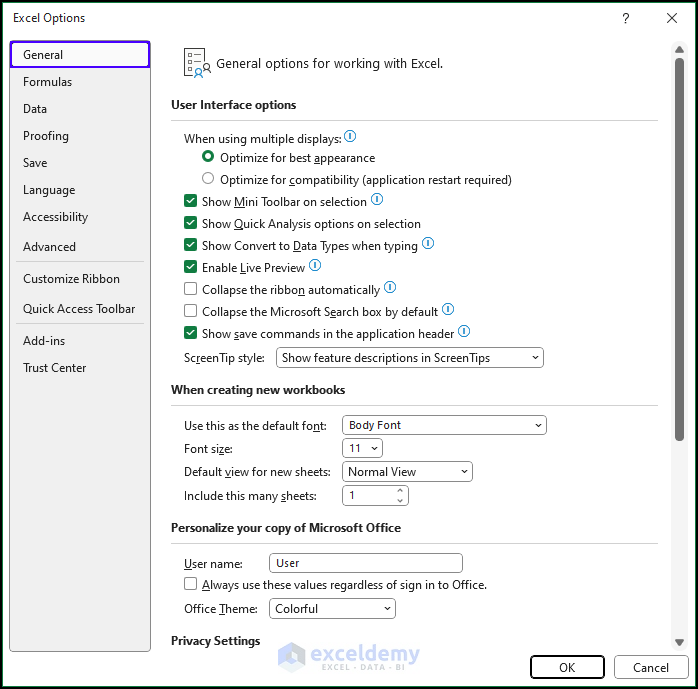
General Tab
The General tab provides users with settings for the overall Excel environment. You can customize preferences related to user interface options, personalizing the look of Excel. Such as default font styles, worksheet display options, and the number of worksheets in new workbooks.
Read More: Dialog Box Launcher in Excel
Formulas Tab
The Formulas tab is for working with mathematical calculations and functions in Excel. It offers settings related to formula calculation options, error checking, and iteration. You can adjust calculation options, control error-checking rules, and tweak calculation methods to suit specific needs.

Data Tab
The Data tab in Excel Options helps to customize settings related to data handling and analysis. This includes configuration options for sorting and filtering, as well as default settings for importing and exporting data.

Proofing Tab
The Proofing tab is for users who are concerned with document correctness. It encompasses spelling and grammar-checking options, autocorrect settings, and language preferences. You can fine-tune proofing tools to ensure accuracy and professionalism in your documents.

Save Tab
Under the Save tab, you gain control over how Excel saves and manages files. This includes setting default file save locations, choosing file formats, and managing version control.

Read More: How to Input Dialog Box in Excel VBA
Language Tab
Using the Language tab users can configure language preferences in Excel. This includes choosing the editing language, setting proofing languages, and managing language-related options. You can personalize the language to align with your collaborators.

Accessibility Tab
In previous versions, it may be named the Ease of Access tab. Generally using this tab you can make your Excel experience soothing and easier. It can give you tips or feedback when using any Excel feature. Even you can enlarge the display font if necessary.

Advanced Tab
The Advanced tab provides detailed control for advanced Excel users to meet their specific needs. For example, you can change the settings of formula calculation, editing options, and display settings for better visuality and functionality. Besides, you can also configure settings for copy, cut, and paste as well as scrolling options.
It is recommended to use this option if only you have a high level of knowledge and experience in Excel.

Customize Ribbon Tab
You can add, remove, or change the order of tabs and commands on the Ribbon using this tab. This helps you make Excel super convenient by putting your favorite commands right where you can easily find them.

Quick Access Toolbar Tab
The Quick Access Toolbar tab lets users customize the toolbar above the Ribbon. you can choose which commands to display, set the toolbar position, and optimize its functionality. It is a handy feature to use for saving time.

Add-ins Tab
Using this tab, you can manage Excel add-ins. These add-ins are additional features and tools that can enhance Excel functionality. You can turn on or off these tools or activate the ones you need only.

Trust Center Tab
The Trust Center tab in Excel is very important because it keeps your Excel safe and secure. This tab has settings for things like macros codes to make sure they’re safe, privacy options, and trusted places for your documents. You can set it up to make sure Excel is a safe and trusted place for all your work.

Conclusion
The Excel Options dialog box is pretty handy for everyone, whether you’re just starting with Excel or you’re a pro. It provides a range of features and settings across different tabs, catering to various user needs. Depending on your requirements, you can easily navigate to the required tab and make the necessary changes to ease your work. I hope this article has helped expand your knowledge. If you have any comments, questions, or queries, feel free to reach out. Your feedback is important to us!
Frequently Asked Question
Can I reset Excel options to default settings?
No, there’s no direct Reset option in the Excel Options dialog box. To reset to default settings, you can edit the Windows registry or use Windows PowerShell. Alternatively, you can try uninstalling and reinstalling Excel.
What is the default font setting in Excel?
Calibri is the default font style in Excel with a font size of 11 and black font color.
Can I change the Ribbon in Excel to have my own buttons?
Yes! With the Customize Ribbon tab, you can add, remove, or move tabs and buttons on the Ribbon. This way, you can make Excel look just the way you want it to.
Related Articles
- How to Close Dialog Box in Excel
- How to Open the Insert Function Dialog Box in Excel
- [Solved!] Excel Dialog Box Hidden
- How to Stop Name Conflict Dialog Box in Excel
- How to Display References Dialog Box in Excel
<< Go Back to Excel Dialog Boxes | Excel Parts | Learn Excel
Get FREE Advanced Excel Exercises with Solutions!
