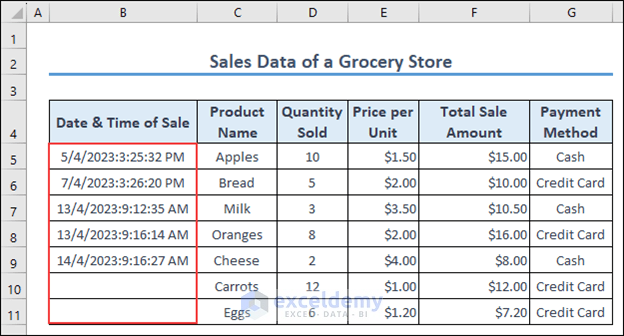
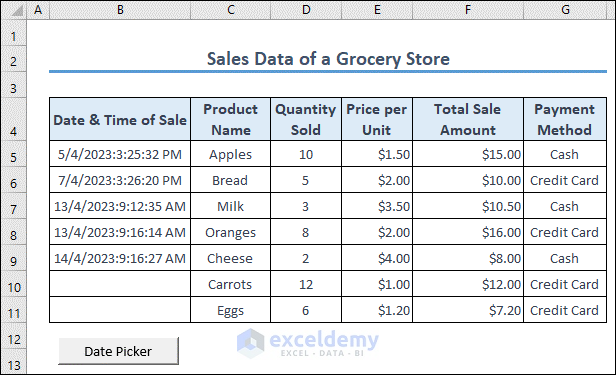
Here’s a dataset of sales data for a grocery shop. In the Date & Time of Sale column, users have to enter the date and time manually. This is not user-friendly. Let’s replace this with a customized datepicker form.
Step 1 – Insert a UserForm
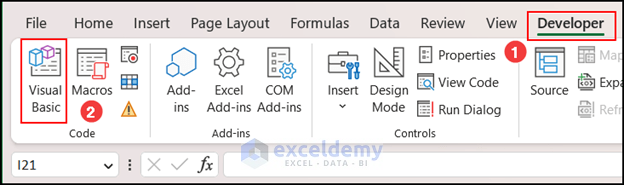
- Click on the Developer tab.
- Select Visual Basic.
- The VBA code editor window will be opened.
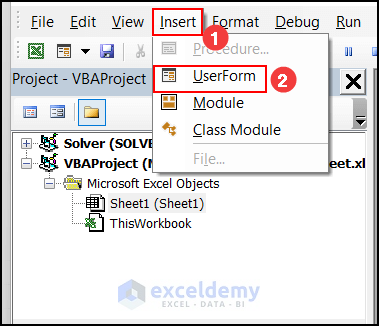
- Hit the Insert option.
- From Insert, select UserFrom.
- You have inserted UserForm in the VBA code editor.

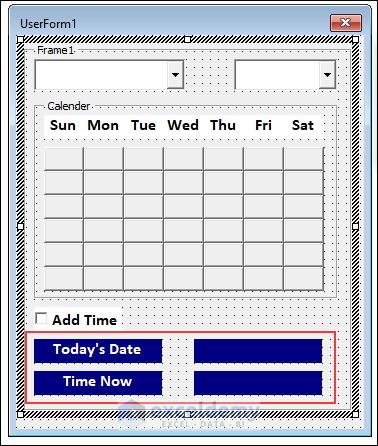
Step 1 -Design the UserForm Controls
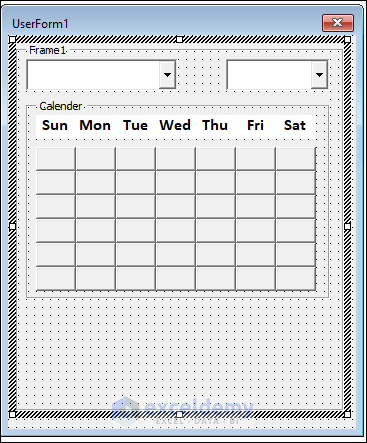
We will use Frame, CommandButton, Label, CheckBox, and ComboBox to design the UserForm.
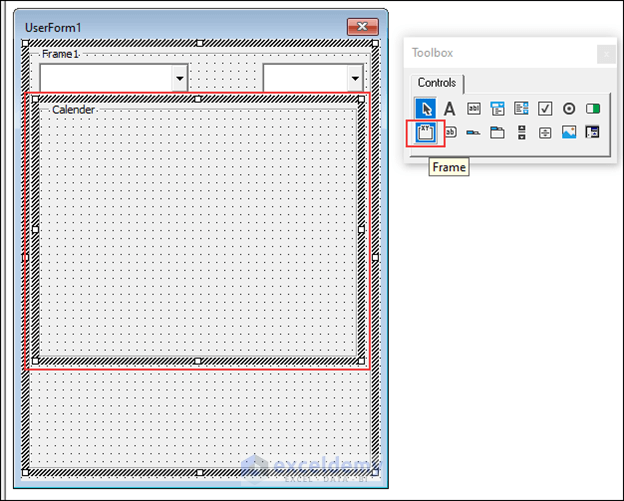
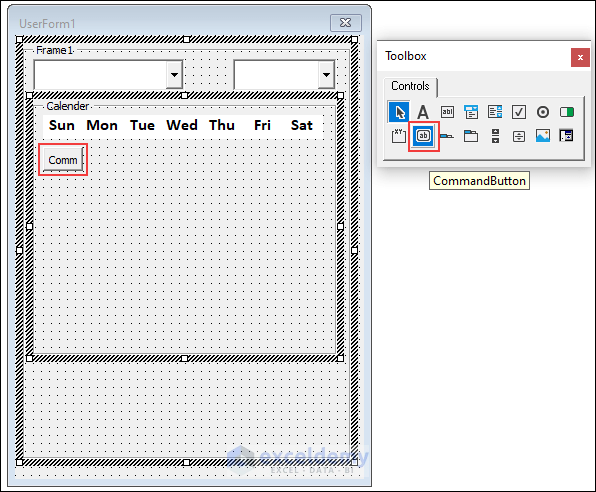
- Add Frame Control from the ToolBox.
- Adjust the size of the Frame with the UserForm by dragging the corners.
![Adding Frame Control in UserForm]\](https://www.exceldemy.com/wp-content/uploads/2023/05/5-Adding-Frame-Control-inn-UserForm.png)
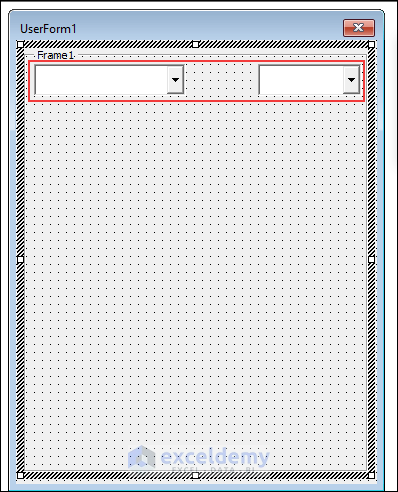
- Insert a ComboBox inside the Frame and resize it so that the Month Names can fit in it.
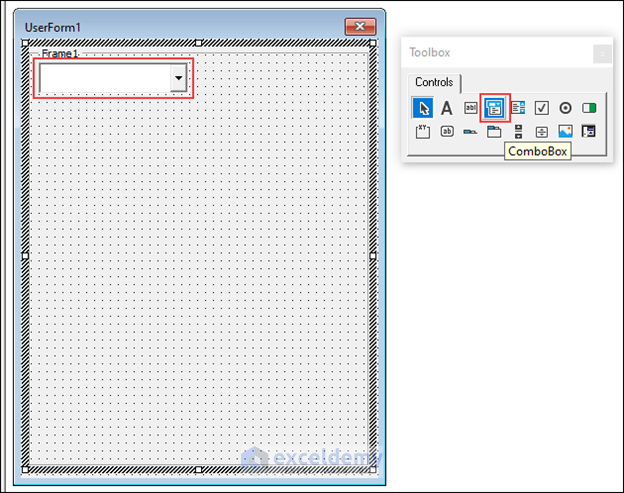
- From the Properties Window which is at the bottom left side of the UserForm, change the Name to “Month_Box”. This name will be used in the code.
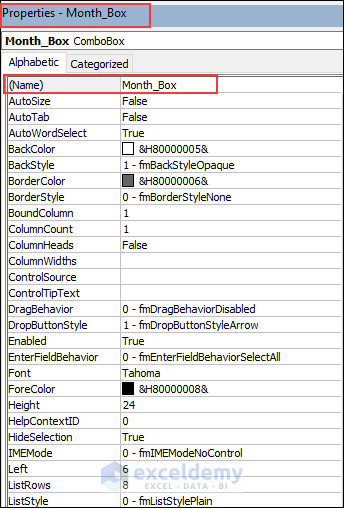
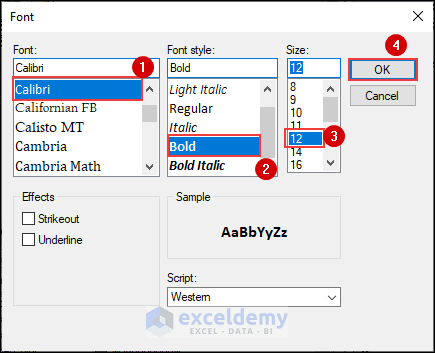
- Click on the marked 3 dots of the Font option in the Properties Window.
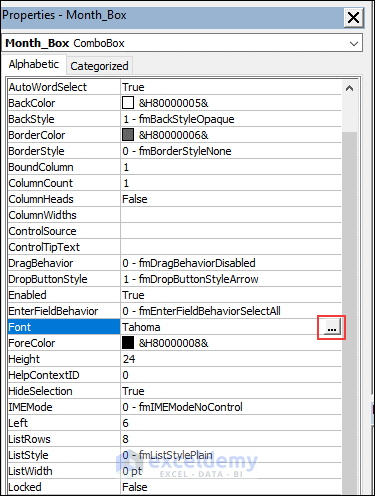
- Select Calibri Font, Font style as Bold, and Size as 12.
- Hit the OK button.
- In this Month_Box, Month Names will be shown.
- Repeat the process to add another ComboBox beside the previous one. This ComboBox will be used for the Year input.
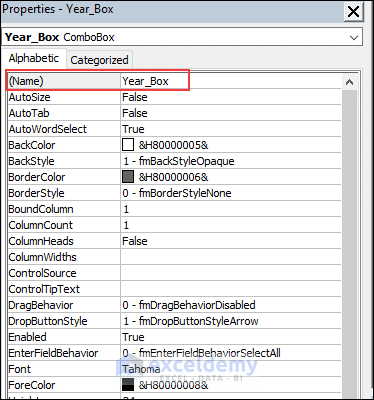
- Change the Name of ComboBox to “Year_Box” from the Properties Window. Also change the Font, Font style, and Size just like the previous one.
- Add another Frame Control and change the caption to “Calendar”. In this Frame, we will build the calendar with the help of Labels and CommandButtons.
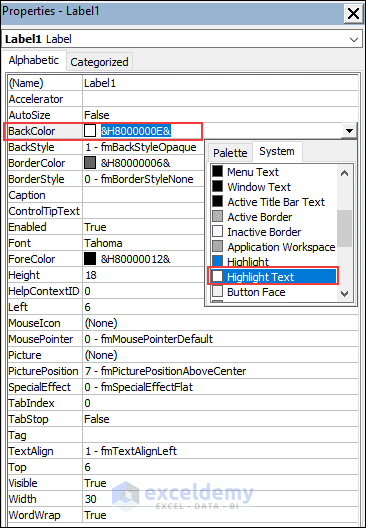
- Insert one Label Control from the Toolbox inside the Calendar Frame.
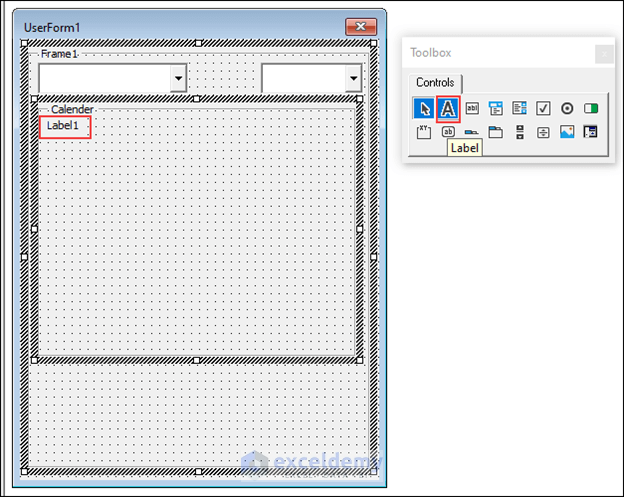
- Delete the caption “Label1” in Properties Window and keep it blank.
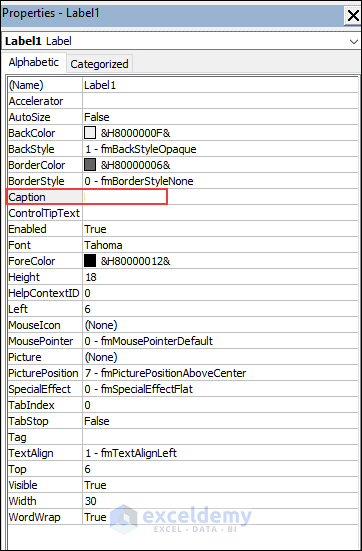
- Click on the 3 dots beside the Font option.
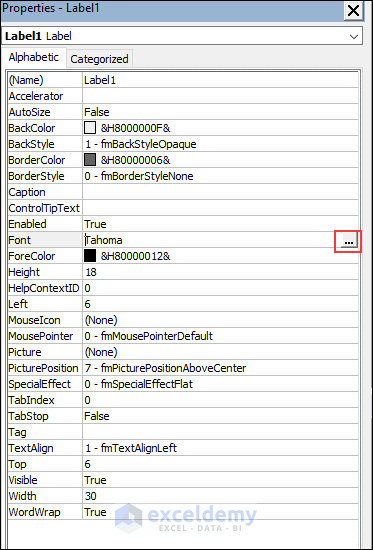
- Change the Font, Font style, and Size to Calibri, Bold, and 12 respectively.
- Set the BackColor of the Label as Highlight Text.
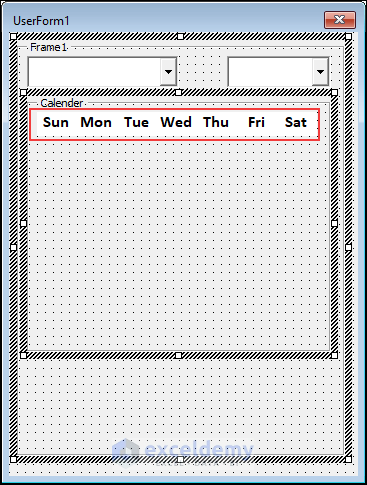
- Copy the Label 6 times and place these identical Labels side by side. Follow the image below as a guide.
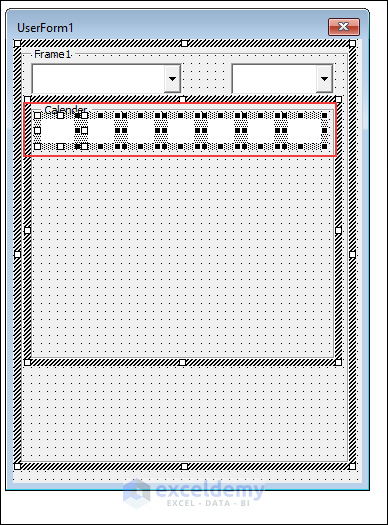
- Change the Caption of the first Label to “Sun” from the Properties Window.

- Set the Caption of the other 6 Labels as the short forms of other days in order. Follow the screenshot provided below.
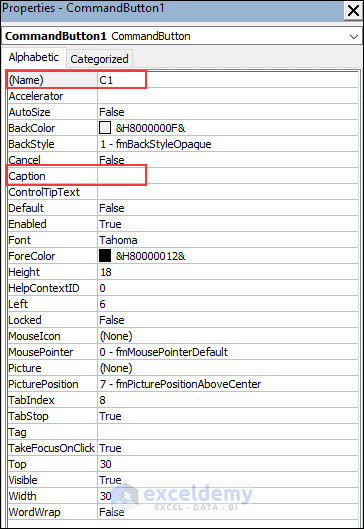
- Add a CommandButton Control inside the Calendar Frame.
- Set the Name Option of the CommandButton as “C1” from the Properties Window.
- Clear the Caption and keep it blank.
- Copy the CommandButton 6 more times and paste them serially. It will look like the picture below.
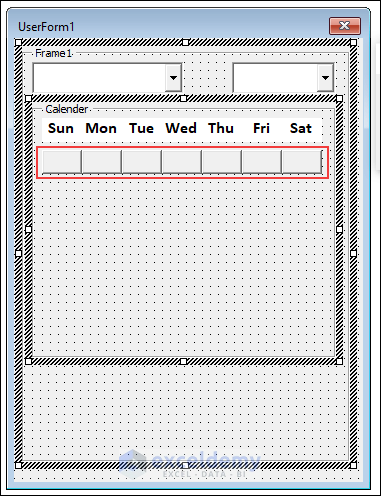
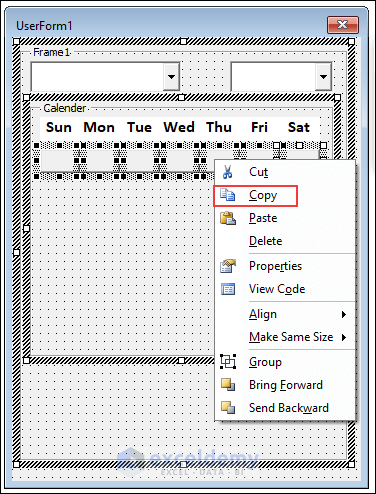
- Select the 7 CommandButtons at a time and copy the whole group.
- Paste this set of CommandButtons 5 times. A calendar-like interface has been created. It has 42 CommandButtons.
- Change the Name of each CommandButton to C2, C3, C4, and so on until you end with C42.
- Insert a CheckBox Control below the Calendar Frame.
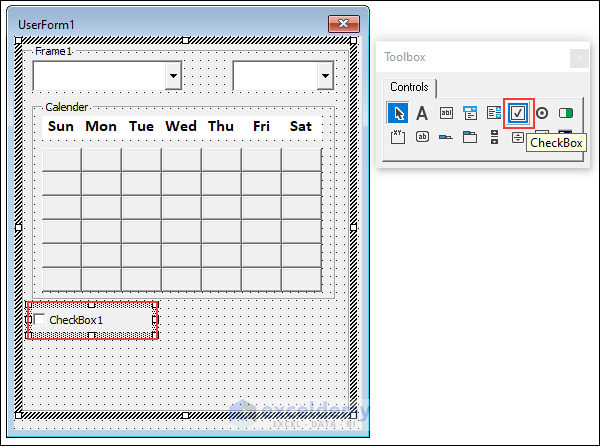
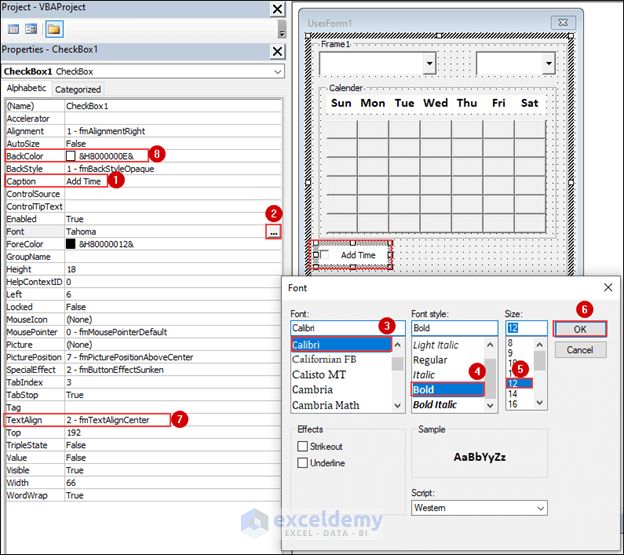
- Edit the Caption of the CheckBox as “Add Time”.
- Change the Font, Font style, and Size to Calibri, Bold, and 12.
- Press OK.
- Keep the TextAlign in the Center.
- The UserForm will look like the image below.

- Insert 4 Label Controls inside Frame1.
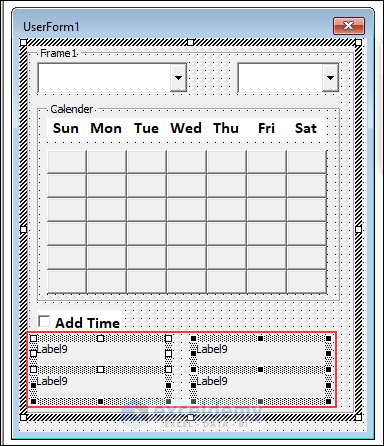
- Change the Captions, Font, and Alignment of Text according to the image below. Follow the previous steps to do this.
- The design of the UserForm is complete.
Step 3 – Change Properties of the Date Picker UserForm
- We have changed the Caption of the Farme1 to “Date Picker”.
- We have also changed the background color of the Calendar Frame.

Step 4 – Insert VBA Code to the UserForm
4.1 Declare the Variables
- Firstly, declare the variables you will be using in the full process under Option Explicit. These variables will be available in every Sub Procedure.
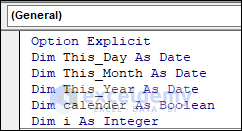
Option Explicit
Dim This_Day As Date
Dim This_Month As Date
Dim This_Year As Date
Dim calender As Boolean
Dim i As Integer
4.2 Create a Private Subroutine
- Create a Private Sub called Create_Calender.
- This is the main procedure for creating the calendar for the Date Picker. This Sub will be called in the UserForm Initialize Event procedure.
Sub Create_Calender()

'  0 = month-day-year;   1 = day-month-year;   2 = year-month-day

    For i = 1 To 42
        If Application.International(xlDateOrder) = 0 Then

            If i < Weekday((Month_Box.Value) & "/1/" & (Year_Box.Value)) Then
            Controls("C" & (i)).Caption = Format(DateAdd("d", (i - Weekday((Month_Box.Value) & "/1/" & (Year_Box.Value))), _
            ((Month_Box.Value) & "/1/" & (Year_Box.Value))), "d")

            Controls("C" & (i)).ControlTipText = Format(DateAdd("d", (i - Weekday((Month_Box.Value) & "/1/" & (Year_Box.Value))), _
            ((Month_Box.Value) & "/1/" & (Year_Box.Value))), "m/d/yyyy")

            ElseIf i >= Weekday((Month_Box.Value) & "/1/" & (Year_Box.Value)) Then
            Controls("C" & (i)).Caption = Format(DateAdd("d", (i - Weekday((Month_Box.Value) & "/1/" & (Year_Box.Value))), _
            ((Month_Box.Value) & "/1/" & (Year_Box.Value))), "d")

            Controls("C" & (i)).ControlTipText = Format(DateAdd("d", (i - Weekday((Month_Box.Value) & "/1/" & (Year_Box.Value))), _
            ((Month_Box.Value) & "/1/" & (Year_Box.Value))), "m/d/yyyy")
            End If

            If Format(DateAdd("d", (i - Weekday((Month_Box.Value) & "/1/" & (Year_Box.Value))), _
            ((Month_Box.Value) & "/1/" & (Year_Box.Value))), "mmmm") = ((Month_Box.Value)) Then
            If Controls("C" & (i)).BackColor <> &HFFFFFF Then Controls("C" & (i)).BackColor = &HFFFFFF
            Controls("C" & (i)).Font.Bold = True

            If Format(DateAdd("d", (i - Weekday((Month_Box.Value) & "/1/" & (Year_Box.Value))), _
            ((Month_Box.Value) & "/1/" & (Year_Box.Value))), "m/d/yyyy") = Format(This_Day, "m/d/yyyy") Then Controls("C" & (i)).SetFocus
            Else
            If Controls("C" & (i)).BackColor <> &H80000016 Then Controls("C" & (i)).BackColor = &H8000000F
            Controls("C" & (i)).Font.Bold = False
            End If

        ElseIf Application.International(xlDateOrder) = 1 Then

            If i < Weekday((Month_Box.Value) & "/1/" & (Year_Box.Value)) Then
            Controls("C" & (i)).Caption = Format(DateAdd("d", (i - Weekday((Month_Box.Value) & "/1/" & (Year_Box.Value))), _
            ((Month_Box.Value) & "/1/" & (Year_Box.Value))), "d")

            Controls("C" & (i)).ControlTipText = Format(DateAdd("d", (i - Weekday((Month_Box.Value) & "/1/" & (Year_Box.Value))), _
            ((Month_Box.Value) & "/1/" & (Year_Box.Value))), "d/m/yyyy")

            ElseIf i >= Weekday((Month_Box.Value) & "/1/" & (Year_Box.Value)) Then
            Controls("C" & (i)).Caption = Format(DateAdd("d", (i - Weekday((Month_Box.Value) & "/1/" & (Year_Box.Value))), _
            ((Month_Box.Value) & "/1/" & (Year_Box.Value))), "d")

            Controls("C" & (i)).ControlTipText = Format(DateAdd("d", (i - Weekday((Month_Box.Value) & "/1/" & (Year_Box.Value))), _
            ((Month_Box.Value) & "/1/" & (Year_Box.Value))), "d/m/yyyy")
            End If

            If Format(DateAdd("d", (i - Weekday((Month_Box.Value) & "/1/" & (Year_Box.Value))), _
            ((Month_Box.Value) & "/1/" & (Year_Box.Value))), "mmmm") = ((Month_Box.Value)) Then
            If Controls("C" & (i)).BackColor <> &HFFFFFF Then Controls("C" & (i)).BackColor = &HFFFFFF
            Controls("C" & (i)).Font.Bold = True

            If Format(DateAdd("d", (i - Weekday((Month_Box.Value) & "/1/" & (Year_Box.Value))), _
            ((Month_Box.Value) & "/1/" & (Year_Box.Value))), "d/m/yyyy") = Format(This_Day, "d/m/yy") Then Controls("C" & (i)).SetFocus
            Else
            If Controls("C" & (i)).BackColor <> &H80000016 Then Controls("C" & (i)).BackColor = &H8000000F
            Controls("C" & (i)).Font.Bold = False
            End If

        ElseIf Application.International(xlDateOrder) = 2 Then

            If i < Weekday((Month_Box.Value) & "/1/" & (Year_Box.Value)) Then
            Controls("C" & (i)).Caption = Format(DateAdd("d", (i - Weekday((Month_Box.Value) & "/1/" & (Year_Box.Value))), _
            ((Month_Box.Value) & "/1/" & (Year_Box.Value))), "d")

            Controls("C" & (i)).ControlTipText = Format(DateAdd("d", (i - Weekday((Month_Box.Value) & "/1/" & (Year_Box.Value))), _
            ((Month_Box.Value) & "/1/" & (Year_Box.Value))), "yyyy/m/d")

            ElseIf i >= Weekday((Month_Box.Value) & "/1/" & (Year_Box.Value)) Then
            Controls("C" & (i)).Caption = Format(DateAdd("d", (i - Weekday((Month_Box.Value) & "/1/" & (Year_Box.Value))), _
            ((Month_Box.Value) & "/1/" & (Year_Box.Value))), "d")

            Controls("C" & (i)).ControlTipText = Format(DateAdd("d", (i - Weekday((Month_Box.Value) & "/1/" & (Year_Box.Value))), _
            ((Month_Box.Value) & "/1/" & (Year_Box.Value))), "yyyy/m/d")
            End If

            If Format(DateAdd("d", (i - Weekday((Month_Box.Value) & "/1/" & (Year_Box.Value))), _
            ((Month_Box.Value) & "/1/" & (Year_Box.Value))), "mmmm") = ((Month_Box.Value)) Then
            If Controls("C" & (i)).BackColor <> &HFFFFFF Then Controls("C" & (i)).BackColor = &HFFFFFF
            Controls("C" & (i)).Font.Bold = True

            If Format(DateAdd("d", (i - Weekday((Month_Box.Value) & "/1/" & (Year_Box.Value))), _
            ((Month_Box.Value) & "/1/" & (Year_Box.Value))), "yyyy/m/d") = Format(This_Day, "yyyy/m/d") Then Controls("C" & (i)).SetFocus
            Else
            If Controls("C" & (i)).BackColor <> &H80000016 Then Controls("C" & (i)).BackColor = &H8000000F
            Controls("C" & (i)).Font.Bold = False
            End If

        End If
    Next i

End Sub
4.3 Copy the VBA Code for UserForm_Initialize Event
- Copy the code under a Private Sub UserForm_Initialize.
- This code will Run when the UserForm Initialize event occurs.
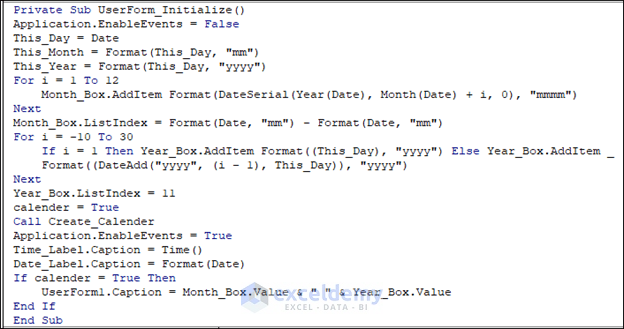
Private Sub UserForm_Initialize()

Application.EnableEvents = False

This_Day = Date

This_Month = Format(This_Day, "mm")

This_Year = Format(This_Day, "yyyy")

For i = 1 To 12

Month_Box.AddItem Format(DateSerial(Year(Date), Month(Date) + i, 0), "mmmm")

Next

Month_Box.ListIndex = Format(Date, "mm") - Format(Date, "mm")

For i = -10 To 30

If i = 1 Then Year_Box.AddItem Format((This_Day), "yyyy") Else Year_Box.AddItem _

Format((DateAdd("yyyy", (i - 1), This_Day)), "yyyy")

Next

Year_Box.ListIndex = 11

calender = True

Call Create_Calender

Application.EnableEvents = True

Time_Label.Caption = Time()

Date_Label.Caption = Format(Date)

If calender = True Then

UserForm1.Caption = Month_Box.Value & " " & Year_Box.Value

End If

End Sub
- The following code will trigger when the value of Month_Box is changed.
Private Sub Month_Box_Change()

    If Me.Month_Box.Value <> "" And Me.Year_Box.Value <> "" Then
        Call Create_Calender
    End If

End Sub- The following code will trigger when the value of Year_Box is changed.
Private Sub Year_Box_Change()
If Me.Month_Box.Value <> "" And Me.Year_Box.Value <> "" Then
 Call Create_Calender
End If
End Sub- The following code will trigger when the value of Time_Box is changed.
Private Sub Time_Box_Change()

    Dim cellValue As String

    cellValue = Selection.Value

    If cellValue <> "" Then
        If Time_Box.Value = True Then
            If InStr(1, cellValue, ":") > 0 Then
                Exit Sub
            Else
                Selection.Value = Selection.Value & ": " & Time()
            End If

        Else
            If InStr(1, cellValue, ":") > 0 Then
                Selection.Value = Left(cellValue, InStr(1, cellValue, ":") - 1)
            Else
                Exit Sub
            End If
        End If
    End If

End Sub
4.4 Copy VBA Code for CommandButton_Click Event
- Click on the CommandButton Named “C1” and a Subroutine, Private Sub C1_Click is created.
- Copy the code given below under this Subroutine.
- This code will Insert the value of the CommandButton into the Selected cell of the Excel Sheet.
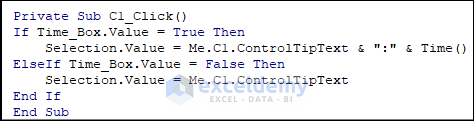
Private Sub C1_Click()
If Time_Box.Value = True Then
    Selection.Value = Me.C1.ControlTipText & ":" & Time()
ElseIf Time_Box.Value = False Then
    Selection.Value = Me.C1.ControlTipText
End If
End Sub- Click on each CommandButton of the Calender and copy the same code into the subroutines.
- You have to just change the CommandButton Name accordingly into the code.
- I have provided the image of the code so that you can understand it clearly.
Private Sub C1_Click()
If Time_Box.Value = True Then
    Selection.Value = Me.C1.ControlTipText & ":" & Time()
ElseIf Time_Box.Value = False Then
    Selection.Value = Me.C1.ControlTipText
End If
End Sub
Private Sub C11_Click()
If Time_Box.Value = True Then
    Selection.Value = Me.C11.ControlTipText & ":" & Time()
ElseIf Time_Box.Value = False Then
    Selection.Value = Me.C11.ControlTipText
End If
End Sub
Private Sub C12_Click()
If Time_Box.Value = True Then
    Selection.Value = Me.C12.ControlTipText & ":" & Time()
ElseIf Time_Box.Value = False Then
    Selection.Value = Me.C12.ControlTipText
End If
End Sub
Private Sub C13_Click()
If Time_Box.Value = True Then
    Selection.Value = Me.C13.ControlTipText & ":" & Time()
ElseIf Time_Box.Value = False Then
    Selection.Value = Me.C13.ControlTipText
End If
End Sub
Private Sub C14_Click()
If Time_Box.Value = True Then
    Selection.Value = Me.C14.ControlTipText & ":" & Time()
ElseIf Time_Box.Value = False Then
    Selection.Value = Me.C14.ControlTipText
End If
End Sub
Private Sub C15_Click()
If Time_Box.Value = True Then
    Selection.Value = Me.C15.ControlTipText & ":" & Time()
ElseIf Time_Box.Value = False Then
    Selection.Value = Me.C15.ControlTipText
End If
End Sub
Private Sub C16_Click()
If Time_Box.Value = True Then
    Selection.Value = Me.C16.ControlTipText & ":" & Time()
ElseIf Time_Box.Value = False Then
    Selection.Value = Me.C16.ControlTipText
End If
End Sub
Private Sub C17_Click()
If Time_Box.Value = True Then
    Selection.Value = Me.C17.ControlTipText & ":" & Time()
ElseIf Time_Box.Value = False Then
    Selection.Value = Me.C17.ControlTipText
End If
End Sub
Private Sub C18_Click()
If Time_Box.Value = True Then
    Selection.Value = Me.C18.ControlTipText & ":" & Time()
ElseIf Time_Box.Value = False Then
    Selection.Value = Me.C18.ControlTipText
End If
End Sub
Private Sub C19_Click()
If Time_Box.Value = True Then
    Selection.Value = Me.C19.ControlTipText & ":" & Time()
ElseIf Time_Box.Value = False Then
    Selection.Value = Me.C19.ControlTipText
End If
End Sub
Private Sub C2_Click()
If Time_Box.Value = True Then
    Selection.Value = Me.C2.ControlTipText & ":" & Time()
ElseIf Time_Box.Value = False Then
    Selection.Value = Me.C2.ControlTipText
End If
End Sub
Private Sub C20_Click()
If Time_Box.Value = True Then
    Selection.Value = Me.C20.ControlTipText & ":" & Time()
ElseIf Time_Box.Value = False Then
    Selection.Value = Me.C20.ControlTipText
End If
End Sub
Private Sub C21_Click()
If Time_Box.Value = True Then
    Selection.Value = Me.C21.ControlTipText & ":" & Time()
ElseIf Time_Box.Value = False Then
    Selection.Value = Me.C21.ControlTipText
End If
End Sub
Private Sub C22_Click()
If Time_Box.Value = True Then
    Selection.Value = Me.C22.ControlTipText & ":" & Time()
ElseIf Time_Box.Value = False Then
    Selection.Value = Me.C22.ControlTipText
End If
End Sub
Private Sub C23_Click()
If Time_Box.Value = True Then
    Selection.Value = Me.C23.ControlTipText & ":" & Time()
ElseIf Time_Box.Value = False Then
    Selection.Value = Me.C23.ControlTipText
End If
End Sub
Private Sub C24_Click()
If Time_Box.Value = True Then
    Selection.Value = Me.C24.ControlTipText & ":" & Time()
ElseIf Time_Box.Value = False Then
    Selection.Value = Me.C24.ControlTipText
End If
End Sub
Private Sub C25_Click()
If Time_Box.Value = True Then
    Selection.Value = Me.C25.ControlTipText & ":" & Time()
ElseIf Time_Box.Value = False Then
    Selection.Value = Me.C25.ControlTipText
End If
End Sub
Private Sub C26_Click()
If Time_Box.Value = True Then
    Selection.Value = Me.C26.ControlTipText & ":" & Time()
ElseIf Time_Box.Value = False Then
    Selection.Value = Me.C26.ControlTipText
End If
End Sub
Private Sub C27_Click()
If Time_Box.Value = True Then
    Selection.Value = Me.C27.ControlTipText & ":" & Time()
ElseIf Time_Box.Value = False Then
    Selection.Value = Me.C27.ControlTipText
End If
End Sub
Private Sub C28_Click()
If Time_Box.Value = True Then
    Selection.Value = Me.C28.ControlTipText & ":" & Time()
ElseIf Time_Box.Value = False Then
    Selection.Value = Me.C28.ControlTipText
End If
End Sub
Private Sub C29_Click()
If Time_Box.Value = True Then
    Selection.Value = Me.C29.ControlTipText & ":" & Time()
ElseIf Time_Box.Value = False Then
    Selection.Value = Me.C29.ControlTipText
End If
End Sub
Private Sub C3_Click()
If Time_Box.Value = True Then
    Selection.Value = Me.C3.ControlTipText & ":" & Time()
ElseIf Time_Box.Value = False The
    Selection.Value = Me.C3.ControlTipText
End If
End Sub
Private Sub C30_Click()
If Time_Box.Value = True Then
    Selection.Value = Me.C30.ControlTipText & ":" & Time()
ElseIf Time_Box.Value = False Then
    Selection.Value = Me.C30.ControlTipText
End If
End Sub
Private Sub C31_Click()
If Time_Box.Value = True Then
    Selection.Value = Me.C31.ControlTipText & ":" & Time()
ElseIf Time_Box.Value = False Then
    Selection.Value = Me.C31.ControlTipText
End If
End Sub
Private Sub C32_Click()
If Time_Box.Value = True Then
    Selection.Value = Me.C32.ControlTipText & ":" & Time()
ElseIf Time_Box.Value = False Then
    Selection.Value = Me.C32.ControlTipText
End If
End Sub
Private Sub C33_Click()
If Time_Box.Value = True Then
    Selection.Value = Me.C33.ControlTipText & ":" & Time()
ElseIf Time_Box.Value = False Then
    Selection.Value = Me.C33.ControlTipText
End If
End Sub
Private Sub C34_Click()
If Time_Box.Value = True Then
    Selection.Value = Me.C34.ControlTipText & ":" & Time()
ElseIf Time_Box.Value = False Then
    Selection.Value = Me.C34.ControlTipText
End If
End Sub
Private Sub C35_Click()
If Time_Box.Value = True Then
    Selection.Value = Me.C35.ControlTipText & ":" & Time()
ElseIf Time_Box.Value = False Then
    Selection.Value = Me.C35.ControlTipText
End If
End Sub
Private Sub C36_Click()
If Time_Box.Value = True Then
    Selection.Value = Me.C36.ControlTipText & ":" & Time()
ElseIf Time_Box.Value = False Then
    Selection.Value = Me.C36.ControlTipText
End If
End Sub
Private Sub C37_Click()
If Time_Box.Value = True Then
    Selection.Value = Me.C37.ControlTipText & ":" & Time()
ElseIf Time_Box.Value = False Then
    Selection.Value = Me.C37.ControlTipText
End If
End Sub
Private Sub C38_Click()
If Time_Box.Value = True Then
    Selection.Value = Me.C38.ControlTipText & ":" & Time()
ElseIf Time_Box.Value = False Then
    Selection.Value = Me.C38.ControlTipText
End If
End Sub
Private Sub C39_Click()
If Time_Box.Value = True Then
    Selection.Value = Me.C39.ControlTipText & ":" & Time()
ElseIf Time_Box.Value = False Then
    Selection.Value = Me.C39.ControlTipText
End If
End Sub
Private Sub C4_Click()
If Time_Box.Value = True Then
    Selection.Value = Me.C4.ControlTipText & ":" & Time()
ElseIf Time_Box.Value = False Then
    Selection.Value = Me.C4.ControlTipText
End If
End Sub
Private Sub C40_Click()
If Time_Box.Value = True Then
    Selection.Value = Me.C40.ControlTipText & ":" & Time()
ElseIf Time_Box.Value = False Then
    Selection.Value = Me.C40.ControlTipText
End If
End Sub
Private Sub C41_Click()
If Time_Box.Value = True Then
    Selection.Value = Me.C41.ControlTipText & ":" & Time()
ElseIf Time_Box.Value = False Then
    Selection.Value = Me.C41.ControlTipText
End If
End Sub
Private Sub C42_Click()
If Time_Box.Value = True Then
    Selection.Value = Me.C42.ControlTipText & ":" & Time()
ElseIf Time_Box.Value = False Then
    Selection.Value = Me.C42.ControlTipText
End If
End Sub
4.5 Write VBA Code to ThisWorkbook
- Click on ThisWorkBook below the VBAProject marked in the image.

- Write the code in ThisWorkBook so that the UserForm will be shown.

Sub UserForm_Show()
UserForm1.Show
End Sub
Step 5 – Assign the Macro to a Button in Excel Sheet
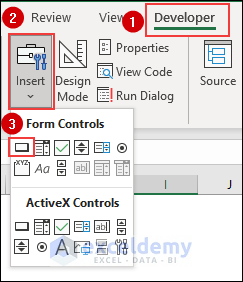
- Select the Developer Tab.
- Click on Insert.
- Select the first button from the Form Controls.
- A Button has been created on the Excel Sheet. Edit the caption of the Button as “Date Picker”.
- Keep the Button near the dataset where you need to insert a Date.
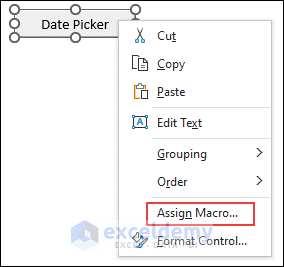
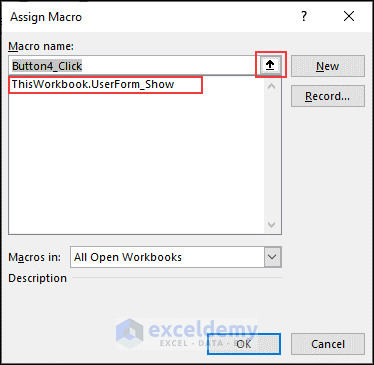
- Right-click on the Date Picker Button.
- Select the Assign Macro… option.
- Click on the arrow beside the Button4_Click.
- The macro of the UserForm will be shown.
- Select ThisWorkbook.UserForm_Show.
- Press OK.
- The created macro is assigned to this Button.
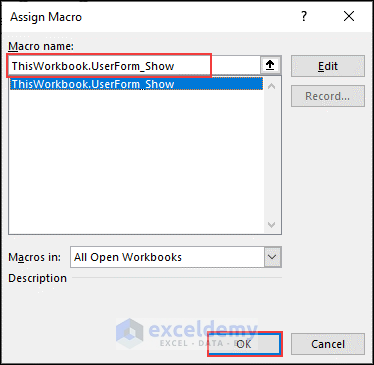
- By clicking the button, you will open the user form and can select the date and time to input.
Download Practice Workbook
You may download the following Excel workbook to use as a template.
Related Articles
- Excel VBA: Show Userform in Full Screen
- Excel VBA: UserForm Image from Worksheet
- How to Create Toggle Button on Excel VBA UserForm
- How to Use VBA to Get Value from Userform Textbox in Excel
- Excel VBA to Format Textbox Number with UserForm
<< Go Back to Excel Date Picker | Learn Excel
Get FREE Advanced Excel Exercises with Solutions!

Hi thanks for a very informative lesson on VBA user form date picker, the only query i have is where is the VBA code in step 4 created? is this in a new module under userform or in sheet 1?
Kind Regards
Stu
Dear Stuart,
I am glad that you find this article informative. Thank you for your query. The VBA code which I have inserted in step 4 is in Sheet1 under Microsoft Excel Objects Section.
Mahfuza Anika Era
ExcelDemy
Hi I have created a userform with the calendar mentioned in this article along with some other text boxes to capture some information. I was able to run but I am not able to view the calendar. The date command boxes and the Date/Time are blank.
Hello Komal!
Thanks for your comment. I see that you are facing some troubles while running the Date Picker UserForm macro. As you have created some more text boxes so I have the following suggestion that you should check:
>> Check that all the textboxes should be inside one UserForm. Also, check whether all the macro codes are written for the same UserForm or not. They all must be under same UserForm to be run properly.
If still you are facing issue then please send us your workboook for this you can post it the ExcelDemy Forum. As the file is working completely fine from our end, it is necessary to have your workbook to find the error.
Regards
Hi Komal!
You did an awesome job for bringing up the calendar. I am amazed an awe of your coding.
I am running into one problem. When I clicked on the box for the time, for some reason it is not displaying the time next to the date. Can you point me in the right direction to troubleshoot this issue? Thanks!
Ron
Hello RON SMITH
Thanks for reaching out and sharing your problem. I want to thank MAHFUZA ANIKA ERA for writing such a helpful article. In particular, she developed the calendar within a UserForm.
However, you are having trouble when clicking the time box. After checking that box, you expect to get the time after the date, but the time is not displaying. I went through this article and discovered why you are having trouble displaying the time and date with a cell.
SOLUTION: You must check the time box before choosing dates to display the date and time.
If you want to choose a date and later display time, I am delighted to inform you that I have developed a Change Event Procedure for the check box named Time_Box for that. When the check box is checked, the time will be next to the date; otherwise, the time will not be displayed.
Steps: Paste the following code with the module of UserForm1 => Save.
OUTPUT:
Hopefully, the Idea will help you. Good luck.
Regards
Lutfor Rahman Shimanto
Hello, I want to praise MAHFUZA ANIKA ERA for sharing this date picker code it was just what I needed to create an attendance tracker but the only issue I’m having is that the date format is not in United States format which is the month/day/year.
Can you please advise me on how to change this in the VBA code?
Dear NURIT,
Thank you so much for your comment. I have changed the date format to United States format in the code. You have to change the VBA code in the subroutine named Private Sub Create_Calender(). Following is the code for your required date format.
Here is the screenshot of the new code. I have marked the changes for your better understanding.
Regards
Mahfuza Anika Era
ExcelDemy
YOU ARE AWESOME! Thank you so much! It’s perfect.
Hello Nurit,
You are most welcome.
Regards
ExcelDemy
Hello MAHFUZA ANIKA ERA
Your datapicker is awesome, even better then old picker from MS.
But i encounter one big problem.
for days from 1 to 12 in each month, date format is messing up:
For example if we pick 07.12.2023 excel will drop: 2023-07-12 (format is yyyy-dd-mm)
But if we pick days 13-31 we getting f.e 21-12-2023 (dd-mm-yyyy)
Is it a way to fix it? I would like to have dd-mm-yyyy for whole month
Hello MARIANOLI,
Thank you so much for your comment. You can fix this problem by changing the date format in your computer’s date and time settings. Change the date format to dd/MM/yy. Hopefully, you will get the dd/mm/yy format for the whole month.
Regards
Mahfuza Anika Era
ExcelDemy
HELLO. I have a problem. When I press the dates 1-12, I get m/d/yyyy (1/1/2024, 1/2/2024, … 1/12/2024). But when I press 13-31, I get d/m/yyyy (13/1/2024, 14/1/2024, … 31/1/2024). Is it a way to fix it? I would like to have d/m/yyyy
Hello SHASHA
Thanks for reaching out and posting your question. I would say yes, you have found the solution to your problem. You can fix this problem by changing the date format in your computer’s date and time settings. Change the date format to your desired one.
However, I am delighted that I have an ultimate solution. I am presenting an Excel VBA sub-procedure that will display the date format based on the PC date & time setting.
OUTPUT Overview:
All you need to do is replace the existing Create_Calender sub-procedure with the following enhanced sub-procedure.
Hopefully, the idea will help you good luck.
Regards
Lutfor Rahman Shimanto
Excel & VBA Developer
ExcelDemy
Hi, it’s me again! First, I want to thank you for how much you help people because I’m a novice trying to code because it’s so helpful with my job.
I was wondering if you may know an EXCEL formula or VBA code that will give the total sum of any numbers in any range of cells colored with conditional formatting and the cell has a specific TEXT in it next to a number?
For example I’m trying to complete my Attendance tracker however I need to be able to type”VAC8″ in a cell to represent vacation time taken by the employee in the amount of 8 hours (or any other number), then have the sum of the hours only for each specific attendance code VAC populate in another cell based solely on the specific color green (color index number 43) which is already set up in the conditional formatted rules of the worksheet. So basically I need a VBA code that will ignore the text and give the sum total of only the number portion of the range of cells (S8:AO43) based on specific conditionally formatted colors.
I would like to have that same thing happen for all the attendance codes with conditional formatted colors listed below. Do you think you can help me?
Attendance Code/ Color Index Number Range of Cells – S8:AO43
VAC 43
FMLA 47
SL 6
FLT 33
WB 44
P-VAC 7
SVC 8
Hello NURIT
Thanks for your nice words. Your appreciation means a lot to us. You wanted a VBA code that will ignore the text within a cell and sum only the number portion on that cell of the S8:AO43 range based on specific conditionally formatted colors.
I am delighted to inform you that I have developed an Excel VBA User-defined function to fulfil your goal.
OUTPUT OVERVIEW:
Excel VBA User-defined Function:
Follow these steps:
Step 1: Open the VBA Editor window => Hover over Insert and click on Module => Insert the code above in the module and Save.
Step 2: Select cell P20 => Insert the following formula => Hit Enter.
Hopefully, the idea will help you. Good luck.
Regards
Lutfor Rahman Shimanto
ExcelDemy
Thank you Lutfor for creating the VBA code for me. I really appreciate it. I tried it but it’s not calculating, it says 0.
I wonder if it has to do with the conditional formatting colors not being the same index as the fill colors. I used the fill colors to get the index numbers because Excel doesn’t allow me to get color index numbers from the conditionally formatted colors that appear.
I’m wondering if I can use either a formula or VBA code that will just add the number portion of a cell based on specific text next also in the cell with the number.
I’m trying to be able to type in a cell the attendance code and hours used for that day e.g., VAC8 and get the total sum for all numbers in a specific cell range with the attendance code “VAC” in it to populate in another cell in the worksheet.
Dear NURIT
It is good to see you again. Thanks for thanking me. Your appreciation means a lot to us.
You are right. When a cell background color is changed by conditional formatting, the cell color index remains xlColorIndexNone. When using conditional formatting to change the cell background based on a condition, it fetches the intended color, but the cell background is not changed ultimately.
SOLUTION to the Mentioned Problem: Remove the conditional formatting from the S8:AO43 range. Use an Excel VBA Event procedure that I developed to solve your problem. This event will ultimately change the background color based on the condition.
Follow these steps: Right-click on the sheet name tab => Click on View Code => Paste the code below in the sheet module, and Save => Return to the sheet and make changes to see the output like the following GIF.
Enhanced User-defined Function: I am delighted to share an Enhanced version of the previous sub-procedure.
Follow these: Hover over Insert => Click on Module => Paste the following code in the module => Save.
Finally, to calculate the sum, Select cell Q8 => Insert the following formula => Drag the Fill Handle icon to cell Q14.
Besides, I am presenting an sub-procedure that will display the color index of a selected cell.
A Friendly Suggestion: Dear Nurit, we are discussing a topic different from the article. So, another visitor may get confused. It would be great if you shared your problem through the ExcelDemy Forum.
I am also attaching the solution workbook for better understanding. Hopefully, this idea will help you reach your goal. Good luck.
DOWNLOAD WORKBOOK
Regards
Lutfor Rahman Shimanto
ExcelDemy
Thank you Lutfor for everything. The VBA code to color by code works however the summing of the number within the colored cell doesn’t work. I understand about you wanting me to go to the forum. I will post in the forum now.
Thanks again.
Hello NURIT
Thanks for sharing another exciting problem. The issue is raised because the UDF (User Defined Function) is not re-calculating.
I am excited to let you know that I have resolved the issue by developing an Excel VBA Sub-procedure named ForcedReCalculation (responsible for application re-calculation).
OUTPUT OVERVIEW:
Follow these steps: Open the VBA Editor window => Right-click on the sheet module => Click on View Code => Replace the previous code with the following code => Save.
Hopefully, you have found your solution. I look forward to seeing you at the ExcelDemy Forum with another exciting problem. Stay blessed.
Regards
Lutfor Rahman Shimanto
Excel & VBA Developer
ExcelDemy
Thank you, Mahfuza, for what I am sure will be a wonderful tool (once I get it working!) Where do I define the Month_Box variable in the code? I get the following error when I debug/compile
Variable no defined
I have copied the code exactly as presented in the article
Hello DENNIS IVAN FORD
Thanks for your comment. For the Month_Box to work properly, paste the following code in the UserForm.
Additionally, you can remove the Option Explicit statement at the beginning when declaring initial variables.
The article has been updated. So, I recommend you to go to the article again. Good luck.
Regards
Lutfor Rahman Shimanto
ExcelDemy
In the Date Picker Code, where is the value of Time_Box declared?
Hello DENNIS IVAN FORD
For the Time_Box to work properly, paste the following code in the UserForm.
Through this code, the UserForm will be able to add time with a date when the Add Time check box is ticked.
Download the practice workbook provided in the article for better understanding. Good luck.
Regards
Lutfor Rahman Shimanto
ExcelDemy
The date formats for the next months view in the present month view of the calendar are switched around (input into the cell as m/d/y; American format) rather than matching the format of the dates that are being input for the current month (that inputs into the cell as d/m/y). Where do I change the cell input date format?
Hello CHARLIE
Thanks for your comment. The existing article’s date picker displays the date based on the date order of the Machine (Windows, Mac or Linux). However, you wanted to modify the VBA code to adjust the date format to match the desired month/day/year (American format) for both the calendar display and input into the cell. Thus, the idea will ensure consistency in date formats between the calendar view and the input into the cell.
To do so, you only need to modify the existing sub-procedure named Create_Calender by replacing it with the following.
Excel VBA Sub-procedure:
I hope you have found the idea helpful. Stay blessed.
Regards
Lutfor Rahman Shimanto
Excel & VBA Developer
ExcelDemy
Dear Mahfuza Anika Era,
thanks for sharing the datepicker which just what I need currently. I have two question:
1 each time, i need to close the datepicker once input the date in one cell in “Date & Time of Sale” column, and then click the datepicker again to input next cell in the same column. could be possible to input the date for the cells one by one or by selection in the column continually until I close the datepicker userform?
2 if I have anther userform called dateinput userform, and insert one textbox in dateinput userform, how can i call the datepicker from dateinput userform, when i click textbox in dateinput userform, and input the date into the textbox above?
thanks for assistance.
Hello David Wang
Thanks for your kind words! You are very welcome.
I have reviewed both of your requirements. These requirements can quickly be developed, and I think they will overcome all your hassles. I have made the necessary changes. Please check the following:
To fulfil your goal, I had to make many changes to the codes and design, develop several sub-procedures and event procedures, and add the necessary validation. As there are many more things, I am not describing everything here. If you are interested in how I developed such a customized date picker, you can post your queries in the ExcelDemy Forum.
Hopefully, you have found the solution you were looking for. I have attached the Date Picker file. Good luck.
DOWNLOAD CUSTOMIZED DATE PICKER
Regards
Lutfor Rahman Shimanto
Excel & VBA Developer
ExcelDemy
Hi, I would like to change the calender’s weekdays order, i.e. the week should start with Monday and end with Sunday. Could you please help? Thank you.
Hello Weronika,
To change the calendar’s weekday order you will need to change the labels name and update the VBA code date filling logic.
To start with Monday and end with Sunday in the Excel date picker, change the order of the day labels (e.g., Label1.Caption = “Mon”, Label7.Caption = “Sun”).
Now, use the updated Create_Calender procedure. Changed the Weekday function to use vbMonday, ensuring that the week starts on Monday. and the rest of the logic remains the same to ensure proper date filling and formatting.
Download the Excel File:
Calendar-Date-Starts-with-Monday.xlsm
Regards
ExcelDemy
First off, thanks everyone for all the information here for adding this Calendar!
It is working great for my use but I’m running into an issue.
I’m using this to define the Start Time to Stop Time of a customer’s “trouble ticket”
I need to calculate the Elapsed Time between these values but I’m not sure how to get it to analyze the format to give me this info.
(Really looking for decimal hours for this result)
Date & Time Start: 9/19/2024: 10:43:12 AM
Date &Time End: 9/19/2024: 1:36:12 PM
Duration of Call: #VALUE!
Sometimes these go past midnight of one day into the morning of the next, so I need it to understand when doing the hours calculation.
Ex: 9/18/2024 11:00PM to 9/19/2024 1:30AM = 2.5 Hours
Any assistance is much appreciated!
Hello Jeremy,
You are most welcome. Thanks for your appreciation. To calculate the elapsed time between two date-time entries in Excel, you can subtract the two cells and display the result in decimal hours. But you must need to use the date and time format properly. You can’t use colon(:) in between date and time.
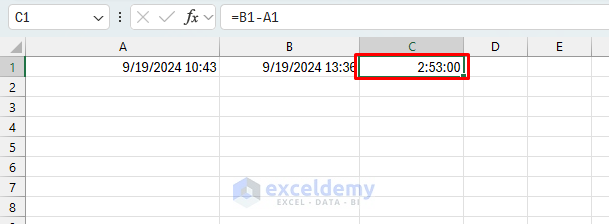
Use this formula to subtract G21 from G22:
=G22 – G21
Format the result cell as [h]:mm:ss.
Select the cell T21 >> Right-click >> select Format Cells >> select Custom >> type [h]:mm:ss
Multiply the result by 24 to get the answer in hours:
=(G22 – G21) * 24
Excel naturally handles dates and times. When subtracting times that span over midnight, the same formula will work.
Regards
ExcelDemy
Hello, First off a huge Thank You! to all that have provided this wealth of information and handy VB. I’m still relatively new to VB and self taught a little from examples like this Calendar add-in that make my job much easier.
I have this Calendar working now inside an Excel Work Form where my team logs After Hours Customer Service calls, Start Times and End Times.
I’m attempting to get it to calculate the Elapsed time between the 2 Date/Time results chosen from the Calendar.
Example:
[G21] Date & Time Start: 9/19/2024: 10:43:12 AM
[G22] Date &Time End: 9/19/2024: 1:36:12 PM
[T21] Duration of Call: #VALUE! [G22-G21] (Answer Needed in Decimal Hours)
* I also need it to understand how to count if this becomes an Overnight call such as:
[G21] Date & Time Start: 9/19/2024: 11:00:00 PM
[G22] Date &Time End: 9/19/2024: 2:30:00 AM
[T21] Duration of Call: Looking for a result of 3.5 hrs here.
Thanks in advance for any help that can be provided!
Hello Jeremy,
You are most welcome. Thanks for your appreciation. To calculate the elapsed time between two date-time entries in Excel, you can subtract the two cells and display the result in decimal hours. But you must need to use the date and time format properly. You can’t use colon(:) in between date and time.

Use this formula to subtract G21 from G22:
=G22 – G21
Format the result cell as [h]:mm:ss.
Select the cell T21 >> Right-click >> select Format Cells >> select Custom >> type [h]:mm:ss
Multiply the result by 24 to get the answer in hours:
=(G22 – G21) * 24
Excel naturally handles dates and times. When subtracting times that span over midnight, the same formula will work.
Regards
ExcelDemy
HI,
I need to copy this VBA Date picker in each row in my excel table. My database creates for the enter training participation date .
Hello Devindi,
To copy this VBA Date picker in each row in my your table, you will need to create a dynamic date picker.
Here are the steps to create a dynamic date picker in each row of your Excel table:
1. Set up the UserForm with a date picker control (as shown in the article).
2. Use the Worksheet_SelectionChange event to trigger the date picker when a cell in your “Participation Date” column is selected.
3. Capture the date in the DatePickerForm code, handle the selection:
Once the date is picked, insert it into the active cell.
Ensure that the date picker works dynamically across all rows of your table.
Regards
ExcelDemy
Can you give a fresh code after incorporating all changes
Hello Asger,
Please download the Excel file to get the fresh code.
Regards
ExcelDemy
Thank you so much for your prompt response. Date picker is working. But there are two things which I want to mention. First, while clicking dates from 1 to 12 it picks up dates in American format(mm/dd/yyyy) while dates from 13 to 31 in correct Indian format(dd/mm/yyyy). Secondly, after picking a date, the calendar remains displayed and we have to physically close it.
Hello Asger
You are most welcome. However, different formats might show due to mixed regional settings or VBA interpreting some dates incorrectly. To enforce consistency, we can modify the code to always use a single format, regardless of system settings.
Here’s an updated version that ensures the date format is consistently dd/mm/yyyy:
To ensure the calendar automatically hides after a date is selected, you can modify the code to make the calendar invisible after a date is picked. Add the following code to the Calendar1_Click event, which will trigger each time a date is chosen:
If you’re using buttons for each day as clickable dates, include the Calendar1.Visible = False line in the click event for each button:
This approach ensures the calendar closes automatically after a date selection. Let me know if this solves it!
Regards
ExcelDemy
Thank you for reply. I replaced the create_Calender event. Initially it did not work. There was a spelling error in the word calendar. Even though the spelling was correct as per dictionary it was giving error as the procedure name was written using ‘e’ . After correcting it worked. But the problem of different format from 1-11 and 12-31 is still persisting.
I also tried hiding date after a date is picked by introducing the procedure you suggested but it is not working.
Regards and excuse me for giving you trouble.
Asger
Hello Asger,
It seems like there are still a few challenges with the date format and the auto-hide functionality. Here’s a refined approach:
Let’s force the date format explicitly in each control to avoid any discrepancy. By handling it this way, we ensure all dates display in dd/mm/yyyy.
Update the Create_Calendar procedure as follows:
If the calendar is not hiding after selection, it may be that the event isn’t firing as expected. Try placing the following line inside each button’s event handler where a date is selected:
If you encounter issues with function names, ensure they match throughout the code, especially when calling or referencing functions. This should clear up any lingering format or visibility issues.
This should address both format consistency and auto-closing the calendar. Let me know if this resolves it, or if I can assist further!
Regards
ExcelDemy
Great Effort,
I want to link date particular cell only without click cell. can you advice, please
Hello Mohamed ali,
To link the date picker to a specific cell without clicking it, you can modify the VBA code to directly reference the desired cell. For example, in the UserForm’s code, set the date picker value to update the specific cell directly:
This will update the specific cell (like A1) with the selected date without needing to click the cell itself.
Regards
ExcelDemy
Dear Team thank you this is really help full however my requirement is After selecting the date and time i need the date and time in the below format please suggest 06-Dec-24 13:03:00 how to remove the : between the date and time
Hello Inderpal Singh,
Thank you for your feedback! To achieve the format 06-Dec-24 13:03:00 in Excel without the colon between the date and time, you can use a formula to reformat it after inserting the date from date picker. Assuming your date and time are in cell A1, use:
=TEXT(A1, “DD-MMM-YY hh:mm:ss”)
This removes the colons and combines the date and time as desired.
Or you can updae the existing VBA code’s date format to format the date and time as 06-Dec-24 130300 (removing the colons between time), you can adjust the ControlTipText property in the existing code. Here’s the updated section:
Update the ControlTipText line:
Explanation:
1. The Replace function removes the colons (:) from the formatted date and time.
2. Format ensures the date is displayed in the dd-mmm-yy hh:mm:ss format before applying Replace.
3. Incorporate this into each section of the code where ControlTipText is being set.