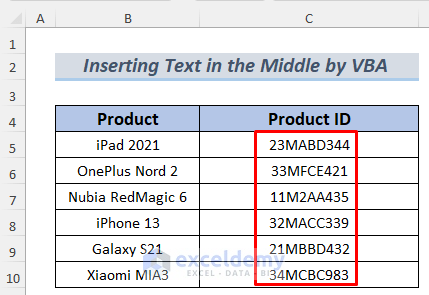
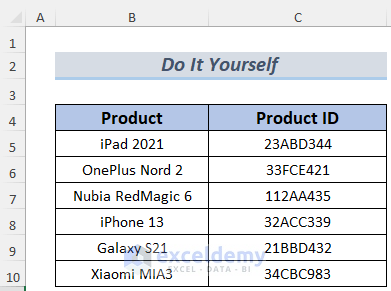
The dataset showcases IDs of different Smartphone Products.

Method 1 – Using the Excel LEFT and MID Functions to Add Text in the Middle of a Cell
You want to insert M after every second number in Product IDs.
Steps:
- Create a new column for the new IDs and enter the following formula in D5.
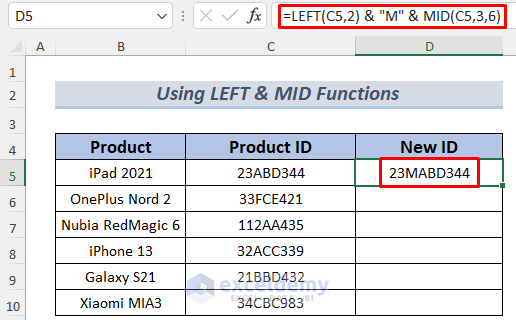
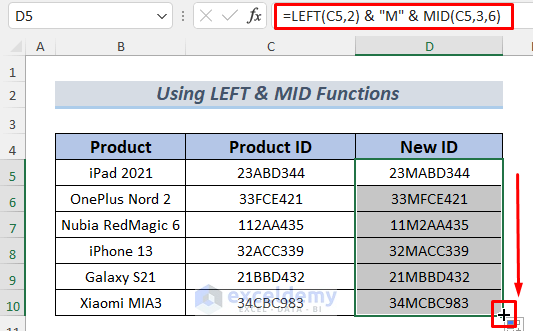
=LEFT(C5,2) & "M" & MID(C5,3,6)
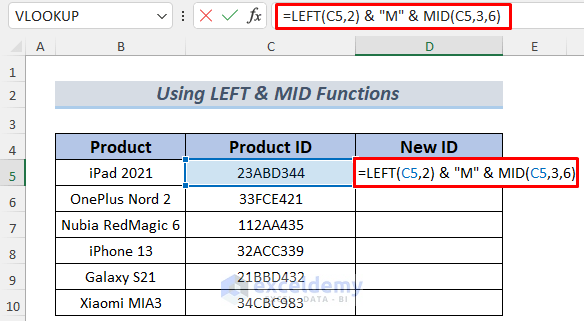
The formula divides the text in C5 into two parts. The LEFT function returns the first two characters of the ID of C5 and the MID function returns 6 characters starting from the 3rd character of the ID. The Ampersand adds M between these two parts.
- Press ENTER to see the output.
- Use the Fill Handle to AutoFill the rest of the cells.
Read More: How to Add Text to End of Cell in Excel
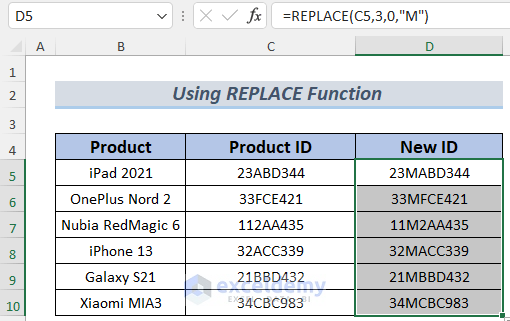
Method 2 – Applying the REPLACE Function to Add Text in the Middle of a Cell
Steps:
- Create a new column for the new IDs and enter the following formula in D5.
=REPLACE(C5,3,0,"M")
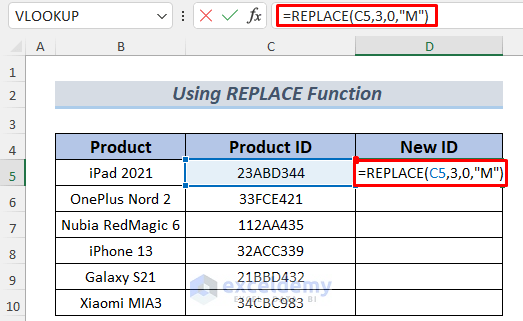
The formula will add M after the 2nd character of the text in C5.
- Press ENTER.
- Drag the Fill Handle to AutoFill the rest of the cells.
Method 3 – Combining Functions to Add Text in the Middle of a Cell
Steps:
- Create a new column for the new IDs and enter the following formula in D5.
=CONCATENATE(LEFT(C5,2),"M",RIGHT(C5,LEN(C5)-2))
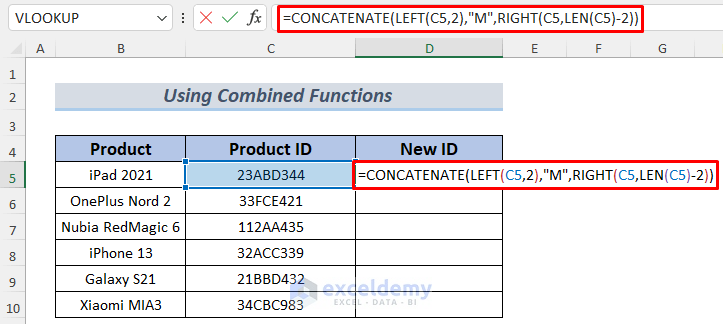
The formula will add M after the 2nd character of the text in C5.
Formula Breakdown
- LEN(C5)-2—-> returns the subtraction result between the character length of C5 and 2.
- Output: 6
- RIGHT(C5,LEN(C5)-2)—-> becomes
- RIGHT(C5,6)—-> turns into
- Output: “ABD344”
- LEFT(C5,2)—-> returns the two first characters of the text in C5.
- Output: “23”
- CONCATENATE(LEFT(C5,2),”M”,RIGHT(C5,LEN(C5)-2))—-> becomes
- CONCATENATE( “23”,”M”, “ABD344”)—-> results into
- Output: “23MABD344”
- Press ENTER.
- Drag the Fill Handle to AutoFill the rest of the cells.

Read More: How to Add Text in Excel Spreadsheet
Method 4 – Adding Text in the Middle of a Cell Using VBA
Steps:
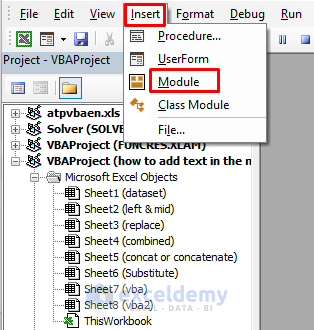
- Go to the Developer Tab and select Visual Basic.

- In the VBA editor, select Insert >> Module to open a VBA Module.
- Enter the following code in the VBA Module.
Sub AddTextInCell()
Dim mnCell As Range, nSelected_Range As Range
Set nSelected_Range = Application.Selection
Set nSelected_Range = Application.InputBox _
("Select the Range", _
"Add Text", nSelected_Range.Address, Type:=8)
For Each mnCell In nSelected_Range
mnCell.Value = VBA.Left(mnCell.Value, 2) & "M" & _
VBA.Mid(mnCell.Value, 3, VBA.Len(mnCell.Value) - 1)
Next
End Sub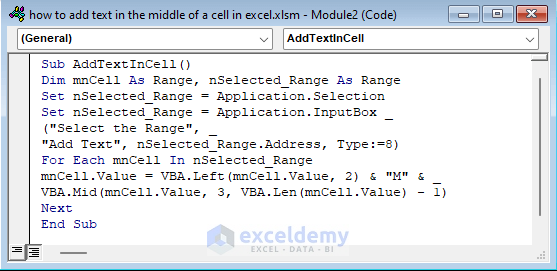
This VBA code will add M in the Product IDs like in Method 1 and 2.
The VBA Left, Mid and Len functions were used. Also, a For Loop. The coding is similar to the formula used in Method 1.
- Go back to your sheet and run the Macro: AddTextInCell.
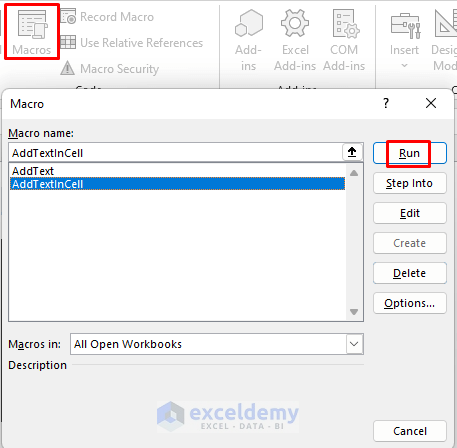
- In the message box, select the range of IDs you want to update and click OK.

You will see the Product IDs with an M after the 2nd character.
Read More: How to Add Text to Cell Value in Excel
Method 5 – Applying the SUBSTITUTE Function to Add Text Based on Criteria
Steps:
To add an X after every A in the Product IDs:
- Create a new column for the new IDs and enter the following formula in D5.
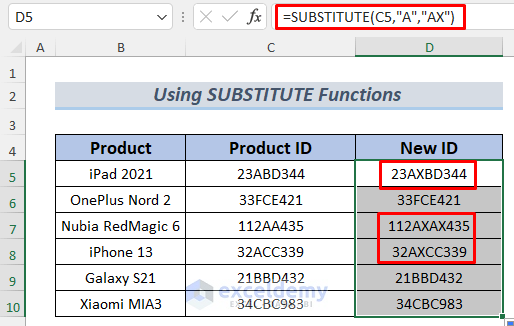
=SUBSTITUTE(C5,"A","AX")
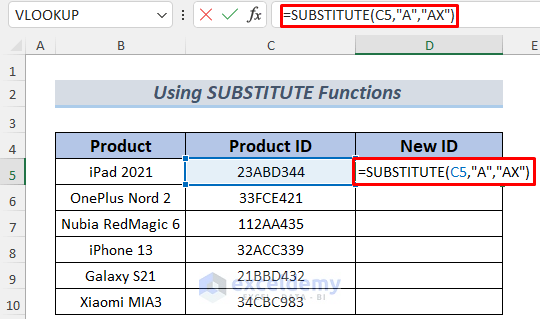
The formula will add an X whenever it finds an A.
- Press ENTER.
- Drag the Fill Handle to AutoFill the rest of the cells.
Read More: How to Add Text to Beginning of Cell in Excel
Practice Section
Practice here.
Download Practice Workbook
Related Articles
- How to Add Text to Multiple Cells in Excel
- How to Add Text to Cell Without Deleting in Excel
- How to Add a Word in All Rows in Excel
- How to Add Text Before a Formula in Excel
- How to Add Text in IF Formula in Excel
- Add Text and Formula in the Same Cell in Excel
<< Go Back to Excel Add Text to Cell Value | Concatenate Excel | Learn Excel
Get FREE Advanced Excel Exercises with Solutions!
