
Image by Editor
It is common to use a dropdown selection while creating a table or database. The Lookup Wizard in Microsoft Access is a powerful feature that allows you to create dropdown menus for your table fields. This ensures consistency and prevents errors when entering data. It ensures users select from predefined options rather than manually typing values. In this tutorial, we will show how to use the Lookup Wizard to create dropdown selections for tables in Access.
Understanding Lookup Fields:
In Access, a lookup field appears as a dropdown list or combo box when you’re entering data into a table. The options in this dropdown can come from two sources:
- A list of values that you define manually.
- Values from a field in another table (which creates a relationship between tables).
Consider you have a Product table where each product belongs to a category. Instead of typing the category name manually, you can create a lookup field that references a Categories table.
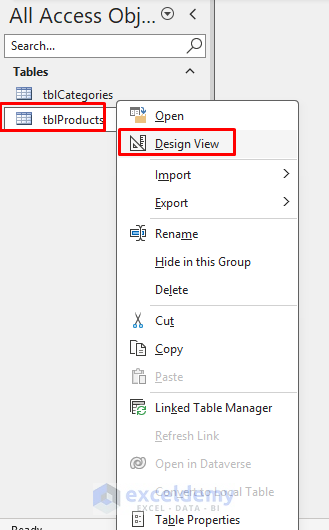
Step 1: Open Your Table in Design View
- Open Microsoft Access and load your database.
- Go to the Tables section in the Navigation Pane.
- Right-click on the table (e.g., tblProducts) where you want to add the dropdown.
- Select Design View.
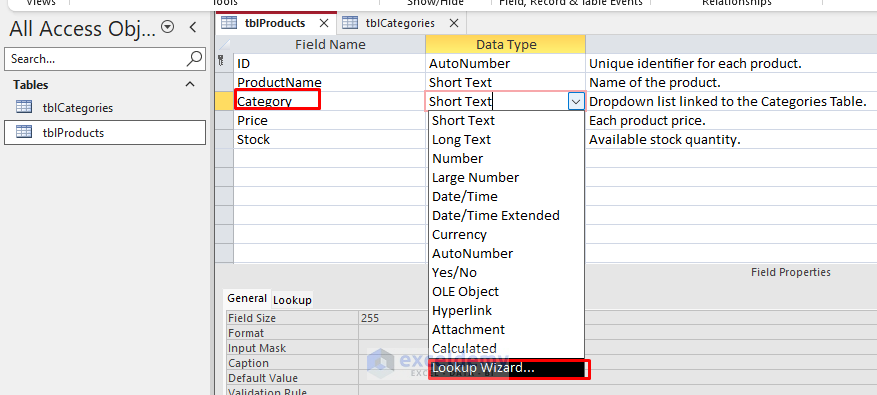
Step 2: Add a New Lookup Field
- Click on an empty row in the Field Name column.
- Type a name for the lookup field (e.g., Category).
- In the Data Type column >> choose Lookup Wizard.
Step 3: Choose Data Source for Lookup Values
You will see two options:
- Option 1: Lookup values from an existing table or query (Best for relational databases).
- Option 2: Type values manually (Best for small, fixed lists).
Prompts:

Option 1: Creating a Lookup Field from Another Table
1. Ensure You Have Two Tables
While selecting option 1 you must ensure you have two tables.
- A main table where you want to add the lookup field.
- We are using a product table named tblProducts.

- A lookup table containing the values you want to appear in the dropdown.
- We are using a category table named tblCategories.

2. Follow the Lookup Wizard Prompts
- On the first screen >> select I want the lookup field to get the values from another table or query.
- Click Next.

- Select the table that contains the values for your dropdown list (e.g., tblCategories table).
- Click Next.

- In the Available Fields list, select the Field (e.g., Category Name) you want to include in your lookup field.
- The first field you select will be the one stored on your main table (usually an ID).
- Additional fields will be displayed in the dropdown but not stored.
- Use the arrow (>) button to move selected fields to the Selected Fields list.
- Click Next.

3. Sort Your Dropdown Values (Optional)
If you want to sort the values in your dropdown, select the field to sort by.
- Select categoryName >> choose Ascending.
- You can add additional sort levels if needed.
- Click Next.

4. Adjust Column Widths (Optional)
You can adjust how wide each column appears in the dropdown by:
- Clicking and dragging the column dividers in the preview.
- Double-clicking the column divider to auto-size.
- Click Next.

5. Choose Key Field and Complete Setup
- In the next screen, select the checkbox for Hide key column (usually checked by default)
- Enter a label for your lookup column if you want to change it
- Choose whether to enable data integrity:
- Restrict Delete prevents the deletion of lookup values that are in use
- Cascade Update automatically updates related records if lookup values change
- Click Finish.

Your lookup field is now set up and will display values from the related table.

Option 2: Enter Values Manually
We copied the product table to create the dropdown list manually.

In the Lookup Wizard prompt.
- Select I will type in the values that I want.
- Click Next.

- Enter the list of categories in the Col1.
- Accessories
- Electronics
- Home Appliances
- Networking Devices
- Storage Devices
- Wearable Tech Accessories
- Click Next.

- Select Limit To List.
- Click Finish.

Step 5: Save and Test the Lookup Field
- Click Save (Ctrl + S).
- Right-click >> select Datasheet View to test the dropdown selection.
- Click on the new field and verify that the dropdown appears.
- Click the arrow to see your list of values.
- Select a value to confirm it works as expected.

Common Challenges and Solutions
Dropdown Not Appearing
If your dropdown isn’t appearing:
- Ensure you complete all steps in the Lookup Wizard.
- Check that your table has been saved after making the changes.
- Close and reopen the table if necessary.
Modifying a Lookup Field Later
To modify an existing lookup field:
- In Table Design View >> select your Lookup field.

- In the Properties pane at the bottom,
- Look for Row Source Type and Row Source.
- You can edit properties like Row Source to change the dropdown options.

Conclusion
The Lookup Wizard in Access simplifies data entry by allowing users to select values from a predefined list. By using this you can improve the data accuracy, consistency, and efficiency in your database. You can design the table to insert selections manually or from another table based on your dataset type. Lookup fields are just the beginning of what you can do with Access. As you become more comfortable with these basic techniques, you can explore more advanced features like cascading dropdowns, filtered lookups, and custom validation rules to make your database even more robust and user-friendly.
Get FREE Advanced Excel Exercises with Solutions!
