To reduce file size and improve performance, it’s always recommended to compress images in Excel files. Here are 2 methods to do so.
Method 1 – Using Picture Format Tool to Reduce Excel File Size with Pictures
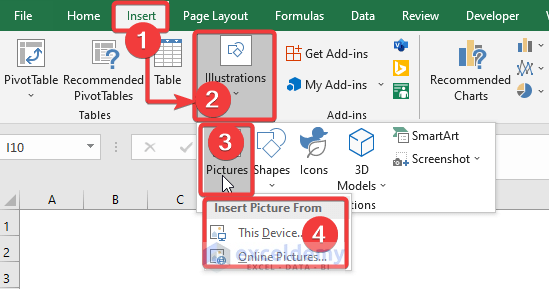
STEPS:
- Go to the Insert tab.
- Select the Illustrations command.
- Click on the Pictures option.
- Insert an image using the Insert Picture From option.
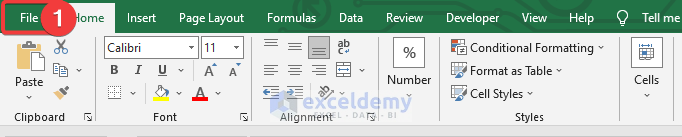
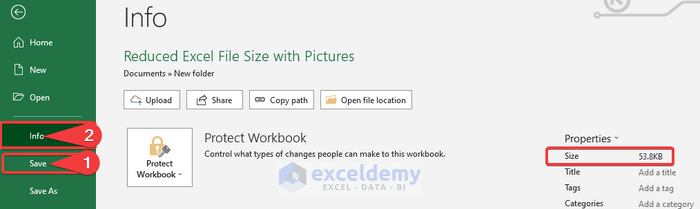
- Navigate to the File tab.
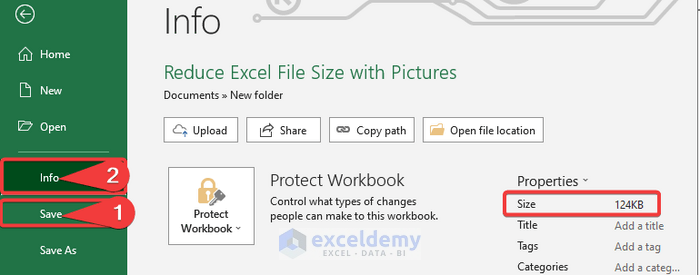
- Click on the Save option.
- Select the Info option and you will see the actual file size, here 124 KB.
- Click on the inserted picture.
- Open the Picture Format tool.
- Click on the Adjust command.

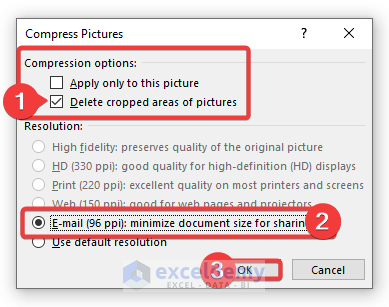
The Compress Pictures window will open.
- From the Compression Options, choose the Delete cropped areas of pictures option.
- Under Resolution, click on E-mail (96 ppi): minimize document size for sharing.
- Click on OK.
- Save the workbook.
- Select the Info option.
The outcome is a reduced Excel file size of 53.8 KB.
Read More: How to Compress Excel File for Email
Method 2 – Applying VBA Code to Reduce Excel File Size with Pictures
We can also create a VBA macro to compress pictures.
STEPS:
- Go to the Developer tab.
- Select the Visual Basic command.
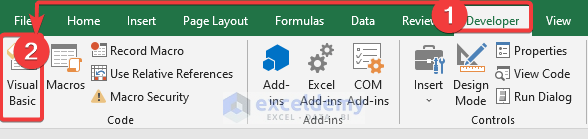
The Visual Basic window will open.
- From the Insert option, click on Module to open a Module window.
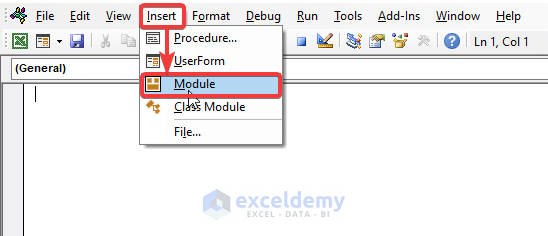
- Paste the following VBA code into the Module.
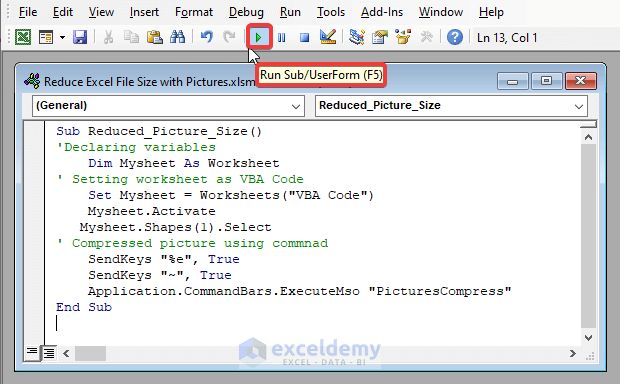
- Click the Run button or press F5 to run the code.
Sub Reduced_Picture_Size()
'Declaring variables
    Dim Mysheet As Worksheet
' Setting worksheet as VBA Code
    Set Mysheet = Worksheets("VBA Code")
    Mysheet.Activate
   Mysheet.Shapes(1).Select
' Compressed picture using commnad
    SendKeys "%e", True
    SendKeys "~", True
    Application.CommandBars.ExecuteMso "PicturesCompress"
End Sub
VBA Code Breakdown
- We name our Sub Procedure as Reduced_Picture_Size().
- We declare our variable Dim Mysheet as Worksheet.
- We set our worksheet name as VBA Code using Set Mysheet= Worksheets(“VBA Code”).
- We compress our pictures using Application.CommandBars.ExecuteMso “PicturesCompress”.
The Excel file with compressed images has reduced considerably in size.

Read More: How to Reduce Excel File Size with Macro
Download Practice Workbook
Related Articles
- How to Zip an Excel File
- How to Compress Excel File to Smaller Size
- How to Compress Excel File More than 100MB
- How to Reduce Excel File Size by Deleting Blank Rows
- How to Reduce Excel File Size Without Deleting Data
- How to Reduce Excel File Size Without Opening
- How to Reduce Excel File Size with Pivot Table
- Determine What Is Causing Large Excel File Size
- [Fixed!] Excel File Too Large for No Reason
<< Go Back to Excel Reduce File Size | Excel Files | Learn Excel
Get FREE Advanced Excel Exercises with Solutions!
