Example 1 – Print All Sheets at Once in Excel
Case 1.1 – Using the Print Entire Workbook Feature for Printing All Sheets at Once
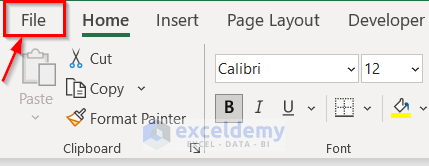
- Go to the File tab on the ribbon or press CTRL+P. This will take us to the main menu.
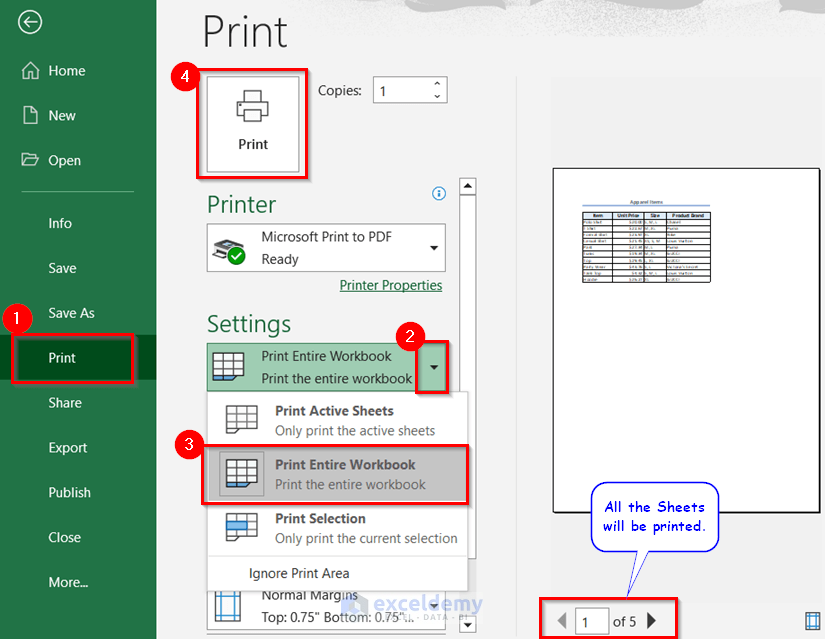
- From the Print option, go to the Settings drop-down menu, select Print Entire Workbook, and click on the Print button.
Case 1.2 – Use VBA Code to Print the Entire Workbook
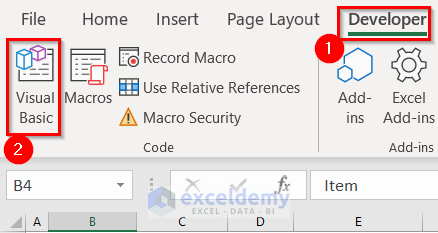
- Go to the Developer tab on the ribbon.
- Click on Visual Basic to open the Visual Basic Editor where we will write the VBA codes. Another way to open the Visual Basic Editor is to press ALT + F11.
- Go to Insert and select Module from the drop-down menu.

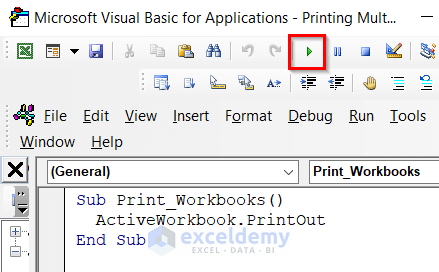
- Copy and paste the VBA code in Module and click on the RUN button to run the code.
VBA Code:
Sub Print_Workbooks()
  ActiveWorkbook.PrintOut
End Sub
Case 1.3 – Converting the Excel File into a PDF File with VBA Code to Print All Sheets
- Go to the Developer tab >> Visual Basic >> Insert >> Module.
- Copy and paste the VBA code that is shown below.
VBA Code:
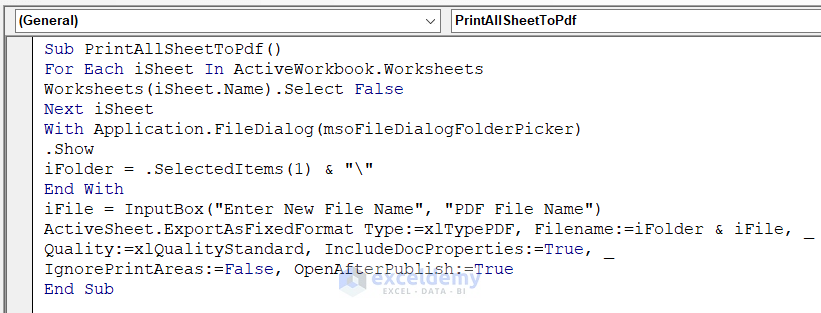
Sub PrintAllSheetToPdf()
For Each iSheet In ActiveWorkbook.Worksheets
Worksheets(iSheet.Name).Select False
Next iSheet
With Application.FileDialog(msoFileDialogFolderPicker)
.Show
iFolder = .SelectedItems(1) & "\"
End With
iFile = InputBox("Enter New File Name", "PDF File Name")
ActiveSheet.ExportAsFixedFormat Type:=xlTypePDF, Filename:=iFolder & iFile, Quality:=xlQualityStandard, IncludeDocProperties:=True, IgnorePrintAreas:=False, OpenAfterPublish:=True
End Sub- Press F5 on your keyboard.
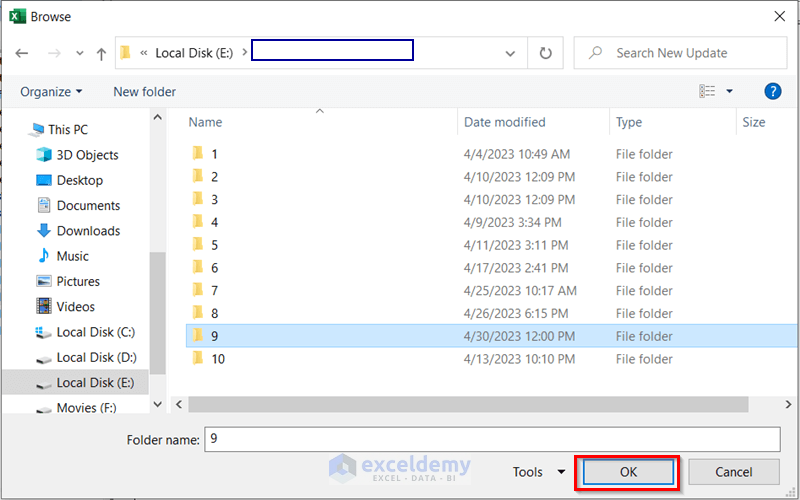
- You will be asked to select the folder where you want to save the PDF file.
- Select the new file path and click OK.
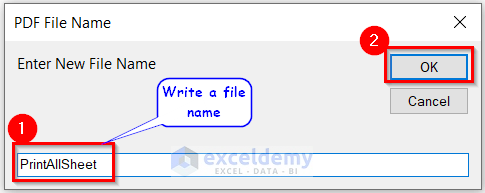
- A pop-up input box will appear. It will ask you for a name.
- Write any name for your new PDF file. We named our new PDF file “PrintAllSheet”.
- Click OK.
- Each page of the PDF file will carry the data from each of the worksheets from the Excel workbook.
Case 1.4 – Print Certain Sheets by Using VBA Code
- Go to the Developer tab on the ribbon >> click on Visual Basic >> from Insert >> select Module.
- Insert the following VBA code.
VBA Code:
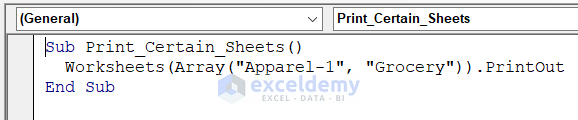
Sub Print_Certain_Sheets()
  Worksheets(Array("Apparel-1", "Grocery")).PrintOut
End SubApparel-1, and Grocery are the name of the sheets. Run the code by clicking the RUN button. In the end, running the code will print multiple sheets (Apparel-1, and Grocery) at one click.
Example 2 – Print Multiple Active Sheets
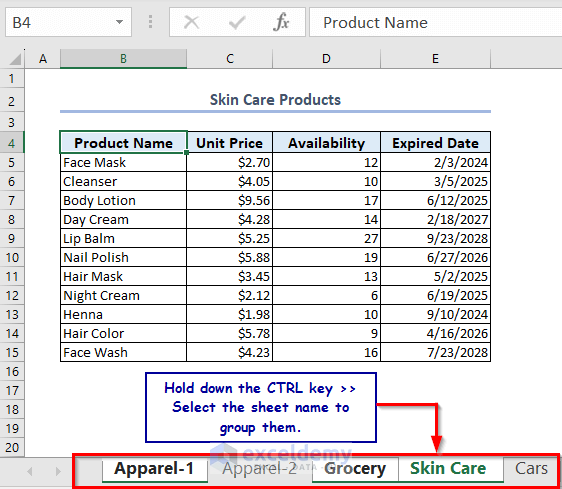
We have five sheets of data but there are only three active sheets we want to print.
- To select more than one sheet at a time, hold down the Ctrl key then select the sheet names one by one.
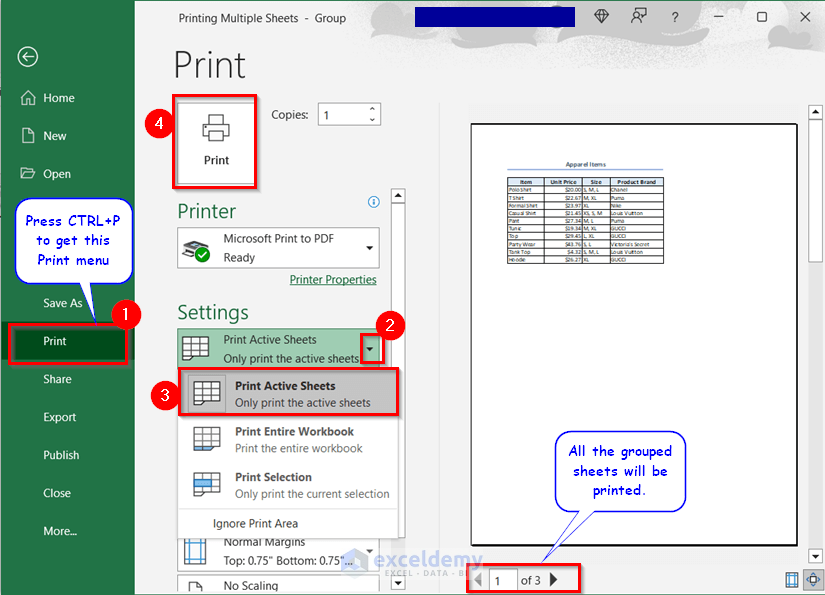
Case 2.1 – Use the Print Active Sheets Feature for Printing Multiple Sheets
- Press CTRL+P to get the Print menu.
- From the Print option >> go to the Settings drop-down menu >> select Print Active Sheets >> click Print.
Case 2.2 – Use the ActiveSheet Property in VBA Code to Print Only the Active Sheets
- Go to the Developer tab >> click on Visual Basic >> insert a new Module >> insert the code there.
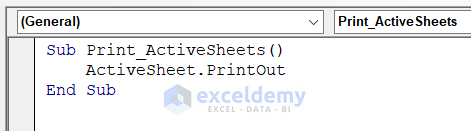
VBA Code:
Sub Print_ActiveSheets()
    ActiveSheet.PrintOut
End Sub- Run the code by pressing the F5 key. This will print all the active sheets on the spreadsheet.
Case 2.3 – Using the SelectedSheets Property to Print Selected Excel Sheets
- Click the Developer tab >> go to Visual Basic >> from the drop-down menu under Insert, go to Module >> insert the following VBA code.
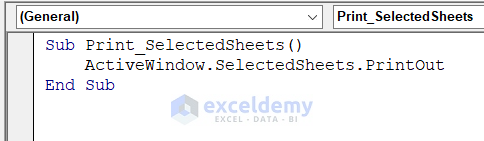
VBA Code:
Sub Print_SelectedSheets()
    ActiveWindow.SelectedSheets.PrintOut
End Sub- Run the code by pressing F5 to get the printed copies of selected sheets.
Example 3 – Print Multiple Sheets with a Specific Print Area
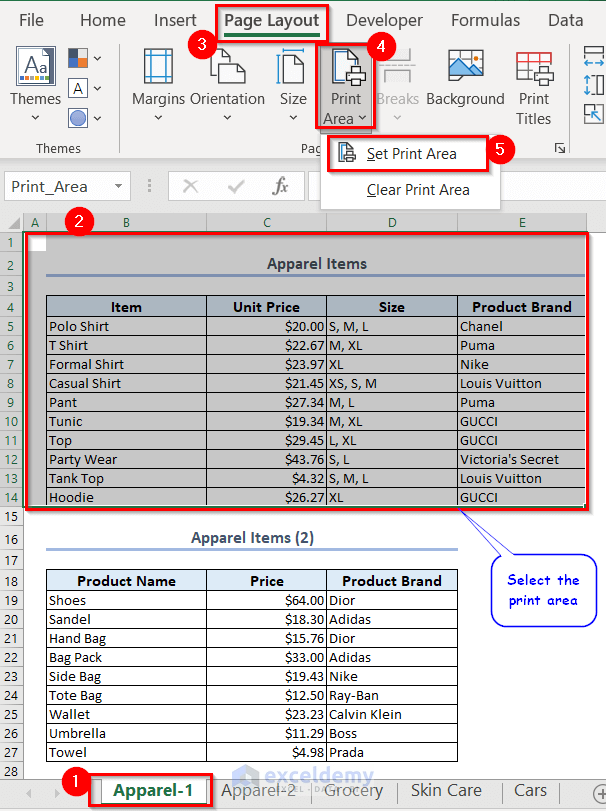
Case 3.1 – Manually Adjusting the Print Area for Different Sheets
- Go to the first worksheet >> select the particular area for printing >> go to the Page Layout tab >> click on the Print Area drop-down menu under the Page Setup group >> click on the Set Print Area.
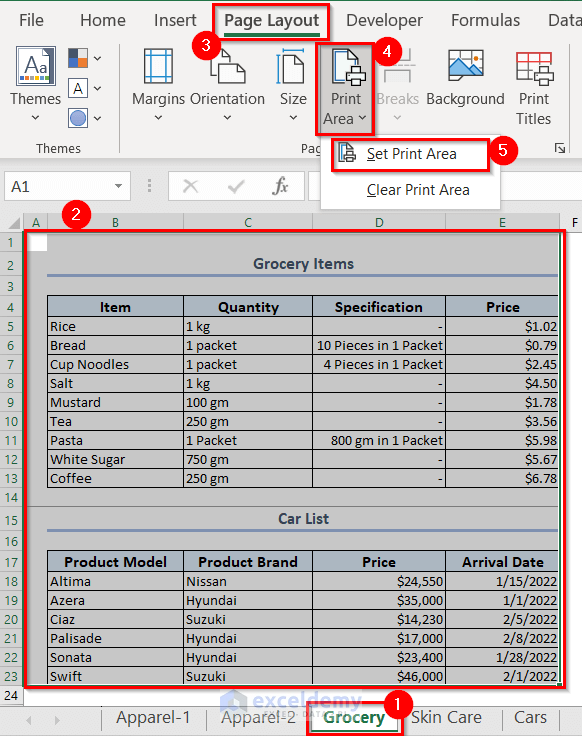
- Go to other sheets and select the print area >> select Page Layout >> go to Print Area >> press Set Print Area.
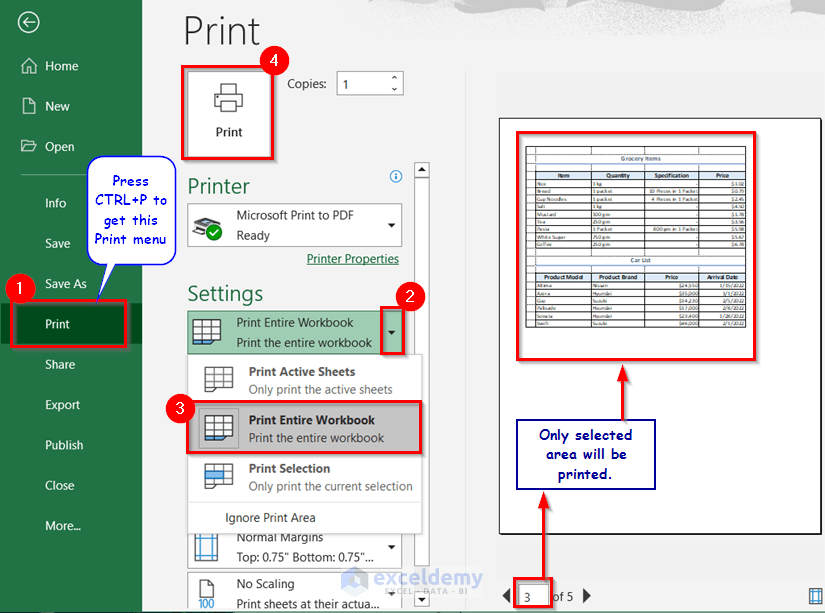
- Press CTRL + P to get the Print menu >> go to the Settings drop-down menu >> select Print Entire Workbook >> click on Print.
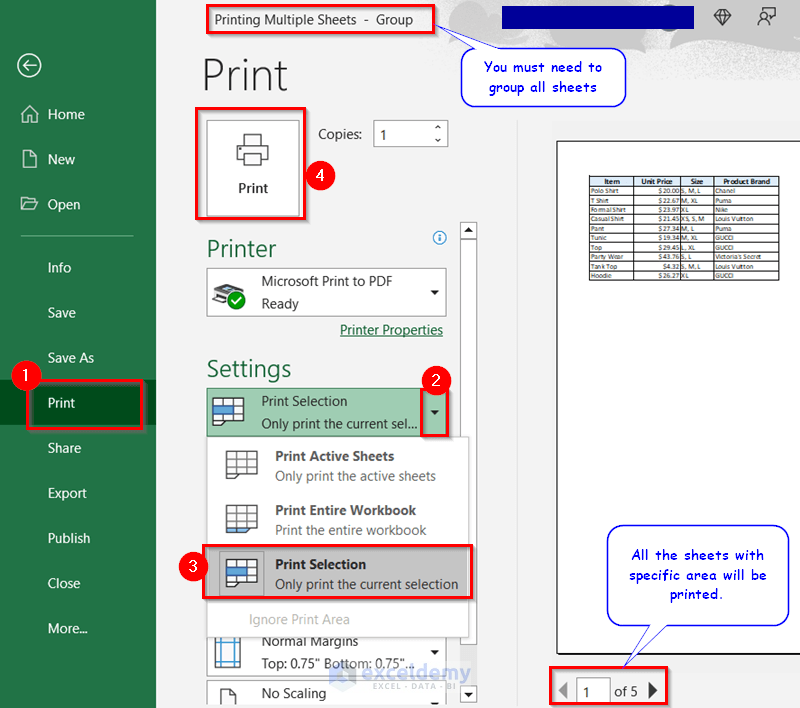
Case 3.2 – Using Print Selection to Print the Same Area of Multiple Sheets
- Hold down the Ctrl key >> select all the sheet names you want to print >> select the print area.

- Press CTRL+P to get the Print menu >> go to the Settings drop-down menu >> select Print Selection >> click on Print.
Example 4 – Use the Camera Icon to Print Multiple Excel Sheets on One Page
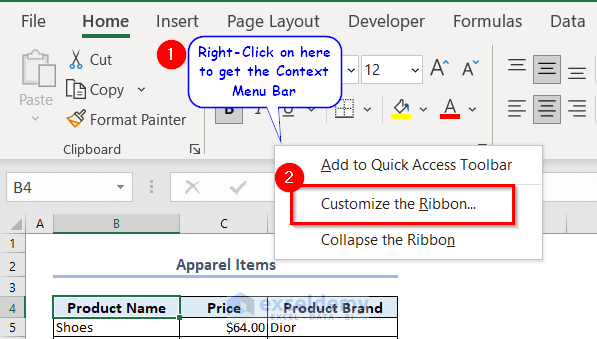
- Right-click on the top ribbon to get the Context Menu Bar >> go to Customize the Ribbon.
- From Choose commands from: >> select Camera >> choose New Tab >> press the Add button >> click on OK.
![]()
You will see the Camera feature under New Tab in the top ribbon.
- Go to a sheet >> select the area that you want to print >> go to New Tab >> click Camera.
![]()
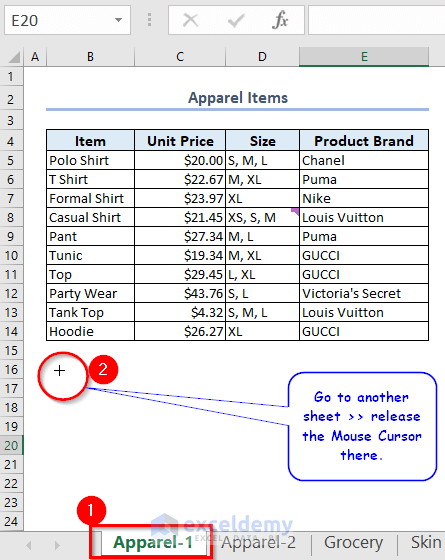
- Choose a specific sheet where you will bring all the required portions from other sheets >> go to that sheet >> release the mouse cursor there.
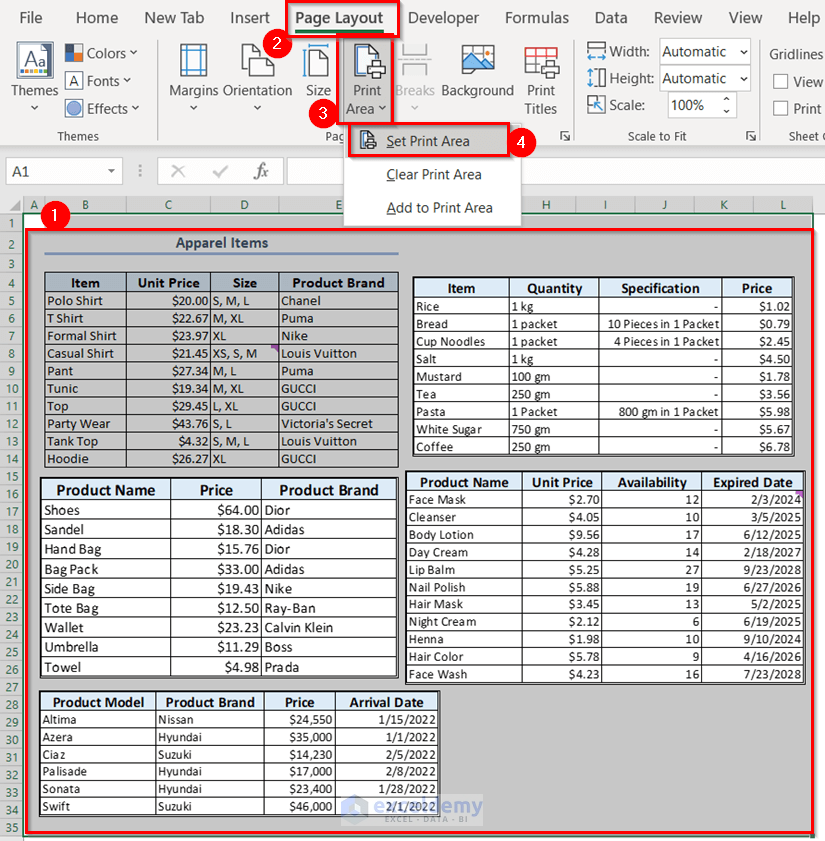
- We have saved all the information in one sheet.
- Go to Page Layout >> select Print Area >> select Set Print Area.
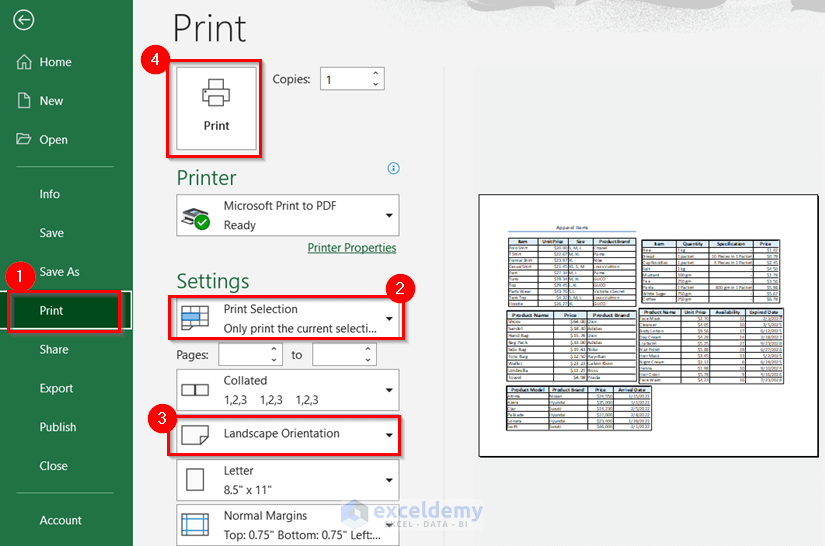
- Press CTRL + P to go to the Print menu >> go to Print Settings >> select Print Selection >> choose Landscape Orientation >> press Print.
Finally, you will get all the important parts on one single page.
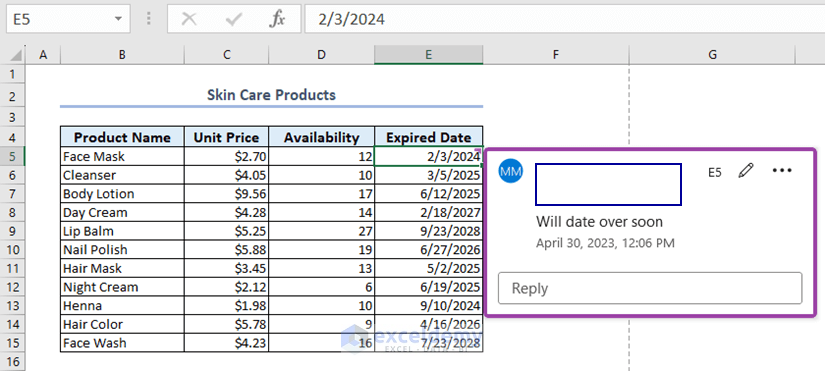
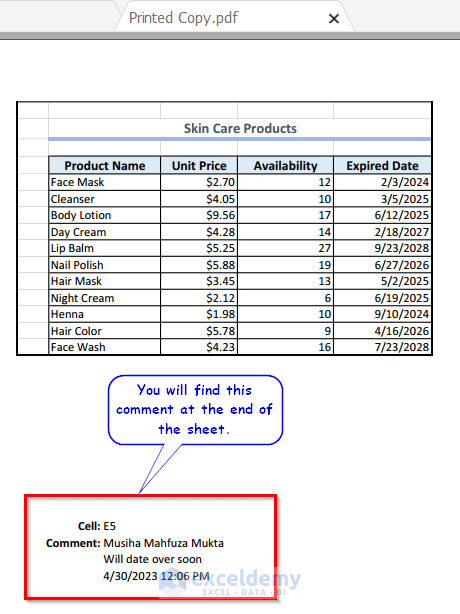
Example 5 – Using VBA Code to Print Multiple Sheets with Comments in Excel
We’ll print this sheet with the comment.
- From the Developer tab, click Visual Basic to open the Visual Basic Editor.
- Go to Insert and select Module from the drop-down menu.
- Insert this VBA code.
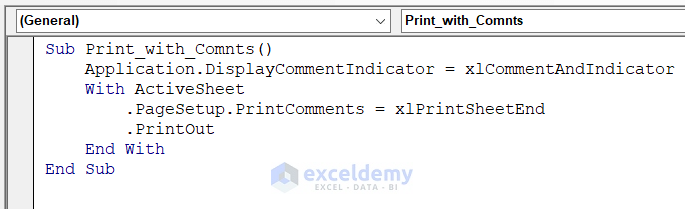
VBA Code:
Sub Print_with_Comnts()
    Application.DisplayCommentIndicator = xlCommentAndIndicator
    With ActiveSheet
        .PageSetup.PrintComments = xlPrintSheetEnd
        .PrintOut
    End With
End Sub- After running the code, you will find the comment at the end of the sheet.
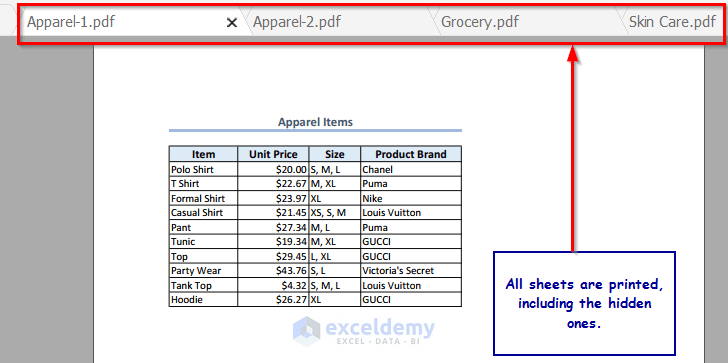
Example 6 – Print Multiple Hidden Worksheets
We hid a few sheets.

- Click on the Developer tab and select Visual Basic.
- Select Module from the drop-down menu under Insert.
- Copy and paste the VBA code below to see the final output.
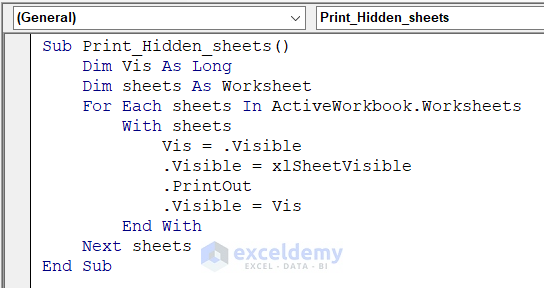
VBA Code:
Sub Print_Hidden_sheets()
    Dim Vis As Long
    Dim sheets As Worksheet
    For Each sheets In ActiveWorkbook.Worksheets
        With sheets
            Vis = .Visible
            .Visible = xlSheetVisible
            .PrintOut
            .Visible = Vis
        End With
    Next sheets
End Sub- After running the code, you will get all sheets printed, including the hidden ones.
How to Print an Excel Sheet with Row and Column Indexes
- From Page Layout, click on the Drop-Down Arrow for Page Setup.
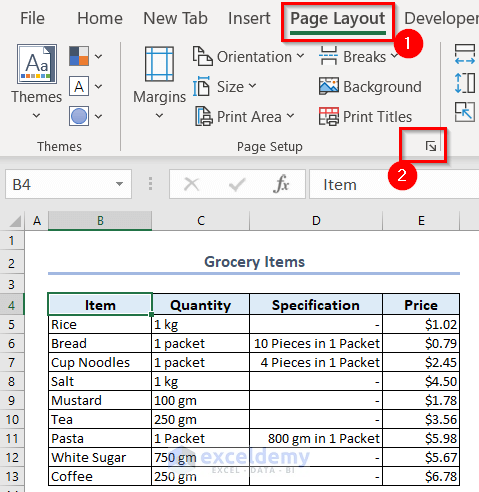
- Go to the Sheet tab.
- Check Rows and columns headings.
- Press OK.
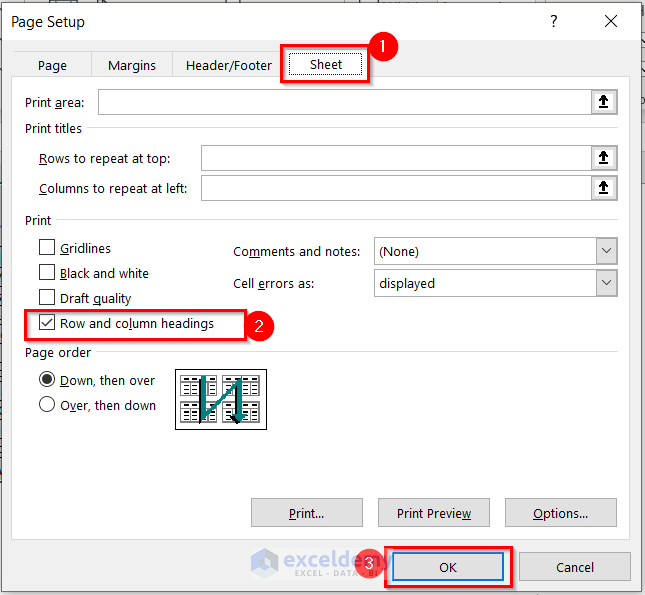
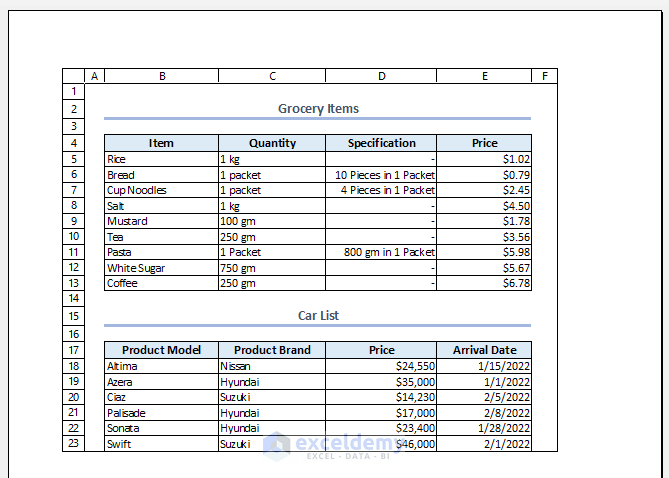
You will get the row and column index in that printed sheet.
Frequently Asked Questions
How to print an Excel sheet in A4 size full page?
From Page Layout, go to the Drop-Down Arrow in the Page Setup group. In the Paper Size box, select A4, then press OK.
How to print an Excel sheet on a full page?
From Page Layout, go to the Drop-Down Arrow beside the Page Setup group. From the Scaling section, check Fit to box and write 1 in page wide by and 1 in tall, then press OK.
Download the Practice Workbook
<< Go Back to Print in Excel | Learn Excel
Get FREE Advanced Excel Exercises with Solutions!

I have two sheets and when I want to save it to pdf as one file it will not allow me to save it as one file but as two separate files which I then have to combine separately. How can I print two sheets to one file?
Hello Minette Ngalu,
You can select both sheets first, then save them as one PDF.
1. Hold down Ctrl and click the sheet tabs you want to include.
2. Go to File > Export > Create PDF/XPS.
3. Or File > Save As > PDF.
Because the sheets are grouped, Excel will export them together into a single PDF file instead of creating separate ones.
Regards
ExcelDemy