When dealing with a large number of worksheets in an Excel file, we may need to include buttons on the worksheet to execute macros that let us travel back and forth between sheets. So, in this section, we will design buttons to assist Excel users with this difficulty.
In this Excel tutorial, you will learn how to create navigation buttons in Excel in two ways with proper explanations.
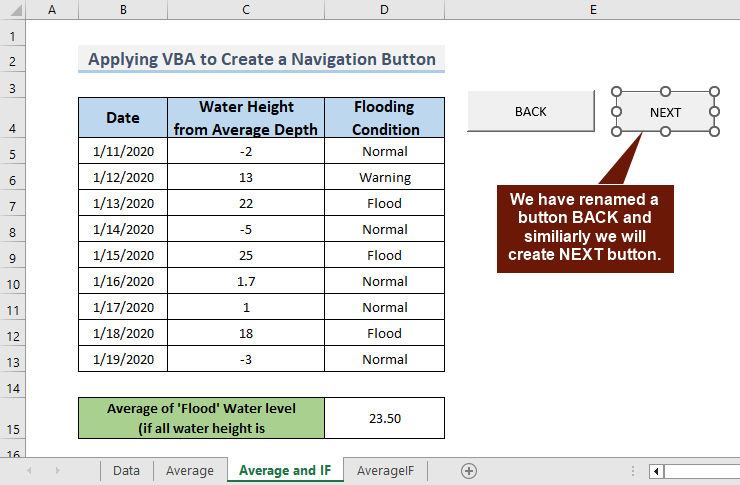
In the following image, you will see the use of a navigation button to open a specific sheet.

Why Use Navigation Buttons in Excel?
Before creating the navigation button, let’s understand the importance of navigation buttons in Excel. These buttons offer a user-friendly way to move between sheets, cells, or specific data ranges within a workbook. It also saves time and improves overall efficiency. If you’re dealing with financial reports, project plans, or any other data-intensive task, navigation buttons can be a game-changer
2 Ways to Create Navigation Buttons in Excel
The two methods below will show Excel users how to place buttons and then add hyperlinks or assign macros to navigate to a specific worksheet.
To create the navigation button for opening a certain worksheet, follow these two methods:
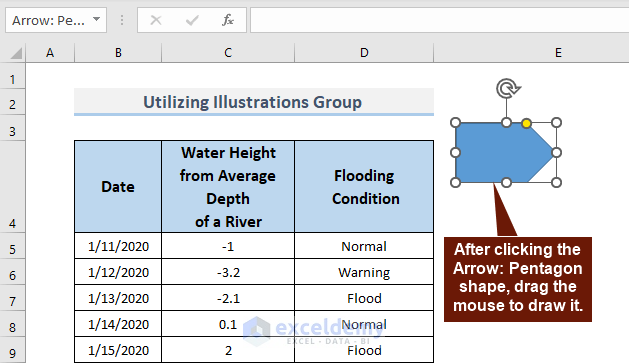
Utilizing Illustrations Group
This part will walk you through inserting an Arrow: Pentagon and then adding a hyperlink for this Arrow: Pentagon to navigate to a specific worksheet. To perform this task, follow the steps accordingly:
Step 1: Insert a Shape
- Go to the Insert tab > Illustrations group > Shapes feature > Block Arrows: Pentagon.

- Draw an Arrow: Pentagon on the worksheet.
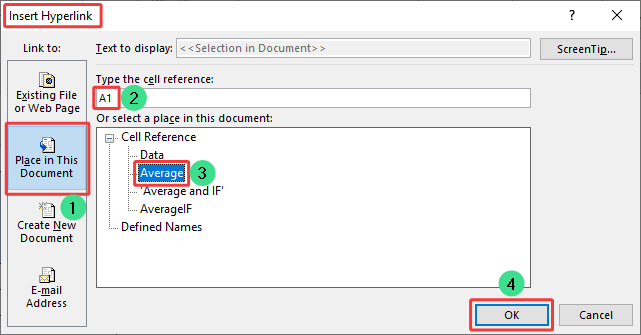
Step 2: Link the Button
- We have formatted it and typed “Second Sheet” on it according to our preference.
- To create a hyperlink, right-click on the shape “Arrow: Pentagon” > Insert Link from the menu that appears.

- In the Insert Hyperlink dialog box:
- Click Place in This Document in the Link to section.
- To select a specific sheet name, click in the Or select a place in this document section.
- Now we are going to input the target cell’s address in the Type the cell reference box.
- After that, just click OK.
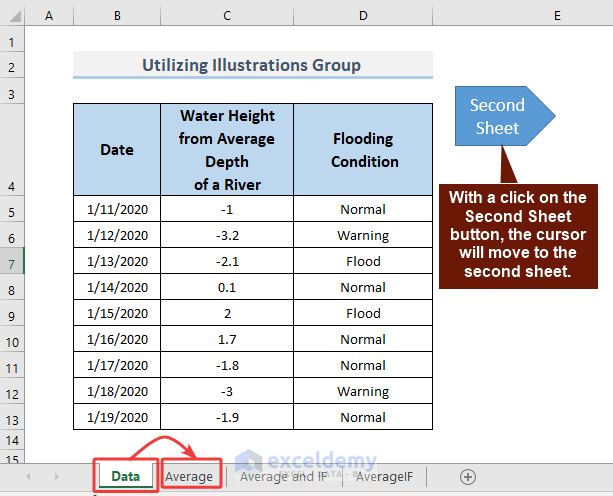
- After clicking on the Second Sheet, the cursor will move to the second sheet named “Average“.
Applying VBA Code
Using a command button and creating a macro to access a sheet tab demands a certain level of proficiency. In this section, you will learn how to place buttons and then assign macros to navigate to a specific worksheet.
In this stage, follow this path to create a button using the VBA macro:
Step 1: Add Command Button
- Go to the Developer tab > Controls group > Insert command > Form Controls > Button in the Form Controls box.
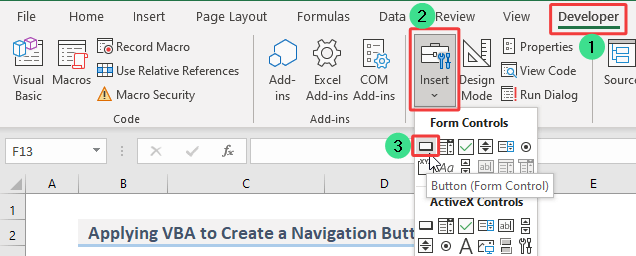
- Draw the Button (Form Control) here.

- We will rename the button “BACK.“
- Now, copy this button to create the “NEXT” button.
Step 2: Apply Assign Macro
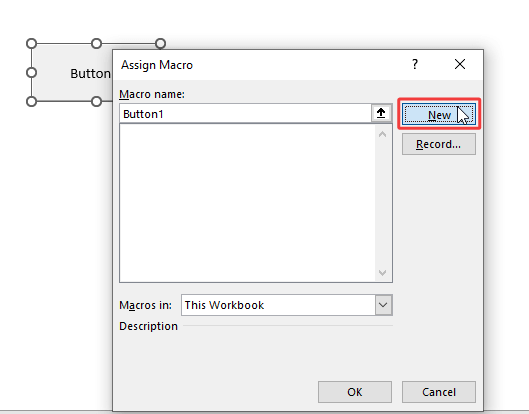
- Right-click on the button, and then click Assign Macro.

- In the Assign Macro dialog box, select New.
Step 3: Add the Macro Code
- In the Module, paste the following VBA code for both NEXT and BACK operations.
- After entering the code, save and close the VBA tab.
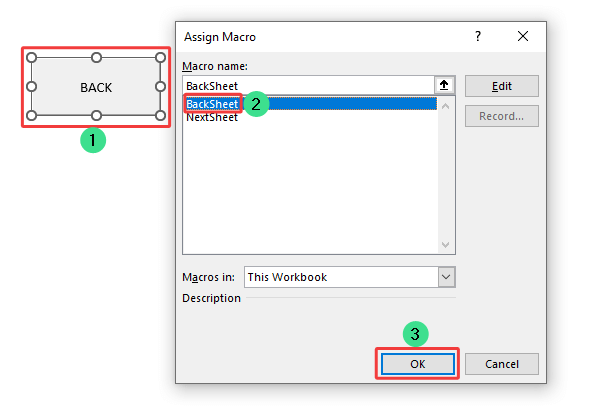
Sub NextSheet() Dim wbook As Workbook Dim xSheets As Long Dim ySheet As Long Dim zMove As Long Dim toNext As Long Set wbook = ActiveWorkbook xSheets = wbook.Sheets.Count ySheet = ActiveSheet.Index zMove = 1 With wbook For zMove = 1 To xSheets - 1 toNext = ySheet + zMove If toNext > xSheets Then zMove = 0 toNext = 1 ySheet = 1 End If If .Sheets(toNext).Visible = True Then .Sheets(toNext).Select Exit For End If Next zMove End With End Sub Sub BackSheet() Dim wbook As Workbook Dim xSheets As Long Dim ySheet As Long Dim zMove As Long Dim toNext As Long Set wbook = ActiveWorkbook xSheets = wbook.Sheets.Count ySheet = ActiveSheet.Index zMove = 1 With wbook For zMove = 1 To xSheets - 1 toNext = ySheet - zMove If toNext < 1 Then zMove = 0 toNext = xSheets ySheet = xSheets End If If .Sheets(toNext).Visible = True Then .Sheets(toNext).Select Exit For End If Next zMove End With End Sub - At this moment, we will assign the BackSheet macro to the BACK button.
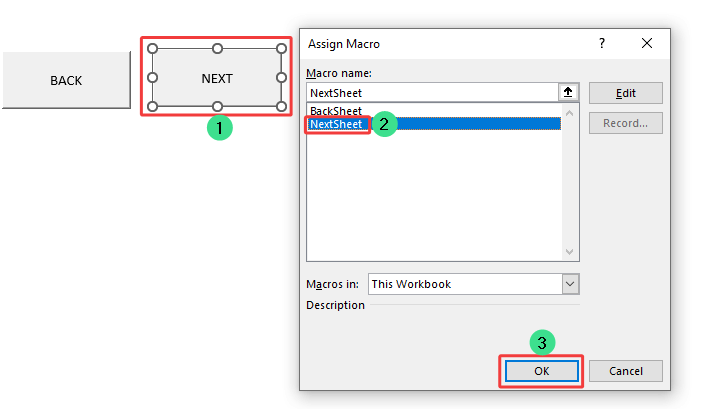
- Similarly, we will assign the NextSheet macro to the NEXT button.
In the following GIF, you can see the navigation between sheets using the navigation button.
Download Practice Workbook
You can download the practice workbook from the following download button.
Conclusion
In this article, you will learn to create a navigation button to open a certain worksheet. So, we have created a navigation button using the Illustrations group and the VBA macro. If you have any questions, concerns, or suggestions, please leave them in the comments section.
Frequently Asked Questions
Is there a risk of losing data when using navigation buttons in Excel?
Using navigation buttons in Excel is generally safe and won’t make you lose data if done correctly. But be careful not to delete rows by selecting blank cells, as this can accidentally remove important information. Just follow the right steps to keep your data safe.
Can I share Excel workbooks with navigation buttons intact?
Yes, you can share Excel workbooks with navigation buttons intact. However, ensure that the recipients have the necessary permissions and enable macros if required, as navigation buttons often rely on macros to function properly.
How can I remove a navigation button in Excel if I no longer need it?
To remove a navigation button, right-click on the button, select “Cut,” and then right-click on the cell where you want to remove the button. Alternatively, you can access the “Format Control” option from the Developer tab to delete the button.
What are the navigation keys in Excel?
The navigation keys in Excel provide a quick and precise way to move around the cells, enabling users to navigate large datasets and perform tasks with ease. There are some handy lists of navigation shortcut keys in the table below.
| Keys | Action |
|---|---|
| Left, Right, Up, and Down Arrow | Moves by one cell in the direction of the arrow |
| CTRL + Arrow Key | Moves to the boundary of the dataset |
| SHIFT + Arrow Key | Selects one cell in the direction of the arrow |
| CTRL + SHIFT + Arrow Key | Selects all the non-blank cells in the direction of the arrow |
| Tab | Shifts to the right by one cell |
| Shift + Tab | Shifts to the left by one cell |
| Home | Jumps to the start of the row |
| CTRL + Home | Moves to the first cell (A1) of the worksheet |
| End | Goes to the next blank cell in the row |
| CTRL + End | Proceeds to the last unused cell at the bottom |
| Page Up | Moves up by one page/screen |
| Page Down | Goes down by one page/screen |
| ALT + Page Up | Scrolls to the left by one unit of screen |
| ALT + Page Down | Scrolls to the right by one unit of screen |
Related Articles
- Perform Cell Navigation in Excel
- How to Use Navigation Pane in Excel
- Navigate Large Excel Spreadsheets
- How to Perform Tab Navigation in Excel
- How to Navigate Between Sheets in Excel
- [Fixed] Excel Navigation Arrow Keys Not Working
- How to Use Navigation Keys in Excel
<< Go Back to Navigation in Excel | Learn Excel
Get FREE Advanced Excel Exercises with Solutions!
