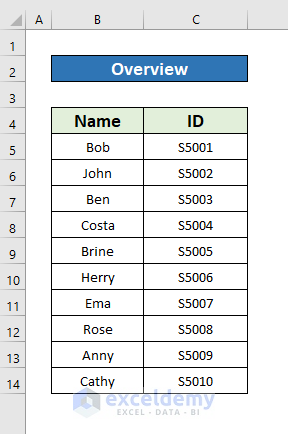
Dataset Overview
We have a dataset that contains information about 10 different students. Student names and their identification numbers are given in columns B and C respectively.
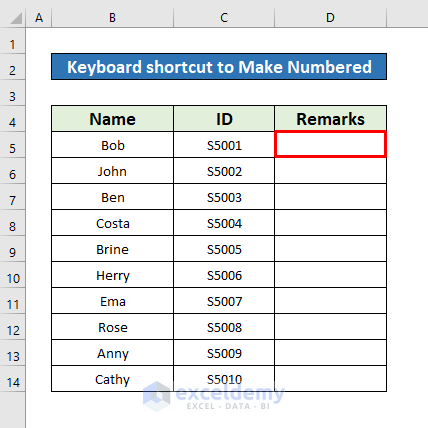
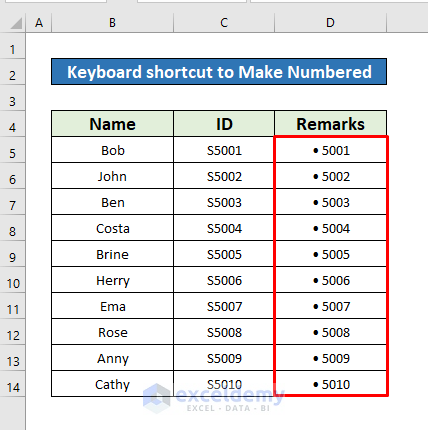
Method 1 – Applying the Keyboard Shortcut to Make a Numbered List in Excel
Scenario: We want to create a numbered list in Excel using a keyboard shortcut.
Objective: Create a list of student identification numbers.
Steps:
- Select a cell (e.g., D5) where you want to start the numbered list.
- Press Alt + 0149 simultaneously on your keyboard to insert a solid bullet (or press Alt + 9 for a hollow bullet).
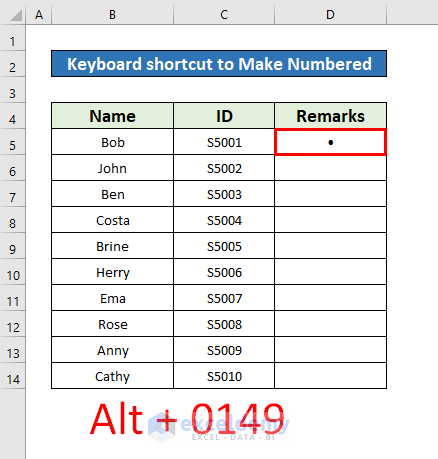
- While holding the Alt key, insert 5001.
- Release the Alt key. The solid bullet will appear in cell D5, followed by the number 5001.
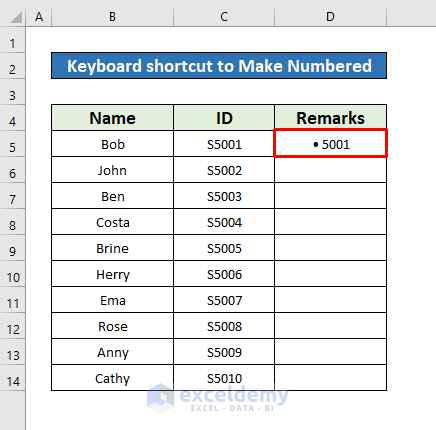
- Autofill the keyboard shortcut down the entire column to generate the desired output.
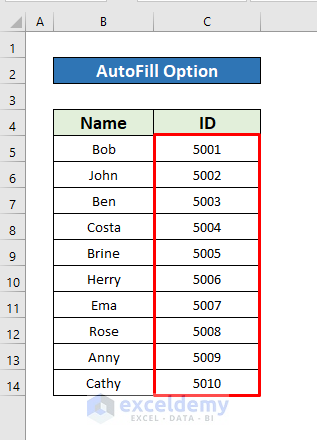
Method 2 -Using the AutoFill Tool to Make a Numbered List in Excel
Scenario: We want to create a numbered list using the AutoFill tool.
Objective: Generate student identification numbers for Bob and John.
Steps:
- Insert 5001 and 5002 as the student IDs for Bob and John in cells C5 and C6, respectively.
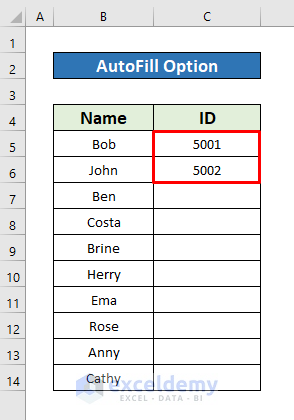
- Select cells C5 and C6.
- Place your cursor on the bottom-right corner of the selected cells until the AutoFill sign appears.
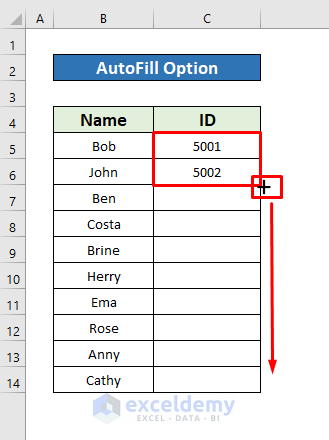
- Drag the AutoFill handle downward to fill in the student IDs for the remaining students in column C.
Read More: How to Make a List within a Cell in Excel
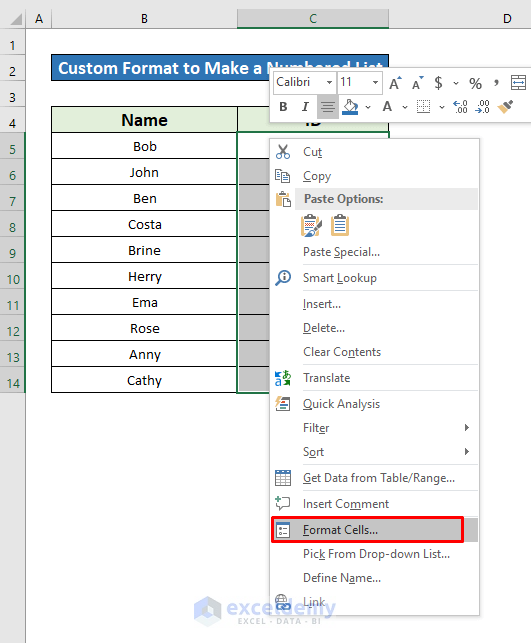
Method 3 – Applying the Custom Formatting to Make a Numbered List in Excel
Scenario: We want to create a custom numbered list format.
Objective: Apply a custom format to display student identification numbers.
Steps:
- Select cells from C5 to C14.

- Right-click and choose Format Cells.
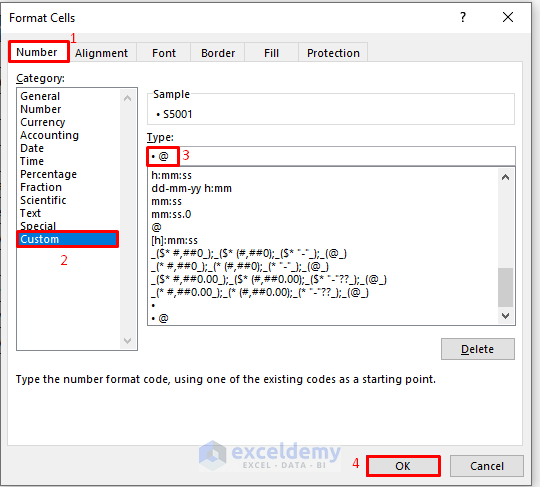
- In the Format Cells dialog box, go to the Number tab.
- Select Custom from the Category list.
- In the Type box, enter “• @” (a bullet followed by the actual value).
- Click OK.
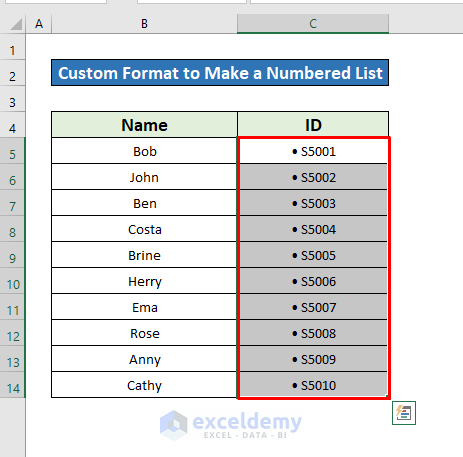
- The cells will display the custom numbered list format as shown in the screenshot.
Read More: How to Generate List Based on Criteria in Excel
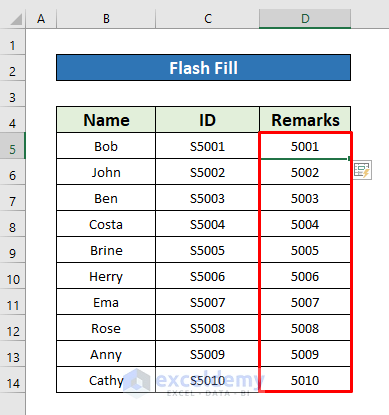
Method 4 – Using the Flash Fill Option to Make a Numbered List in Excel
Scenario: We want to create a numbered list using the Flash Fill command.
Objective: Automatically generate student identification numbers.
Steps:
- Manually insert Michael’s identification number (5001) in cell D5.
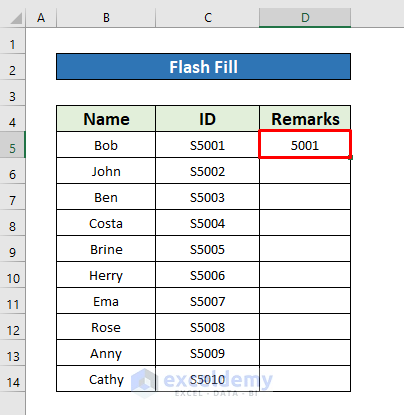
- From the Home tab, go to Editing, select Fill and click on Flash Fill.
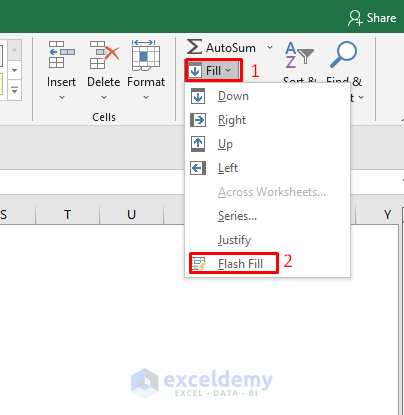
- The Flash Fill option will automatically generate the remaining numbered list based on the pattern you’ve set.
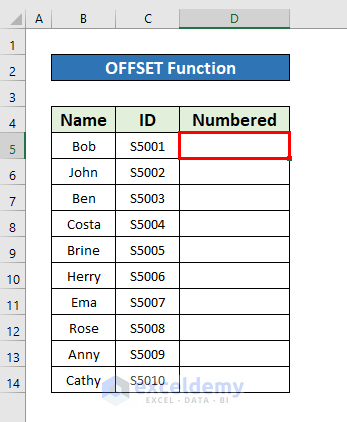
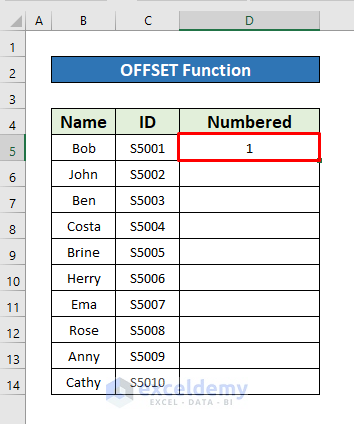
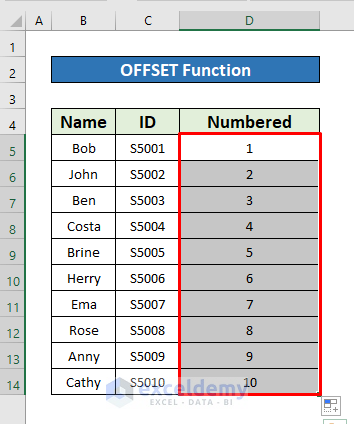
Method 5 – Inserting the OFFSET Function to Make a Numbered List in Excel
Scenario: We want to create a numbered list using the OFFSET function.
Objective: Generate a series of numbers starting from 1.
Steps:
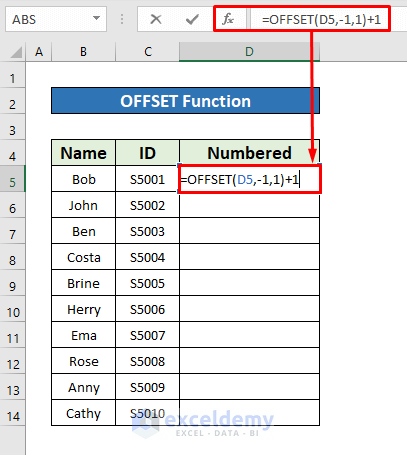
- Select cell D5.
- In the Formula Bar, insert the following OFFSET function:
=OFFSET(D5,-1,1)+1- D5 is the starting cell reference.
- -1 indicates moving one row upward.
- 1 indicates moving one column to the right.
- +1 ensures the numbering starts from 1.
- Press Enter.
- AutoFill the OFFSET function down the column to create the desired numbered list.
Read More: How to Create List from Range in Excel
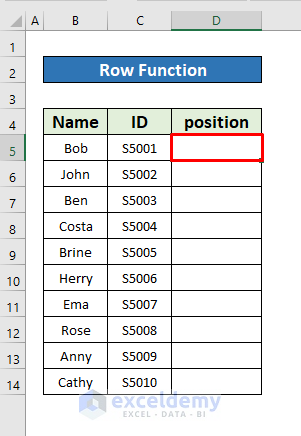
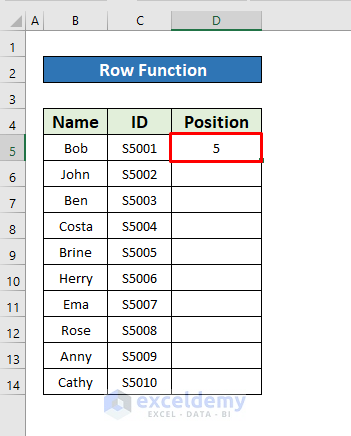
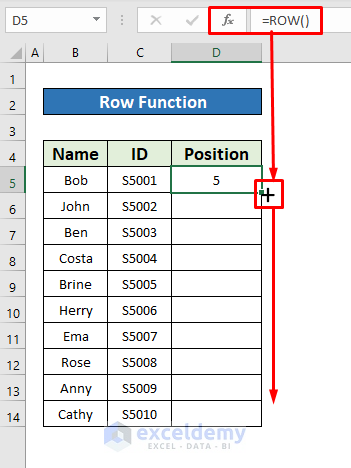
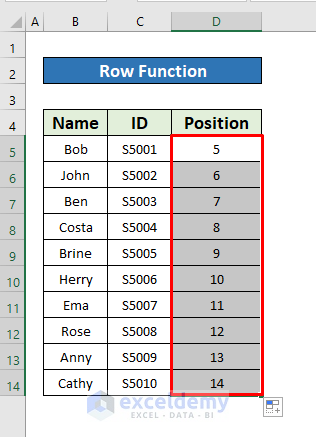
Method 6 – Applying the ROW Function to Make a Numbered List in Excel
Scenario: We want to create a numbered list using the ROW function.
Objective: Generate a series of numbers starting from 1.
Steps:
- Select an empty cell (e.g., D5) where you want to create the list.
- In the Formula Bar, insert
=ROW()- The ROW function will return the row number.
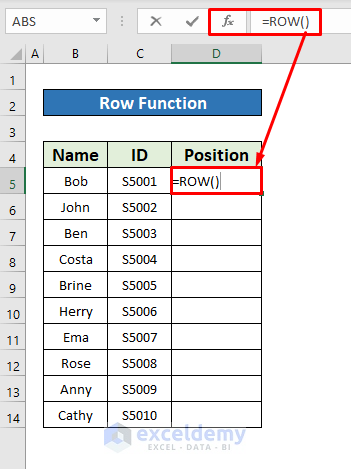
- Press Enter to get the row number (which is 5 in this case).
- Drag the AutoFill handle downward to fill in the remaining numbers.
Method 7 – Applying the CHAR Function to Make a Numbered List in Excel
Scenario: We want to create a numbered list using the CHAR function.
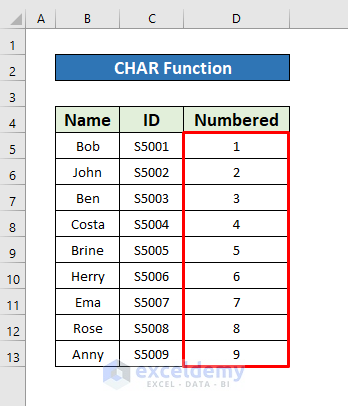
Objective: Generate a series of numbers from 1 to 9.
Steps:
- Select cell D5.
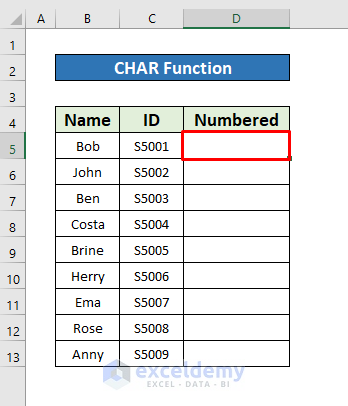
- In the Formula Bar, insert:
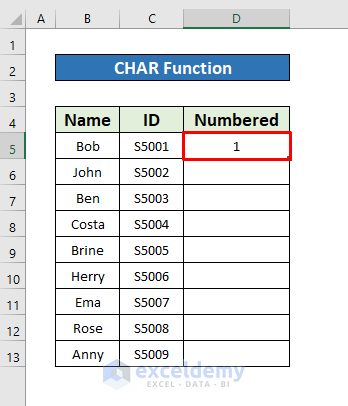
=CHAR(49)(which represents the character “1”).
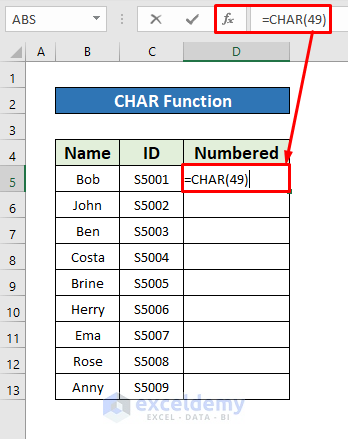
- Press Enter to get the number 1.
- Manually insert the CHAR function’s arguments from 50 to 57 to get numbers 2 to 9 in cells D6 to D13.
Read More: How to Make a To Do List in Excel
Method 8 – Running a VBA Code to Make a Numbered List in Excel
Scenario: We want to create a numbered list using a VBA macro.
Objective: Generate a series of numbers from 1 to 10.
Steps:
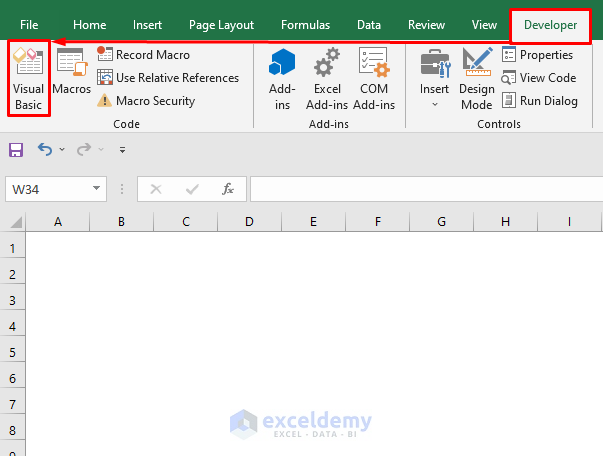
- Open the Visual Basic for Applications (VBA) editor by going to Developer and selecting Visual Basic.
- Insert a new module (go to Insert and click on Module).

- Copy and paste the following VBA code into the module:
Sub Make_Numbered_List()
For i = 1 To 10
Range("B" & i) = i
Next
End Sub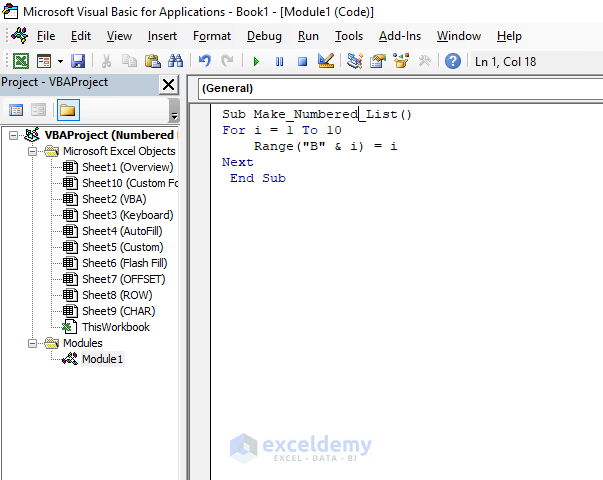
- Run the code by going to Run and selecting Run Sub/UserForm.
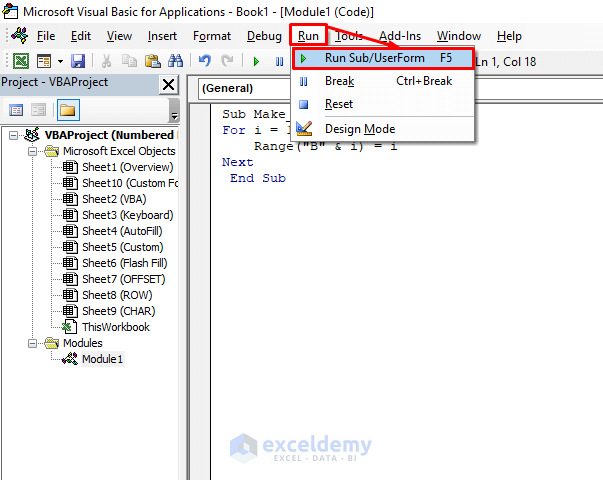
- The numbers 1 to 10 will appear in column B.

Things to Remember
Remember to manually insert a cell value before applying the Flash Fill option.
Download Practice Workbook
You can download the practice workbook from here:
Related Articles
- How to Make a Price List in Excel
- Create a Unique List in Excel Based on Criteria
- How to Make a Comma Separated List in Excel
- How to Create a Contact List in Excel
<< Go Back to Make List in Excel | Excel Drop-Down List | Data Validation in Excel | Learn Excel
Get FREE Advanced Excel Exercises with Solutions!
