
Image by Editor
Integrating external APIs in Excel is now crucial to connect Microsoft Excel to external data sources to fetch real-time or regularly updated information. Power Query is a powerful feature in Excel that allows you to connect to external data sources, including APIs, to fetch live data directly into spreadsheets.
In this tutorial, we will show how to integrate external APIs to fetch live data using Power Query in Excel.
What is an API?
An API is a set of rules that allows different software applications to communicate with each other. Many websites and online platforms offer structured data APIs, often in JSON or XML format.
Prerequisites:
- Microsoft Excel (Excel 2016 or later is recommended).
- Basic understanding of Excel.
- An Internet connection.
- API endpoint URL and any required authentication details.
Step 1: Open Excel and Use Power Query to Connect to the API
- Open a blank Excel workbook.
- Go to the Data tab >> from Get & Transform Data >> select From Web.
- In the Form Web dialog box, you will get two options;
- Basic Connection:
- Simple URL connections (e.g., https://api.example.com/data)
- Paste the full URL, and Excel connects directly.
- You can use straightforward APIs or web pages without extra parameters or headers.

- Advanced Connection:
- Complex URLs or APIs requiring parameters or headers (e.g., https://api.example.com/data?category=finance&limit=100).
- Build the URL in parts, add query parameters, or include HTTP headers (e.g., API keys).
- Useful for APIs needing authentication, dynamic URLs, or custom settings like timeouts.
- Click OK.

Step 2: Handle Authentication
- If your API requires authentication, you’ll need to set it up:
- In the dialog that appears, select the appropriate authentication method:
- Anonymous: For public APIs with no authentication.
- Windows: For APIs or services that require Windows authentication (e.g., internal company systems or SharePoint).
- Basic: For username and password authentication.
- Web API: For OAuth or API key authentication.
- Organizational account: For APIs or services that require authentication via an organizational account (e.g., Office 365, Azure).

- For API key authentication:
- Select Web API.
- In Key field: YOUR_API_KEY_HERE
- Select level.
- Click Connect.

Step 3: Transform the API Response
Once connected, Power Query Editor will open with your data:
- Most APIs return data in JSON format. Power Query will display the structure.
- Navigate through the JSON structure by:
- Click on the Record links to expand objects.
- Click on the List links to expand arrays.
- Use the To Table button to convert lists to tables.
- Common transformations:
- Expand columns: Click the expand icon (double arrows) in column headers.
- Filter rows: Use the filter dropdown on column headers.
- Remove columns: Right-click column header >> select Remove.
- Rename columns: Double-click the column header and rename it.
- For complex API responses:
- Use the Add Column tab to create calculated columns.
- Apply Text Filters to extract specific data.
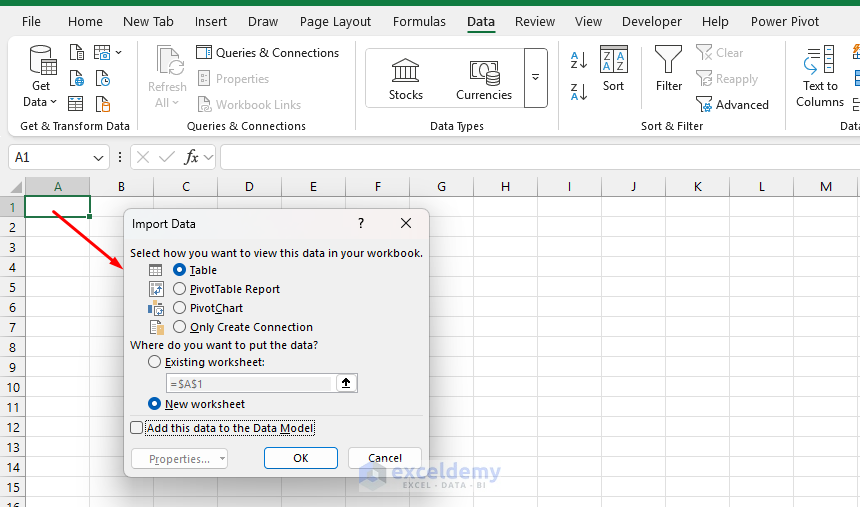
Step 4: Load Data to Excel
Once your data is transformed:
- Go to the Home tab >> from Close & Load >> select Close & Load To.
- Choose where to place the data:
- Table: Creates a formatted Excel table.
- PivotTable Report: Creates a PivotTable from the data.
- PivotChart: Creates a PivotChart from the data.
- Only Create Connection: Stores the query without loading data.
- Select your preferred destination (worksheet/cell) and click OK.
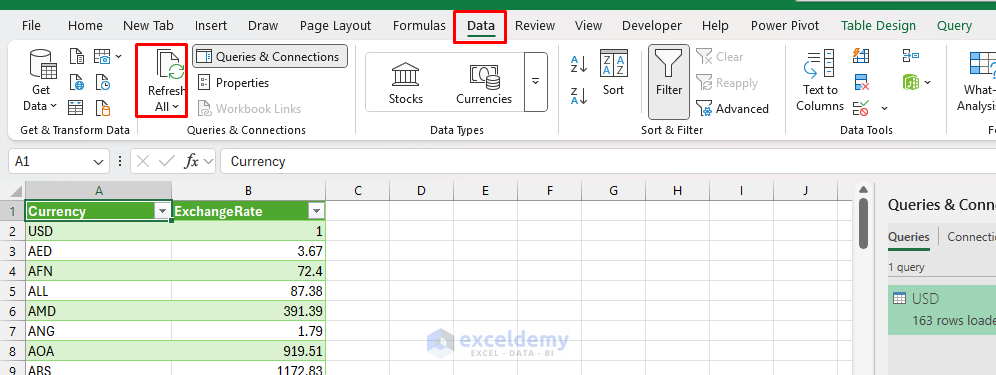
Step 5: Refresh Your Data
To update your data with the latest information from the API:
- Click anywhere in your data table.
- Go to the Data tab >> select Refresh All from the Queries & Connections section.
You can also set up automatic refresh:
- Go to Data tab >> select Queries & Connections.

- Right-click your query >> select Properties.
- Set refresh options, including scheduled refreshes.
- In Refresh every field >> insert the time length.
- Click OK.

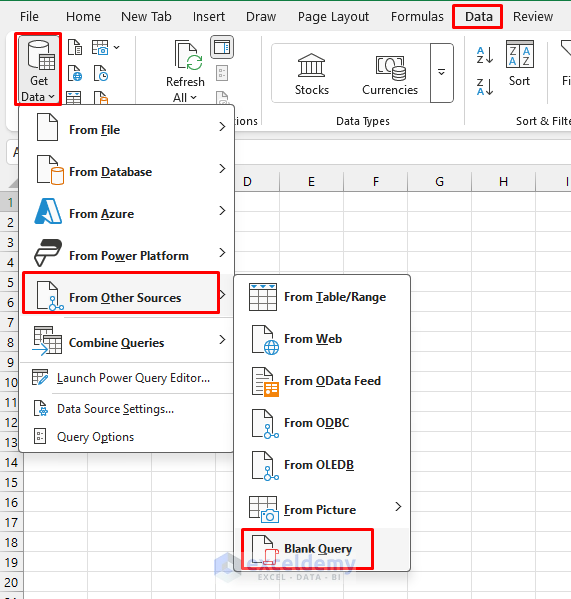
Advanced: Using M Code for Custom API Requests
For more complex API interactions:
- Go to Data tab >> select Get Data >> select From Other Sources >> select Blank Query.
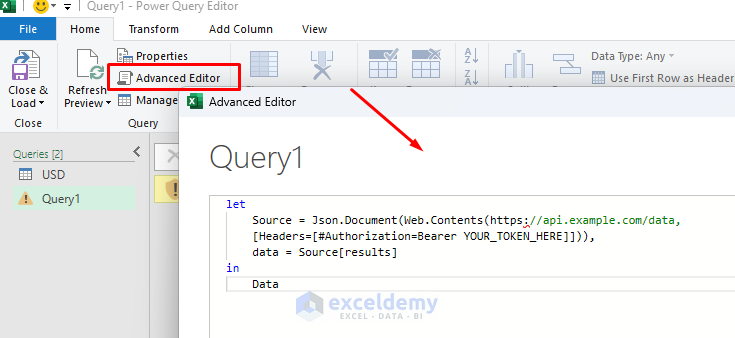
- In the Power Query Editor, click Advanced Editor.
- Insert custom M code to handle your API request:
let
   Source = Json.Document(Web.Contents(https://api.example.com/data,
   [Headers=[#Authorization=Bearer YOUR_TOKEN_HERE]])),
   data = Source[results]
in
   Data
Example: Fetching Currency Conversion Data
Load Data into Power Query:
Let’s walk through an example of fetching stock market data from a public API:
- Go to the Data tab >> from Get & Transform Data >>select From Web.
- In the Form Web dialog box >> insert the following API in the basic connection.
https://api.exchangerate-api.com/v4/latest/USD
- Click OK and choose Anonymous authentication.
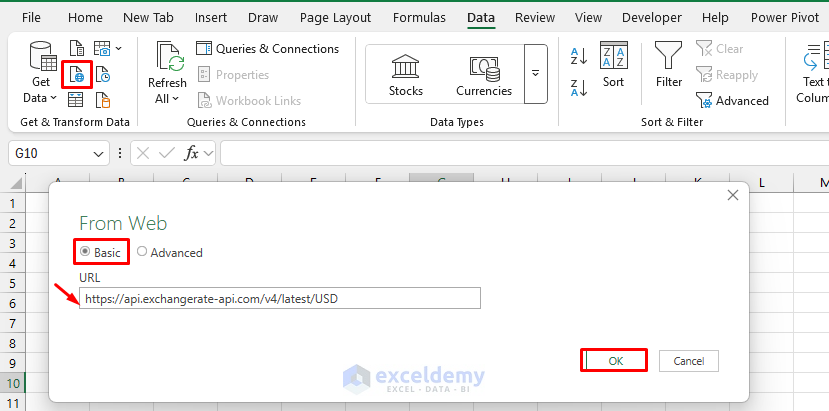
This endpoint returns the latest exchange rates for USD (United States Dollar) to multiple currencies. This API is free and does not require an API key.
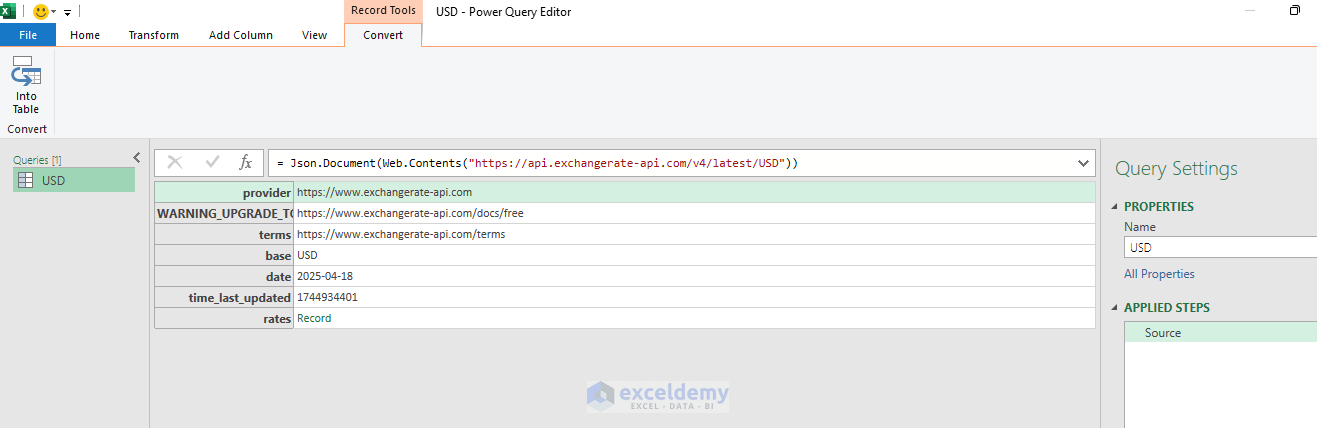
Explore the Data in Power Query Editor:
After a few seconds, Power Query will load and display the structure of the JSON data.
- In the query editor, you will see a record with several fields such as base, date, and rates.
- Right-click on the Record next to the rates.
- Select Drill Down into the exchange rates.
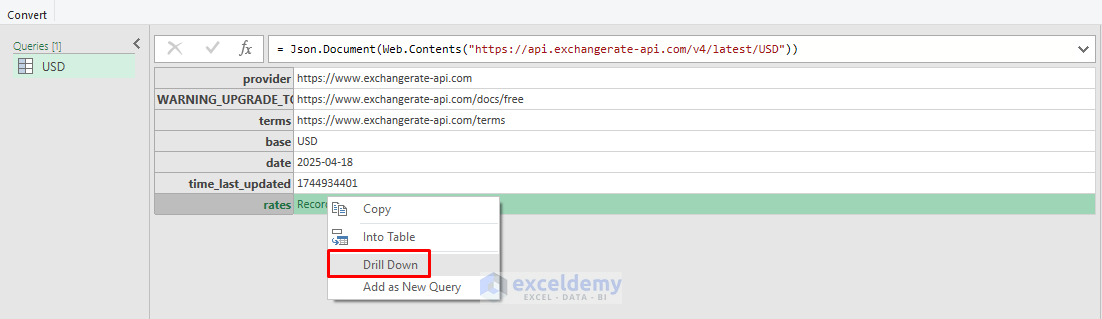
- Power Query will convert the nested JSON data into a list of records.
- Go to the Convert tab >> select Into Table.

- You will now see two columns:
- Name: Contains currency codes like USD, EUR, GBP, etc.
- Value: Contains the exchange rate values.

- Select the column name.
- Double-click to rename it.
- Or, go to the Transform tab >> select Rename.
- Rename the columns to something more meaningful, such as Currency and ExchangeRate.

Load Data into Excel:
- Once your data looks good, click Close & Load in the Power Query Editor.

- The data will now appear on your Excel sheet as a formatted table.

Troubleshooting Common Issues
- API Rate Limiting: If you hit rate limits, add delays between refreshes or reduce query frequency.
- Authentication Errors: Double-check your API key or credentials
- Data Type Issues: Use the Transform tab to correct data types.
- Complex JSON: For deeply nested JSON, you may need to write custom M code (Power Query formula language).
Conclusion
By following these steps, you can effectively integrate external APIs with Excel using Power Query, bringing live data directly into your spreadsheets for analysis, reporting, and visualization. Whether you’re fetching simple data through the Basic connection or handling more complex scenarios with the Advanced option, Power Query makes it easy to connect to a wide range of web data sources. Integrate External APIs to automate data retrieval, enhance your workflows, and gain valuable insights directly within Excel.
Get FREE Advanced Excel Exercises with Solutions!
