Importing text files into Excel can be a powerful way to bring data from external sources into your Excel workbooks. This can include data from sources such as databases, web pages, or other programs that can export data in text file formats. It is very important to import text files to Excel when you deal with a lot of data. There are various procedures to import text files to Excel. In this tutorial, we are going to show you 5 easy and simple ways to import text files to Excel.
Whether you’re an experienced Excel user or just starting, this guide will help you streamline the process of importing text file data to Excel.
Differences Between Text File and Excel File
People commonly use both text files and Excel files to store and manage data. Text files typically come in two formats. One is (.txt), and the other is (.csv). The commonly used format to save an Excel file is (.xlsx). There are some key differences between these two types of files:
- File Format: Excel files are binary files that contain data in a more sophisticated, structured format, whereas text files are straightforward plain-text files that store data as text characters.
- Structure: Text files typically consist of a sequence of rows and columns separated by delimiters like commas, tabs, or spaces and have no preset structure or formatting. Excel files, on the other hand, have a preset structure made up of rows and columns arranged into spreadsheets.
- Data Types: Excel files support a variety of data types, including text, numbers, dates, and formulas, but text files can only store data as text.
- Features: Excel files provide a variety of features not found in plain text files, including the ability to sort, filter, calculate, and chart data. Contrarily, text files are straightforward and light, and we often use text files to store data that requires minimal processing or analysis.
- File Size: Text files often take up less space than Excel files because they don’t include formatting or styling data. They are now simpler to store and send over the internet as a result.
- Compatibility: Any text editor or program can read and edit text files, as they support plain text. In contrast, to open and edit Excel files, you need Microsoft Excel or any compatible spreadsheet tool.
When Is It Appropriate to Import a Text File to Excel?
Suppose you have valuable data saved in a text file that you would like to incorporate into an existing Excel spreadsheet. In that case, you might consider importing the file to make the process more efficient. There are several situations where importing a text file into Excel might be helpful.
- One scenario is when connecting with external programs that export reports as text files. In this situation, you can use Excel to analyze and organize the data.
For example, if you’re working with financial data and an accounting software exports reports as text files, you can import the file into Excel to manipulate the data and make charts and graphs to visualize the data.
- Another scenario is when you have pre-existing data in a text file that you want to transfer to Excel. Rather than manually typing the information into the spreadsheet, you can save time and effort by importing the text file directly into Excel.
This feature is particularly useful when dealing with large datasets.
- A third scenario where importing a text file into Excel might be helpful is when manipulating data. Excel provides numerous tools for performing calculations and organizing data, making it an ideal choice for data analysis. By importing a text file into Excel, you can leverage these tools to make changes to your data and draw insights.
In conclusion, if you have data saved in a text file that you would like to utilize in an Excel spreadsheet, importing the file is a useful option. It can save you time and effort, connect with external programs, and allow you to take advantage of Excel’s capabilities for data manipulation and analysis.
How to Import Text File to Excel: 5 Easy Ways
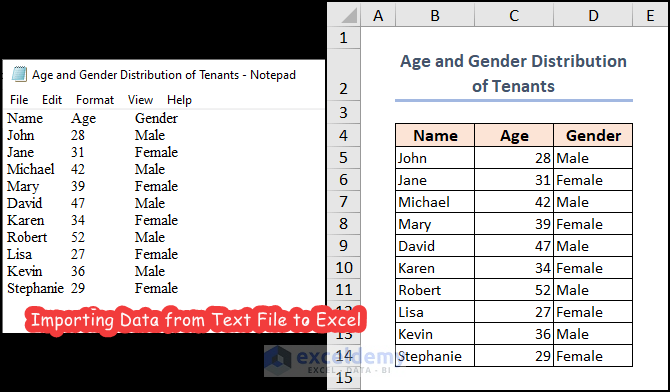
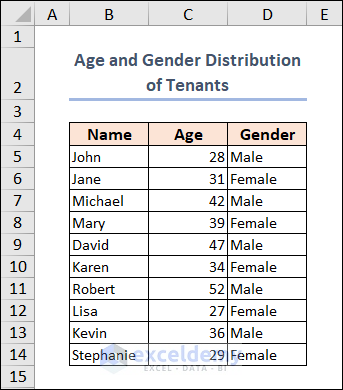
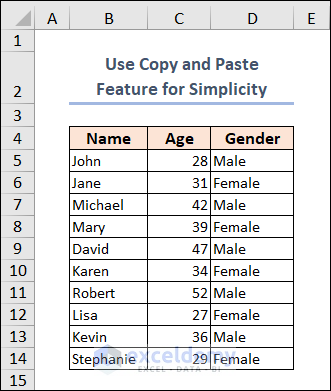
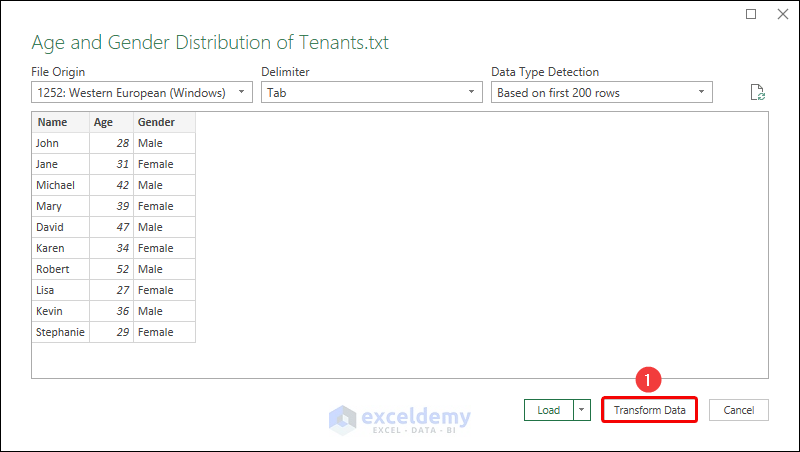
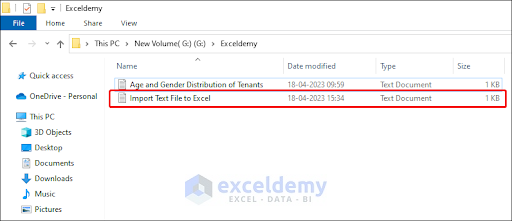
Let’s assume we have the “Age and Gender Distribution of Tenants” of a particular apartment. This dataset includes the Name, Age, and Gender of some tenants under columns B, C, and D.
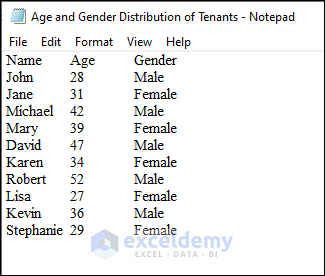
We have the dataset in (.txt) format opened in the Notepad application of our system. Also, we showed the dataset opened in Excel. You can see the difference between the visualization and formatting of the same file.
Note: This is a basic dataset to keep things simple. In a practical scenario, you may encounter a much larger and more complex dataset.
Now, we’ll utilize this dataset to import the text file to Excel using multiple methods. So, let’s explore them one by one.
Not to mention, here, we have used the Microsoft Excel 365 version; you may use any other version according to your convenience. Please leave a comment if any part of this article does not work in your version.
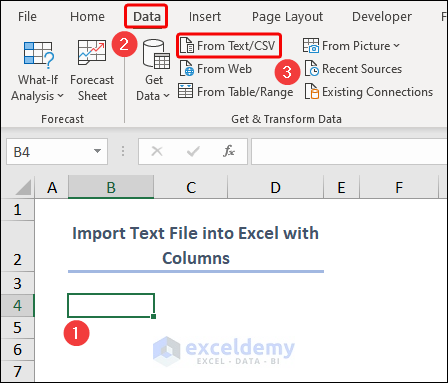
1. Import Text File into Excel with Columns
For importing text files with columns in Excel, we will use the From Text/CSV command under the Data tab. But first, you have to create or have the text file that you want to import. Then you have to follow the steps.
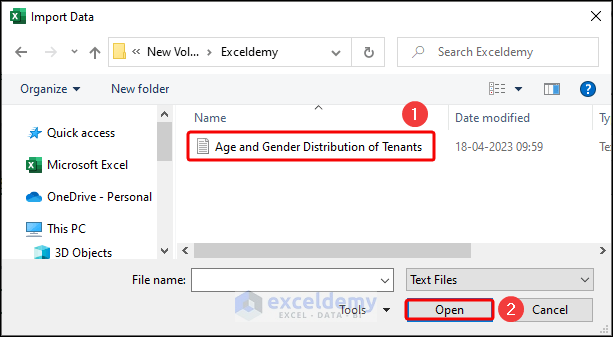
- Select the cell where you want to import the file. Here we select B4, then go to Data >> Get & Transform Data >> From Text/CSV.
- After that, the Import Data window will appear. Here, select your desired text file and click on the Open button.
- Then, click on Load >> Load To.
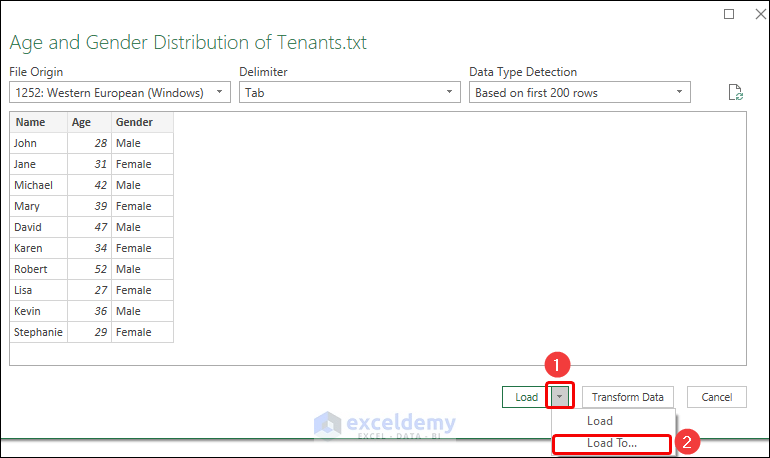
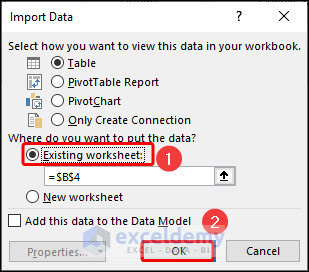
- A dialog wizard Import Data will appear. Select Existing worksheet >> Select the cell $B$4. Press OK.
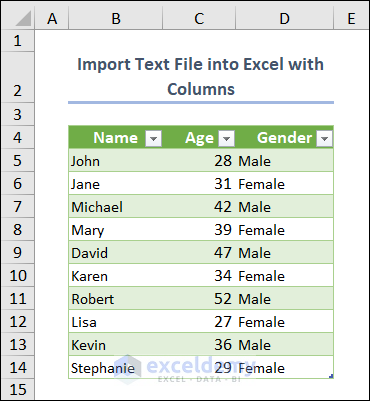
- Finally, Excel will import your text file to your existing worksheet.
2. Utilize File Tab to Import Text File to Excel
We can also import text files from the File tab option. It is an easy task where you need to select the desired text file by opening File Explorer.
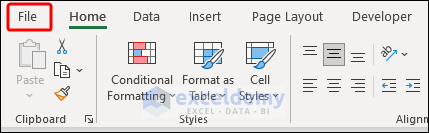
- Initially, navigate to the File tab.
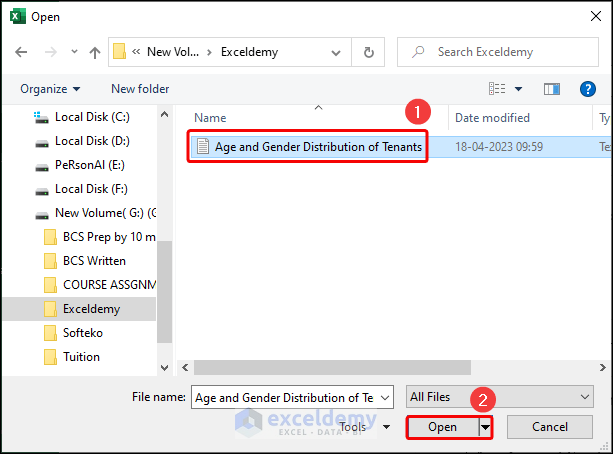
- Then go to Open >> Browse.

- Select the preferred text file in the Open window and click on Open.
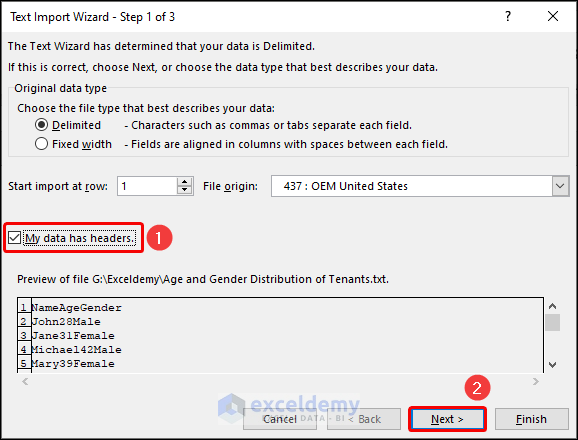
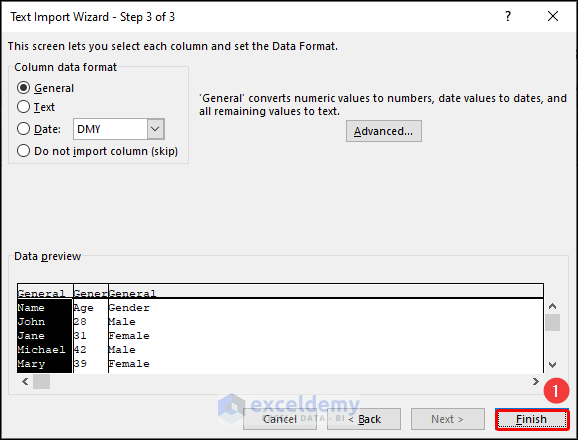
- In Step 1 of Text Import Wizard, check the box My data has headers. Then, click on the Next button.
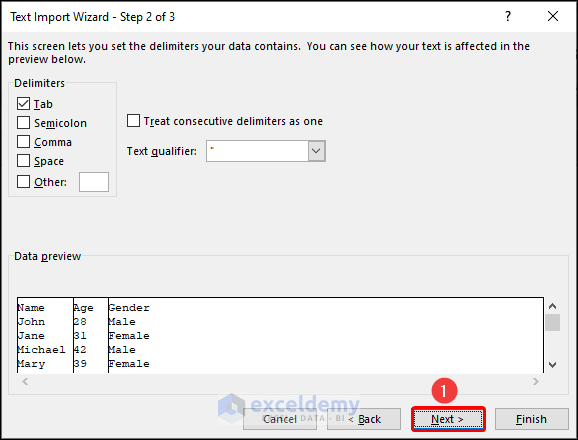
- Here, you can see that Excel has already selected Tab as Delimiter. Just click on Next.
- Click on Finish to accomplish the task.
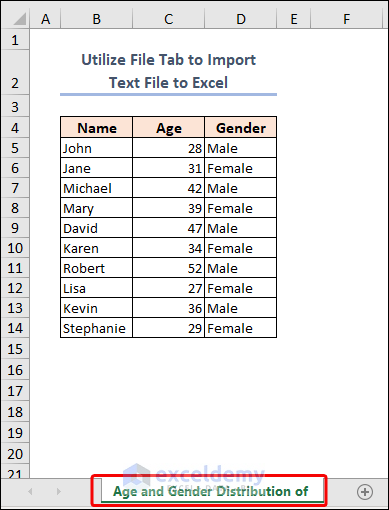
In this process, a new workbook is created to open the text file within it. In the following image, we can see it.
3. Use Text to Columns Wizard
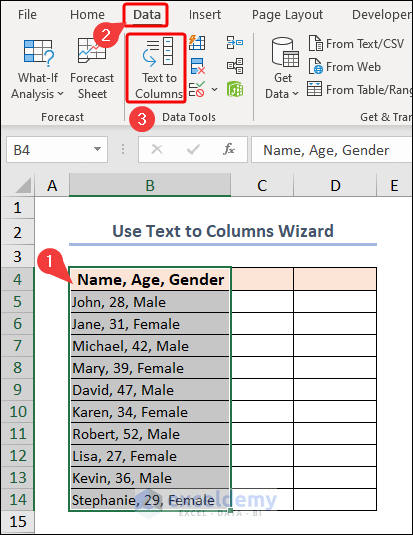
Microsoft Excel has a command called Text to Columns wizard under the Data tab. It is used to split the text into other columns. While using this wizard, you can define the delimiter character.
- Select the whole dataset. Then, go to Data >> Text to Columns on the Data Tools group of commands.
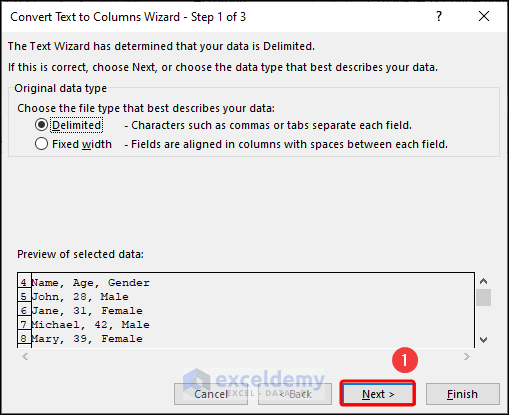
- After that, a dialog box will pop out named Convert Text to Columns Wizard – Step 1 of 3 >> Select the Delimited option >> Press Next.
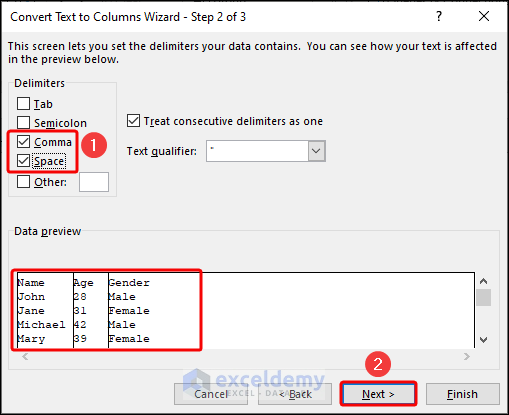
- Then, under the Convert Text to Columns Wizard – Step 2 of 3, uncheck all the tick marks except Comma and Space. Also, you can see the preview of your data in this window. Press Next.
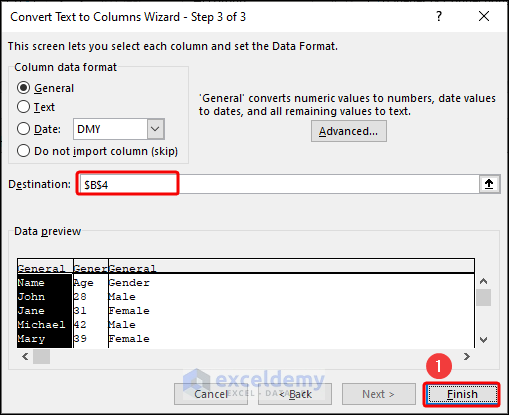
- Under the Convert Text to Columns Wizard – Step 3 of 3, select General >> then click on Finish.
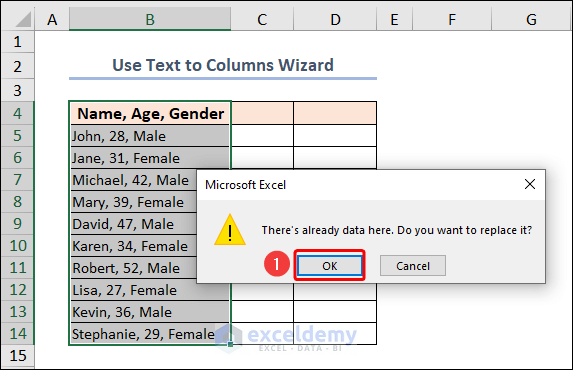
- Currently, it shows a dialog box to confirm replacing the old data in Column B. Here, click OK.
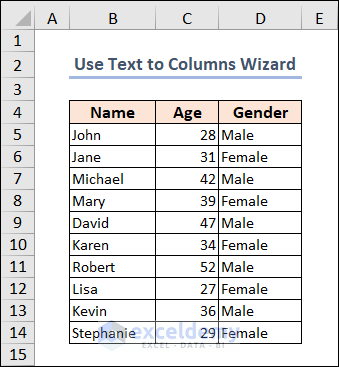
Finally, we have split the imported data into columns.
4. Use Copy and Paste Feature for Simplicity
By copying the data from the text file and pasting it into Excel, you can quickly transfer the data while maintaining the original formatting.
- You just have to select the entire dataset in the notepad or any software capable of opening text files. Then copy the data by simply pressing CTRL + C on your keyboard.
- Open the Excel file and paste it using the CTRL + V keyboard shortcut.
This method is easy and time-saving. But, keep in mind that it’s applicable for smaller datasets only. For larger datasets, it’s not that efficient as it will take more time. It can become time-consuming and error-prone when dealing with larger datasets. Here are some reasons why:
Manual Process: Copying and pasting data can be a manual and repetitive process that takes a significant amount of time. It also increases the risk of errors, such as accidentally skipping a row or copying the wrong data.
Limited Capacity: The copy-and-paste feature in Excel has some limitations in terms of the amount of data that can be copied and pasted at once. This can result in the process being interrupted, requiring you to start over, and potentially losing some of the data you’ve already copied.
Formatting Issues: Copying and pasting text data can also create formatting issues, such as losing leading zeros or changing the data format. This can lead to errors when analyzing or using the data in Excel.
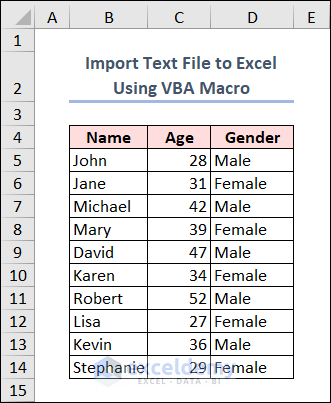
5. Import Text File to Excel Using VBA Macro
We can also import the text file to Excel by using VBA code. Excel VBA code can add the text file and split it into your desired sections.
- Move to the Developer tab, then click on the Visual Basic button in the Code group.
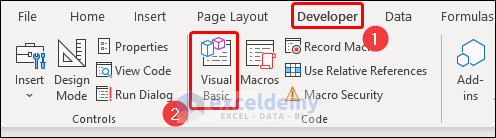
Note: By default, the Developer tab remains hidden. You can learn to enable the Developer tab by following this linked article.
It launches the Microsoft Visual Basic for Applications window.
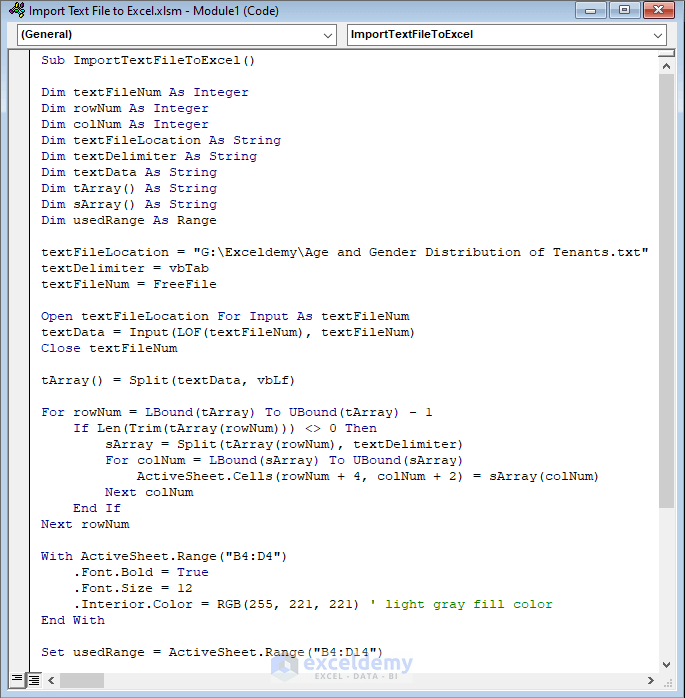
- Now, click the Insert tab and choose Module from the list. We get a small Module window to insert our VBA code.

- Here’s the working code to do the task. Paste this code into the module.
Sub ImportTextFileToExcel()
Dim textFileNum As Integer
Dim rowNum As Integer
Dim colNum As Integer
Dim textFileLocation As String
Dim textDelimiter As String
Dim textData As String
Dim tArray() As String
Dim sArray() As String
Dim usedRange As Range

textFileLocation = "G:\Exceldemy\Age and Gender Distribution of Tenants.txt"
textDelimiter = vbTab
textFileNum = FreeFile

Open textFileLocation For Input As textFileNum
textData = Input(LOF(textFileNum), textFileNum)
Close textFileNum

tArray() = Split(textData, vbLf)

For rowNum = LBound(tArray) To UBound(tArray) - 1
If Len(Trim(tArray(rowNum))) <> 0 Then
sArray = Split(tArray(rowNum), textDelimiter)
For colNum = LBound(sArray) To UBound(sArray)
ActiveSheet.Cells(rowNum + 4, colNum + 2) = sArray(colNum)
Next colNum
End If
Next rowNum

With ActiveSheet.Range("B4:D4")
.Font.Bold = True
.Font.Size = 12
.Interior.Color = RGB(255, 221, 221) ' light gray fill color
End With

Set usedRange = ActiveSheet.Range("B4:D14")

' Apply borders to the used range
With usedRange.Borders
.LineStyle = xlContinuous
.Weight = xlThin
.ColorIndex = xlAutomatic
End With

MsgBox "Data Imported Successfully", vbInformation

End Sub
Code Breakdown
- The first few lines define some variables that will be used later in the code.
- The textFileLocation and textDelimiter variables are set to the location of the text file and the delimiter used in the file.
- The textFileNum variable is set to the file number of the text file using the FreeFile function.
- The text file is opened for input and its contents are read into the textData variable using the Input function. The file is then closed.
- The textData variable is split into an array of lines using the vbLf (line feed) character and stored in the tArray() variable.
- A loop is started to iterate over each line in the tArray() variable.
- For each line, the Len function is used to check if the line has any characters in it (i.e. it is not blank). If the line is not blank, the line is split into an array of columns using the textDelimiter and stored in the sArray() variable.
- Another loop is started to iterate over each column in the sArray() variable.
- The ActiveSheet.Cells() function is used to set the value of the current cell in the Excel sheet to the corresponding value in the sArray() variable. The rowNum and colNum variables are used to keep track of the current row and column.
- After all the data has been imported, the range of cells that the data was imported to is formatted to have the bold font, size 12, and light gray fill color.
- The usedRange variable is set to the range of cells that the data was imported to.
- The Borders property of the usedRange object is used to apply a thin continuous border to the cells.
- Finally, a message box is displayed indicating that the data was imported successfully.
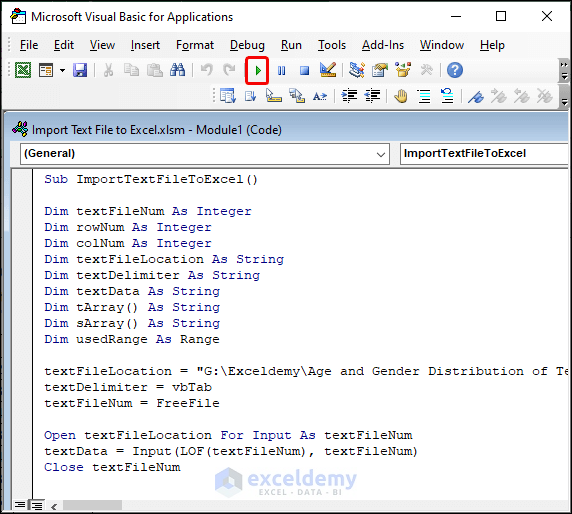
- After completing the code script, click the green-colored play button to Run the code. You can press F5 on the keyboard to do the same task.
- After executing the code, the result is before our eyes.
You can watch this video for a better understanding.
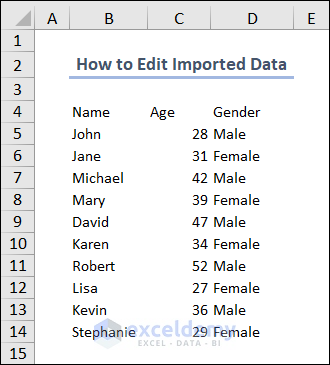
How to Edit the Imported Text File in Excel
Editing imported data can be a daunting task, especially if the text file contains large amounts of data. However, with the right approach, editing imported data can be quick and efficient.
Review Imported Data: Once you import the data, you should take the first step of reviewing it to ensure that it has been imported correctly and contains no errors or inconsistencies. This step involves checking that all the data is in the correct format, that there are no missing values or duplicate entries, and that the data is in the correct cells after the import.
Adjust Column Widths: Next, it is important to adjust the column widths to ensure that all the data is visible and easy to read. This can be done by clicking on the column header and dragging the column to the desired width, or by using the AutoFit feature to automatically adjust the column width to fit the data.
Format Data as Needed: Depending on the type of data that has been imported, it may be necessary to format the data to make it more readable or to perform calculations. This can involve formatting numbers as currency, dates as specific date formats, or text as bold or italicized. Excel provides a wide range of formatting options, and these can be accessed via the Format Cells dialog box or by using the formatting tools in the Home tab.
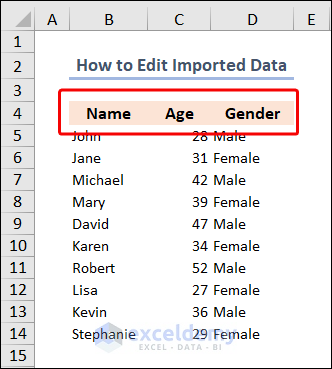
- Check the appearance of the data and review the data lightly.
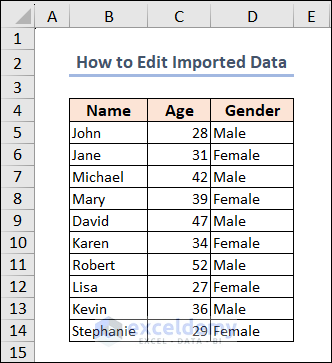
- Then, bold the column headers, apply a background fill color, and make the font size a little bigger than others.
- After that, apply All Borders to the data.
Save Excel File: After making all the necessary edits and formatting changes, it is important to save the Excel file.
Clicking on the Save button in the Quick Access Toolbar or selecting Save or Save As from the File menu enables you to save your work.
It is a good idea to save the file with a meaningful name and to choose a location that is easy to remember and access.
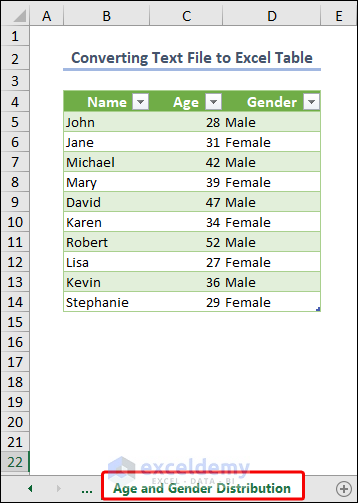
How to Convert Text File to Excel Table
You may also import the text files to an Excel table using some easy steps. Luckily, you’ll get the Sheet name automatically as it exists in the existing text file on our PC.
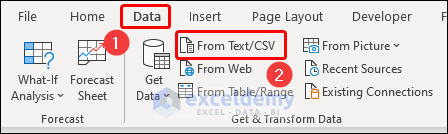
- We have to select the From Text/CSV feature under the Data tab in the ribbon.
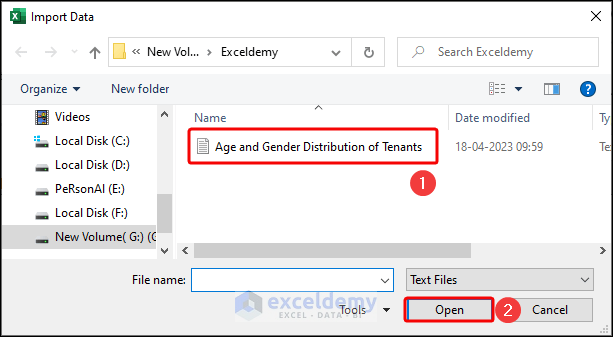
- Select the file named Age and Gender Distribution of Tenants. Then, click on Open.
- A dialog box will pop out. There we need to select Transform Data.
- Select the data table and click the Close & Load command.
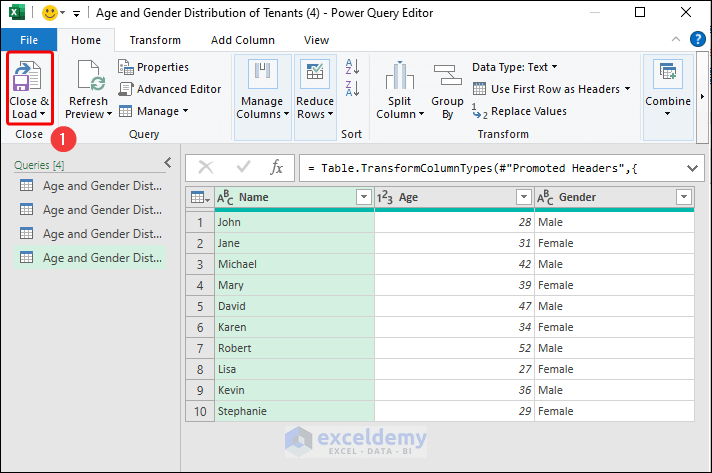
- Finally, Excel will open a new worksheet within your existing file and restore your text documents in the worksheet. In the following image, you see the Sheet name is Age and Gender Distribution which is mainly the text file name.
How to Export Text File from Excel
Exporting data from Excel to a text file can be a useful way to share data with others who may not have access to Excel, or to import data into other programs that accept text file formats.
- Go to the File tab on the ribbon.
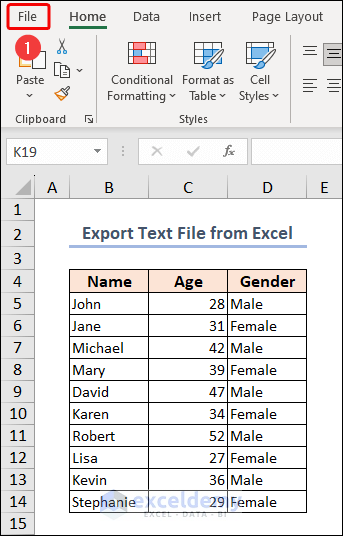
- Then go to Save As >> Browse.
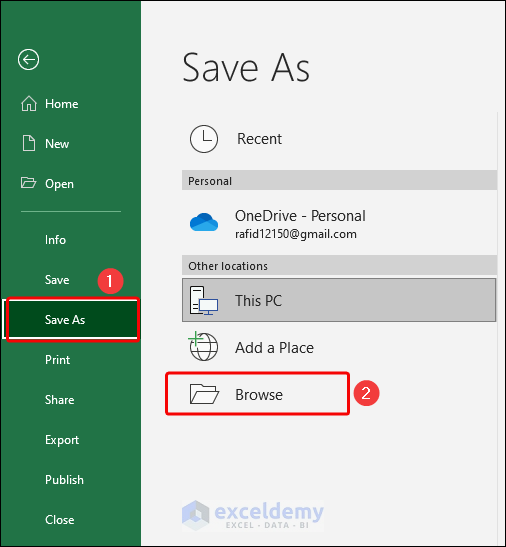
- Next, in the Save As dialog box, select Text (Tab delimited) as Save as type and click on the Save button.
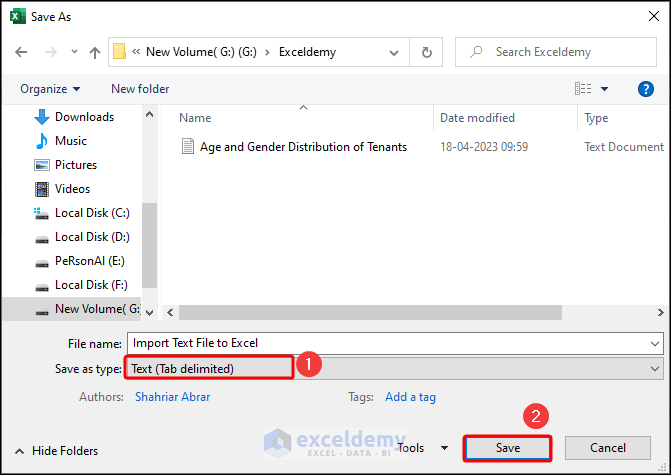
- Finally, you can see the saved new text file in the preferred location.
Once you have exported the text file from Excel, you can open it in any program that supports the file format you chose (e.g. Notepad, Microsoft Word, or a database program).
Benefits of Importing Text File to Excel
Importing a text file to Excel can help users manage and analyze data more efficiently, saving time and reducing errors.
- Data Manipulation: Excel offers a wide range of features that enable users to manipulate data easily. By importing a text file into Excel, you can take advantage of these features to sort, filter, and organize data, making it easier to analyze and draw insights from.
- Time-saving: Manually copying and pasting data from a text file to Excel can be time-consuming, especially for large amounts of data. Importing a text file to Excel streamlines the process and saves time.
- Reduced Errors: Importing data from a text file to Excel reduces the risk of errors that can occur when manually copying and pasting data.
- Enhanced Data Analysis: Excel is a powerful tool for data analysis, offering a wide range of functions and formulas to perform complex calculations. By importing a text file into Excel, you can use these features to analyze your data and gain insights that may not be immediately apparent.
- Compatibility: A variety of programs and operating systems can create text files. Importing data from a text file to Excel provides a way to consolidate data from different sources and formats.
- Scalability: Text files can store large amounts of data, making them ideal for storing and transferring large data sets. By importing a text file into Excel, you can work with large data sets without worrying about memory or performance issues.
Things to Remember
- Make sure that the text file you want to import is in a format that Excel can recognize. Excel can import text files in delimited or fixed-width formats, and in various file extensions such as .txt, .csv, and .prn.
- When importing a text file to Excel, it’s important to specify the correct data type for each column of data. Excel can automatically detect data types for delimited files, but for fixed-width files, you may need to manually specify the column widths and data types.
- If your text file contains text fields that include the delimiter character, you may need to use a text qualifier (such as quotes) to ensure that Excel recognizes the field correctly. You can specify the text qualifier in the Import wizard.
- If your text file contains non-ASCII characters, make sure that you select the correct encoding option in the Import Wizard. The default encoding option may not recognize all non-ASCII characters, so it’s important to choose the correct encoding for your data.
Frequently Asked Questions
1. Can I import a text file with non-English characters into Excel?
Yes, Excel can import text files with non-English characters. However, it is important to select the correct character encoding in the Text Import Wizard to ensure the proper showcase of characters.
2. Can I import a text file with headers into Excel?
Yes, if the text file contains headers for each column of data, you can select the My data has headers option in the Text Import Wizard. This will allow Excel to properly label each column of data.
3. Can I import a text file into a specific location in an Excel worksheet?
Yes, you can import a text file into a specific location in an Excel worksheet by selecting the cell where you want to start the import and then selecting Existing Worksheet in the Text Import Wizard. From there, you can select the range of cells where you want to import the data.
Download Practice Workbook
Download the following practice workbook and text file. It will help you to realize the topic more clearly.
Conclusion
That’s all about today’s session. These are some easy methods of how to import text files to Excel. By following the steps outlined in this reference, you can format your text file properly and prepare it for import into Excel. Whether you are importing data for analysis or for use in other applications, Excel’s text import wizard and formatting options provide a flexible and powerful way to work with text files.
Please let us know in the comments section if you have any questions or suggestions. For a better understanding, please download the practice sheet. Thanks for your patience in reading this article.
Import Text File to Excel: Knowledge Hub
- Convert Text File to Excel Automatically
- Import Text File with Multiple Delimiters into Excel
- Convert Notepad to Excel with Columns
- Import Data from Text File into Excel
- VBA Code to Convert Text File to Excel
<< Go Back to Importing Data in Excel | Learn Excel
Get FREE Advanced Excel Exercises with Solutions!
