
Image by Editor
One of the most powerful features of Power Query is its data transformation. While working with large datasets, you often need to extract only specific columns to create a focused table. The Table.SelectColumns function in Power Query M allows you to achieve this efficiently by selecting only the columns you need, helping to reduce unnecessary data and improve performance. In this tutorial, we will show how to use Table.SelectColumns to create focused tables using Power Query M language.
What is Table.SelectColumns?
Table.SelectColumns is a Power Query M function that allows you to select specific columns from a table while removing all others.
Syntax
Table.SelectColumns(table as table, columns as any, optional missingField as nullable number) as table
Parameters
- table: The input table from which columns will be selected.
- columns: A list of column names to keep.
- missingField (optional): Determines how missing columns should be handled. The possible values are:
- MissingField.Error (default): Returns an error if a specified column is missing.
- MissingField.Ignore: Ignores missing columns without causing an error.
- MissingField.UseNull: Adds missing columns but fills them with null.
Let’s consider a SalesData table to show the use of Table.SelectColumns in Power Query. SalesData contains the following information.
How to Insert M Language Code in Power Query
To manually enter M Language code inside Power Query Editor, follow these steps:
Step 1: Open Power Query Editor
- In Excel:
- Select your data range.
- Go to the Data tab >> select From Table/Range.
- Alternatively, load a dataset, then select Transform Data to open the Power Query Editor.

- In Power BI:
- Click on Transform Data to open the Power Query Editor.
Step 2: Open the Advanced Editor
Once in Power Query:
- Go to the Home tab >> click on Advanced Editor.
- A new window will open where you can write M code.
- Click Done to close the Advanced Editor.

Alternative: Use a Blank Query
If you do not have an existing dataset and want to create a new table using M code:
- Go to the Home tab >> select New Source >> select Other Sources >> select Blank Query.
- Open Advanced Editor and paste your M Language code.
- Click Done.
- Rename each query and Load the data.

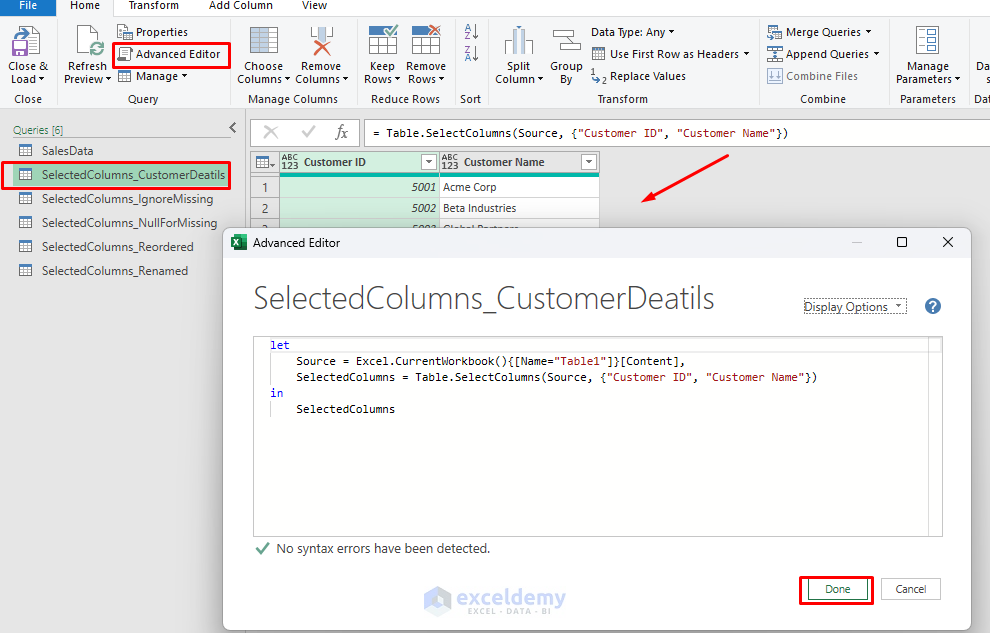
Select Specific Columns
Create a new table that only includes customer information by using the Table.SelectColumns function.
Power Query M Code:
let
    Source = Excel.CurrentWorkbook(){[Name="Table1"]}[Content],
    SelectedColumns = Table.SelectColumns(Source, {"Customer ID", "Customer Name"})
in
    SelectedColumns
This code selects only the Customer ID and Customer Name and creates a new table.
Instead of creating multiple queries, you can store each transformation step in a single query using intermediate steps.

Handle Missing Columns
If you try to select a column that doesn’t exist, Power Query will return an error by default. However, you can prevent errors using MissingField.Ignore or MissingField.UseNull options.
Example: Ignore Missing Columns
Suppose the Discount column doesn’t exist in SalesData, this code won’t generate an error.
Power Query M Code:
let
    Source = Excel.CurrentWorkbook(){[Name="Table1"]}[Content],
    SelectedColumns = Table.SelectColumns(Source, {"Customer ID", "Product Name", "Discount"}, MissingField.Ignore)
in
    SelectedColumns
Here, MissingField.Ignore ignore Discount column and does not return an error.

Example: Use Null for Missing Columns
If you want, you can keep the column but fill it with null values:
Power Query M Code:
let
    Source = Excel.CurrentWorkbook(){[Name="Table1"]}[Content],
    SelectedColumns = Table.SelectColumns(Source, {"Customer ID", "Product Name", "Discount"}, MissingField.Ignore)
in
    SelectedColumns
Here, MissingField.UseNull adds the missing column (Discount) but fills it with null values.

Reorder SelColumns
Power Query’s Table.SelectColumns does not change the original column order. However, if you want to reorder the selected columns, you can do so by specifying the order explicitly in the function.
Power Query M Code:
let
    Source = Excel.CurrentWorkbook(){[Name="Table1"]}[Content],
    SelectedColumns = Table.SelectColumns(Source, {"Customer ID", "Product Name", "Discount"}, MissingField.UseNull)
in
    SelectedColumns
The Table.SelectColumns function selects the mentioned columns based on the specified order.

Select Columns Dynamically
Instead of hardcoding column names, you can select them dynamically based on their data type.
Power Query M Code:
let
    Source = Excel.CurrentWorkbook(){[Name="Table1"]}[Content],
    ColumnNames = Table.ColumnNames(Source),
    // Keep only columns that contain "Date" in their name
    DateColumns = List.Select(ColumnNames, each Text.Contains(_, "Date")),
    SelectedColumns = Table.SelectColumns(Source, DateColumns)
in
    SelectedColumns
This Power Query M code dynamically selects only the columns that contain “Date” in their name from the table.
Explanation:
- Table.ColumnNames(Source): Get all column names.
- List.Select(ColumnNames, each Text.Contains(_, “Date”)): Filter columns containing “Date”.
- Table.SelectColumns(Source, DateColumns): Select only filtered columns.

Use Table.SelectColumns with Other Functions
Power Query is powerful when combining multiple functions. Table.SelectColumns is often used with functions such as Table.RenameColumns, Table.TransformColumns, and Table.Sort.
Select and Rename Columns: If you want to select specific columns and rename them, you can use Table.RenameColumns after Table.SelectColumns.
Power Query M Code:
let
    Source = Excel.CurrentWorkbook(){[Name="Table1"]}[Content],
    SelectedColumns = Table.SelectColumns(Source, {"Customer ID", "Customer Name"}),
    RenamedColumns = Table.RenameColumns(SelectedColumns, {{"Customer Name", "Client Name"}, {"Customer ID", "Client ID"}})
in
    RenamedColumns
Explanation:
- Table.SelectColumns(Source, {“Customer ID”, “Customer Name”}): Extracts the required columns.
- Table.RenameColumns(SelectedColumns, {{“Customer Name”, “Client Name”}, {“Customer ID”, “Client ID”}}): Renames the columns.

Use Case: Create a Focused Table for Reporting
Imagine you are preparing a report and need only customer-order-related details. You can use Table.SelectColumns to refine the dataset before exporting it to Excel or Power BI.
Power Query M Code:
let
	Source = Excel.CurrentWorkbook(){[Name="Table1"]}[Content],
	FocusedTable = Table.SelectColumns(Source, {"Order ID", "Customer Name", "Product Name", "Total Amount"})
in
	FocusedTable
This ensures that only relevant data is passed to your report, making it cleaner and easier to analyze.

Conclusion
The Table.SelectColumns function is a powerful way to extract only the needed columns from a table. By using this function, you can remove unnecessary data and handle missing columns easily. It also dynamically selects columns based on conditions that help to create a report. By using this function, you can efficiently manage and transform your data in Power Query!
Get FREE Advanced Excel Exercises with Solutions!
