
In this tutorial, we will show you how to build these interactive files without any VBA.
1. Prepare Your Dataset
To make an interactive Excel file, you must clean and structure your dataset. A well-formatted and structured dataset is crucial for creating effective interactive behaviors.
- Clean your dataset.
- Remove duplicates and spaces.
- Correct formatting and data type issues.
Convert Data to Table
- Select the dataset.
- Go to the Insert tab >> select Table.
- Check My table has headers.
- Click OK.

- Rename the table:
- Go to the Table Design tab >> select Table Name and give it a relevant name, such as Sales.

2. Use Data Validation Drop-Down Lists
Drop-down lists are essential elements for creating interactive Excel files. A drop-down list enables quick, consistent, and controlled user input. Later, you can use it to filter data, charts, and KPIs interactively.
Steps:
Build Helper Lists: Build helper lists on the top or right side of your sheet. You can hide these later.
- Select a cell and enter the following formula to list the unique regions:
=SORT(UNIQUE(Sales[Region]))
- Select a cell and enter the following formula to list the product names:
=SORT(UNIQUE(Sales[Product]))
- Optional: Add “All” above each list before inserting the formulas to spill the unique list.
Create Drop-Down List:
- Select the cell where you want the drop-down (e.g., B2).
- Go to the Data tab >> select Data Validation.
- Under Allow, choose List.
- In Source, select the region list from the helper column.
=$Q$1:$Q$5
- Click OK.

- Following similar steps, create a drop-down list for Product.
- Under Allow, choose List.
- In Source, select the product list from the helper column.
=$R$1:$R$6

Tip: You can create a named range for the lists and then use it in data validation.
3. Use Dynamic Formulas with a Drop-Down
Integrating dynamic formulas with a drop-down automatically updates KPIs and filters data.
Create KPIs:
- Total Revenue:
=SUMIFS(
Sales[Revenue],
Sales[Region], IF($B$2="All","*", $B$2),
Sales[Product], IF($B$4="All","*", $B$4))
- Average Discount:
=AVERAGEIFS(
Sales[Discount],
Sales[Region], IF($B$2="All","*", $B$2),
Sales[Product], IF($B$4="All","*", $B$4))
Apply the percentage format for a cleaner look.
- Total Orders:
=COUNTIFS(
Sales[Region], IF($B$2="All","*", $B$2),
Sales[Product], IF($B$4="All","*", $B$4))
- Total Units Sold:
=SUMIFS(
Sales[Units],
Sales[Region], IF($B$2="All","*", $B$2),
Sales[Product], IF($B$4="All","*", $B$4))

Test Interactivity:
- Select a Region and Product from the drop-down lists.
- KPIs update automatically.

4. Create Dynamic Charts with Named Ranges
Make charts that update automatically based on user selections.
Filtered Data:
=FILTER(
CHOOSE({1,2}, Sales[Date], Sales[Revenue]),
IF($B$2="All", Sales[Region]<>"", Sales[Region]=$B$2) *
IF($B$4="All", Sales[Product]<>"", Sales[Product]=$B$4),
"No rows")

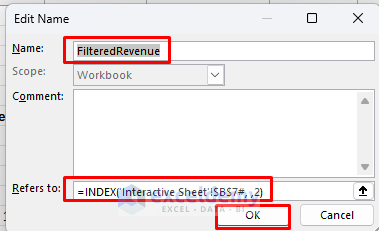
Define a Dynamic Named Range:
- Go to the Formulas tab >> select Name Manager >> select New.
- Name: FilteredDates
- Refers to:
=INDEX('Interactive Sheet'!$B$7#, ,1)

- Name: FilteredRevenue
- Refers to:
=INDEX('Interactive Sheet'!$B$7#, ,2)
Create the Chart:
- Go to the Insert tab >> from Charts >> select Line Chart.
- Right-click the chart >> choose Select Data.

- For Series Values, type:
='Interactive Sheet'!FilteredRevenue

- For Horizontal Axis Labels:
='Interactive Sheet'!FilteredDates

Test Interactivity:
- Choose the East region and all products.
- The chart shows all the relevant data.

- Pick a specific Region and a specific Product.
- The chart instantly filters.
- This works for any combination without VBA.

5. Use Conditional Formatting for Visual Feedback
Highlight key values or user choices instantly with Conditional Formatting.
Steps:
- Select your data range.
- Go to the Home tab >> select Conditional Formatting >> select New Rule.
- Choose Use a formula to determine which cells to format.
- Insert the following formula:
=AND(OR('Interactive Sheet'!$B$2="All", $C2='Interactive Sheet'!$B$2), OR('Interactive Sheet'!$B$4="All", $F2='Interactive Sheet'!$B$4))
- Choose a highlight color.
- Click OK.
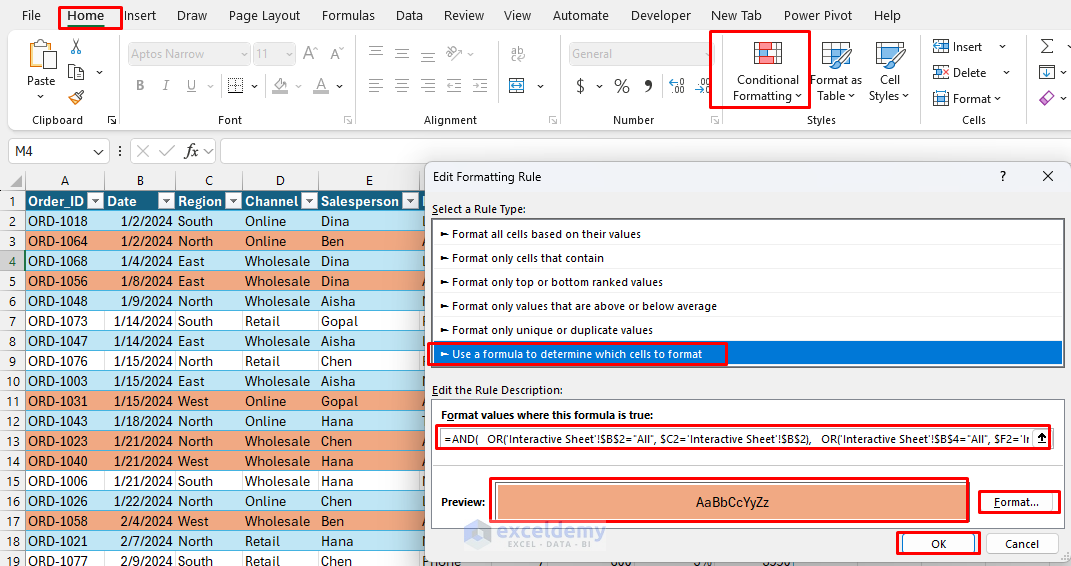
Only matching rows get highlighted, visually reinforcing the filter selection.
6. PivotTables, Slicers, and Interactive Charts
PivotTables, PivotCharts, and Slicers are core interactive features in Excel that make filtering data incredibly easy.
Create PivotTable:
- Select your data range.
- Go to the Insert tab >> select PivotTable.
- Select a location: New or Existing Worksheet.
- Click OK.

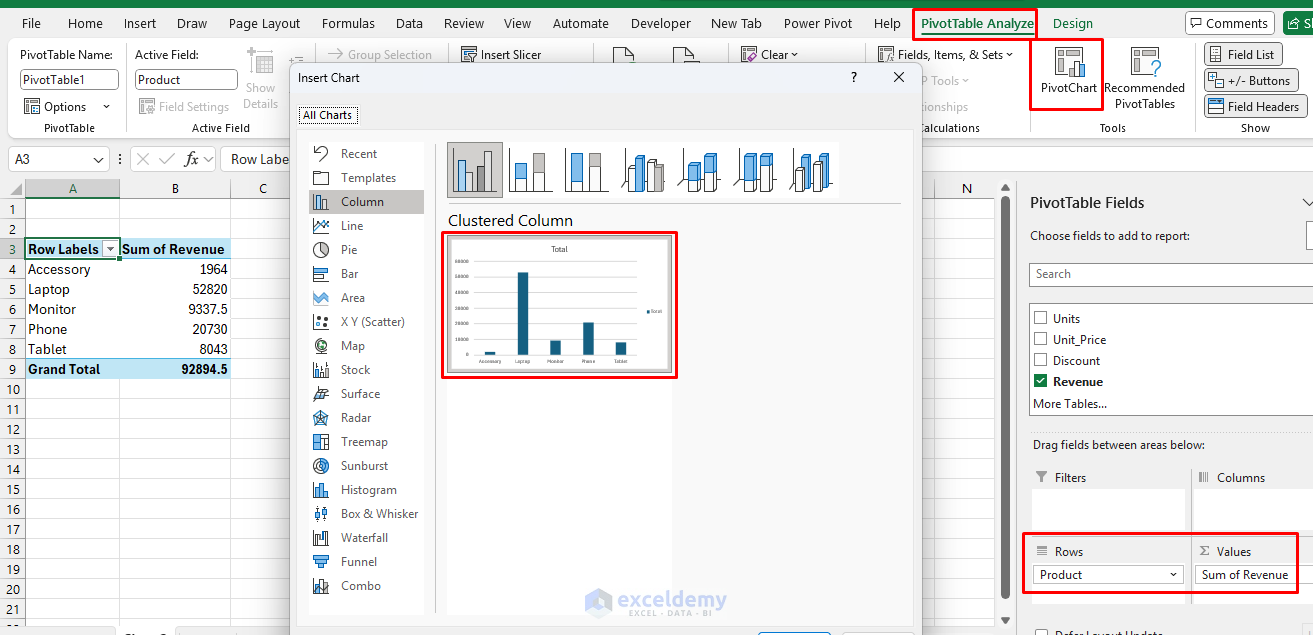
- From PivotTable Fields:
- Drag Product to the Rows area.
- Drag Revenue to the Values area.
Create PivotCharts:
- Select the PivotTable.
- Go to the PivotTable Analyze tab >> select PivotChart.
- Select a Clustered Column chart.
- Click OK.
Add Interactive Slicers:
- Go to the PivotTable Analyze tab >> select Insert Slicer.
- Choose a field to filter by, such as:
- Region, Product, Salesperson, etc.
- You can click buttons in the slicer to filter charts and tables instantly.

- To keep the slicers and the chart together, you can group them.
- Place the slicers near or on the chart, select all objects (the chart and the slicers), then right-click and select Group.

Connecting Multiple PivotTables with Shared Slicers
- Create multiple pivot tables from the same data source.
- Insert Slicers.
- Right-click the slicer >> select Report Connections.
- Connect the slicer to multiple PivotTables.

- Now, copy the slicers and the charts to your dashboard sheet.
- You can hide the PivotTable sheet.

7. Use Hyperlinks for Navigation
To make your Excel file feel more like a clickable app, you can use hyperlinks for navigation. This allows users to jump to different sheets, charts, or tables.
Steps:
- Go to the Insert tab >> from Illustrations >> select Shapes >> select Rectangle.
- Name the shape “Sales Data”.
- Right-click the shape >> select Link.

- In the Insert Hyperlink dialog box:
- Select Place in This Document >> type the cell reference A1 >> select the Sales sheet.
- Click OK.
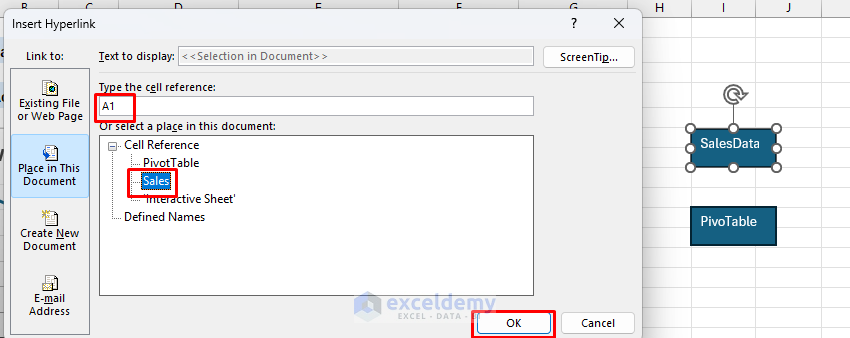
- Select Place in This Document >> type the cell reference A3 >> select the PivotTable sheet.
- Click OK.

- Format it like a button for a cleaner look.
- Navigation hyperlinks like these allow users to easily jump between a “Dashboard” and various “Details” sheets.
Final Interactive Excel File:

- The example below shows all regions and the “Accessory” product selected.
- Selections can also be made from the slicer.
- All data updates automatically.

Tips
- We demonstrated both a dynamic chart (using the FILTER function) and a PivotChart to show different interactive methods. You can choose whichever type best suits your needs.
- You can also explore Form Controls, which offer more interactive options without requiring VBA.
- To create a search box, you can use the dynamic XLOOKUP function.
Download Practice Workbook
Conclusion
Using these features and techniques, you can create sophisticated, interactive Excel files without any VBA. The key is to combine multiple techniques for maximum interactivity. Remember to always test your interactive elements thoroughly and provide clear instructions for users. With practice, you’ll be able to create impressive dashboards and tools that make data analysis both powerful and user-friendly, all without writing a single line of VBA code.
Get FREE Advanced Excel Exercises with Solutions!
