
Managing repeated data imports in Excel can be a hassle, especially when multiple files need to be processed regularly. Luckily, by combining Power Query with a simple folder system, you can simulate drag-and-drop file uploads that auto-refresh your data model without complex VBA or macros.
In this tutorial, we will show how to implement drag-and-drop file uploads using Excel and Power Query.
Imagine you’re managing monthly sales reports collected monthly from different field agents. Instead of copying and pasting data manually, you can implement drag-and-drop file uploads. Then, tell agents to upload or drag their CSV into the shared folder.
Step 1: Set Up Your Drag-and-Drop Folder
- Open File Explorer.
- Create a new folder (e.g., Drag and Drop File).
C:\Users\YourName\Documents\Drag and Drop Files.
- Place one or more sample files there. Example files:
- Sales June.csv
- Sales July.csv
- Inform users to drag and drop files into this folder. This can be shared or pinned to quick access.

Each file contains rows with sales data (product, region, quantity, and revenue). Ensure all files follow this structure: the same columns, the same order, and the same CSV format.
Step 2: Use Power Query to Connect to a Folder
- Open Excel.
- Go to the Data tab >> select Get Data >> select From File >> select From Folder.

- Navigate to the Drop and Drop Files folder >> click Open.

- Power Query will display a list of files in that folder.
- In the preview window, click Combine & Transform Data or Transform Data.

Step 3: Combine Files in Power Query
Power Query will show a list of files in the folder.
- Click Combine >> select Combine & Transform Data.
- A Combine Files preview will open.
- Select the correct sheet/table/delimiter as needed (Power Query auto-detects headers).
- Click OK.

- Power Query creates:
- Automatically create a function to load all files.
- A transformation query that stacks data from all files.
- Add steps to expand and combine them.

Step 4: Transform Data IF Requires
- You can apply transformations here:
- Rename columns.
- Change data types.
- Filter rows.
- Merge queries, etc.
- In the query editor:
- Delete unnecessary columns like Extension or Source.Name, if not needed.
- Right-click >> select Remove.
- Rename the query (e.g., CombinedFiles).

- Once done, click Close & Load.

- Now, your Excel sheet will load all rows from all files in the folder.

Step 4: Simulate Drag-and-Drop Uploads
To simulate a drag-and-drop upload:
- Simply drop a new .csv file into the Drop and Drop Files folder.
- Drag and drop the Sales August.csv file.
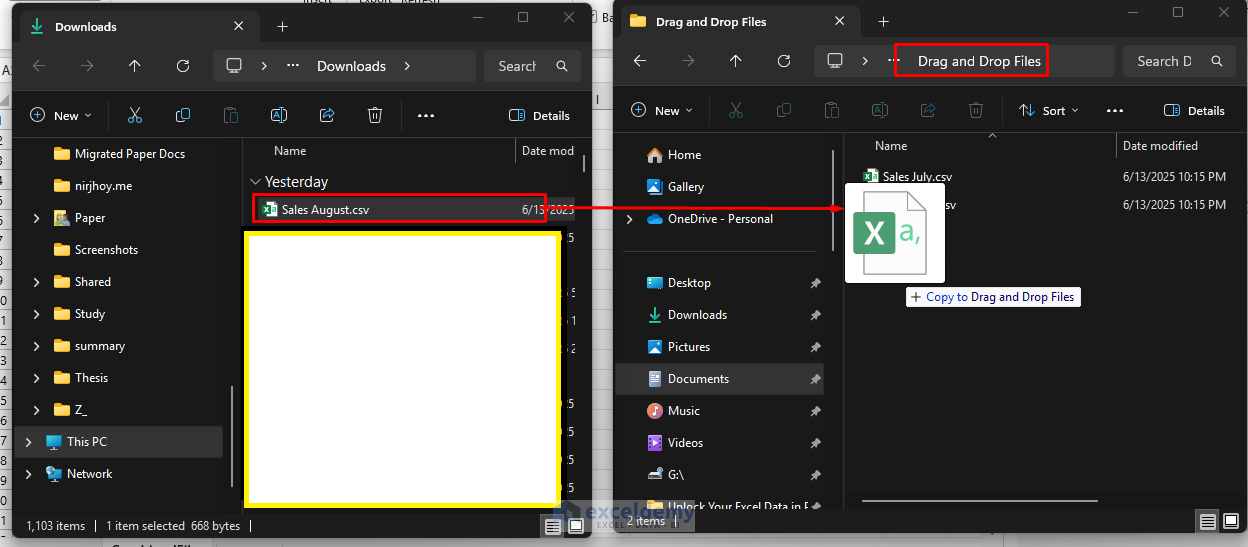
- Go back to Excel.
- Right-click >> select Refresh on the table.
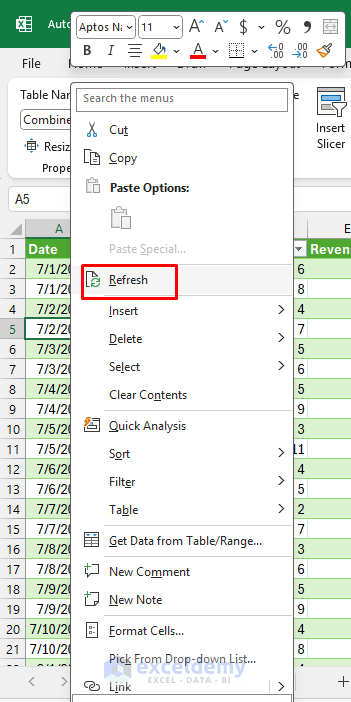
- New rows from the dropped file will appear instantly.

Step 5: Automate Refresh
- Go to the Data tab >> select Queries & Connections.
- Right-click on the Query >> select Properties.

- Enable:
- Refresh every 10 minutes.
- Click OK.

Monitor Specific Files or Formats
You can filter only .csv files using:
= Table.SelectRows(Source, each Text.EndsWith([Extension], ".csv"))
Or exclude temp/system files using:
= Table.SelectRows(Source, each not Text.StartsWith([Name], "~$"))
Troubleshoot Tips
- File in Use: Ensure the file isn’t open in another app when refreshing.
- Headers Not Detected: Adjust the “Combine Files” step in Power Query to treat the first row as headers.
- Performance: For very large files, consider using “Data Model” instead of loading to a worksheet.
Conclusion
By following the above steps, you can implement drag-and-drop file uploads, which makes Excel smarter and your workflow far more efficient. With just Power Query and a monitored folder, you can build a lightweight, user-friendly file upload system in Excel. Power Query’s ability to monitor a folder, instantly import, and process any new file you add saves countless hours otherwise spent on manual tasks. It’s perfect for small businesses, admin teams, and field operations that need to combine regular file updates quickly and reliably.
Get FREE Advanced Excel Exercises with Solutions!
