
Custom add-ins are powerful tools to extend Excel’s functionality. You can build your add-ins to automate repetitive tasks, create custom functions, or provide users with unique tools. In this article, we will build custom add-ins for enhanced functionality.
This tutorial will guide you through building a custom Excel add-in using JavaScript and Office Add-ins framework. By using the ExchangeRates API we will build a currency converter add-in.
Step 1. Set Up Your Development Environment
Instal and download the prerequisites:
- Install Node.js:
- Download and install Node.js.
- Install VS Code:
- Download and install Visual Studio Code.
- Install Office Add-in CLI:
- Open PowerShell or terminal and run:
npm install -g yo generator-office

- Install Excel:
- Ensure you have Excel 2016 or later (Office 365 recommended).
- We are using MS Office 365.
Step 2: Create a New Add-in Project
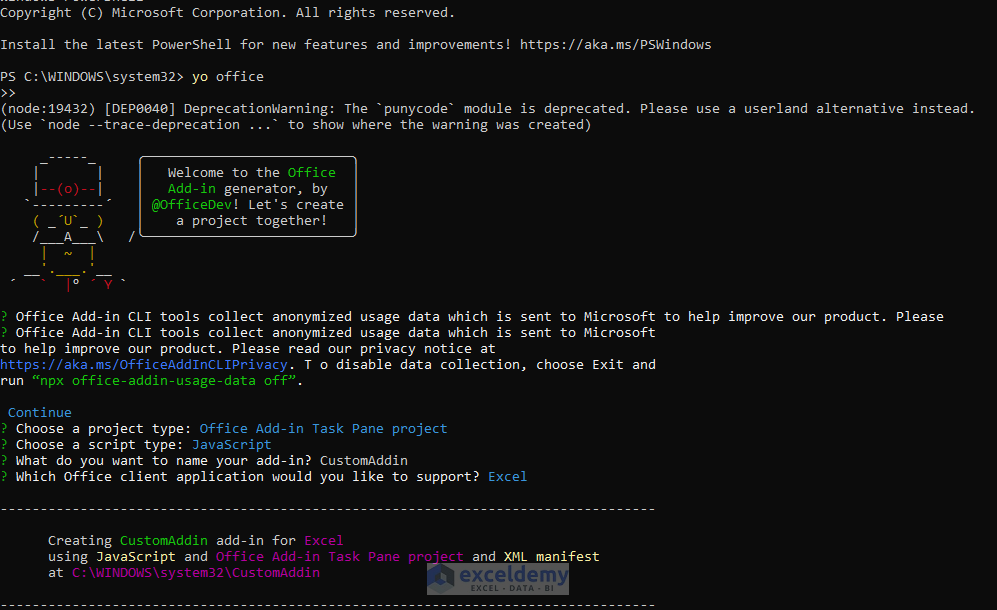
- Open PowerShell or Command Prompt and Run as Administrator.
- Run the following command to create your Office Add-in project:
yo office
- This command will prompt Continue or Exit.
- Select Continue to proceed with the setup of your Office Add-in project.
- Use the arrow keys to select Continue and press Enter.
- Next, it will prompt a series of questions about the type of add-in you want to create.
- Choose a project type:
- Choose Task pane add-in (use the arrow keys and press Enter).
- Choose a script type:
- Choose JavaScript or TypeScript based on your preference.
- What do you want to name your add-in?
- Type the name for your project (e.g., CustomAddin).
- Which Office client application would you like to support?
- Select Excel.
- Choose a project type:
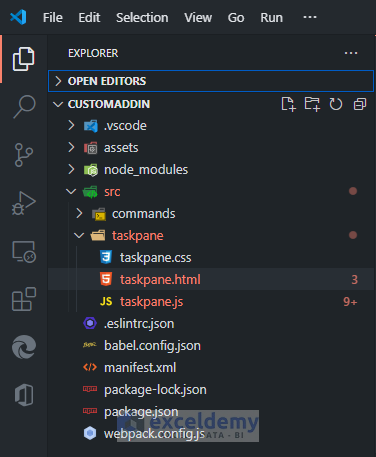
- Wait for the generator to complete. The generator will set up a project folder with all necessary files. The project will contain the following files:
-
- taskpane.html: The UI of the task pane.
- taskpane.js: Contains JavaScript code for your task pane.
- manifest.xml: Describes your add-in to Office.
Step 3: Open the Project in Visual Studio Code
After completing the setup, you can open the project folder by using the terminal or you can open it directly in VS code. While creating the project, Yeoman creates a folder in the current directory where you ran the yo office command. The folder will have the name of the add-in project you specified earlier (e.g., CustomAddin).
Navigate to the Project Folder in the Terminal:
- In your PowerShell or Command Prompt, use the cd (change directory) command to move into the project folder.
- Insert the following command to move into the project folder
cd CustomAddin
Open the Folder in Visual Studio Code:
- Once you’re in the project folder, you can open it in Visual Studio Code directly from the terminal.
- Run the following command to open the folder in VS Code:
code .

- This will open the entire project in Visual Studio Code.
You can open the Project folder directly in Visual Studio:
- Open File Explorer (Windows) or Finder (Mac) and navigate to the folder where Yeoman created your add-in project.
- Right-click the project folder (e.g., CustomAddin) >> select Open with Code if you have Visual Studio Code installed.
- Alternatively, you can open Visual Studio Code, go to File tab >> select Open Folder, and select your project folder.
Step 3. Creating Real-Time Currency Converter
Once the project is open in VS Code, you can begin editing and building your add-in:
Install Dependencies:
If you haven’t already installed the required dependencies (like Office.js), open a terminal in VS Code and run the following command.
npm install
Update taskpane.html and taskpane.js in VS Code
Now, you can edit the HTML, JavaScript, and CSS files in the src/ folder to define the functionality and appearance of the add-in.
Let’s modify the taskpane.html to design your add-in’s user interface, and update the taskpane.js to add interactivity (e.g., functions that interact with Excel).
Modify taskpane.html:
Open taskpane.html and replace the existing content with the following:
<!DOCTYPE html>
<html>
<head>
<title>Currency Converter</title>
<script src="https://appsforoffice.microsoft.com/lib/1/hosted/office.js"></script>
<script src="./taskpane.js"></script>
</head>
<body>
<h2>Currency Converter</h2>
<label for="fromCurrency">From:</label>
<input id="fromCurrency" type="text" placeholder="e.g., USD" />
<br>
<label for="toCurrency">To:</label>
<input id="toCurrency" type="text" placeholder="e.g., EUR" />
<br>
<button id="convertButton">Convert</button>
<p id="status"></p>
</body>
</html>
Explanation:
- <head> Section:
- <title>: Sets the title of the page as “Currency Converter.”
- <script>:
- Includes office.js for Office Add-in integration.
- Links taskpane.js for custom JavaScript functionality.
- <body> Section:
- <h2>: Displays the “Currency Converter” heading.
- <label> and <input>: Fields for user input (fromCurrency and toCurrency).
- <button>: Triggers the currency conversion.
- <p>: Displays status messages or errors.
This layout forms the user interface for your Excel add-in.
Adding Logic in taskpane.js:
Open taskpane.js and replace the existing content with this code:
Office.onReady(() => {
  document.getElementById('convertButton').addEventListener('click', convertCurrency);
});
async function convertCurrency() {
  const fromCurrency = document.getElementById('fromCurrency').value.toUpperCase();
  const toCurrency = document.getElementById('toCurrency').value.toUpperCase();

  if (!fromCurrency || !toCurrency) {
      document.getElementById('status').innerText = "Please enter valid currencies.";
      return;
  }

  try {
    const apiKey = "Your_Api_Key"; // Replace with your ExchangeRates API key
      const url = `https://api.exchangerate-api.com/v4/latest/${fromCurrency}`;
      const response = await fetch(url);
      const data = await response.json();

      const rate = data.rates[toCurrency];
      if (!rate) {
          document.getElementById('status').innerText = `Invalid conversion rate for ${toCurrency}.`;
          return;
      }

      await Excel.run(async (context) => {
          const range = context.workbook.getSelectedRange();
          range.load("values");
          await context.sync();

          const convertedValues = range.values.map(row =>
              row.map(cell => cell * rate)
          );

          range.values = convertedValues;
          document.getElementById('status').innerText = `Converted to ${toCurrency} successfully.`;
          await context.sync();
      });
  } catch (error) {
      console.error(error);
      document.getElementById('status').innerText = "Error fetching conversion rate.";
  }
}
Explanation:
- Office.onReady: Initializes the add-in when the Office environment is ready.
- convertCurrency Function:
- Reads input currencies (fromCurrency and toCurrency).
- Validates inputs and fetches the exchange rate via API.
- Uses Excel.run to apply the conversion to selected Excel cells.
- Displays success or error messages in the task pane.
- Error Handling: Catches and logs API or Excel runtime errors, providing user feedback.
Step 4. Test Your Add-in
Let’s test the add-in to see how it works in Excel.
- If you are not in the project folder, navigate to your project folder in the terminal:
- Run the following command in the VS code terminal.
cd CustomAddin
- To start the development server, run the following command.
npm start
- It will prompt a question: “? Allow localhost loopback for Microsoft Edge WebView?”
- Type: Yes
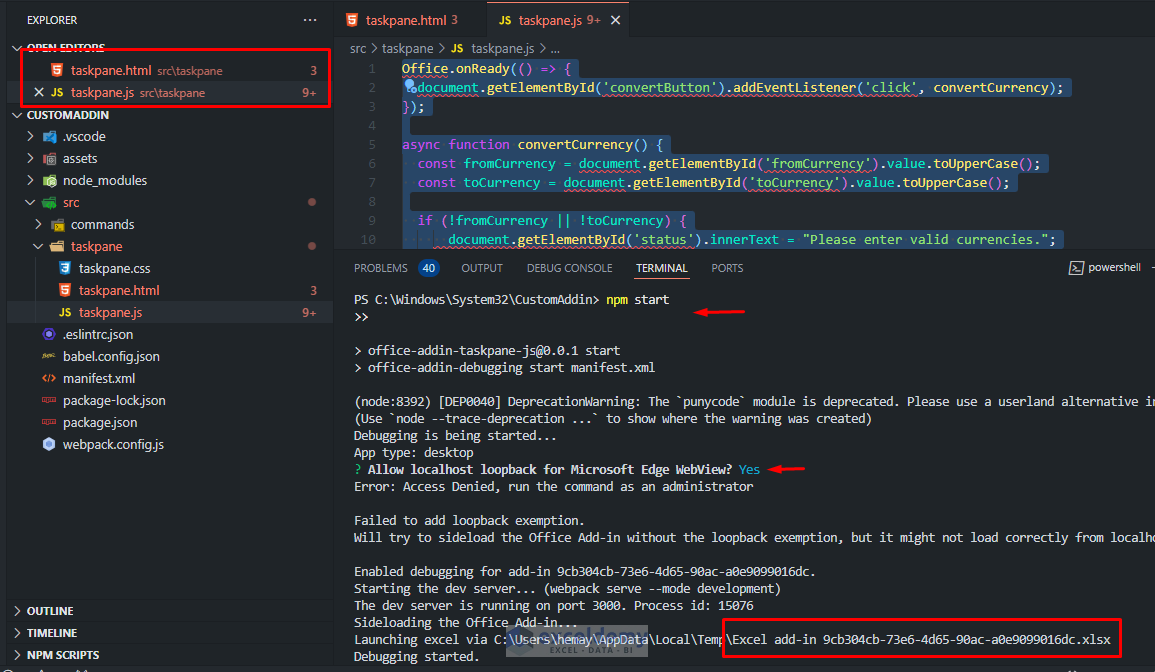
This command will launch the Excel file.
- Excel will open, and the add-in will be loaded automatically in the task pane.
- Select a range of cells containing values in the source currency.
- We selected cell A2:A10.
- In the From box: insert USD and To box: insert EUR.
- Click Convert.

Step 5: Deploy the Add-In
You can deploy it to Office 365 or share it to use within your organization. You can do this by packaging the add-in and uploading it to the Office Store.
Here’s how to package the add-in:
- In the terminal, run:
npm run build
- This will create a production build of your add-in, which you can host on a web server or upload to a cloud service like Azure.
Common Environment Setup Issues and Solutions
- Script Execution Policy Error (npm.ps1 cannot be loaded)
- Solution: Set the execution policy by running:
Set-ExecutionPolicy -Scope CurrentUser -ExecutionPolicy RemoteSigned
- yo Command Not Recognized
- Solution: Ensure Yeoman is installed correctly by running:
npm install -g yo
-
- To verify the installation run:
yo --version
- Permission Issues When Installing Packages
- Solution: Run PowerShell or Command Prompt as Administrator, or use the –force flag during installation.
Conclusion
By following the above step, you can create a Currency Converter add-in in Excel. We covered the detailed steps of how to set up the development environment, build the add-in, and implement the functionality with JavaScript. You can extend this add-in functionality further by adding more advanced features.
Get FREE Advanced Excel Exercises with Solutions!
