Method 1 – Format Column in Excel for Email Addresses with ‘Data Validation’ Feature
STEPS:
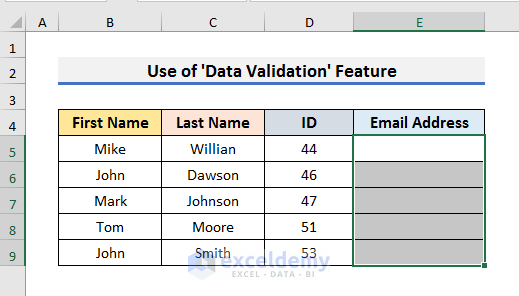
- Select cells that you want to format for email addresses.
- We will format Cells E5 to E9 of Column E.
- Select the whole Column E if you want.
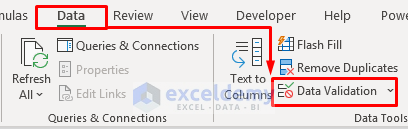
- Navigate to the Data tab and select the ‘Data Validation’ icon. It will open the Data Validation window.
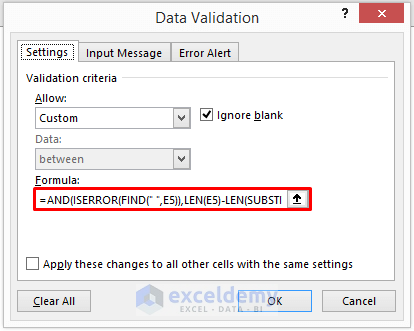
- In the Data Validation window, select Custom in the Allow field.
- Type the formula below in the Formula field:
=ISNUMBER(MATCH("*@*.?*",E5,0))
Note: The first cell of the email address column is Cell E5. You need to change it according to your dataset.
- You can also use the formula below in the Formula field instead of the previous one:
=AND(ISERROR(FIND(" ",E5)),LEN(E5)-LEN(SUBSTITUTE(E5,"@",""))=1,IFERROR(SEARCH("@",E5)<SEARCH(".",E5,SEARCH("@",E5)),0),ISERROR(FIND(",",E5)),NOT(IFERROR(SEARCH(".",E5,SEARCH("@",E5))-SEARCH("@",E5),0)=1),LEFT(E5,1)<>".",RIGHT(E5,1)<>".")- Cell E5 is the first cell of the email address column.
This formula ensures seven conditions. They are:
- It ensures there is no space.
- Ensure the @ sign.
- It ensures a dot (.) symbol after the @ sign.
- Also ensures that there is no comma.
- It ensures that the dot (.) symbol is not right after the @ sign.
- It checks that the email does not start with a dot (.) symbol.
- Or ends with a dot (.) symbol.
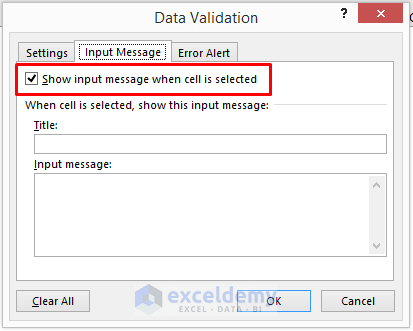
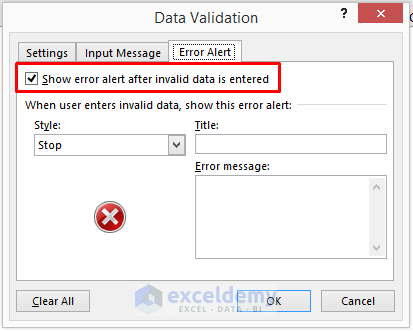
- After inserting the formula, click ‘Show input message when cell is selected’ from the Input Message tab.
- Check ‘Show error alert after invalid data is entered’ in the Error Alert field.
- Click OK to proceed.
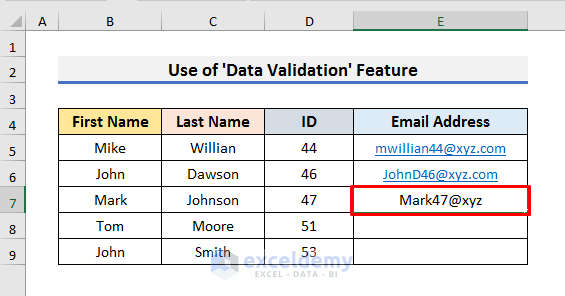
- In the following step, select Cell E5 and type an email address.
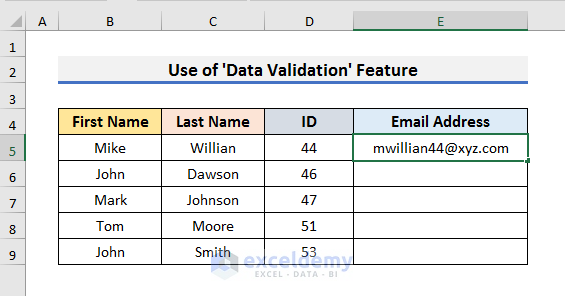
- Press Enter, and you will see the formatted email address.
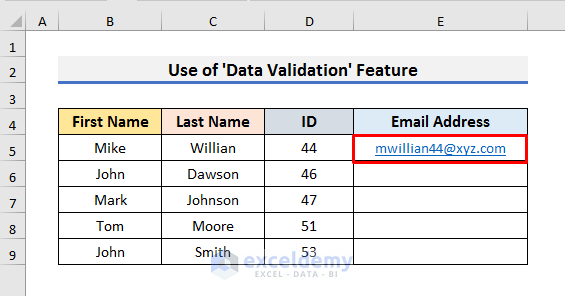
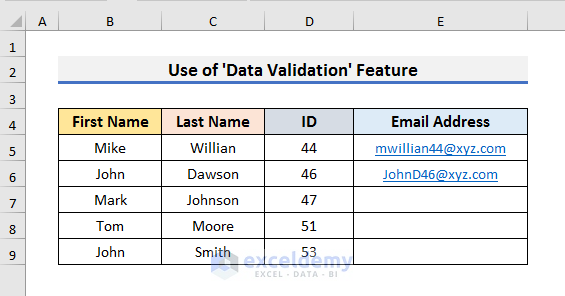
- Repeat the previous step while inserting email addresses one by one.
- If all email addresses follow the same pattern then you can take a glance at Method-2.
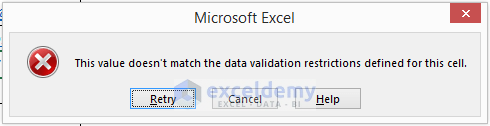
- Try to enter the wrong email address then it will show a message.
- We entered an email without the .com part and pressed Enter.
- After pressing Enter, a message will appear saying the value doesn’t match the data validation restrictions.
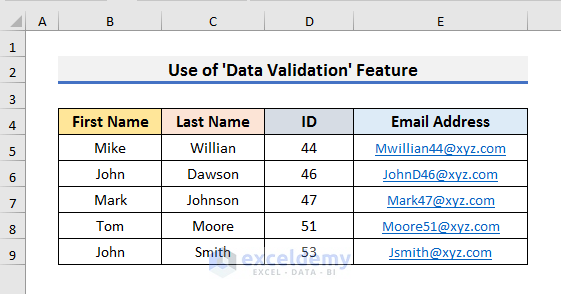
- After inserting all the emails, the address column will look like the picture below.
Method 2 – Apply Excel Formulas to Format a Column for Email Addresses
2.1 Combine LOWER and LEFT Functions
STEPS:
- Select Cell E5 and type the formula:
=LOWER(LEFT(B5)&C5&D5)&"@"&"xyz.com"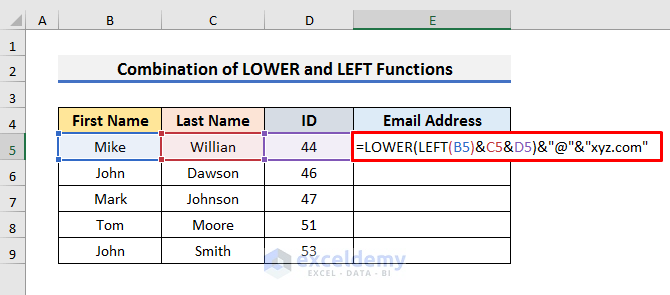
How Does the Formula Work?
- The & operator connects different cell values.
- LEFT(B5)&C5&D5
This part extracts the leftmost character of Cell B5 and concatenates it with Cell C5, D5, @, and xyz.com. Its output becomes [email protected].
- LOWER(LEFT(B5)&C5&D5)&”@”&”xyz.com”
The LOWER function converts the characters into lowercase. The final output is [email protected].
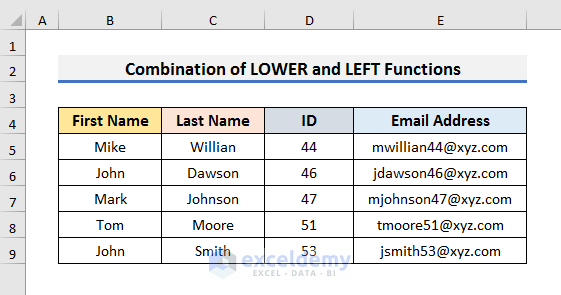
- Hit Enter and drag the Fill Handle down.
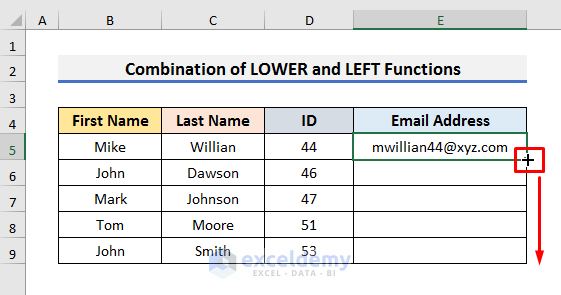
- You will get results like the screenshot below.
2.2 Apply CONCATENATE and LEFT Functions Together
STEPS:
- Select Cell E5 and type the formula:
=CONCATENATE(LEFT(B5,1),C5,D5,"@axy.com")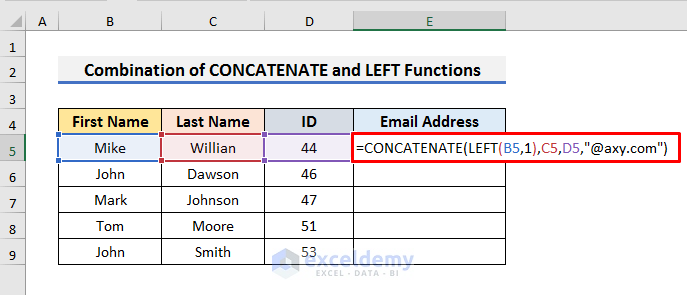
How Does the Formula Work?
- LEFT(B5,1)
This part extracts the leftmost character of Cell B5. So the output of this part becomes M.
- CONCATENATE(LEFT(B5,1),C5,D5,”@axy.com”)
The CONCATENATE function joins text strings of Cell B5, C5, and D5 along with @axy.com. The final output is [email protected].
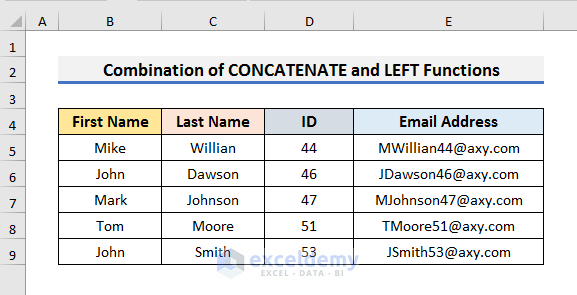
- Press Enter and drag down the Fill Handle.

- Format a column in Excel for email addresses like the picture below.
Download Practice Book
Download the practice book from here.
Related Articles
- How to Make an Address Book in Excel
- How to Organize Addresses in Excel
- Extracting Email Addresses from Excel
<< Go Back to Address Format | Text Formatting | Learn Excel
Get FREE Advanced Excel Exercises with Solutions!

I tried your first suggestion for entering email addresses as I have tried others. However, when I enter the email addresses and then click on them, it opens a Microsoft Edge window instead of an email program. The other formulas that I have tried do the same thing. I would appreciate your help. Thanks, Russ
Hello Russell,
Thank you for sharing your query. I hope the following solution will work for you.
First, click on the Start icon and select Settings.
Then, select Apps in the new window.
Next, go to the Default apps section on the left panel.
Here, check if the application for Email is selected as Mail.
If not, then click on it and choose Mail from the list of applications.
After this, I recommended you restart your device once. I hope it will solve your problem. Please let me know your feedback.
Thanks!