What are Sequential Dates?
Sequential dates are a series of dates that follow a specific interval. For instance, if you have dates like January 1, 2023, January 2, 2023, January 3, 2023, and so on, they are sequential because they form a continuous and consecutive pattern.
Creating Sequential Dates in Excel
In Excel, you can easily create sequential dates using the AutoFill drag-down feature.
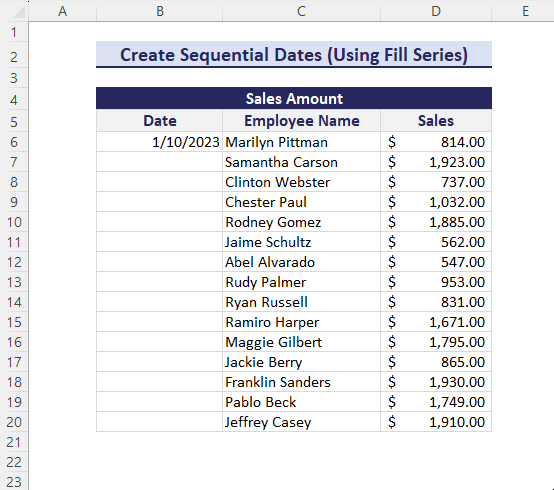
Step 1 – Enter the First Date
- In the first cell of the column where you want to fill sequential dates, enter the initial date (e.g., 01-10-2020 in cell B6).
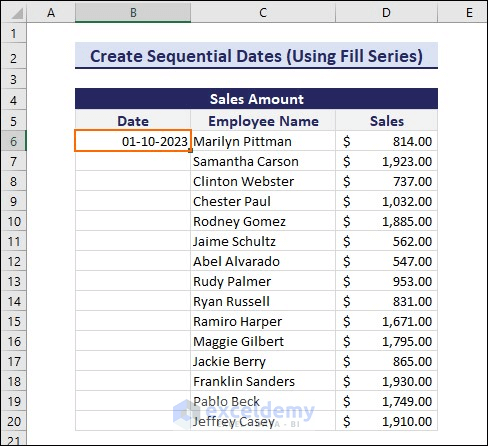
Step 2 – Use AutoFill
- Hover over the bottom-right corner of cell B6.
- The cursor changes to a green plus sign (the Fill Handle feature).
- Drag the Fill Handle down to Autofill the formulas for the remaining rows.
- Excel will automatically generate the sequential dates using the Fill Series option.
Read More: How to Repeat Formula Pattern in Excel
Method 1 – Using an Excel Formula to Enter Sequential Dates Across Sheets
- We’ll use a formula combining DATE, REPLACE, CELL, and SEARCH functions.
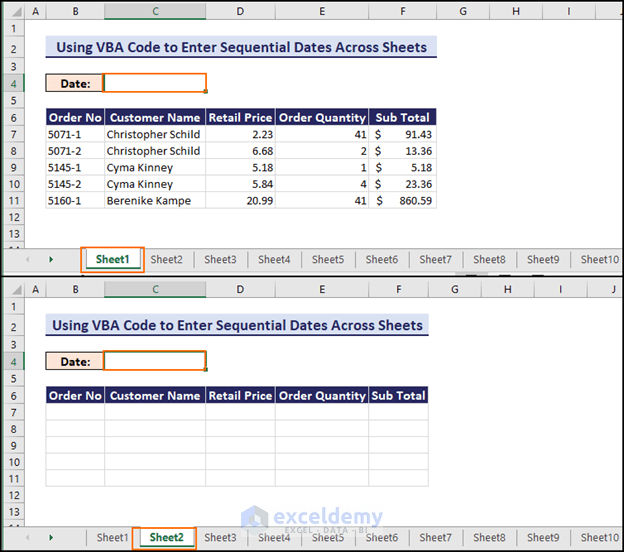
- Assume you have an Excel workbook with 10 worksheets (named 1, 2, 3, …, 10).
- We want to enter sequential dates from 1-10-2023 to 10-10-2023 in cell C4 of each worksheet.
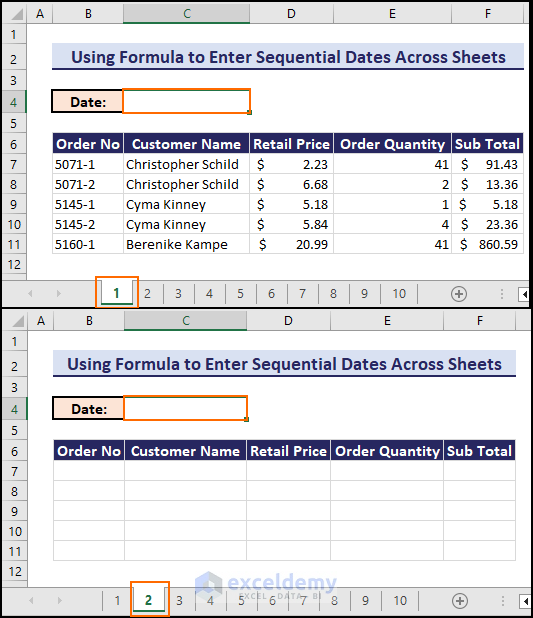
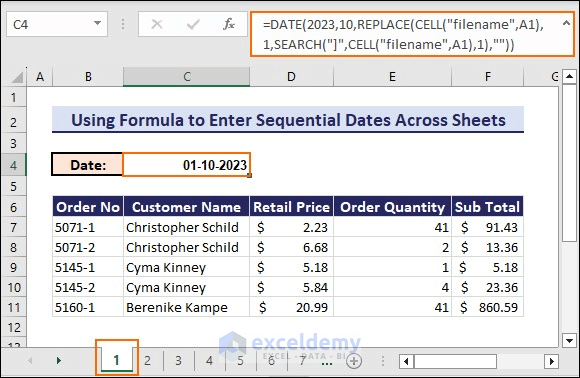
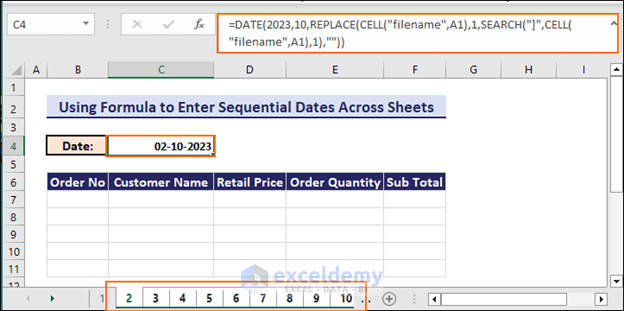
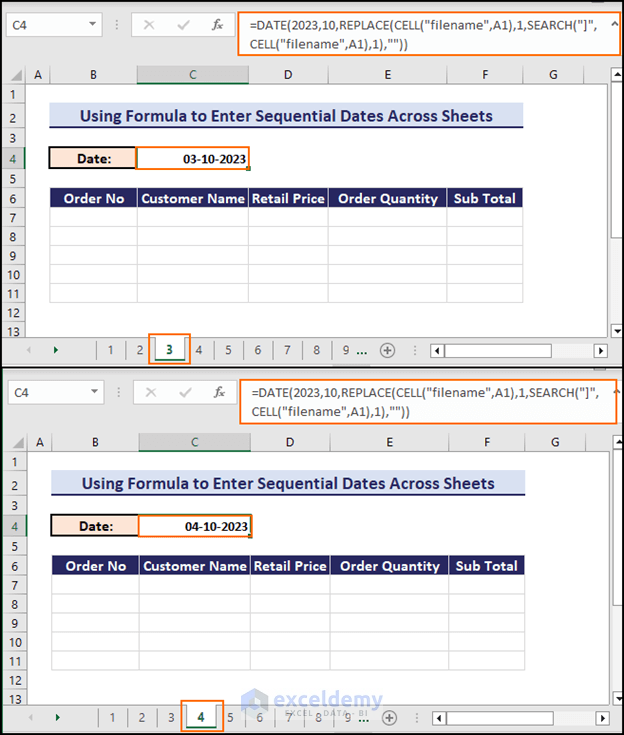
- Enter this formula in cell C4 of the first sheet and press Enter:
=DATE(2023,10,REPLACE(CELL("filename",A1),1,SEARCH("]",CELL("filename",A1),1),""))You will get the date 01-10-2023 in cell C4 of the worksheet named 1.
-
- This formula extracts the date 01-10-2023 based on the workbook filename.
- The sheet name will change sequentially from 1 to 10.
- Copy this formula to the rest of the worksheets:
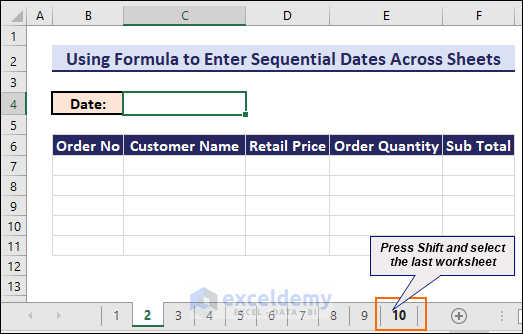
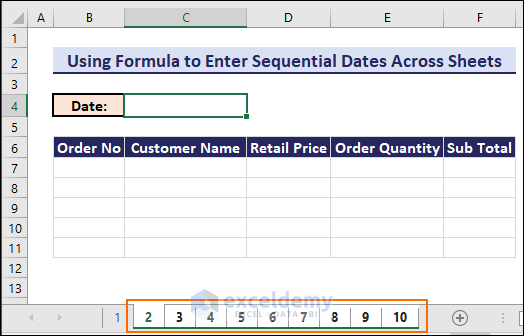
- Select all sheets (from 2 to 10) simultaneously, by pressing the Shift key and then select the worksheet named 10.
- Paste the formula into cell C4 of each sheet.
- Press Enter.
-
- You’ll see the next date, 02-10-2023, in cell C4 of worksheet 2.
- Check each sheet individually.
- You’ll find that the sequential dates span from 01-10-2023 to 10-10-2023.
If you’re dealing with a large number of sheets, manually copying the formula can be cumbersome. In such cases, consider using a VBA code to autofill the data.
Method 2 – Using VBA Macro to Generate Sequential Dates Across Sheets
In this section, we’ll utilize a VBA code to create sequential dates across multiple sheets in Excel. We’ll cover two examples: entering sequential dates in a single cell across sheets and entering them in a range of cells.
2.1 Entering Sequential Dates in a Single Cell Across Sheets
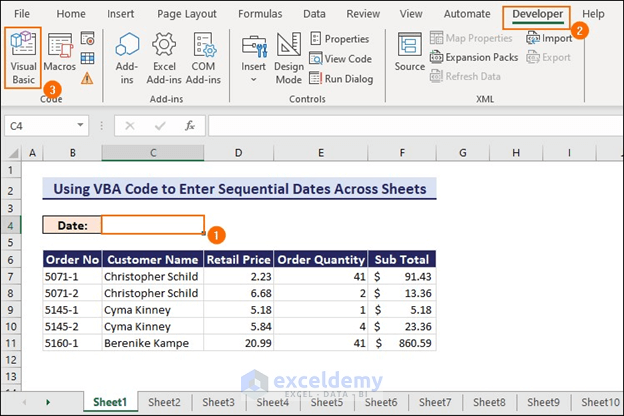
- Workbook Setup:
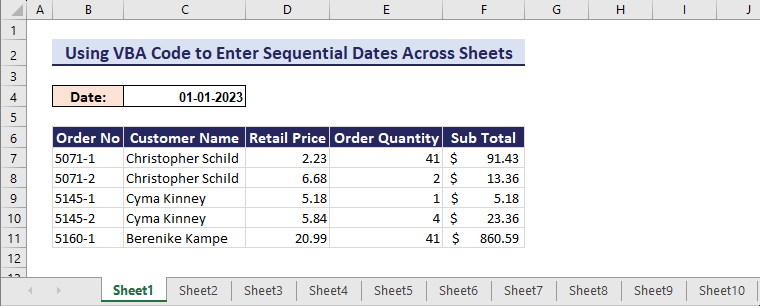
- We have a workbook with 10 worksheets, each representing order details for a specific day.
- Cell C4 in each sheet is designated for entering the date.
- Steps
To enter VBA code, follow these steps:
-
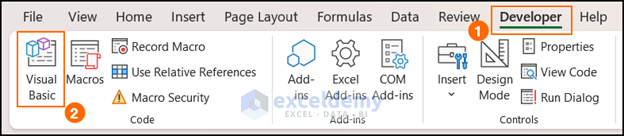
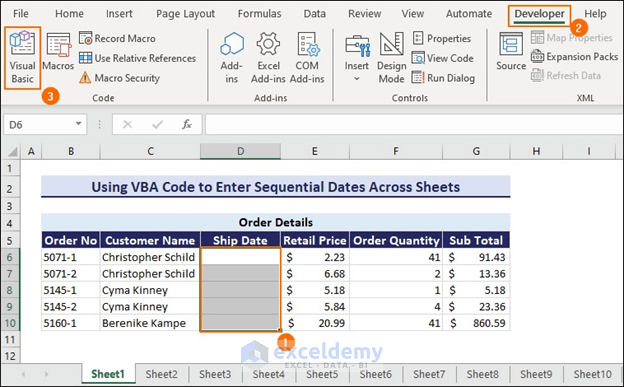
- Click the Developer tab in the Excel Ribbon. If you don’t see the Developer tab, enable it in Excel Options.
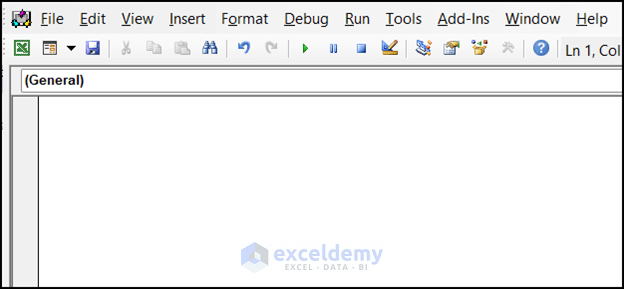
- Select Visual Basic (or press Alt+F11).
-
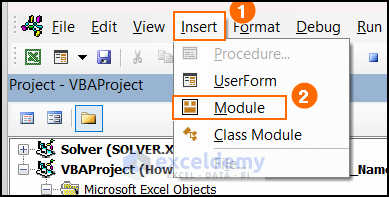
- In the VBA Editor Window, choose Insert and click Module.
-
- Copy the provided code into Module1 and save it (Ctrl+S).
VBA Code:
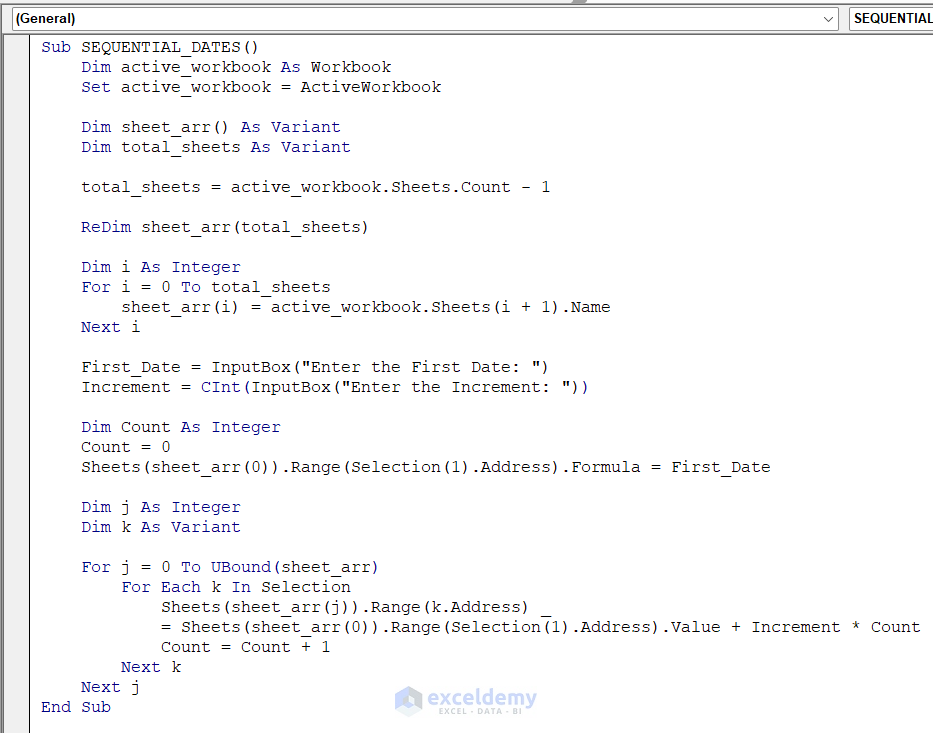
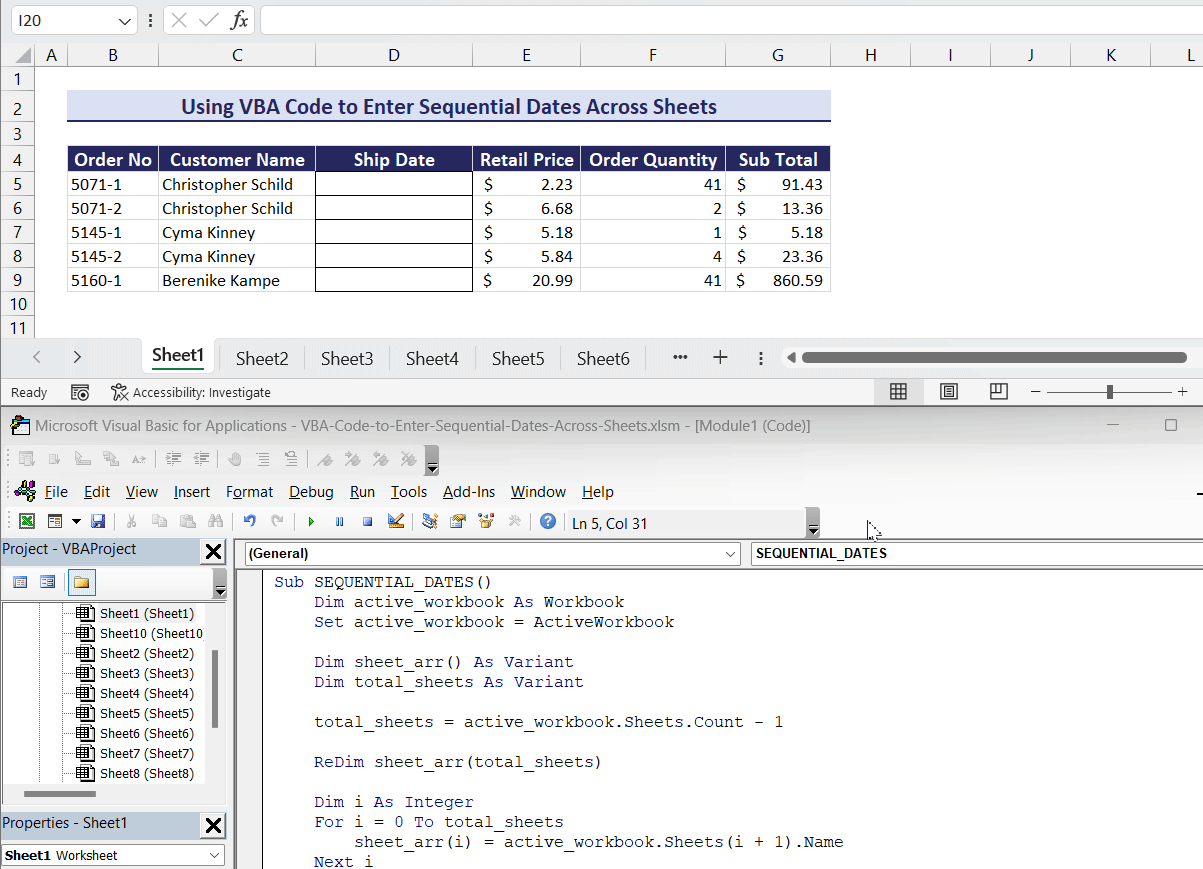
Sub SEQUENTIAL_DATES()
Dim active_workbook As Workbook
Set active_workbook = ActiveWorkbook
Dim sheet_arr() As Variant
Dim total_sheets As Variant
total_sheets = active_workbook.Sheets.Count - 1
ReDim sheet_arr(total_sheets)
Dim i As Integer
For i = 0 To total_sheets
sheet_arr(i) = active_workbook.Sheets(i + 1).Name
Next i
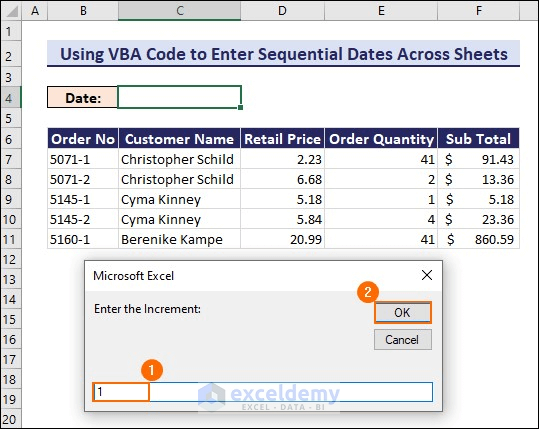
First_Date = InputBox("Enter the First Date: ")
Increment = CInt(InputBox("Enter the Increment: "))
Dim Count As Integer
Count = 0
Sheets(sheet_arr(0)).Range(Selection(1).Address).Formula = First_Date
Dim j As Integer
Dim k As Variant
For j = 0 To UBound(sheet_arr)
For Each k In Selection
Sheets(sheet_arr(j)).Range(k.Address) = Sheets(sheet_arr(0)).Range(Selection(1).Address).Value + Increment * Count
Count = Count + 1
Next k
Next j
End Sub
Click the image for detailed view
- Execution
- Select cell C4 in the first sheet (Sheet1).
- Click the Developer tab, then choose Visual Basic.
-
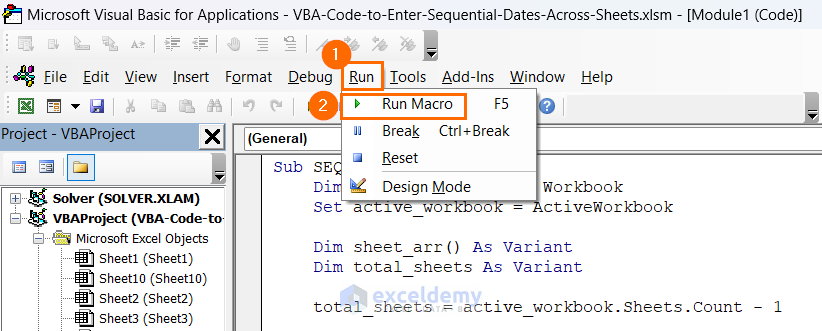
- Run the VBA code (either by clicking Run Sub/Macro or pressing F5).
-
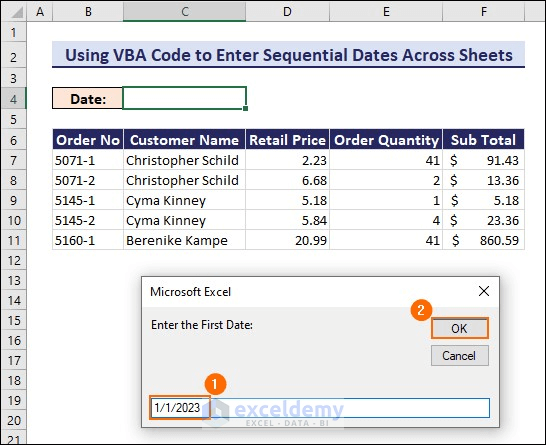
- Enter the initial date (e.g., 1/1/2023) and the desired increment (e.g., 1).
- The sequential dates will populate in all worksheets.
Remember to adjust the increment value based on your specific requirements.
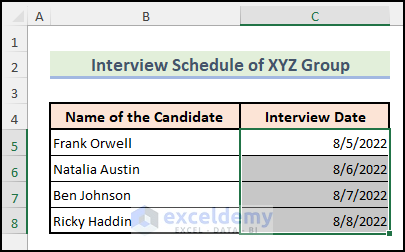
2.2 Entering Sequential Dates in a Range of Cells Across Sheets
- Workbook Setup:
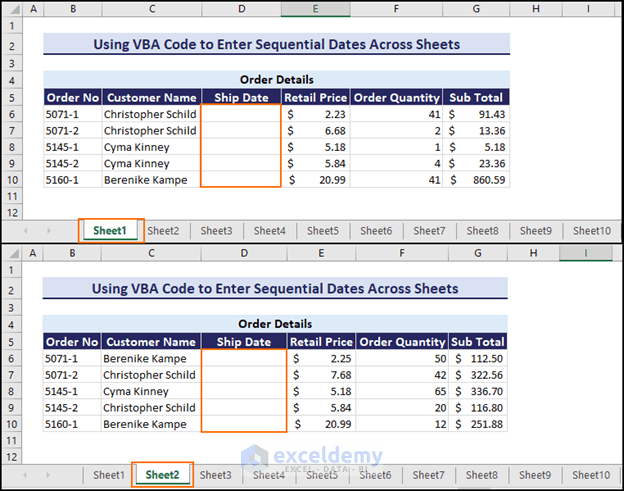
- We have a workbook with 10 worksheets.
- Each sheet represents order details for a specific day.
- The Ship Date column in each sheet needs sequential dates.
- Steps
- Copy the same VBA code provided earlier into this new workbook.
Sub SEQUENTIAL_DATES()
    Dim active_workbook As Workbook
    Set active_workbook = ActiveWorkbook

    Dim sheet_arr() As Variant
    Dim total_sheets As Variant

    total_sheets = active_workbook.Sheets.Count - 1

    ReDim sheet_arr(total_sheets)

    Dim i As Integer
    For i = 0 To total_sheets
        sheet_arr(i) = active_workbook.Sheets(i + 1).Name
    Next i

    First_Date = InputBox("Enter the First Date: ")
    Increment = CInt(InputBox("Enter the Increment: "))

    Dim Count As Integer
    Count = 0
    Sheets(sheet_arr(0)).Range(Selection(1).Address).Formula = First_Date

    Dim j As Integer
    Dim k As Variant

    For j = 0 To UBound(sheet_arr)
        For Each k In Selection
            Sheets(sheet_arr(j)).Range(k.Address) = Sheets(sheet_arr(0)).Range(Selection(1).Address).Value + Increment * Count
            Count = Count + 1
        Next k
    Next j
End Sub

Click the image for a detailed view
- Execution
-
- Select the range of cells where you want to enter sequential dates.
- Click the Developer tab, then choose Visual Basic.
-
- Run the code from the VBA code editor.
- Enter the initial date (e.g., 1/1/2023) and the desired increment (e.g., 3 days).
- Sequential dates will populate in all worksheets.
Remember to adjust the increment value based on your specific requirements.
Download Practice Workbook
You can download the practice workbooks from here:
Further Readings
- How to AutoFill Months in Excel
- How to Create Automatic Rolling Months in Excel
- How to Increment Month by 1 in Excel
- How to Autofill Days of Week Based on Date in Excel
- How to Fill Down Blanks in Excel
- How to Add Sequence Number by Group in Excel
- How to Repeat Number Pattern in Excel
- How to Perform Predictive AutoFill in Excel
<< Go Back to Autofill Dates | Excel Autofill | Learn Excel
Get FREE Advanced Excel Exercises with Solutions!

Hi do you know why when I enter in an increment of 1 it displays every 2 days? If I enter 0.5 it makes it the same date. Not sure what I am doing wrong
Thank you Chelsea for your comment. We have checked the code and it’s working perfectly on our end. Here, we have set the date as
and 1 as the increment.
Did you follow the steps correctly? If yes, then you can send your Excel file and we can take a look into that.
When I try to run the macro I receive an error and break at line, “Sheets(out(j)).Range(k.Address) = Sheets(out(0)).Range(Selection(1).Address).Value + Increment * Count”
I have an individual sheet for Monday, Tuesday, Wednesday, Thursday, and Friday.
I’m entering a date 12/28/22, and would like Tuesday to add “1” day to populate the next date aka 12/29/22, Wednesday to be +1 being 12/30/22 and so forth.
So, the first time the macro ran it asked First date I put “=Monday!E1” then Increment “1”
Now I don’t know how to fix the error and get it to run again. Any needs or questions please reach out.
Greetings. You must carry out the subsequent steps if you want to resolve the issue.
When you run the VBA code, you will find a Microsoft Excel prompt box asking you to enter the first date.
Subsequently, enter the date that you want to insert in the first worksheet. Enter it using the DATE function in Excel.
To fix your problem, you have to enter the formula:
=DATE(2022,12,28)
Year, month, and day are shown, respectively, as (2022,12,28).
Next, click on OK.
Now, another Microsoft Excel prompt box will appear that will ask you to enter the increment.
Enter the increment, and then click on the OK button.
I have copy and pasted the code into VBA but when I run the macro the increment increases by 2 weeks. I use =date() and put in an increment of 1.
Hello, Robert Scott!
Thanks for sharing your problem with us!
We have checked the code and it’s working perfectly on our end. Here, we have set the date as
and 1 as the increment.
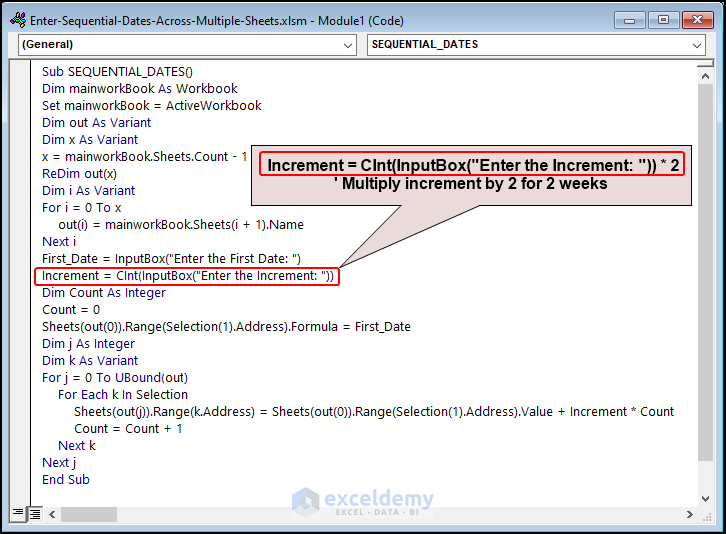
If you change the code as shown in the screenshot, the macro will increase the increment by 2 weeks. Otherwise, the macro will return the increment by 1 week.
If you cannot solve your problem, please mail us at the address below.
[email protected]
Regards
Md. Abdur Rahim Rasel (Exceldemy Team)
hi there, this is a great VBA however, we are a 6day working company and need a code to exclude the sundays but keep rolling onto the next sheet from the monday. do you have a code for this please?
Hello Cass,
Thanks for your appreciation. Here’s the updated VBA code with adjustments to skip Sundays and continue from Monday.
This code skips Sundays by checking if the weekday of currentDate is Sunday (Weekday(currentDate, vbMonday) > 6). If it is, it advances to the next date (Monday).
It continues filling dates across the sheets with the specified increment, excluding Sundays.
Regards
ExcelDemy