In this article, I’ve discussed 4 suitable examples to save an Excel file as a PDF using the Macro with the date in the filename.
How to Save as PDF with Date in Filename: 4 Examples
1. Save as PDF with Date in Filename in Current Directory
The code used in this method can save the current workbook as a pdf with the date and time in the filename. The pdf file will be saved in the same folder where your Excel file is located.
Anyways, here are the steps to follow:
❶ Press ALT + F11 to open the VBA Editor.
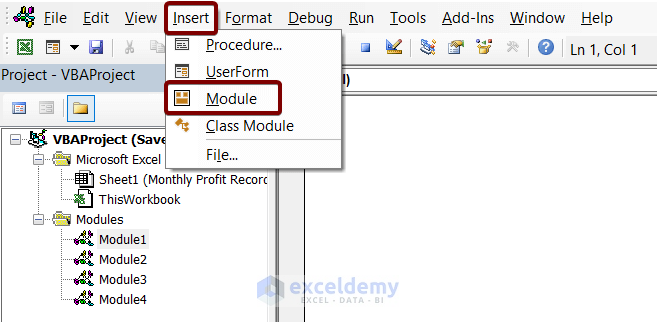
❷ Then go to Insert ➤ Module.
❸ Insert and save the following code in the VBA Editor.
Sub Save_PDF_Current_Folder()

    Dim xName As String

    xName = ThisWorkbook.Path & "\" & ActiveSheet.Name & " " & _
        Format(Now(), "hh.mm mm.dd.yy") & ".pdf"
    ActiveSheet.ExportAsFixedFormat Type:=xlTypePDF, FileName:=xName, _
        Quality:=xlQualityStandard, IncludeDocProperties:=True, _
        IgnorePrintAreas:=False, OpenAfterPublish:=False

End Sub
Breakdown of the Code
- Here, I’ve declared a variable
- Then I used the path property to save the pdf file in the current directory.
- I’ve used the Format and Now functions to specify the Current Date with the format of the name of the pdf file.
- Finally, I used the ExportAsFixedFormat property to export the current worksheet as a pdf with the date in the filename.
❹ Now press the F5 button to run the VBA code.
After running the code, you will see your active worksheet is saved as a pdf with the date and time in the filename.

Read More: Excel Macro to Save as PDF
2. Save as PDF in Desktop Folder with Date and Time in Filename
The following code can save the active worksheet as a pdf with the date and time in the filename. But one thing that makes this code different from the previous one is that it saves the Excel file in the Desktop folder instead of the current folder.
Now follow the steps below:
❶ Press ALT + F11 to open the b
❷ Then go to Insert ➤ Module.
❸ Insert the following code in the VBA Editor and save it.
Sub Save_As_PDF_Desktop_Folder()

    Dim xDesktop As String

    xDesktop = CreateObject("WScript.Shell").SpecialFolders("Desktop")
    ThisWorkbook.ExportAsFixedFormat Type:=xlTypePDF, _
        FileName:=xDesktop & "\Monthly Profit Record " & Format(Date, "hh.mm dd.mm.yyyy") & ".pdf"

End Sub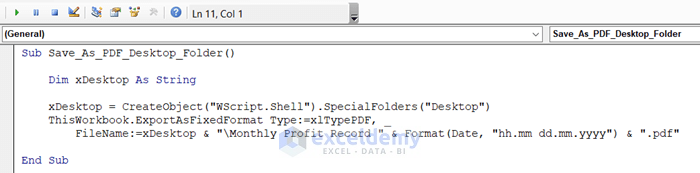
Breakdown of the Code
- Here, I’ve declared a variable
- Then I used the SpcialFolders property to save the pdf file on the Desktop
- After that, I used the ExportAsFixedFormat property to export the current worksheet as a pdf with the date in the filename.
- I used the Format function and used the format of my choice to give the date structure.
❹ Press the F5 key to run the VBA code.
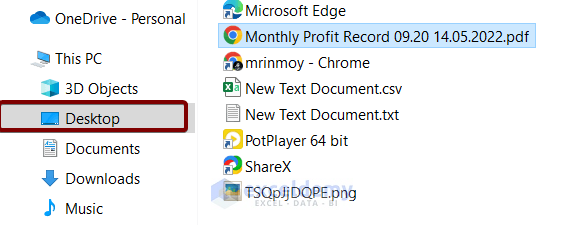
This will automatically save the active worksheet as a pdf with the date in the filename in the Desktop folder.
Read More: Excel Macro to Save as PDF with Filename from Cell Value
3. Save as PDF with Date in Filename with Prompt Window
This code when it runs opens a prompt window. The window allows you to set a directory to save your active worksheet with the date and time in the filename.
To use the code,
❶ Press ALT + F11 to open the VBA Editor.
❷ Then go to Insert ➤ Module.
❸ Insert the following code in the VBA Editor and save it.
Sub Save_PDF_with_Prompt()

Dim xWs As Worksheet
Dim xWb As Workbook
Dim xTime As String
Dim xName As String
Dim xPath As String
Dim xFile As String
Dim yPathFile As String
Dim zFile As Variant

On Error GoTo errHandler

Set xWb = ActiveWorkbook
Set xWs = ActiveSheet
xTime = Format(Now(), "mm.dd.yyyy\_hh.mm")

xPath = xWb.Path
If xPath = "" Then
  xPath = Application.DefaultFilePath
End If
xPath = xPath & "\"

xName = Replace(xWs.Name, " ", "")
xName = Replace(xName, ".", "_")

xFile = xName & "_" & xTime & ".pdf"
yPathFile = xPath & xFile

zFile = Application.GetSaveAsFilename _
    (InitialFileName:=yPathFile, _
        FileFilter:="PDF Format (*.pdf), *.pdf", _
        Title:="Save as a PDF file")

If zFile <> "False" Then
    xWs.ExportAsFixedFormat _
        Type:=xlTypePDF, _
        FileName:=zFile, _
        Quality:=xlQualityStandard, _
        IncludeDocProperties:=True, _
        IgnorePrintAreas:=False, _
        OpenAfterPublish:=False
    MsgBox "Successfully saved as a pdf: " _
      & vbCrLf _
      & zFile
End If

exitHandler:
    Exit Sub
errHandler:
    MsgBox "Failed to save"
    Resume exitHandler

End Sub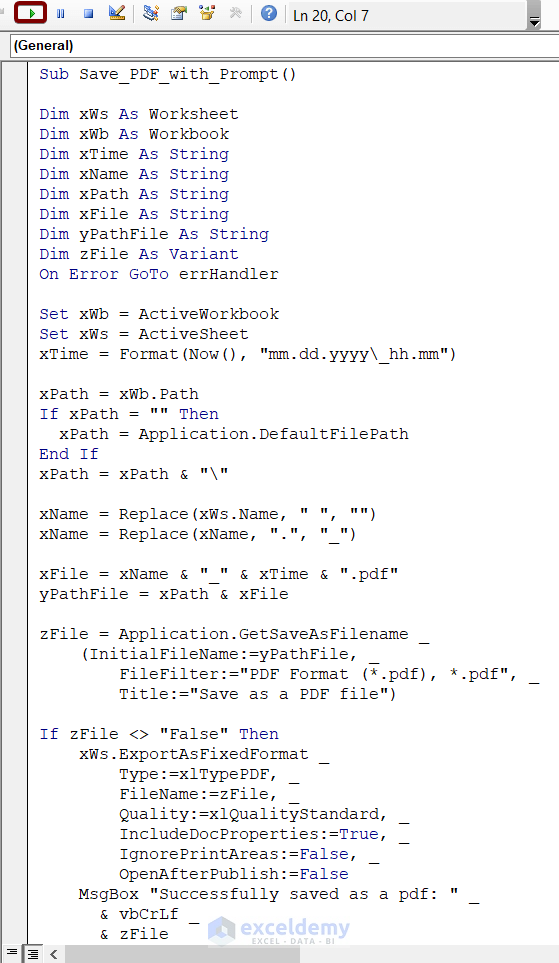
Breakdown of the Code
- Here, I’ve declared 8 variables
- Then I used the Format and Now functions to format the current date structure to have it in Filename.
- After that, I used the DefaultFilePath property inside the IF statement to save the pdf file in the same folder as the Excel file’s current location.
- I used the GetSaveAsFilename property to save the current worksheet in a prompt window. The prompt window has the title “Save as a PDF file”.
- Next, I used the ExportAsFixedFormat property to export the current worksheet as a pdf with the date in the filename.
- Later, I used a MsgBox so that If the export is successful then a pop-up MsgBox appears with the message “Successfully saved as a pdf”.
- Finally, I used errHandler to handle if any errors occur with a pop-up MsgBox showing the message “Failed to save”.
❹ To run the code, press the F5 button.
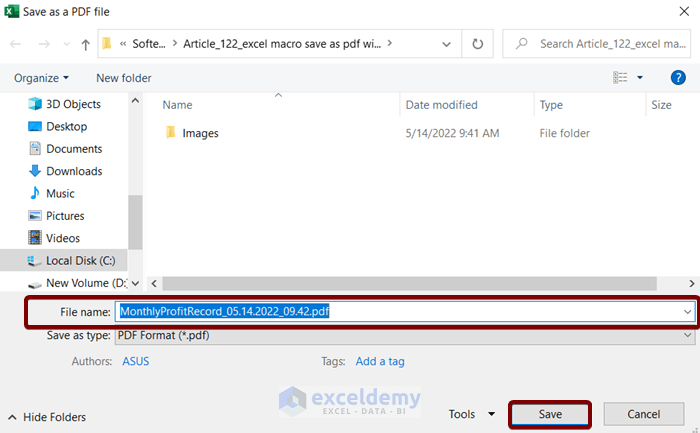
After that, a prompt window will appear.
This will allow you to choose a folder of your own choice.
The code automatically generates a filename with the date and time and saves the active worksheet as a pdf file.
❺ Hit the Save button.
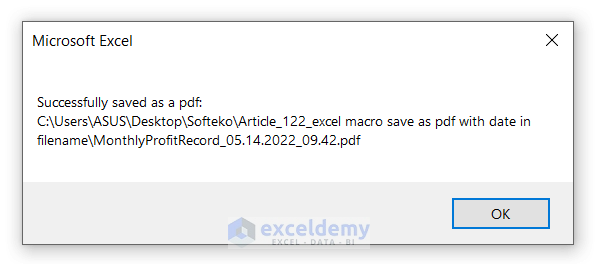
Finally, a pop-up Message Box will appear with a message that “Successfully saved as a pdf.”
Read More: Excel VBA: Choose Location and Save as PDF
4. Save as PDF and Insert Date in Filename
In this code, you have to insert a directory to save the pdf file. This code will automatically insert the date in the filename and save the active worksheet as a pdf file.
Anyways, here are the steps to follow:
❶ Press ALT + F11 to open the VBA Editor.
❷ Then go to Insert ➤ Module.
❸ Insert and save the following code in the VBA Editor.
Sub Save_As_PDF()

ActiveWorkbook.SaveAs ("C:\Users\ASUS\Desktop\Monthly_Profit_Record " & Format(Now(), "MM-DD-YYYY") & ".pdf")

End Sub
Breakdown of the Code
- Here I used the SaveAs property to export the active worksheet as a pdf with the date in the file name.
- Then I used the Format and the Now functions to format the date
❹ Now hit the F5 button to run the code.
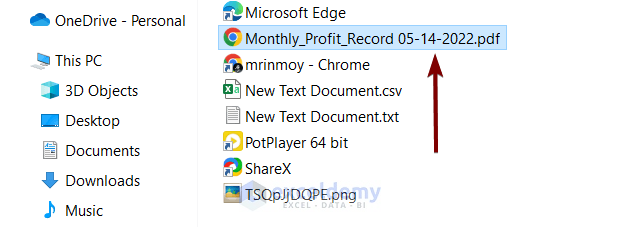
The code will instantly save the active worksheet as a pdf file with the date in the filename in your specified directory.
Download Practice Workbook
You can download the Excel file from the following link and practice along with it.
Conclusion
We have discussed 4 examples to save as a pdf with the date in the filename using macro in Excel. You are recommended to download the practice workbook attached with this article and practice all the methods. And don’t hesitate to ask any questions in the comment section below. We will try to respond to all the relevant queries asap.

