Suppose you have the following dataset:

Method 1 – Using the Sort and Filter Feature
Steps:
- Create a new column and insert 1 and 2 sequentially in the first two cells of the column.
- Use the Autofill Tool to generate a sequence to the rest of the cells in the column (1, 2, 3, 4, 5, 6, …).
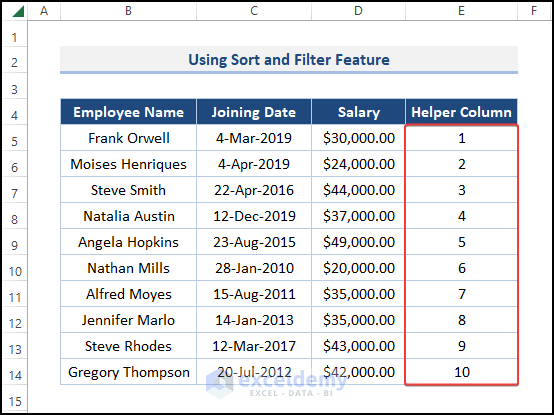
- Insert the value of n in the next cell of the column (3 in this example), then double that value and put that number in the cell below it (6).
- Use the Autofill Tool to fill out the sequence for a few more cells in the column.
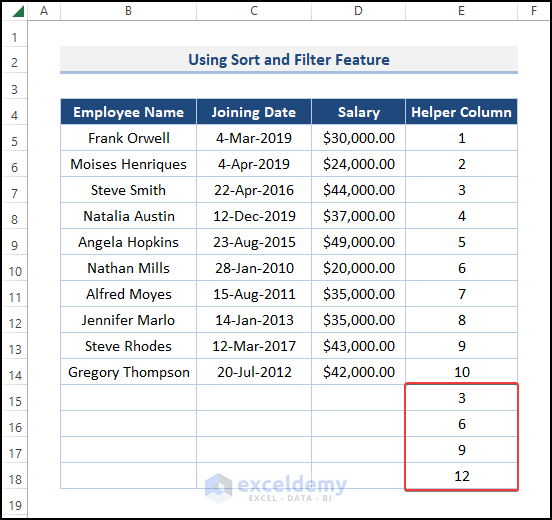
- Select the whole data set (including the “Helper Column” and the extended portion down the end).
- Navigate to the Home ribbon and choose Sort & Filter from the Editing group.
- Pick the Custom Sort tool.
![]()
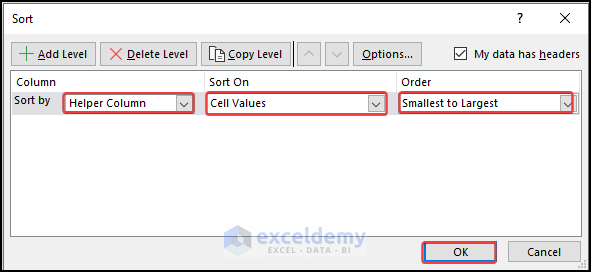
- The Sort dialog wizard pops up.
- For Sort by option, select the new column (Helper Column). From the Sort on option, pick Cell Values, and from the Order option, select Smallest to Largest.
- Hit OK.
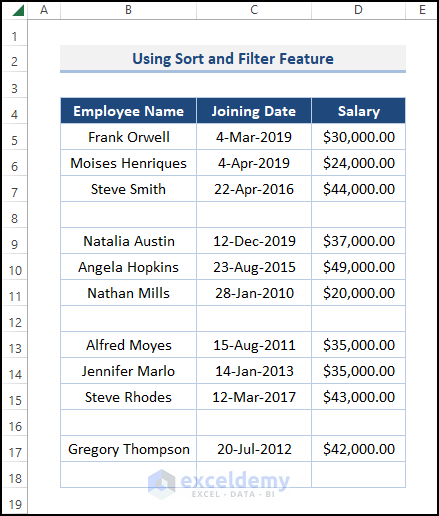
Blank rows should now be inserted after every nth row (3rd in this example).
![]()
Delete the new column (Helper Column) if necessary.
Read More: Insert New Row in Excel with Shortcut
Method 2 – Incorporating VBA Macros
Steps:
- Navigate to the Developer tab then choose Visual Basic.
- A dialog box appears. Select the Insert tab then Module.
- Choose Module1.
![]()
- In the General box, enter the following code:
Sub Insert_Blank_Rows()
Dim rng As Range
Dim CountRow As Integer
Dim i As Integer
Dim n As Integer
n = Int(InputBox("Enter the Value of n: "))
k = Int(InputBox("Enter the Number of Blank Rows: "))
Set rng = Selection
CountRow = rng.EntireRow.Count
For i = 1 To Int(CountRow / n)
    For j = 0 To k - 1
        ActiveCell.Offset(n + j, 0).EntireRow.Insert
    Next j
    ActiveCell.Offset(n + k, 0).Select
Next
End Sub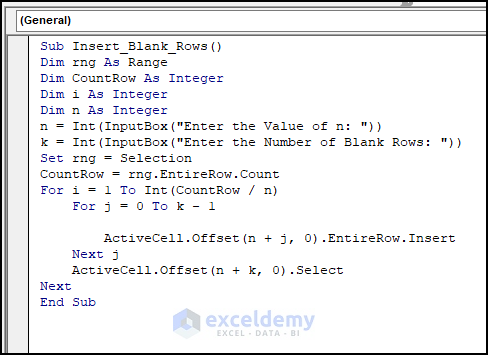
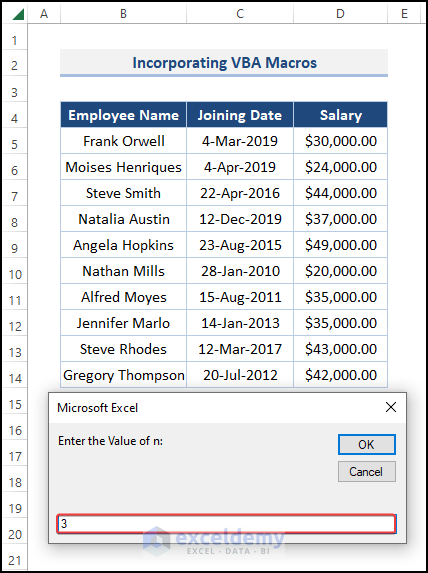
- Select the whole data set, minus the Column Headers.
![]()
- Run this Macro.
- An InputBox appears. Enter the value of n (3).
- Click OK.
- Another InputBox appears asking for the number of blank rows (2).
- Click OK.
![]()
There should now be the appropriate number of blank rows in the correct intervals.
![]()
Read More: How to Insert Row Below in Excel
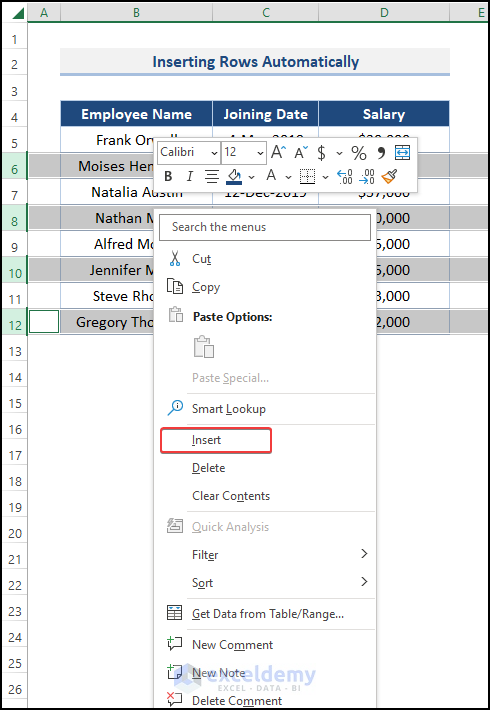
Method 3 – Insert Blank Rows Automatically in Excel
Steps:
- Select one specific row of data.
- Hold the CTRL key and click on the other rows below where the empty rows should be.
![]()
- Let go of the CTRL key and right-click on any selected cell.
- A Context Menu appears. Choose the Insert command.
One row before the selected rows should have been added automatically.
![]()
Method 4 – Insert Multiple Blank Rows Between Data in Excel
Steps:
- Select the groups of rows to add blank rows above by holding the CTRL key and clicking on the cells.
- Let go of the CTRL key and press the CTRL, SHIFT, and + (plus) keys together.
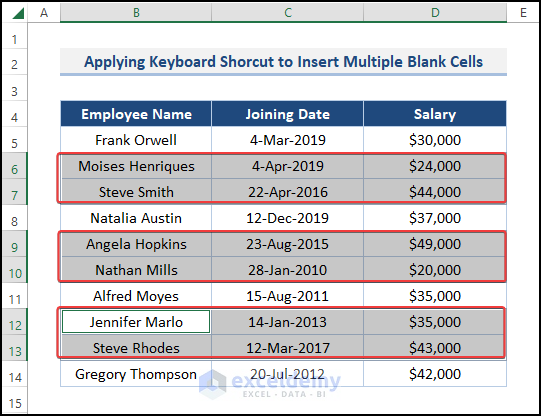
- An Insert dialog wizard pops up. Choose Entire row and hit OK.
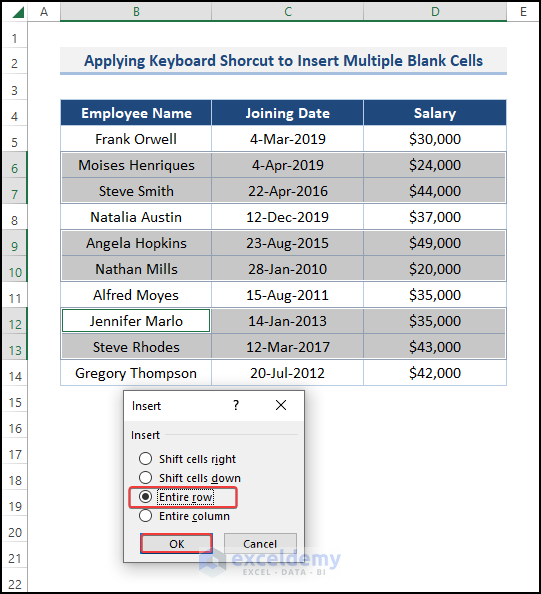
Multiple blank rows should be added before the selected rows.
![]()
Read More: Excel Formula to Insert Rows Between Data
Download Practice Workbook
Download the following practice workbook. It will help you to realize the topic more clearly.
Related Articles
- How to Insert a Total Row in Excel
- Cannot Insert Row in Excel
- Excel Fix: Insert Row Option Greyed Out in Excel
- How to Insert Multiple Rows After Every Other Row in Excel
<< Go Back to Insert Rows | Rows in Excel | Learn Excel
Get FREE Advanced Excel Exercises with Solutions!

Hello Rifat, Thank you very much. I enjoyed your VBA code.
Would you let me fix a couple of bugs by adding 2 lines at the beginning:
When you come from copying and left active the clipboard, it makes a mess. Solution:
Application.CutCopyMode = False
If you are selecting a range but for some reason (you had pressed Enter or Tab) your active cell is not in the first row. The macro don’t execute over the lines previous to active cell:
Selection(1).Activate ‘Activate the first cell in the selected range so it starts from the first row in selection
Don’t need to post this to the public. please, would you send me an email when you find a spare minute
Hello Jorge.F,
Thank you so much for your suggestion. I think you might want the following code incorporating your suggested lines. Moreover, I tried to select the range through an input box which may help you select the range.