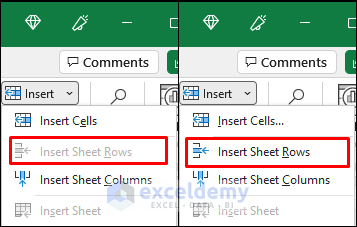
The following picture highlights the problem and the solution.
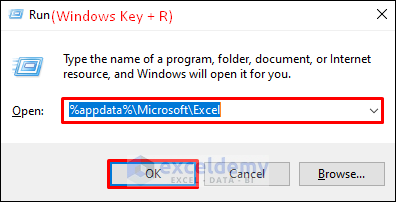
Solution 1 – Press Windows+R and Change the Microsoft Excel AppData
- Close all open Excel files.
- Press Win + R.
- Enter %appdata%\Microsoft\Excel in Open.
- Click OK.
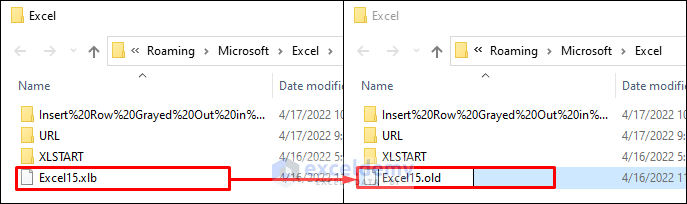
- Change the .xlb file extension to .old
The Insert Row option is working.
Read More: Cannot Insert Row in Excel
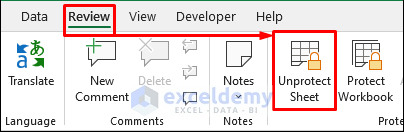
Solution 2 – Unprotect the Worksheet
- Select Review >> Unprotect Sheet to unprotect the worksheet.
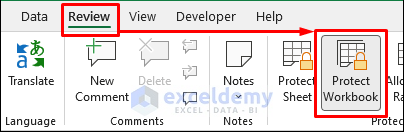
Solution 3 – Unprotect the Workbook
- Select Review >> Protect Workbook to unprotect the workbook.
- Enter the password.
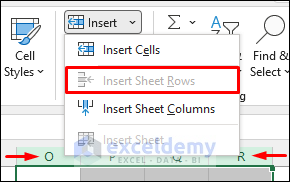
Solution 4. Unselect Columns to Re-enable the Insert Row Option
- Unselect the columns.
- Unselect the rows to insert or delete columns.
Solution 5. Enable a Grayed out Insert Row Option by Exiting Cell Editing
- Press Esc to exit cell editing and try to use the insert row command.
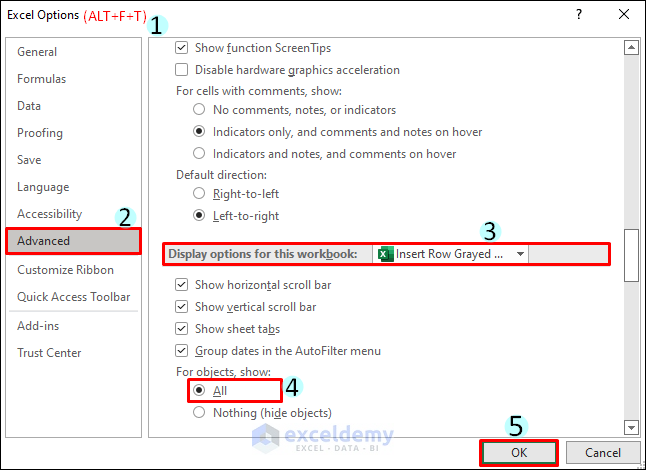
Solution 6. Change the Display Options
- Press ALT+F+T to open Excel Options.
- Go to Advanced.
- In Display options for this workbook, select the worksheet.
- In For Objects,show, choose All.
- Click Ok.
Read More: Excel Shortcuts to Insert New Row
Solution 7 – Fix the Disabled Insert Row Option in a Shared Workbook
- Select Review >> Share Workbook. Uncheck Allow changes by more than one user at the same time and click OK.
Solution 8 – Remove Unnecessary Add-Ins
- Go to File >> Options >> Add-Ins. Remove the Add-Ins one by one to see. Add them again.
Solution 9 – Fix Grayed out Insert Row Option with an Excel VBA
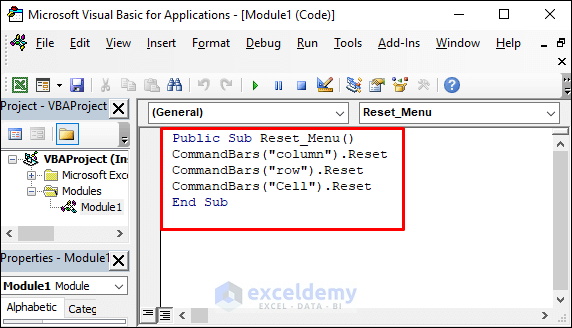
- Press ALT+F11 to open the VBA window.
- Select Insert >> Module.
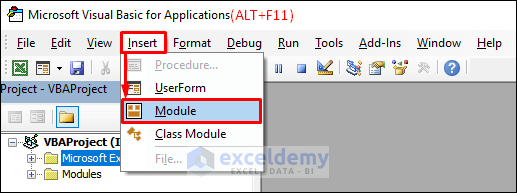
- Copy the following code.
Public Sub Reset_Menu()
CommandBars("column").Reset
CommandBars("row").Reset
CommandBars("Cell").Reset
End Sub- Paste the code into the module. Press F5 to run the code.
Things to Remember
- You can try deleting the following registry from the registry editor to reset the commands >> HKEY_CURRENT_USER\Software\Microsoft\Office|16.0\Excel\Options.
- Sometimes restarting your PC or updating your Office automatically fixes the bugs.
Download Practice Workbook
Download the practice workbook here.
Related Articles
- How to Insert a Total Row in Excel
- Insert Multiple Blank Rows in Excel
- How to Insert Multiple Rows in Excel
- Excel Formula to Insert Rows Between Data
- How to Insert Row Below in Excel
- How to Insert Rows in Excel Automatically
- Insert Blank Row After Every Nth Row in Excel
- Insert Multiple Rows After Every Other Row in Excel
<< Go Back to Insert Rows | Rows in Excel | Learn Excel
Get FREE Advanced Excel Exercises with Solutions!

You can also try to delete rows that you are not using.
In my case the table for some reason filled up all 100.000 entries of excel and there was no space for a new one anymore.
Just delete some rows and you will be able to add new ones.
Good luck!
Thank you very much for your suggestion. Good to know that.
Hopefully, this will help someone.
And Good Luck to you too!
Thank you Shamim! The 1. Press Windows Key+R and Change Microsoft Excel AppData helped me!
Hi GIRIDAR N,
Thanks for your appreciation and we are glad to help you. For any types of Excel-related problems kindly reach out to us.
Regards
ExcelDemy
thank u very much
Dear Raja,
You are most welcome.
Regards
ExcelDemy
Shamima thanks a lot. This solved my problem with option 1.
Dear S Roy,
You are most welcome.
Regards
ExcelDemy