When working with large Excel worksheets, cleaning unnecessary data is essential. Deleting specific rows and shifting the remaining ones up to close the gap left by removed rows can be a time-consuming manual process. Fortunately, Excel VBA offers efficient ways to automate this task.
Activate the Developer Tab and Launch the Visual Basic Editor
- To execute VBA code, activate the Developer tab in the Ribbon (if you haven’t done so already).
- Once the Developer tab is visible, click on it and select Visual Basic under the Code section.
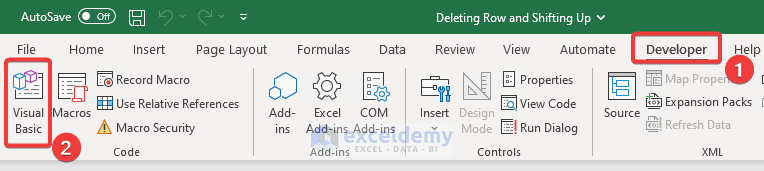
- Alternatively, you can press ALT+F11 to directly open the VBA window.
Inserting Code in the Visual Basic Editor
- In the Visual Basic Editor window, click the Insert tab and select Module.
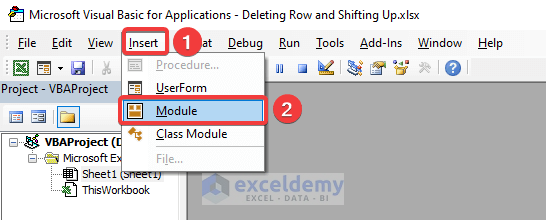
- A Module window will appear next to the Project – VBAProject section.
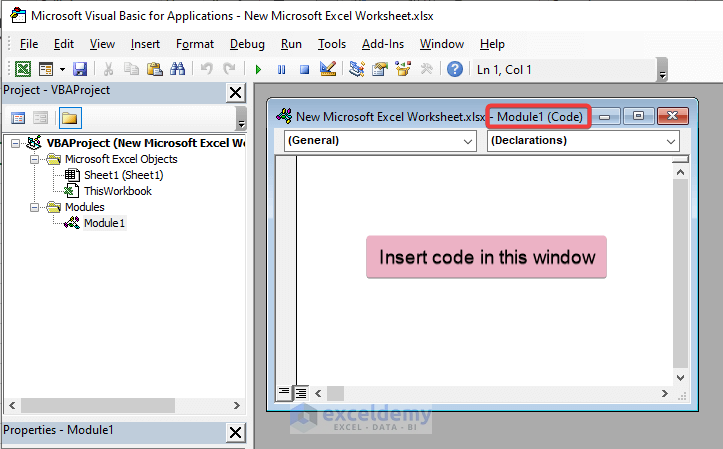
- Insert the VBA code you want to execute into this Module.
- You can use multiple Modules for different Macros or organize your Macros within the same Module.
Example 1 – Deleting Specific Rows and Shift Up Cells
- When you need to delete specific rows from a worksheet, mention the row number or range of rows in your VBA code.
- Let’s look at some examples:
1.1. Removing Single Row
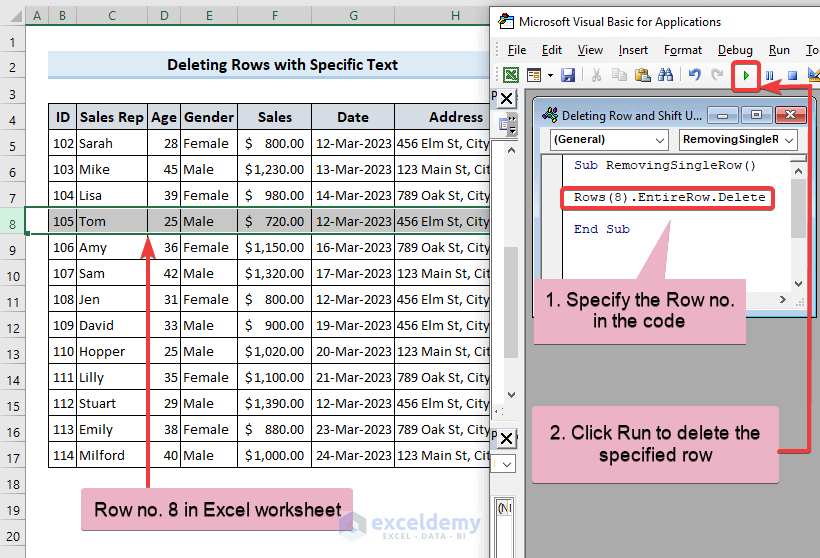
In the above picture, we have a dataset of sales information displaying different information about some sales representatives like their age, gender, sale amount, date of sale, and address.
In Row no. 8 of the Excel sheet, we can see it’s displaying information about Tom. If we want to delete the 8th row, we have to specify it within the VBA code.
The code will be as follows: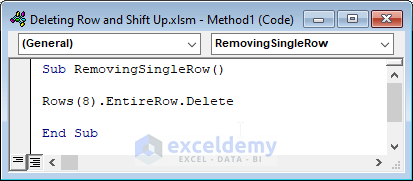 Code:
Code:
Sub RemovingSingleRow()
Rows(8).EntireRow.Delete
End Sub- This code removes the entire 8th row from the Excel sheet.
- To execute the code, click Run in the toolbar options of the VBA window.
- Alternatively, press ALT+F8 to open the macro window, select your Macro, and click Run.
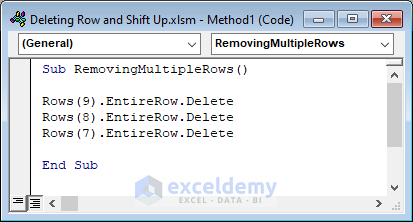
1.2. Removing Multiple Rows
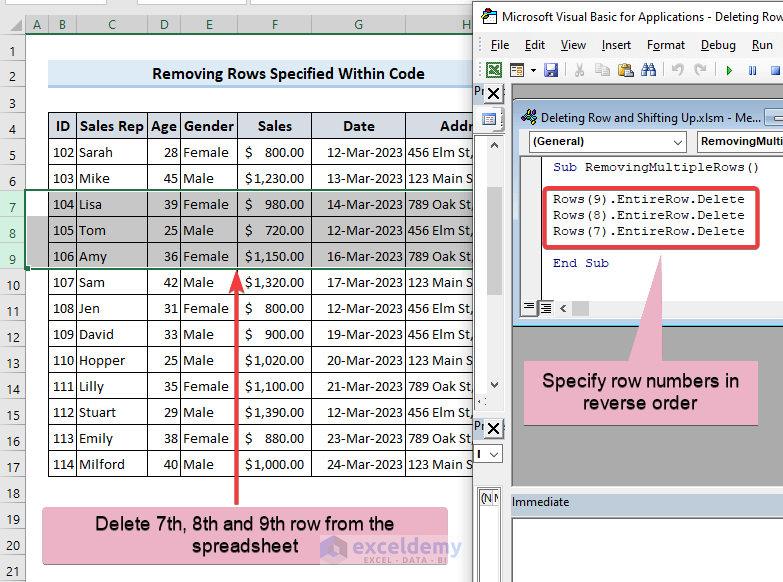
In case of deleting multiple rows, the procedure is the same as for a single row. Specify the row numbers in the code, this will delete the specified rows.
 Code:
Code:
Sub RemovingMultipleRows()
Rows(9).EntireRow.Delete
Rows(8).EntireRow.Delete
Rows(7).EntireRow.Delete
End Sub- Specify the row numbers in reverse order to avoid issues caused by shifting rows.
- Running this code will delete the specified rows from the worksheet.
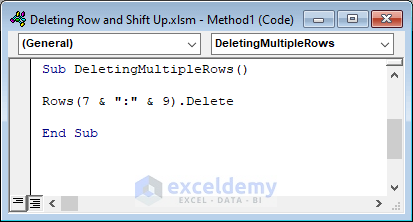
1.3. Deleting a Range of Rows
To delete a range of rows, specify the range of multiple rows as shown in the image below.
 Code:
Code:
Sub DeletingMultipleRows()
Rows(7 & ":" & 9).Delete
End Sub- This code detects rows 7, 8, and 9 and deletes them.
Read More: Excel VBA to Delete Entire Row
Example 2 – Deleting Rows and Shifting Up Cells in a Range of a Worksheet
2.1. Deleting Rows from the Selection Range
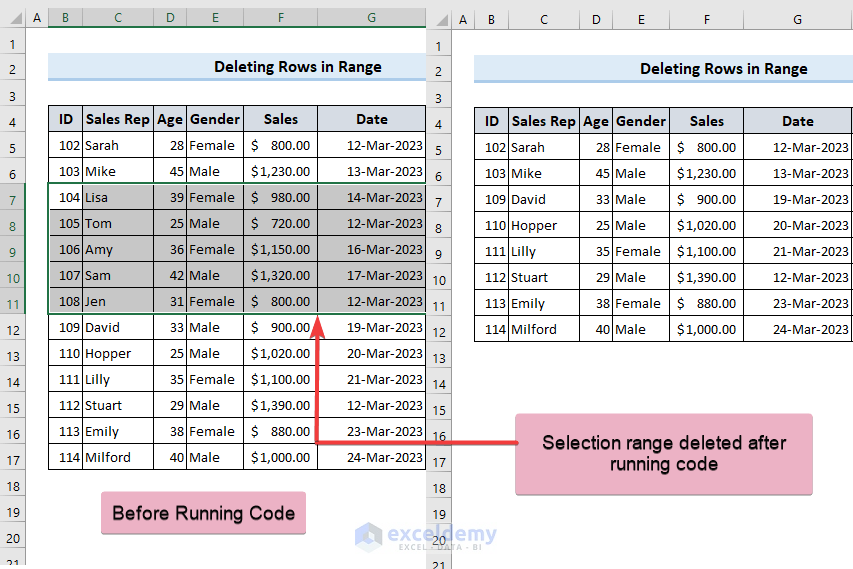
- Sometimes, you need to remove random rows from a worksheet range. The best approach is to select the data range you want to delete and then execute a macro.
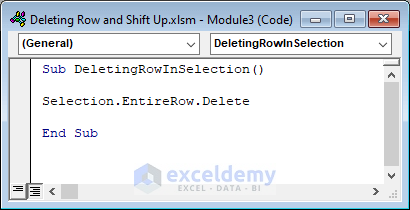
- The following VBA code detects the entire row of the selection range and removes those rows:
 Code:
Code:
Sub DeletingRowInSelection()
Selection.EntireRow.Delete
End Sub
2.2. Deleting Rows Based on a Specified Range
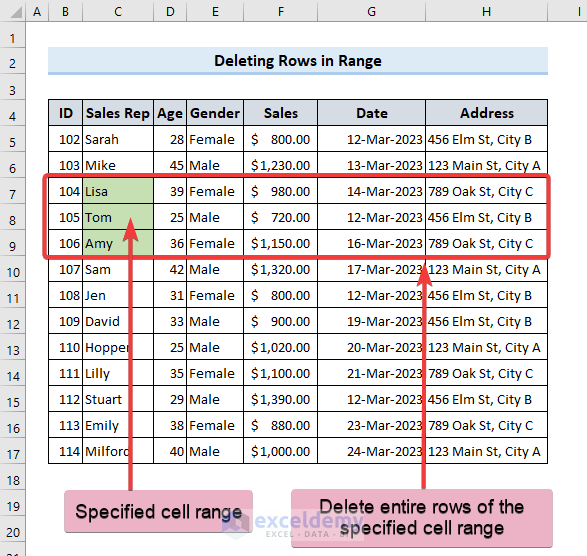
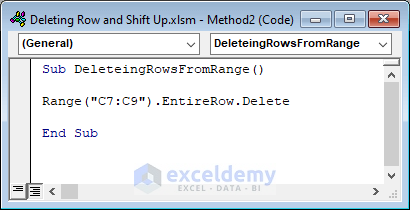
Alternatively, you can mention the range directly in the code. For instance, if you want to delete entire rows containing the cell range C7:C9, enter the following VBA code:
 Code:
Code:
Sub DeleteingRowsFromRange()
Range("C7:C9").EntireRow.Delete
End Sub- Executing this code will remove the entire rows that include the specified cell range.
Read More: How to Delete Rows in a Range with VBA in Excel?
Example 3 – Deleting Alternate Rows or Specific Sequential Rows
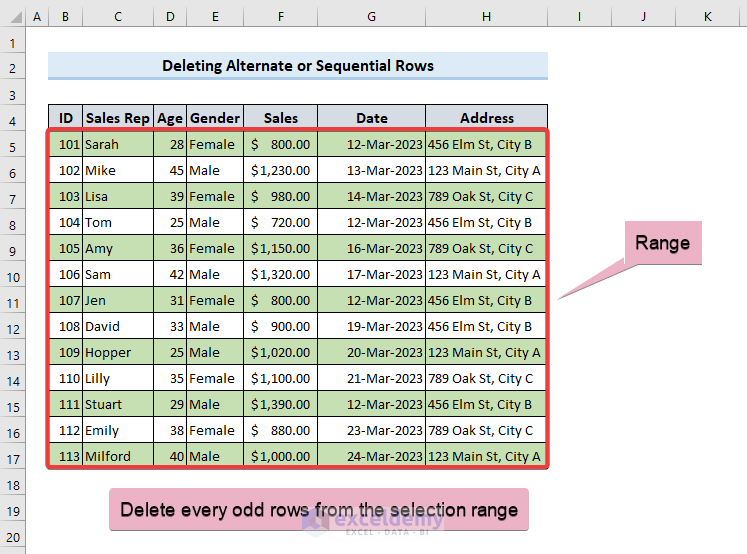
Suppose you want to delete every other row within a selected range. Here’s how you can achieve that using VBA:
 Code:
Code:
Sub Deleting_Sequential_Rows()
Dim Rng As Range
Dim i As Long
Set Rng = Selection
For i = Rng.Rows.Count To 1 Step -2
Rng.Rows(i).EntireRow.Delete
Next i
End Sub- This code initiates a loop that starts from the last row of the selected range and proceeds to the first row, deleting every other row. The loop continues until all targeted rows are removed.
Read More: Excel VBA: Delete Row on Another Sheet
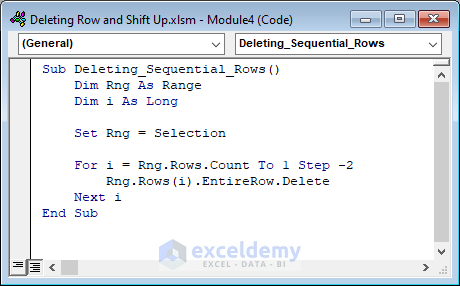
Example 4 – Removing Rows and Shifting Up Cells with Blank Cells

If your Excel spreadsheet contains unnecessary rows with blank cells, you can enter the following VBA code to identify and delete them:
 Code:
Code:
Sub RemovingBlankRows()
Set Rng = Range("B5:H17")
Rng.SpecialCells(xlCellTypeBlanks).EntireRow.Delete
End Sub- Running this code will find the blank cells within the specified range and remove the entire rows containing those cells.
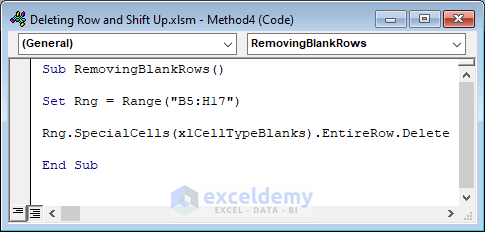
Example 5 – Deleting Rows with Specific Text or Value and Shifting Up
5.1. Using a For Loop Nested with an If Statement
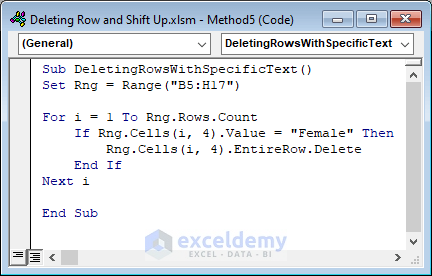
When you need to delete specific rows from your worksheet containing a particular text, VBA provides a solution. Consider our dataset, which contains information about male and female sales representatives. Suppose we want to delete all information related to Female reps. In that case, we need to identify and remove rows containing the word Female.
Here’s the VBA code to delete rows with specific text:
 Code:
Code:
Sub DeletingRowsWithSpecificText()
Set Rng = Range("B5:H17")
For i = 1 To Rng.Rows.Count
If Rng.Cells(i, 4).Value = "Female" Then
Rng.Cells(i, 4).EntireRow.Delete
End If
Next i
End Sub
Code Breakdown
- The code initiates a “For loop” that iterates from the first row to the last row of the defined range.
- The nested “If loop” checks whether the cell in the current row and column 4 (representing the gender information) matches the word “Female.” If it does, the entire row is deleted, and the loop moves to the next row. This process continues until all relevant rows are removed.
5.2. Filtering with a Condition
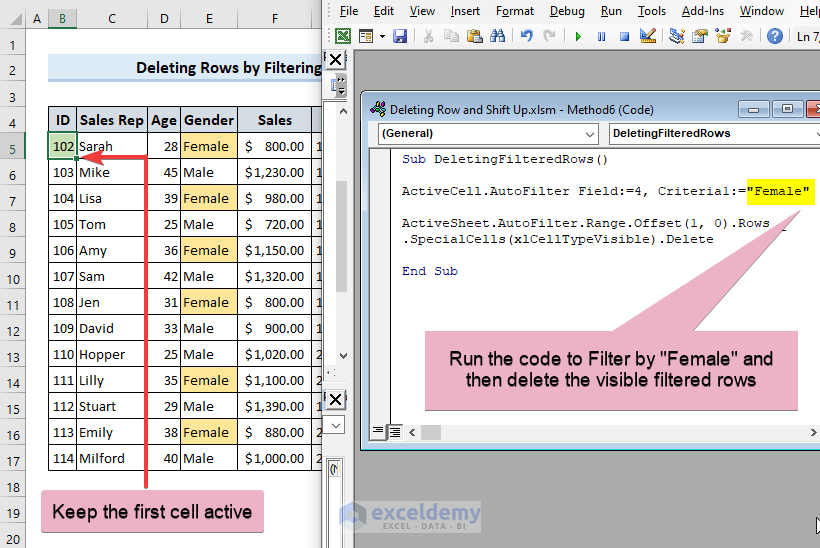
This approach is somewhat similar to Deleting rows with specific text. In our dataset, we’ll filter based on Female, similar to the previous example. After filtering, only information about female employees will be visible, and those visible rows will be deleted using a VBA macro. One important note: Keep the first cell of the data range active, as specified in the code.
Here’s the code for filtering and deleting rows:
 Code:
Code:
Sub DeletingFilteredRows()
ActiveCell.AutoFilter Field:=4, Criteria1:="Female"
ActiveSheet.AutoFilter.Range.Offset(1, 0).Rows.SpecialCells(xlCellTypeVisible).Delete
End Sub
Code Breakdown
- ActiveCell.AutoFilter Field:=4, Criteria1:=”Female” turns on the AutoFilter feature for the currently active cell. It filters the data in the 4th column (gender column) to show only rows where the value is “Female.”
- ActiveSheet.AutoFilter.Range.Offset(1, 0).Rows.SpecialCells(xlCellTypeVisible).Delete deletes all visible rows that match the filter criteria. The Offset(1,0) ensures we start with the second row (to avoid deleting the header row), and the .Rows.SpecialCells(xlCellTypeVisible) selects only visible rows. The .Delete method removes those rows.
Example 6 – Removing the nth Row and Shifting Up Cells Automatically
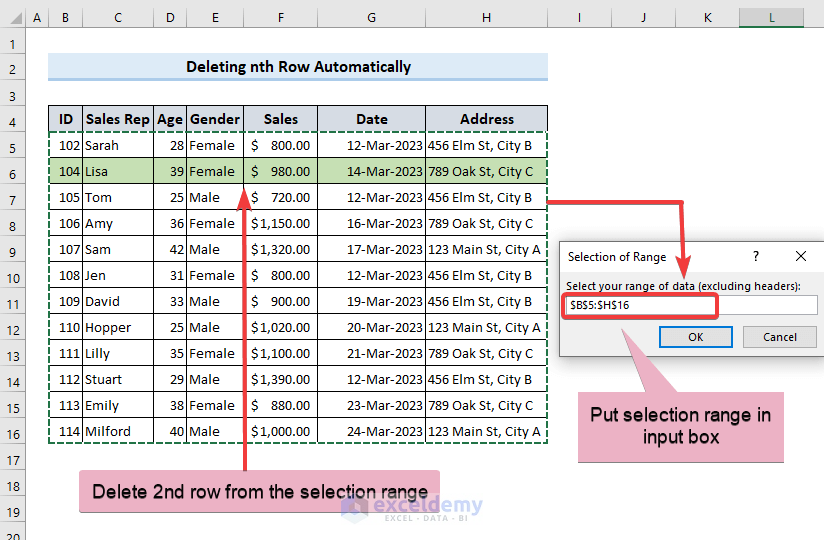
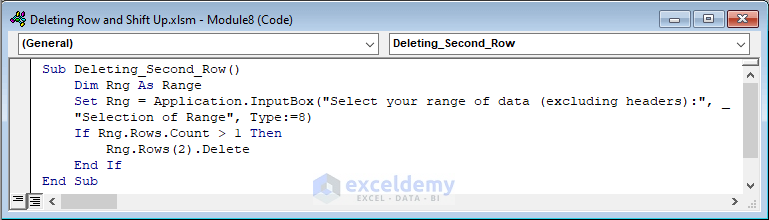
This method automatically deletes the nth row specified in the code from a selection range. An InputBox is used to select the range. For instance, if we want to delete the 2nd row from the selection range, we execute the following code:
Code:
Sub Delete_Second_Row()
Dim Rng As Range
Set Rng = Application.InputBox("Select your range of data (excluding headers):", "Selection of Range", Type:=8)
If Rng.Rows.Count > 1 Then
Rng.Rows(2).Delete
End If
End Sub
Code Explanation
Set Rng = Application.InputBox(“Select your range of data (excluding headers):”, “Selection of Range”, Type:=8) prompts the user to select a range of cells (excluding headers) using an input box. The selected range is assigned to the Rng variable.
- The code checks if the selected range has more than one row(If Rng.Rows.Count > 1). If so, it deletes the 2nd row from the range.
/wpsm_box]
The Type parameter can be set to one of the following values:
| Type:=1 | displays the “Range” input box |
| Type:=2 | displays the “Number” input box |
| Type:=4 | displays the “Text” input box |
| Type:=8 | displays the “Boolean” input box |
| Type:=16 | displays the “Formula” input box |
- The code will delete the nth row if the selection range has more than (n-1) row. So, if you want to delete the 2nd row, your selection range must include more than 1 row.
Example 7 – Deleting Rows Based on Date and Shifting Up Remaining Cells
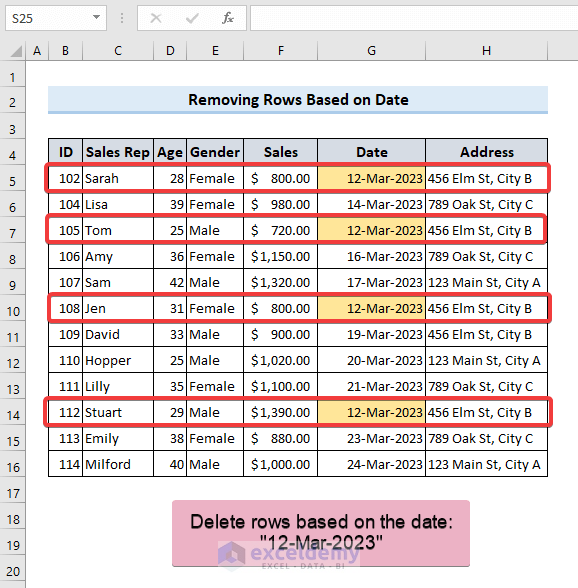
Suppose our dataset contains repeated entries for the date “12-Mar-2023.” We want to remove rows with this date. Here’s how we can achieve that using VBA:
 Code:
Code:
Sub DeletingRowsBasedOnDate()
Dim wks As Worksheet
Dim EndMostRow As Long
Dim i As Long
Dim dateToCheck As Date
wks = ActiveSheet
EndMostRow = wks.Cells(wks.Rows.Count, "G").End(xlUp).Row
dateToCheck = DateValue("12-Mar-2023")
For i = 2 To EndMostRow
If wks.Cells(i, "G").Value = dateToCheck Then
wks.Rows(i).Delete
End If
Next i
End Sub
Code Breakdown
EndMostRow = wks.Cells(wks.Rows.Count, “G”).End(xlUp).Row determines the last non-empty row in column G of the active worksheet.
- The loop checks whether the value in column G of each row equals the specified date. If so, it deletes the entire row.
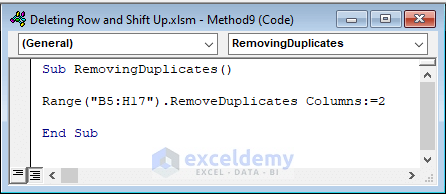
Example 8 – Removing Rows with Duplicate Values and Shifting Up Cells
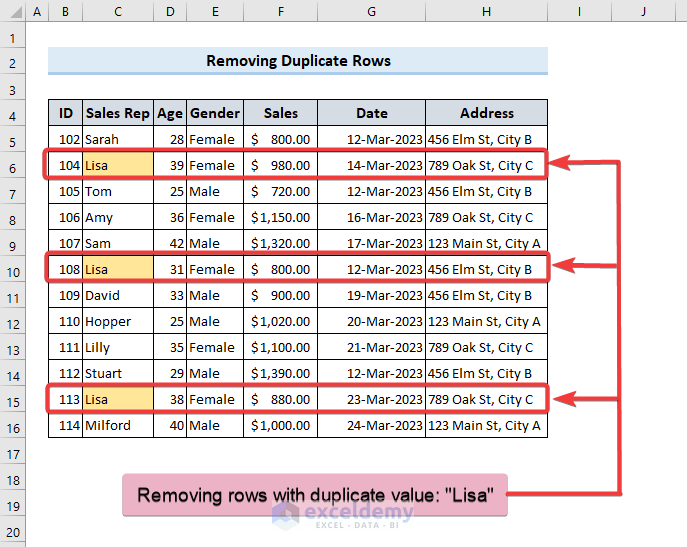
To eliminate duplicate values within a specified range, enter the following code:
 Code:
Code:
Sub RemovingDuplicates()
Range("B5:H17").RemoveDuplicates Columns:=2
End Sub- This code identifies duplicates based on the 2nd column (from the range “B5:H17”) and removes the corresponding rows.
Example 9 – Deleting the Last Row Using VBA
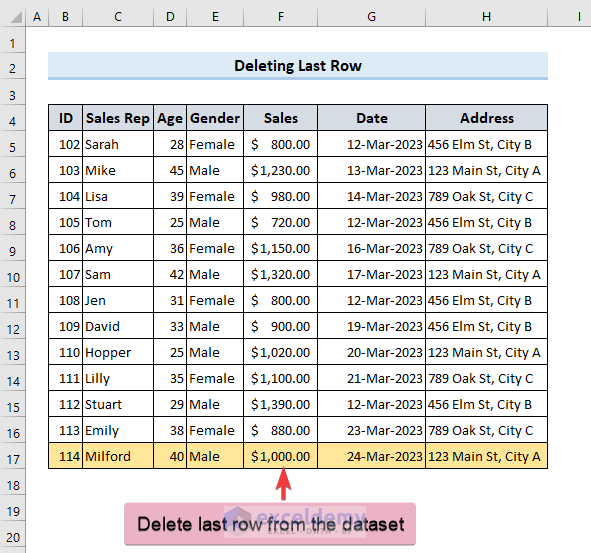
To delete the last row in a dataset, enter this code:
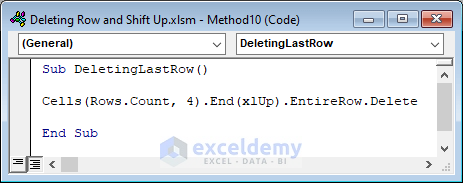 Code:
Code:
Sub DeletingLastRow()
Cells(Rows.Count, 4).End(xlUp).EntireRow.Delete
End Sub
Here, Cells(Rows.Count, 4).End(xlUp) refers to the last cell in column 4 (D). The code deletes the last row in that column and shifts the remaining cells up.
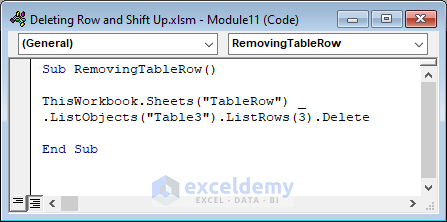
Example 10 – Removing Table Rows and Shifting Up Cells Using VBA
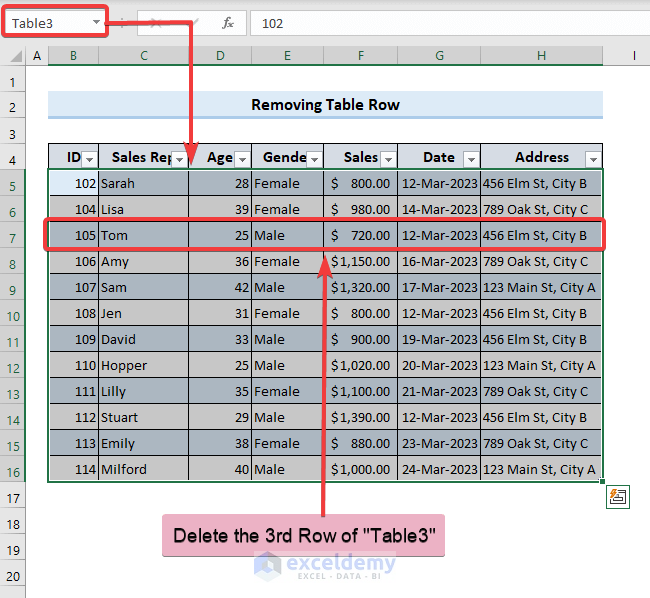
Suppose you want to delete a specific row from a table in an Excel worksheet. If you’ve created a table and want to delete the 3rd row, enter this code:
Code:
Sub RemovingTableRow()
ThisWorkbook.Sheets("Sheet1").ListObjects("Table1").ListRows(3).Delete
End Sub
Read More: Excel VBA to Delete Table Row
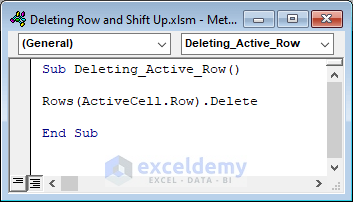
Example 11 – Deleting the Active Row in the Worksheet Using Excel VBA

This code snippet deletes the row containing the active cell. To use it, simply place your cursor in any cell of the row you want to delete and execute the code:
 Code:
Code:
Sub Deleting_Active_Row()
Rows(ActiveCell.Row).Delete
End Sub
How to Delete Columns with Excel VBA
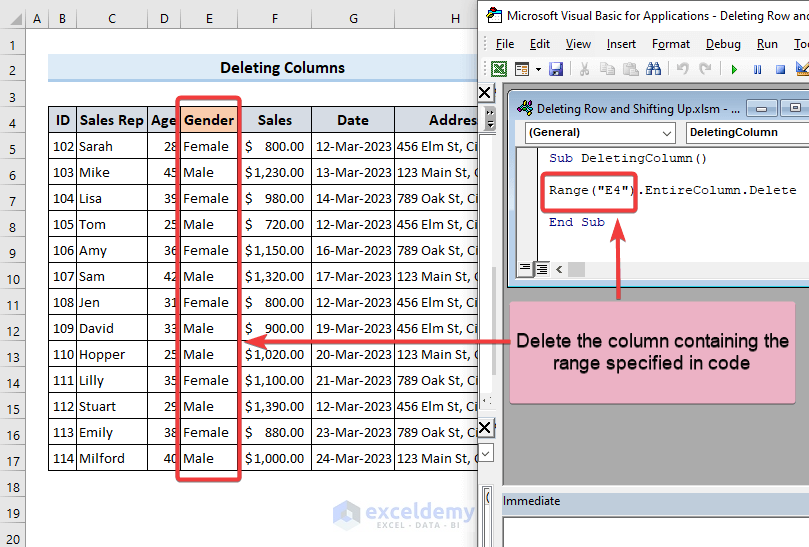
Just as you can delete a row from your dataset, you can also remove a column. Specify a cell in the code, and by using the EntireColumn command, you can delete the entire column containing that specified cell within your data range:
 Code:
Code:
Sub DeletingColumn()
Range("E4").EntireColumn.Delete
End Sub
If you need to delete a specific column (e.g., column 6), mention it directly in the code:
Code:
Sub DeletingColumn()
Columns(6).Delete
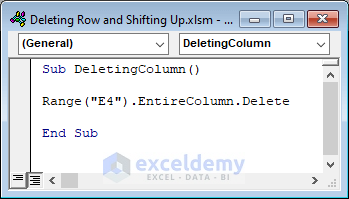
End SubHow to Delete Specific Cell and Shift Up with Excel VBA

If you want to delete a specific cell and have the subsequent cells shift up, use the .Delete command, as shown in the following code:
 Code:
Code:
Sub DeleteCellShiftUp()
Range("F10").Delete
End Sub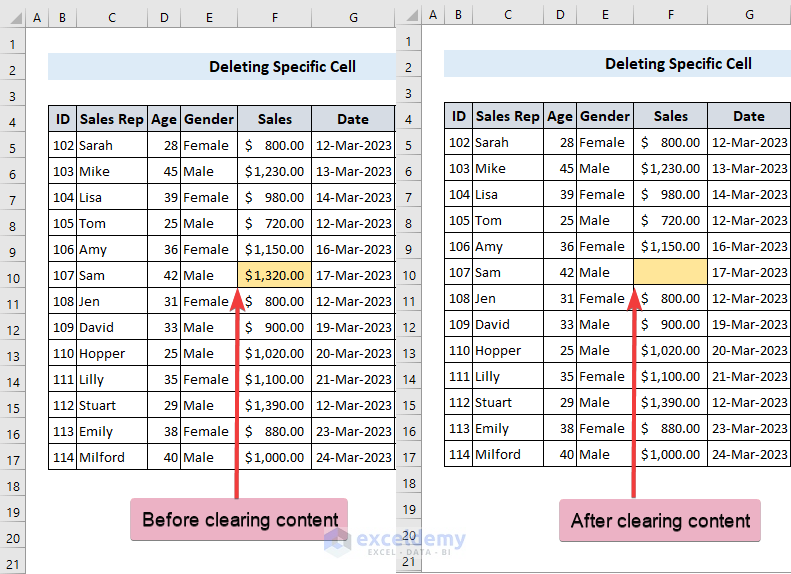
However, if you only want to clear the cell contents while preserving the cell format (i.e., not shifting the next cells up), use the .ClearContents command. This will leave the cell format unchanged after clearing the cell value:
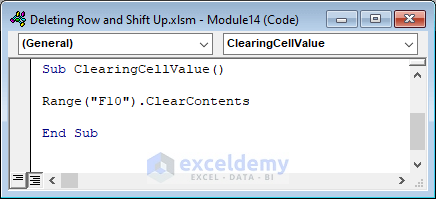 Code:
Code:
Sub ClearingCellValue()
Range("F10").ClearContents
End Sub
Frequently Asked Questions
- Is it possible to undo the deletion of rows using VBA?
- No, it is not possible to undo the deletion of rows using VBA. Once a row is deleted, it cannot be recovered using VBA.
- How can I delete a row based on a specific condition using VBA?
- To delete a row based on a specific condition using VBA, you can use an If statement to check the condition and then delete the row if the condition is true.
- What is the difference between deleting a row and clearing a row in Excel?
- Deleting a row removes the entire row, including any data or formatting it contains. Clearing a row, on the other hand, removes only the data from the row, leaving the formatting intact.
Takeaways from This Article
- Deleting rows and shifting up can be a useful way to reorganize your data in Excel.
- The “Delete” method of the “Range” object can be used to delete rows and shift up using VBA.
- When initiating a loop in VBA, it is safer to start from the last row and gradually move upward to avoid issues caused by changing row numbers.
- Since deleting rows using a VBA macro cannot be undone, it’s good practice to keep backup files for critical data.
Download Practice Workbook
You can download the practice workbook from here:
Related Articles
- Excel VBA to Delete Row Based on Cell Value
- How to Delete Row If Cell Contains Value Using Macro in Excel
- How to Delete Selected Rows with Excel VBA

