Data is often collected in different sheets or tables for feasibility. But in many cases, we need to merge them into one to portray the overall picture or analysis. In that case, the consolidation feature in Excel comes in handy. In this tutorial, we are going to focus on how to build a static consolidation in Excel.
What Is Static Consolidation?
By definition, consolidation is the action or process of making something more solid. As the name suggests, consolidation in Excel is used to combine or merge different pieces of information from different worksheets or books into one sheet. It is very helpful for analysts aiming to overview data of the whole picture.
Data can be collected in different sheets or workbooks because of the time of collection, for managing the data better, etc. When combining all the data collected in different places into a master worksheet, the consolidation feature in Excel is here to save the day. Instead of manually entering all the data again into the master worksheet and calculating, the feature does all the heavy lifting for us.
There are two types of consolidation- static consolidation and dynamic consolidation. Static consolidation is where the data in the master worksheet doesn’t change when one of the source datasets changes. Dynamic consolidation is where changes in the value of the main dataset change the values in the consolidated worksheet.
How to Build a Static Consolidation in Excel: 2 Suitable Examples
While building a consolidation, all we need to do is use the feature from the Data tab and select the datasets to consolidate. The focus of this article is to build static consolidation. In that case, changes in values in any of the datasets won’t change the value in the consolidated dataset. This consolidation can happen from different worksheets of the same workbook and different worksheets from different workbooks. So we have given two examples of each process.
1. Static Consolidation of Different Worksheets
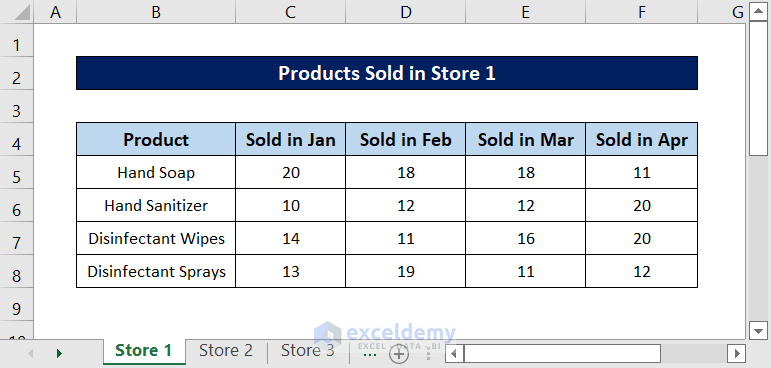
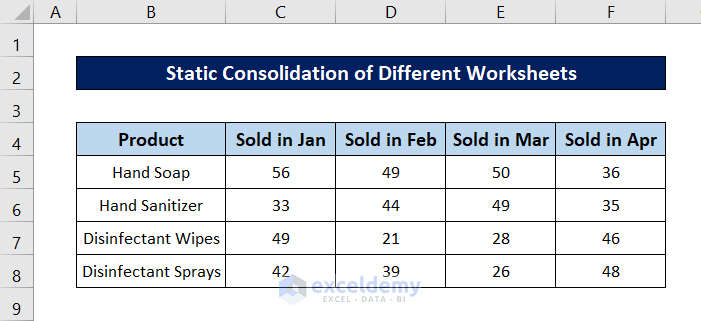
For the first example, we are aiming to build a static consolidation in Excel to combine data from multiple worksheets of the same workbook. We have selected different product sales in different months of different stores for this.
This is the dataset for the first store.
And This is the dataset of the second store.

This is the dataset of the third store.

We are going to build a static consolidation of them in the same Excel workbook. Follow these steps for the detailed process.
Steps:
- First, create a new spreadsheet and select the cell where you want the consolidated spreadsheet.
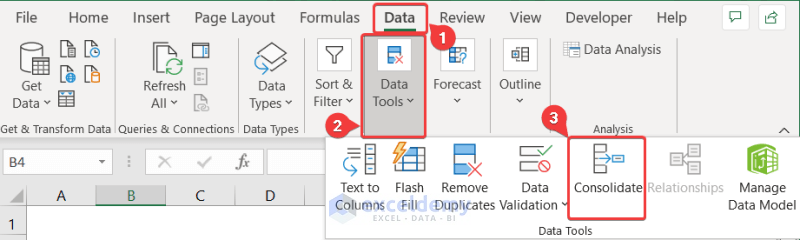
- Then go to the Data tab on your ribbon.
- After that, select Consolidate from the Data Tools group.
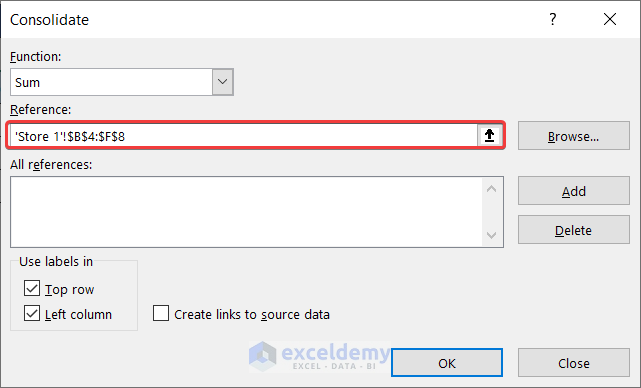
- As a result, the Consolidate box will open up. Firstly, select the function you want from the Function drop-down. We have selected Sum for our demonstration.

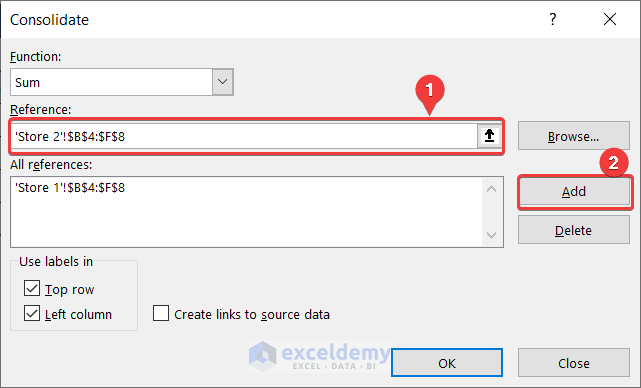
- Secondly, in the Reference field, either manually select the first dataset or type in the following.
'Store 1'!$B$4:$F$8
- After that, click on Add.
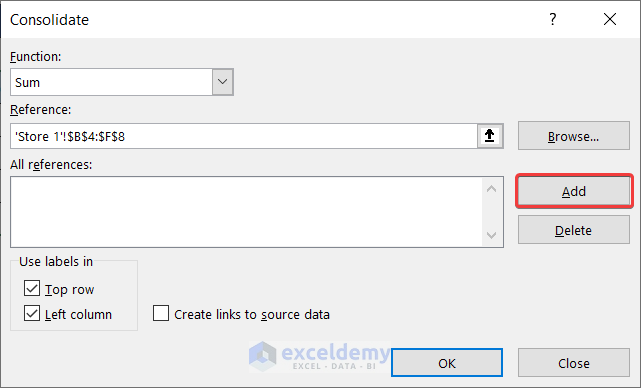
- Next, select the second dataset, either manually or by writing down the following formula. Then click on Add.
'Store 2'!$B$4:$F$8
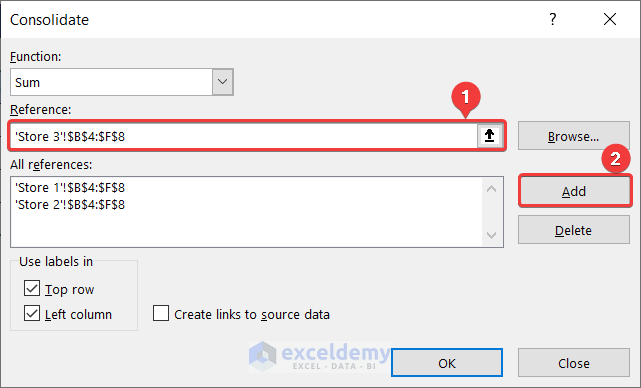
- Then select the third dataset in the Reference field by writing down the following (or manually selecting it) and then click on Add.
'Store 3'!$B$4:$F$8
- Next, make sure to check the Top row and Left column options under the Use labels in section if you have labels in the dataset. We have labels in our dataset, so we are checking them.
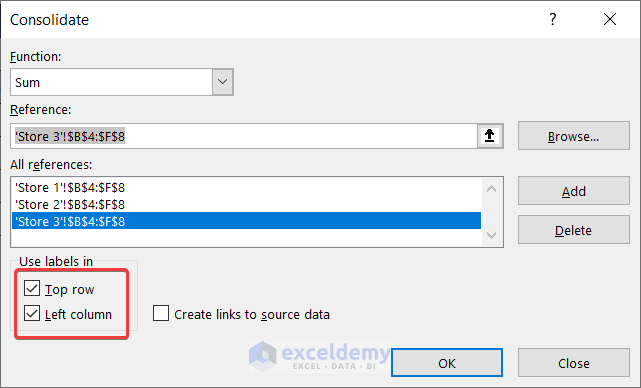
- Finally, click on OK. You will have something like this pop up in your worksheet.

- Finally, format them to your liking and you will have your final dataset.
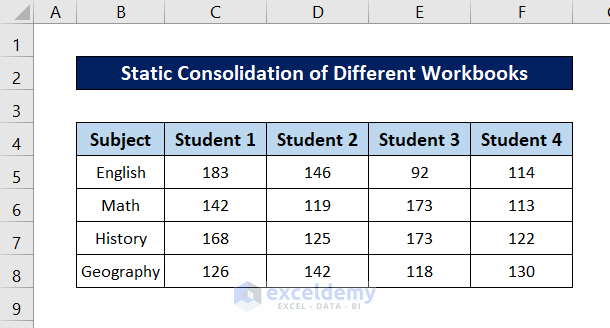
2. Static Consolidation of Different Workbooks
Similar to the previous example, we can also consolidate datasets that belong to different workbooks. In this example, we are going to focus on how to build a static consolidation that belongs to sheets from different Excel workbooks. For the demonstration, we are going to merge these two datasets.
This belongs to the workbook named “Student Marks 1” from the download box.

The following dataset belongs to the one named “Student Marks 2” from the download boxes above.

We are going to consolidate both into one Excel sheet.
Follow these steps for a detailed guide.
Steps:
- First, open all the sheets containing the datasets you want to consolidate.
- Then go to the Excel worksheet where you want to build a static consolidation and select the cell.
- After that, go to the Data tab on your ribbon.
- Then select Consolidate from the Data Tools group.
- As a result, the Consolidate box will open up. Firstly, select the function you want from the Function drop-down. We have selected Sum for our demonstration.
- Then go to the Reference section and either manually select the first dataset from the first workbook or write down the following.
'[Student Marks 1.xlsx]Sheet1'!$B$4:$F$8
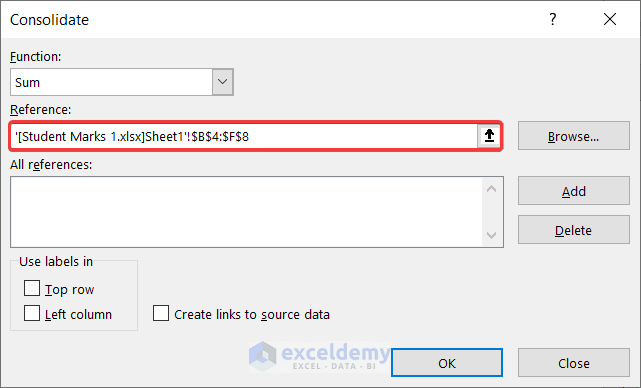
- Then click on Add.
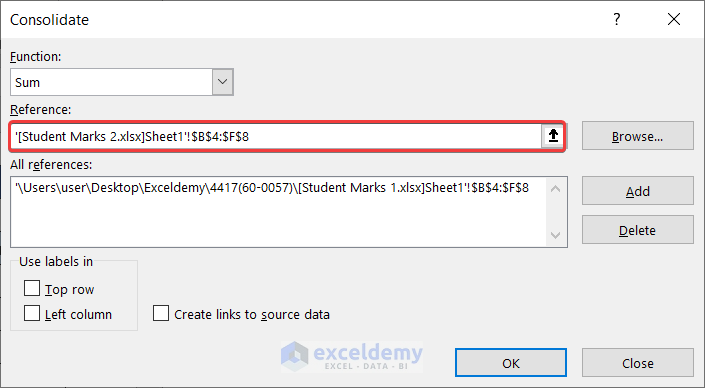
- After that, select the Reference field again and either select the second dataset manually or write down the following.
'[Student Marks 2.xlsx]Sheet1'!$B$4:$F$8
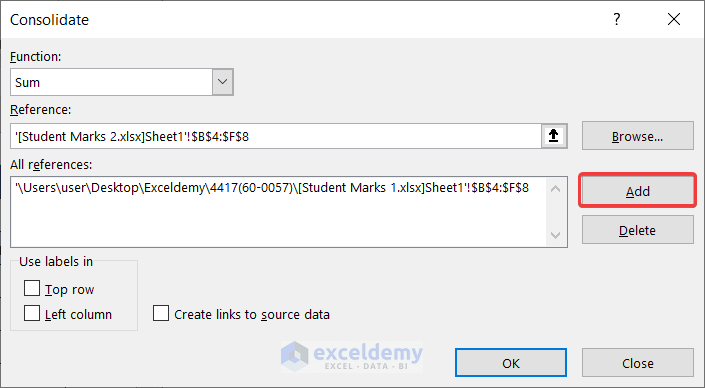
- Then click on Add.
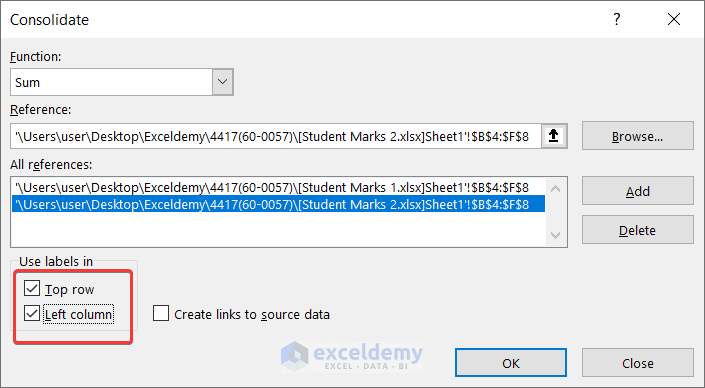
- Next, be sure to check the Top row and Left column options in the Use labels in section if you have labels in the dataset. We have labels in our dataset, so we have selected the options.
- Finally, click on OK and you will have the dataset popping up on your spreadsheet like this.

- Now, format the dataset to your liking, and you will have your static consolidation built into the new spreadsheet.
Things to Remember
- While consolidating different datasets, whether static or dynamic, make sure the datasets are similar i.e. they have the same labels, same number of rows and columns, etc.
- In the second example, instead of selecting the datasets by clicking or writing, you can also select their directory.
- Always remember to check/uncheck the label options depending on whether you have them or not.
Download Practice Workbook
You can download all the workbooks used in the article from the download links below.
This is the workbook used for the first example:
This is the first workbook of the second example:
This is the second workbook of the second example:
This is the consolidated workbook of the second example:
Conclusion
That concludes the guide to build a static consolidation in Excel. Hopefully, you will be able to build a static consolidation in Excel on your own now from the same workbooks and different workbooks. I hope you found this guide helpful and informative. If you have any questions or suggestions, let us know in the comments below.
<< Go Back To Consolidation in Excel | Merge Sheets in Excel | Merge in Excel | Learn Excel
Get FREE Advanced Excel Exercises with Solutions!
