
Image by Editor
Microsoft Word offers powerful layout tools that can transform ordinary documents into professionally formatted publications. Mastering sections and columns allows you to design professional, magazine-style layouts, academic papers, newsletters, or proposals with complex formatting needs.
In this tutorial, we will cover how to master sections and columns in Microsoft Word by using advanced layout techniques.
Understanding Sections in Word
Sections are the foundation of complex document layouts in Word. Each section can have its own formatting, including different headers/footers, page orientation, margins, and column layouts.
Creating Sections
Insert Section Breaks:
- Place your cursor where you want to start a new section.
- Go to the Layout tab (or Page Layout in some versions).
- Click Breaks >> under Section Breaks, choose:
- Next Page: Starts a new section on the next page.
- Continuous: Starts a new section on the same page.
- Even Page: Starts the new section on the next even-numbered page.
- Odd Page: Starts the new section on the next odd-numbered page.

- Let’s open a document.
- Place your cursor at the end of the line.
- Select the Next Page under Section Breaks.
- This creates a new section that starts on a new page.

Section Break Visibility:
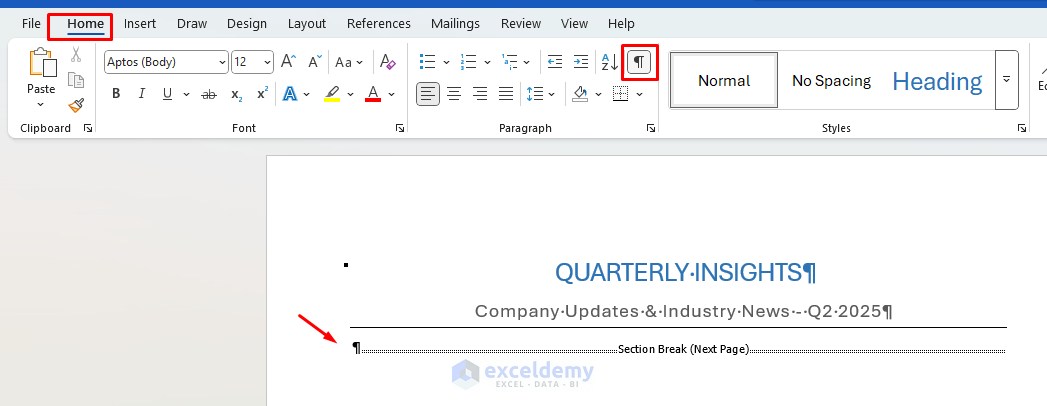
- Go to the Home tab >> click the Show/Hide ¶ button to see section breaks.
- Section breaks appear as double dotted lines with Section Break text.
Managing Section Properties
Different Headers and Footers per Section:
- Double-click in the Header/Footer area.
- Type “QUARTERLY INSIGHTS – CONFIDENTIAL”.
- Notice the Same as Previous indicator in the header/footer.

- Go to the second page (first page of the main content).
- On the Header & Footer tab >> uncheck Link to Previous.
- Create a different header: “QUARTERLY INSIGHTS – Q2 2025”.

Working with Columns
Columns split your text into vertical blocks, like in newspapers or brochures. It enhances readability and gives documents a professional publication look.
Creating Column Layouts
Apply Columns to an Entire Document:
- Go to Layout tab >> click Columns.
- Select a preset or choose Two, Three, or More Columns… to customize.
- In the dialog box, set:
- Number of columns.
- Line between columns.
- Width and spacing.

Create a Three-Column Layout:
- In the new section, type the heading “NEWS HIGHLIGHTS”.
- Place the cursor below this heading.
- Go to the Layout tab >> from Columns >> select Three.
- Type three short news stories (one for each column).
If you want to break the column:
- Insert the cursor at the end of the first columned section.
- Press Ctrl + Shift + Enter to insert the text into the second column.

Output:

Creating Custom Columns:
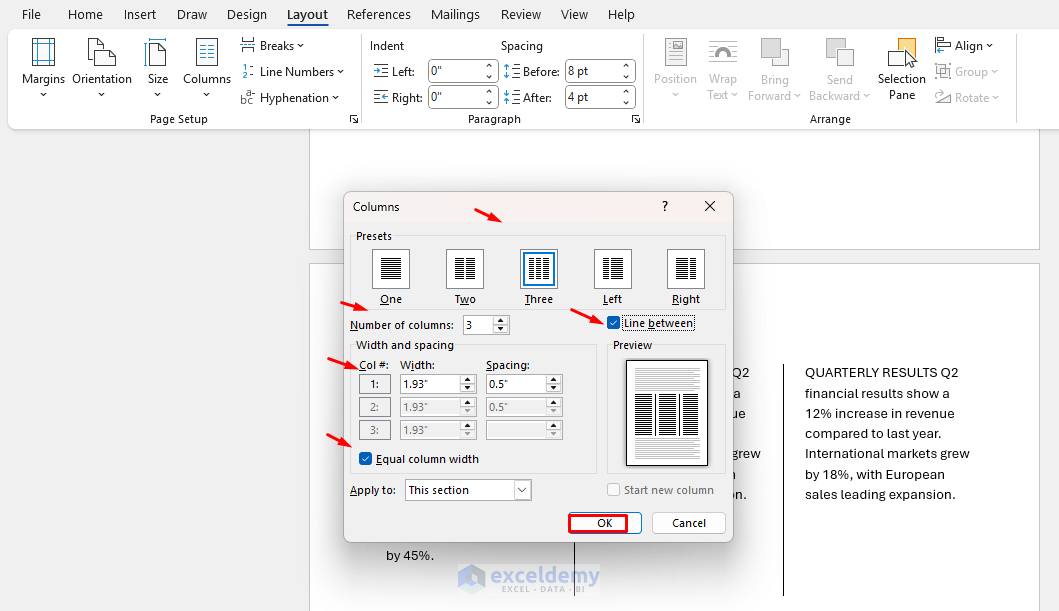
- Go to Layout tab >> click Columns >>select More Columns.

- Select the Number of columns.
- Select the Line between.
- Adjust width and spacing values as needed.
- Check or uncheck the Equal column width to create columns of different widths.
- Choose Apply to: options.
- Click OK.
Apply Columns to Specific Sections:
- Create section breaks to isolate the area for columns.
- Select the content within those section breaks.
- Apply columns as above.
- Select Apply to: This section.

Column Formatting Tips
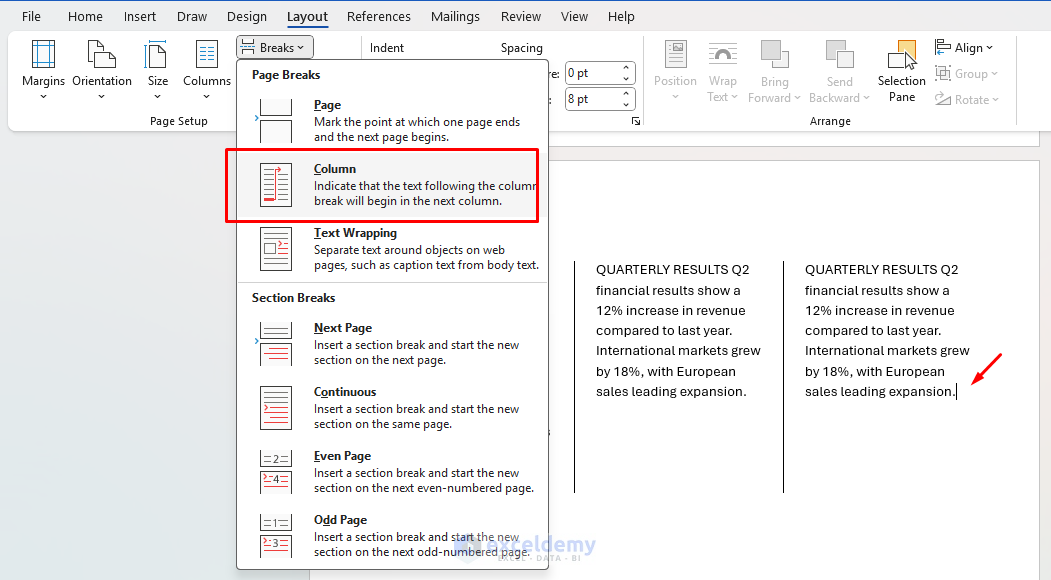
Column Breaks:
To end a column before it naturally flows to the bottom:
- Place the cursor where you want the column to end.
- Go to Layout tab >> from Breaks >> select Column.
Balancing Columns:
- For the final page, you may want columns of equal length.
- Place the cursor at the end of your text.
- Insert a continuous section break.
- In the new section, go to Layout tab >> select Columns >> select More Columns.
- Check the Equal column width and set it to the same number of columns.
Advanced Techniques
Creating Side-by-Side Content
Two-Column Layout with Different-Width Columns:
- In this new section, type the heading FEATURE STORY.
- Create a section with two columns.

- Go to Layout tab >> select Columns >> select More Columns.
- In the dialog box:
- Uncheck Equal column width.
- Set the left column to 3.5 width.
- Set the right column to 1.5 width.
- Click OK.
- In the wider left column, type a longer feature article: “EMBRACING REMOTE WORK CULTURE”.
- In the narrower right column, add a complementary sidebar: “REMOTE WORK QUICK FACTS:”.

Text Beside Images with Text Wrapping:
- Insert your image.
- Select it and go to Format tab >> from Wrap Text >> choose a wrapping style.
- Adjust the text wrapping settings for precise control.
Mixed Column Layouts in One Document
Transitioning Between Different Column Arrangements:
- Create sections with continuous breaks.
- Apply different column settings to each section.
- Example: One-column introduction >> Three-column main content >> Two-column conclusion.
Creating Magazine-Style Layouts:
- Use a combination of:
- Different column settings per section.
- Text boxes are positioned precisely.
- Text wrapping around images.
- Column breaks to control text flow.
Tips for Managing Sections and Columns
- View section breaks: Click ¶ (Show/Hide Paragraph Marks) on the Home tab.
- Avoid confusion: Name your sections by adding comments or using Navigation Pane headings. Ensure you’ve selected only the section you want to format.
- Headers/Footers control: Double-click the header/footer area and use “Link to Previous” to turn off inherited content between sections.
Conclusion
Mastering sections and columns in MS Word will give you powerful tools to control how content flows and appears. By mastering sections and columns, you can create professional documents that combine different layouts within a single file, greatly enhancing both visual appeal and readability. It can dramatically elevate the quality and readability of your documents.
Get FREE Advanced Excel Exercises with Solutions!
