
Power Query is Excel’s most powerful data transformation tool. But many users barely scratch its surface. The problem with real-world data in Excel or Power BI isn’t analysis; it’s cleaning the data before analysis. That’s where Power Query becomes your best friend. With just a few repeatable tricks, you can automate your cleaning steps so you never have to fix the same messy data twice.
In this tutorial, we show 7 Power Query tricks to automate your data cleaning forever.
1. Unpivot Columns to Fix Cross-Tab Data
Datasets often arrive in a cross-tab (pivoted) format, where months or categories are spread across columns instead of stacked neatly in rows. You may need it in a long format for analysis. Power Query’s Unpivot transformation automatically converts wide data to long format.
Steps:
- Load your dataset into Power Query
- Go to the Data tab >> select Get Data >> select your data source

- Hold the CTRL key and select multiple columns
- Select all month columns
- Go to the Transform tab >> select Unpivot Columns

- All the monthly or category columns will transform into two fields: Attribute (for the key, e.g., Month) and Value (e.g., Sales)

- Rename Headers:
- Double-click “Attribute” and “Value” headers to give them meaningful names like “Month” and “Sales”

Tip: You can save this as a custom function by going to Home >> Advanced Editor and wrapping your steps in a function. This lets you apply the same unpivot logic to multiple similar datasets instantly.
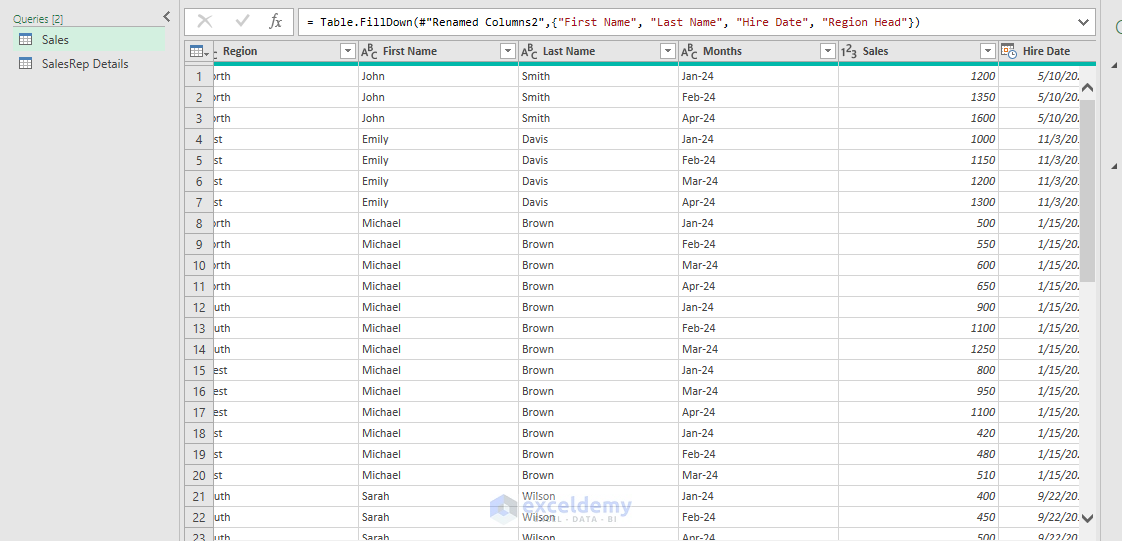
2. Merge Tables to Combine Data Sources
If you have multiple tables (e.g., sales and customer info), you can combine them into one clean dataset based on common keys. Power Query’s Merge function performs database-style joins without writing SQL.
Steps:
- Load both tables into Power Query
- Import your primary table and lookup table into Power Query
- Select your primary table
- Go to the Home tab >> select Merge Queries
- Choose the matching columns, like Sales Rep
- Pick the join type (e.g., Left Join to keep all rows from the first table)
- Click OK

- Expand the new merged column by clicking the expand icon
- Select Hire Date and Region Head
- Uncheck Use original column name as prefix
- Click OK

- You will now add columns from the SalesRep Details table to the Sales table

Join Types Quick Reference:
- Left Outer: Keep all records from the first table; add matches from the second table
- Inner: Only keep records that exist in both tables
- Full Outer: Keep all records from both tables
- Right Outer: Keep all records from the second table; add matches from the first
3. Split Columns by Delimiter
A single column can contain multiple pieces of information (e.g., FirstName LastName, City, State). Power Query’s Split Column feature handles common delimiter patterns.
Steps:
- Select the column (e.g., Sales Rep)
- Go to the Home tab >> select Split Column >> select By Delimiter

- Choose the delimiter (space, comma, dash, etc.)
- Select Space
- Click OK

- Pick how you want to split (into rows or columns)
- You now have First Name and Last Name

Clean, separate fields instead of messy combined data.
4. Fill Down (or Up) Missing Values
The dataset has blank cells in repeating categories (common in exported reports). Power Query’s Fill Down feature propagates values intelligently.
Steps:
- Select the column with blanks
- Go to the Transform tab >> select Fill >> select Down (or Up)

- All blanks inherit the value above. Missing values are filled with the last known entry, keeping your dataset consistent
Advanced Fill Techniques:
- Fill Up: Useful when totals appear before detail rows
- Conditional Fill: Combine with filtering to fill only specific conditions
- Fill Across: Copy values horizontally between columns
Tip: Create a conditional column first to mark group boundaries, then fill down within groups only. This prevents accidentally filling across different categories.
5. Remove Duplicates Automatically
Duplicate rows inflate your data and skew your reports. You need control over which columns determine uniqueness and which duplicates to keep. Power Query’s Remove Duplicates feature, with column selection, removes duplicates instantly.
Steps:
- Select the columns that define uniqueness (hold Ctrl for multiple)
- Go to the Home tab >> select Remove Rows >> select Remove Duplicates
- Power Query keeps the first occurrence and removes the rest based on your selection
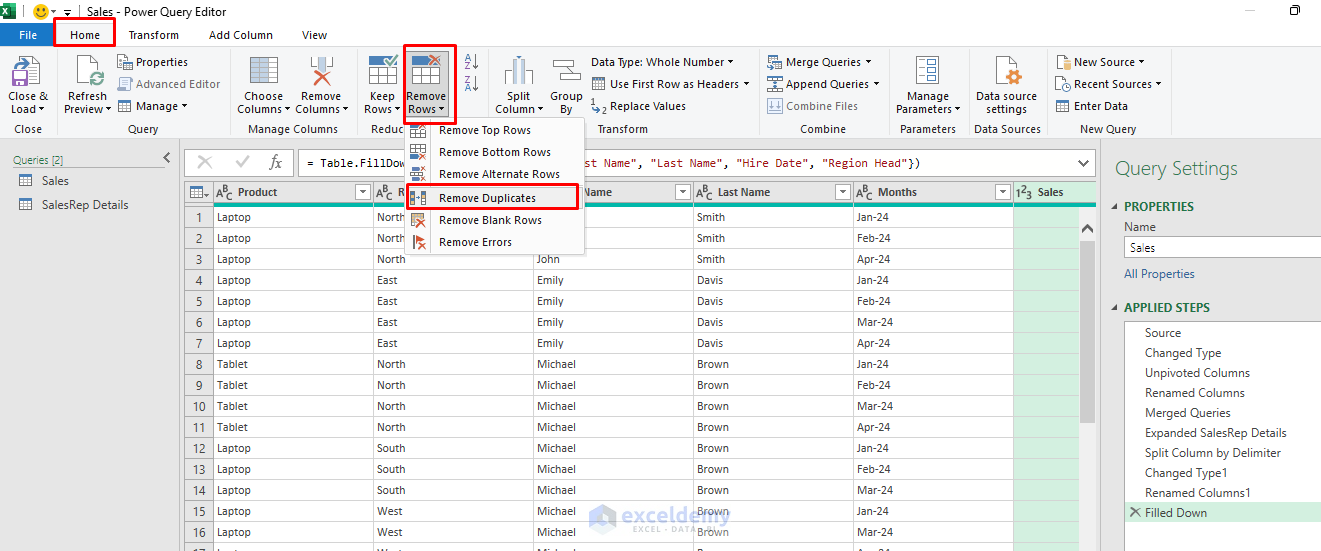
Advanced Duplicate Handling:
- Sort First: Sort by date or a priority column before removing duplicates to control which record survives
- Mark Duplicates: Add a custom column to flag duplicates before deciding what to do
6. Create Custom Columns for Automation
Analysis often requires extra fields (like Year, Quarter, or flags) that don’t exist in the source data. Adding them manually in Excel formulas is repetitive; you can add them to appear automatically whenever data refreshes.
Steps:
- Go to the Add Column tab >> select Custom Column
- Write conditions or combine multiple fields
- New column name: Sales Type
if [Sales] >= 1000 then "High" else "Regular"

- New column name: Fiscal Year
Date.Year(Date.AddMonths([MonthDate], -6))

- A fully automated, reusable transformation step that updates whenever your source data changes

7. Common Data Cleaning: Trim/Clean, Replace Errors, Parameters
- Data Type:
- Select column
- Use the Data Type dropdown in Power Query
- Pick the correct type (Date, Decimal, Text, Whole Number, etc.)

- Trim/Clean Text:
- Select text columns
- Go to the Transform tab >> select Format >> select Trim
- Go to the Transform tab >> select Format >> select Clean (fix key mismatches before you Merge)

- Replace Errors:
- Select columns
- Go to the Home tab >> select Replace Errors (e.g., set to 0 or “Unknown”)
- Or right-click >> select Replace Errors

- When you are done, load the data into Excel
- Go to the Home tab >> click Close & Load

All the data cleaning steps will be recorded in the Applied Steps section of Power Query. These Applied Steps are reusable, editable, and update automatically when your source data changes—no rework needed. Instead of repeating the same manual cleaning tasks, you can refresh your query and watch your cleaned data appear in seconds.

Final Thoughts
By following these 7 tricks, you can automate your data cleaning forever. Power Query isn’t just a cleaning tool; it’s a repeatable automation engine. Once you set these transformations, they run every time you refresh your data. Master them, and you’ll spend less time wrestling with messy data and more time generating insights that matter. If you’re in Power BI, the interface is similar; adapt as needed!
Get FREE Advanced Excel Exercises with Solutions!

thanks for your lesson in excel, i am your vitual student, your lessons has improved my ability to use excel without tears.
Dr Sani Suleiman (Nigeria)
Hello Sani Suleiman,
You are most welcome. Thanks for your feedback and appreciation. I’m truly glad to hear that my Excel lessons have helped you improve your skills. Keep practicing and exploring—there’s always something new to learn in Excel. Wishing you continued success from Nigeria and beyond!
Regards,
ExcelDemy
thank you for learning Excel
Hello Suherman,
Thank you for your kind words! We’re really glad to know you’re enjoying learning Excel with us. Keep exploring and automating your data tasks with Power Query, there’s always something new to discover!
Best regards,
ExcelDemy