In Excel, while importing data from different sources or creating a dataset there stays a possibility of having extra unwanted spaces. Sometimes extra spaces cause errors while using different functions. To make a standard and good dataset trimming extra spaces is necessary. In this article, I’m going to explain how to trim spaces in Excel.
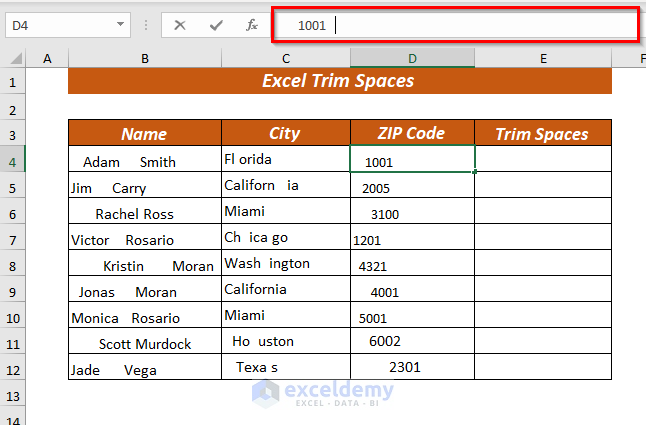
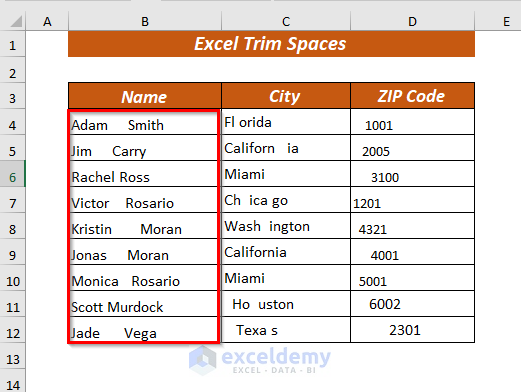
To make the explanation clearer, I’m going to use a sample dataset that represents the personal information of a particular person. The dataset has 3 columns these are Name, City, and Zip Code.
Here, with the help of the TRIM function, we will be able to trim extra spaces.
How to Trim Spaces in Excel: 8 Ways
1. Using TRIM Function to Trim Spaces of String Values
The TRIM function is the most useful function to trim extra spaces. It trims all several types of spaces these are leading, trailing, and in-between spaces from both String and Numeric values. It is unable to trim a single space character between words.
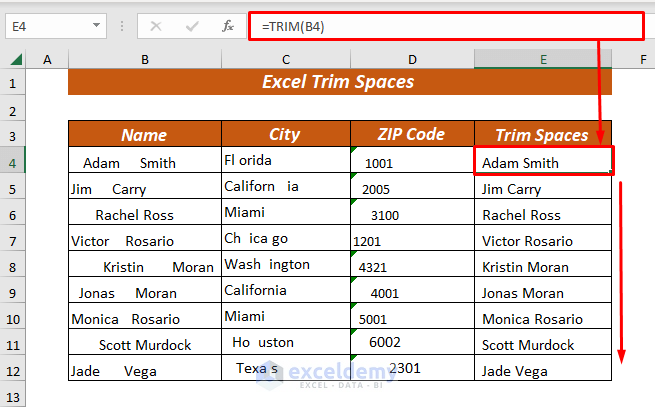
Here, I’m going to trim spaces from the string values of the Name column.
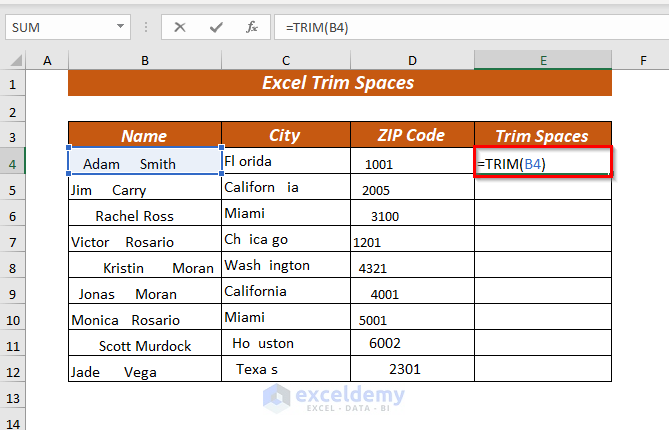
To start with, select any cell to place the resultant value.
➤ I selected the E4 cell.
⏩ In cell E4, type the following formula.
=TRIM(B4)
Here, in the TRIM function, I selected cell B4 as text. Now, the TRIM function will trim all leading, trailing, and in-between spaces from the selected cell.
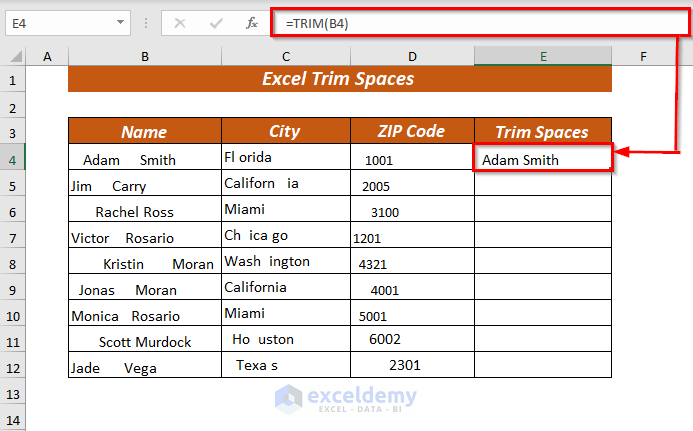
⏩ Press the ENTER key and you will get the Name where extra spaces are trimmed.
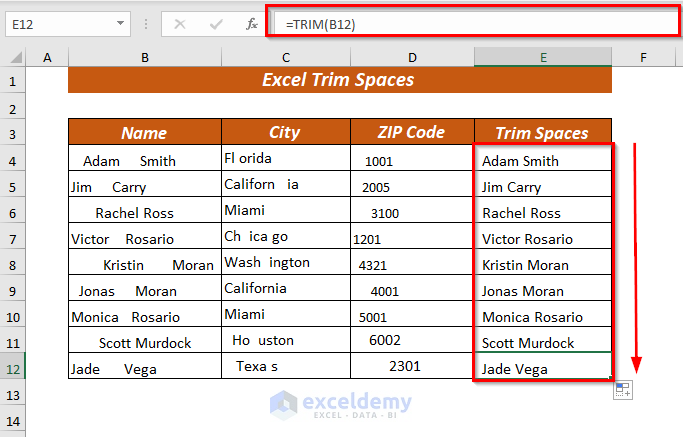
⏩ Now, you can use the Fill Handle to AutoFill the formula for the rest of the cells.
2. Using TRIM Function to Trim Spaces of Numeric Values
You also can remove all leading, trailing, and in-between spaces from numeric values also. But the problem is the TRIM function treats even the numeric values as strings. That’s why you will need to use the VALUE function with the TRIM function to trim spaces from numeric values.
Here, I’m going to trim spaces from the numeric values of the Zip Code column.
To begin with, select any cell to place the resultant value.
➤ I selected the E4 cell.
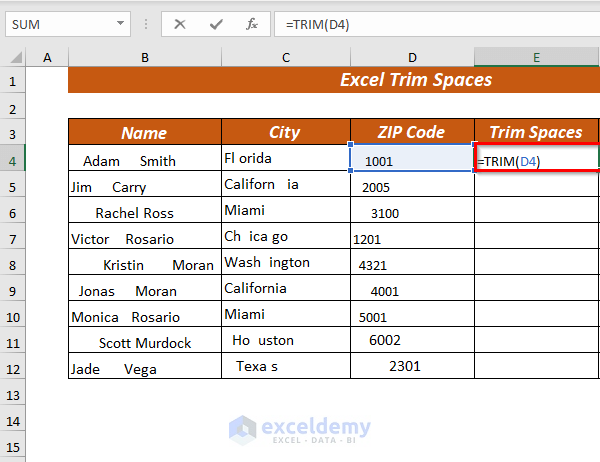
⏩ In cell E4, type the following formula.
=TRIM(D4)Here, in the TRIM function, I selected cell D4 as text. Now, the TRIM function will trim all leading, trailing, and in-between spaces from the selected cell.
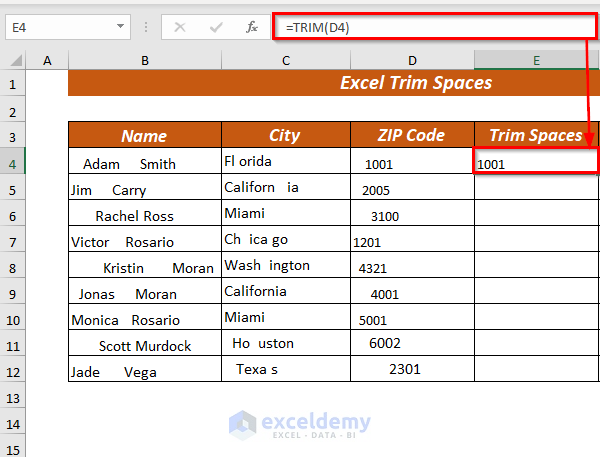
⏩ Press the ENTER key and you will get the Zip Code where extra spaces will be trimmed.
By seeing the result it may seem that the TRIM function has done its job. But if you look properly then you will notice that the trimmed values do not behave like numbers.
To avoid this problem you can use the TRIM and VALUE functions together.
At first, select any cell to place the resultant value.
➤ I selected the E4 cell.
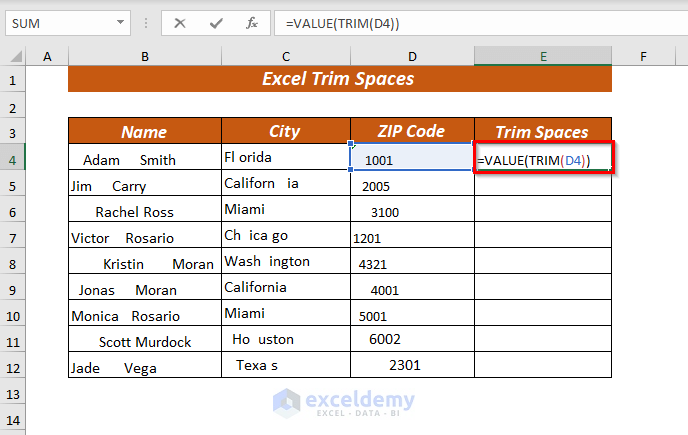
⏩ In cell E4, type the following formula.
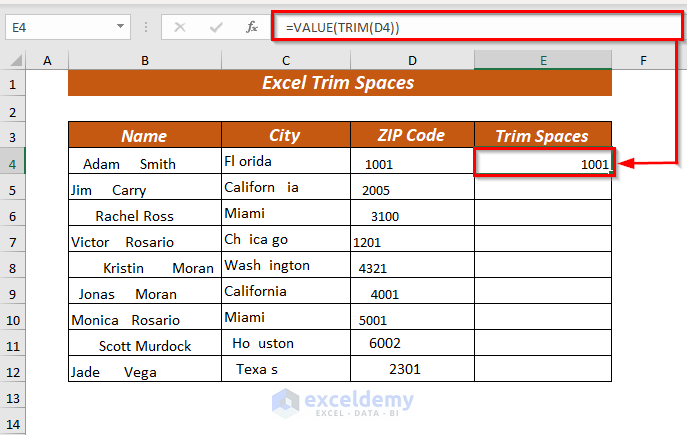
=VALUE(TRIM(D4))Here, in the VALUE function, I used TRIM(D4) as text.
Next, in the TRIM function, I selected cell D4 as text. Now, the TRIM function will trim all leading, trailing, and in-between spaces from the selected cell.
Now, the VALUE function will convert the trimmed string into a number.
⏩ Press the ENTER key and you will get the Zip Code as a number where extra spaces are trimmed.
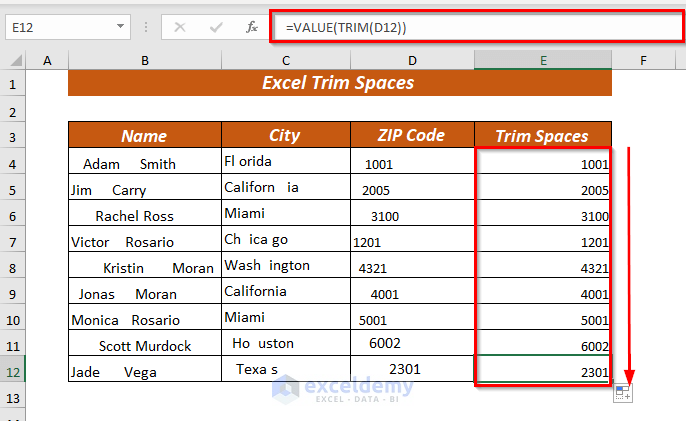
⏩ Now, you can use the Fill Handle to AutoFill the formula for the rest of the cells.
Read More: How to Trim Part of Text in Excel
3. Using Left TRIM to Trim Leading Spaces
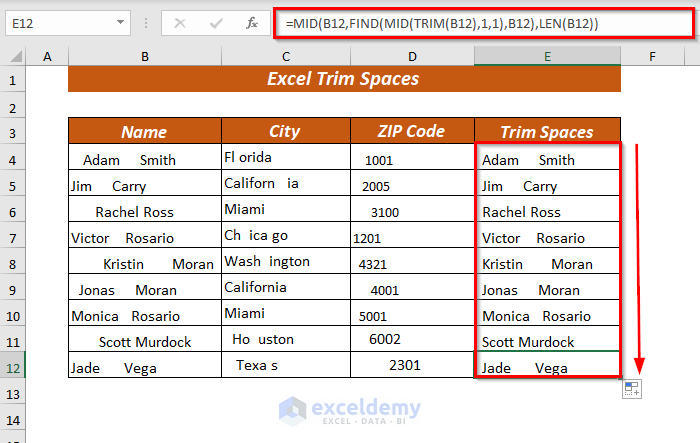
In case you only want to trim the leading spaces then you can do it by using the MID function, FIND function, TRIM function, and LEN function together.
Here, from the Name column, I only want to trim the leading spaces.
To begin with, select any cell to place the resultant value.
➤ I selected the E4 cell.
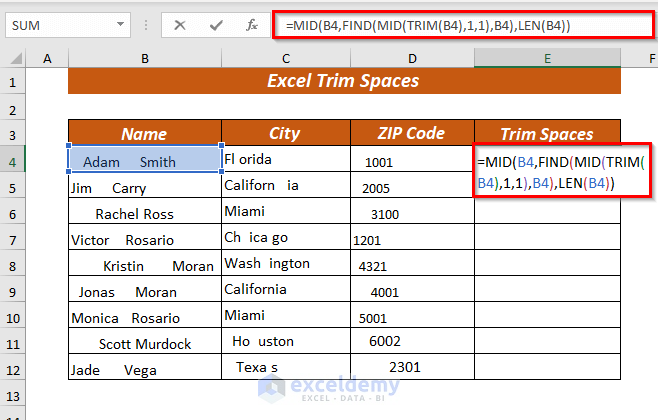
⏩ In cell E4, type the following formula.
=MID(B4,FIND(MID(TRIM(B4),1,1),B4),LEN(B4))Here, in the MID function, I selected cell B4 as text, used FIND(MID(TRIM(B4),1,1),B4) as start_num then used LEN(B4) as num_chars.
Next, in the FIND function, I used MID(TRIM(B4),1,1) as find_text and selected cell B4 as within_text.
Again, In the MID function, I used RIM(B4) as text, used 1 as start_num then used 1 as num_chars.
Then, in the LEN function, I selected the B4 cell as text.
Formula Breakdown
➦ TRIM(B4) —> will trim all extra spaces.
• Output: Adam Smith
➦ MID(TRIM(B4),1,1) —> starting from position 1 will extract a substring from a string.
• Output: A
➥ FIND(MID(TRIM(B4),1,1),B4) —> This will return the position of the string.
• Output: 4
➦ LEN(B4) —> will return the number of characters in the text string.
• Output: 17
➥ MID(B4,FIND(MID(TRIM(B4),1,1),B4),LEN(B4)) —> it will return the entire text string.
ο MID(B4, 4, 17)
• Output: Adam Smith
• Explanation: Trimmed the leading spaces from the name “ Adam Smith”.
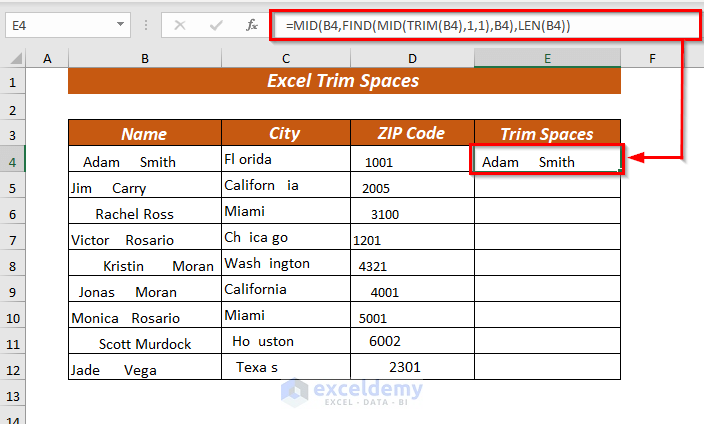
⏩ Press the ENTER key and the leading spaces will be trimmed from the Name column.
⏩ Now, you can use the Fill Handle to AutoFill the formula for the rest of the cells.
Read More: How to Use Left Trim Function in Excel
4. Using SUBSTITUTE Function to Trim All Spaces
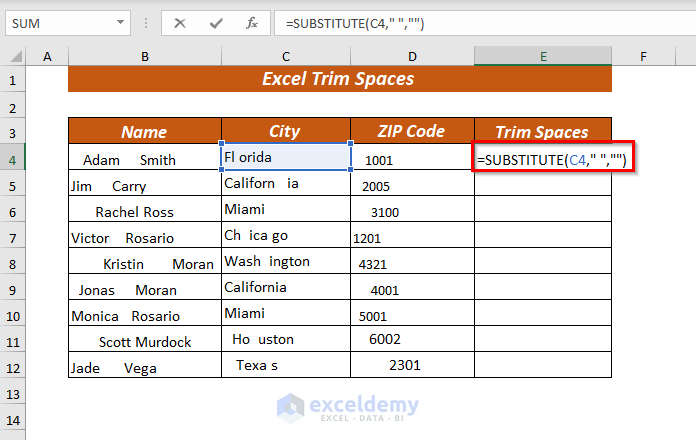
Whenever you want to trim all spaces from any value then you can use the SUBSTITUTE function.
Here, I’ll trim all spaces from the City column.
To start with, select any cell to place the resultant value.
➤ I selected the E4 cell.
⏩ In cell E4, type the following formula.
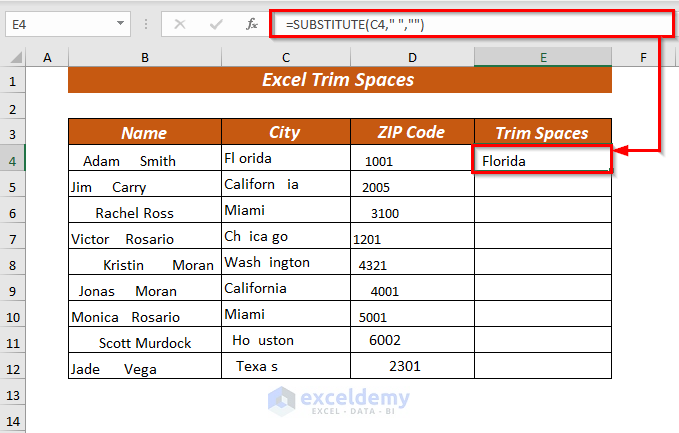
=SUBSTITUTE(C4," ","")Here, in the SUBSTITUTE function, I selected the C4 cell as text, used ” ” (Single Space) as old_text then used “” (No Space) as new_text. Now, the SUBSTITUTE function will substitute the spaces with no space.
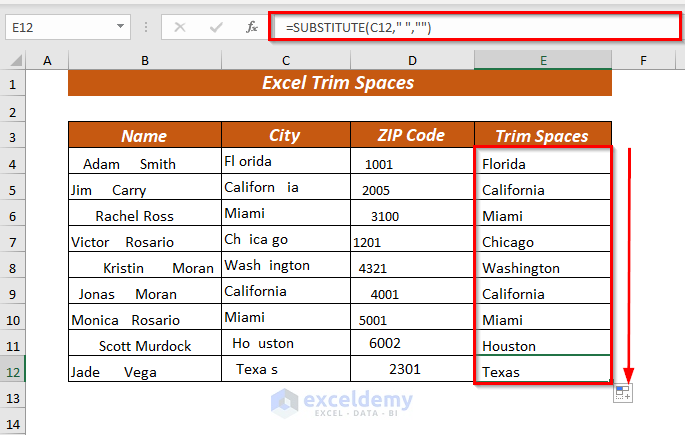
⏩ Press the ENTER key and the extra spaces will be trimmed from the City column.
⏩ Now, you can use the Fill Handle to AutoFill the formula for the rest of the cells.
5. Using TRIM & SUBSTITUTE Function to Trim Non-Breaking Spaces
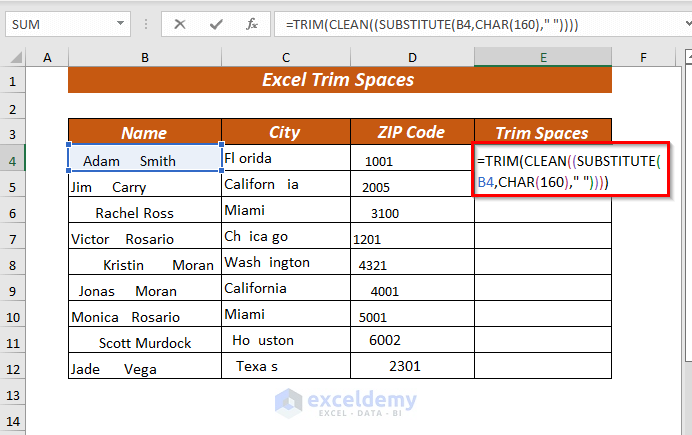
Whenever we import the data from somewhere else most of the time few non-breaking spaces sneaked in. You can trim those non-breaking spaces by using the TRIM function, CLEAN function, and SUBSTITUTE function together.
To begin with, select any cell to place the resultant value.
➤ I selected the E4 cell.
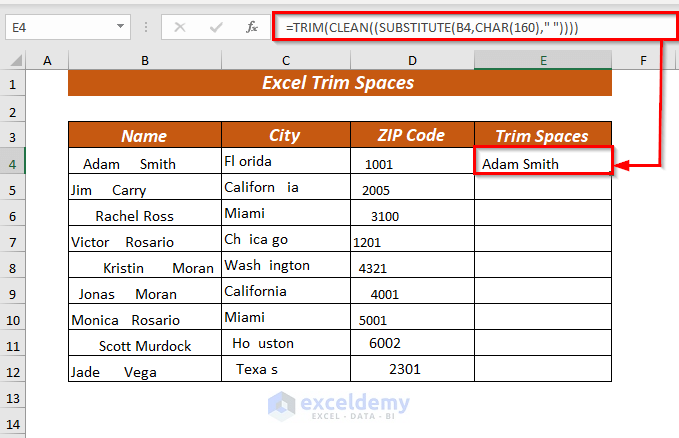
⏩ In cell E4, type the following formula.
=TRIM(CLEAN((SUBSTITUTE(B4,CHAR(160)," "))))Here, in the TRIM function, I used CLEAN((SUBSTITUTE(B4,CHAR(160),” “))) as text. used FIND(MID(TRIM(B4),1,1),B4) as start_num then used LEN(B4) as num_chars.
Next, in the CLEAN function, I used SUBSTITUTE(B4,CHAR(160),” “)) as text.
Then, in the SUBSTITUTE function, I selected the B4 cell as text, used CHAR(160) as old_text, then used ” “ (Single Space) as new_text.
Now, the SUBSTITUTE function will substitute the non-breaking spaces with a single space.
Formula Breakdown
➦ SUBSTITUTE(B4,CHAR(160),” “) —> will trim all extra spaces.
• Output: Adam Smith
➦ CLEAN((SUBSTITUTE(B4,CHAR(160),” “))) —> starting from position 1 will extract a substring from a string.
• Output: Adam Smith
➥ TRIM(CLEAN((SUBSTITUTE(B4,CHAR(160),” “)))) —> This will return the position of the string.
ο TRIM(” Adam Smith”)
• Output: Adam Smith
• Explanation: Trimmed the non-breaking spaces from the name “ Adam Smith”.
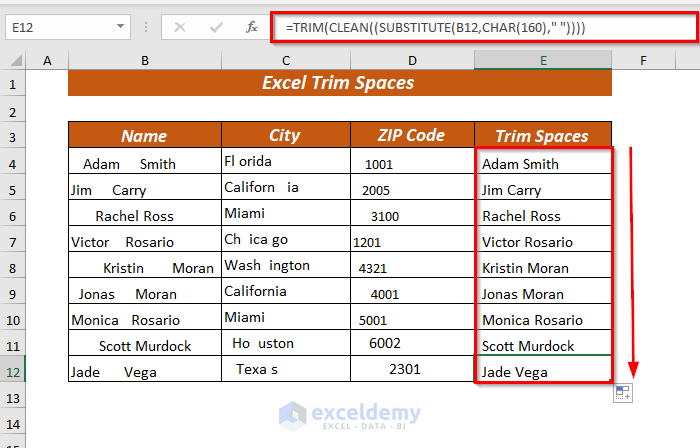
⏩ Press the ENTER key and the non-breaking spaces will be trimmed from the Name column.
⏩ Now, you can use the Fill Handle to AutoFill the formula for the rest of the cells.
6. Using Find & Replace to Trim spaces
You also can use Find & Replace feature to trim spaces in Excel.
Let me demonstrate to you the procedure,
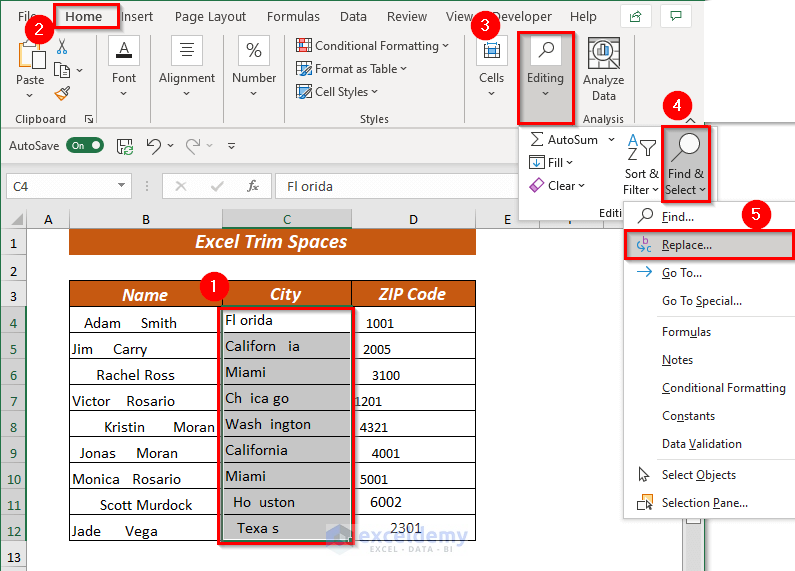
Next, select the cell range from where you want to trim spaces.
➤ I selected the cell range C4:C12.
Then, open the Home tab >> from Editing group >> go to Find & Select >> select Replace
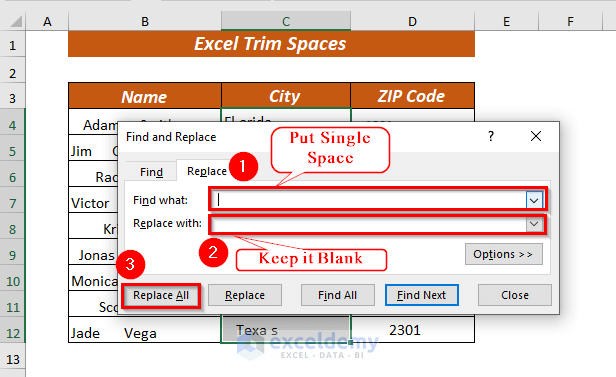
A dialog box will pop up.
⏩ I used single Space in Find what to trim spaces.
⏩ I kept the Replace with field Blank.
Then, click on Replace All.
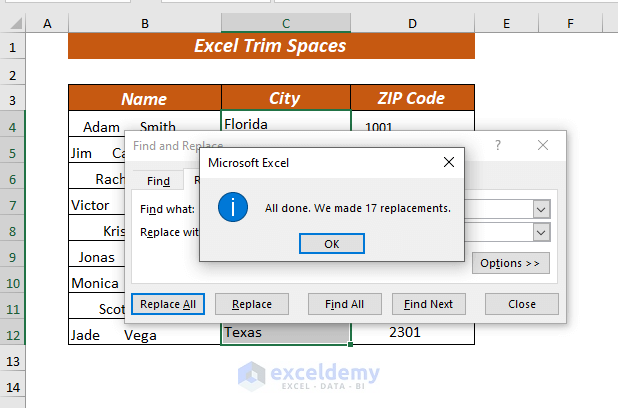
A message will pop up showing how many replacements occurred.
⏩ We made 17 replacements.
Then, click OK and close the dialog box.
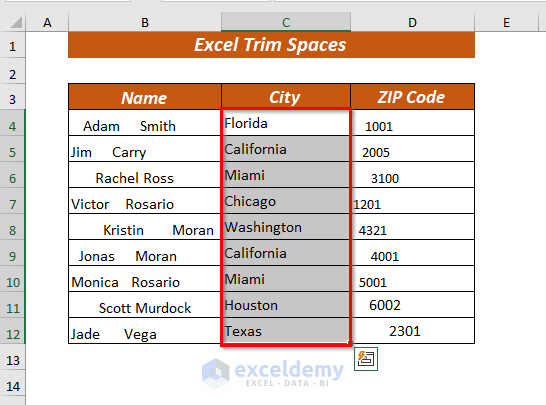
⏩ Here, all the spaces are trimmed in the City column.
Related Content: How to Trim Right Characters and Spaces in Excel
7. Using VBA to Trim Leading Spaces
If you want, you also can use Visual Basic (VBA) to trim leading spaces.
Let me explain the procedure to you,
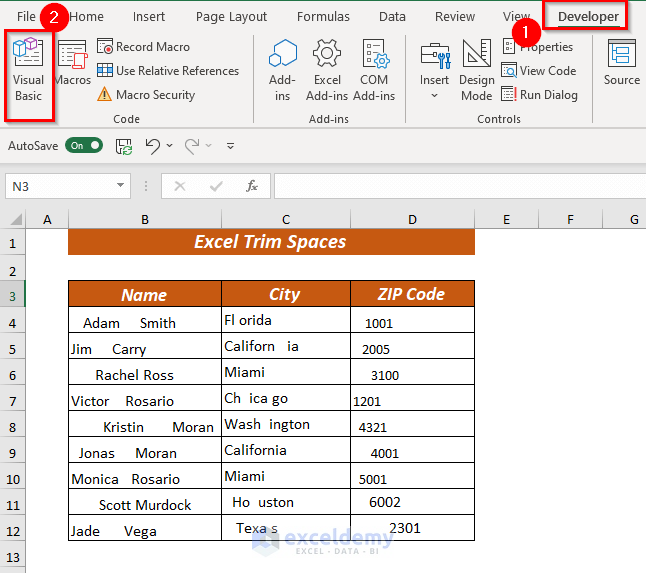
First, open the Developer tab >> then select Visual Basic.
⏩ Then, it will open a new window of Microsoft Visual Basic for Applications.
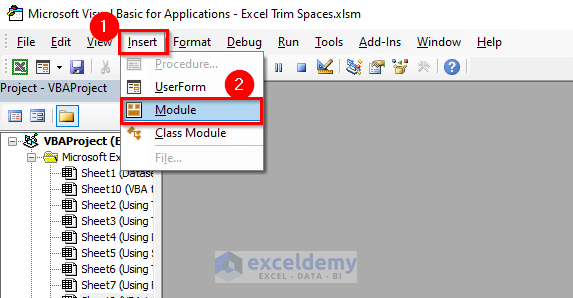
Now, open Insert >> select Module.
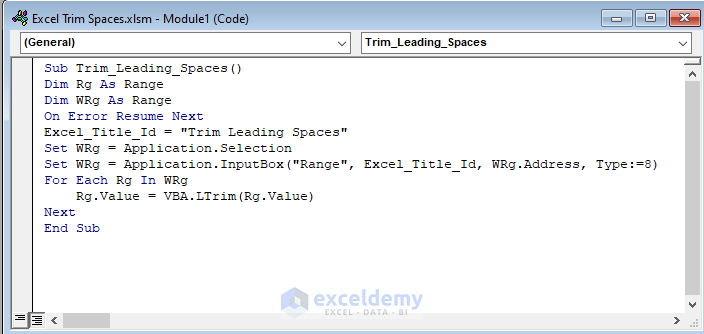
Type the following code in the opened Module to trim leading spaces.
Sub Trim_Leading_Spaces()
Dim Rg As Range
Dim WRg As Range
On Error Resume Next
Excel_Title_Id = "Trim Leading Spaces"
Set WRg = Application.Selection
Set WRg = Application.InputBox("Range", Excel_Title_Id, WRg.Address, Type:=8)
For Each Rg In WRg
    Rg.Value = VBA.LTrim(Rg.Value)
Next
End Sub
Here, in the Sub Trim_Leading_Spaces(), I declared the Rg and WRg variables as Range.
Next, named the dialog box Trim Leading Spaces then used a For loop to TRIM each selected cell.
Then, I used the VBA LTRIM function to trim.
Now, Save the code and go back to the worksheet.
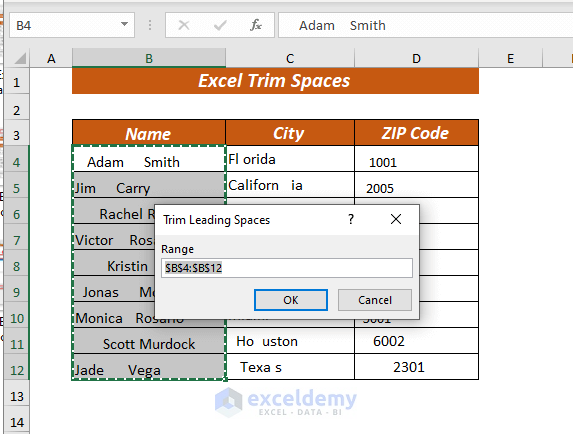
to apply the VBA, if you want you can select the cell or cell range now otherwise you can select the range in the message box.
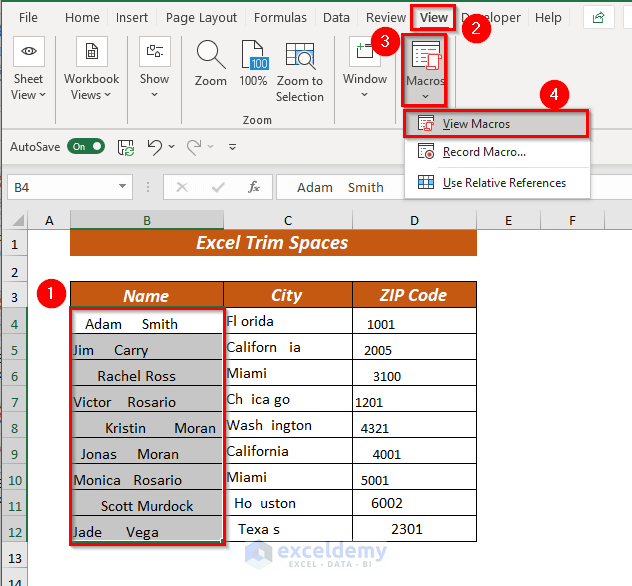
➤ I selected the cell range B4:B12.
Then, open the View tab >> from Macros >> select View Macros.
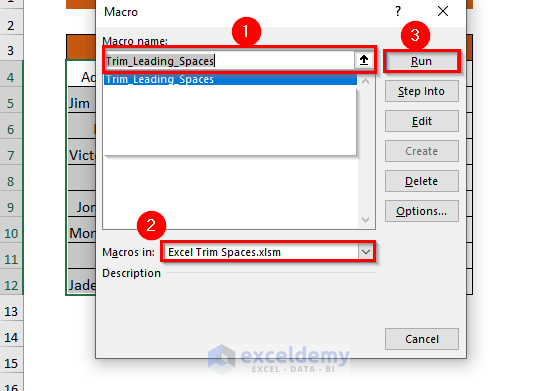
A dialog box will pop up. From there select Macros name and Macros in.
⏩ I selected the Trim_Leading_Spaces in Macros name.
⏩ I selected Excel Trim Spaces.xlsm in Macros in.
Then, click Run.
A message box will pop up where your selected range will be shown.
Now, click OK.
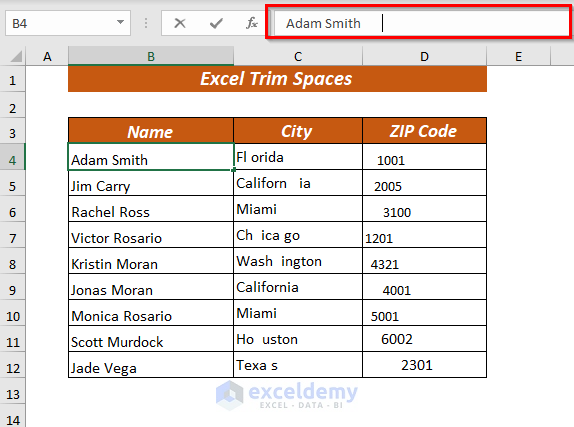
Therefore, all leading spaces will be trimmed.
8. Using VBA to Trim Trailing Spaces
If you want, you also can trim the trailing spaces by using Visual Basic.
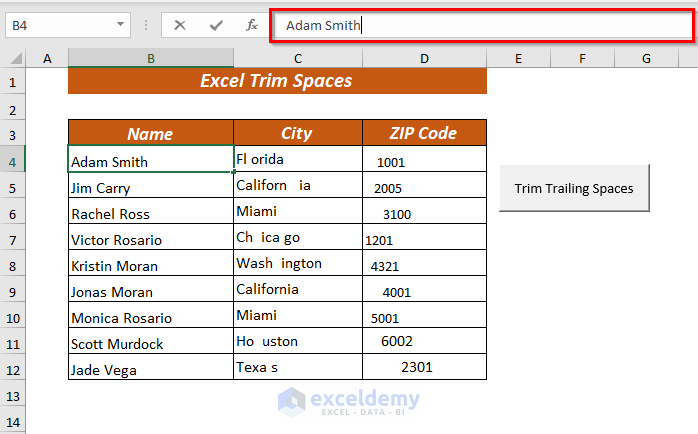
Here, I want to trim the trailing spaces from the Name column.
Now, to open the Visual Basic for Applications window you can follow the steps explained in section 7.
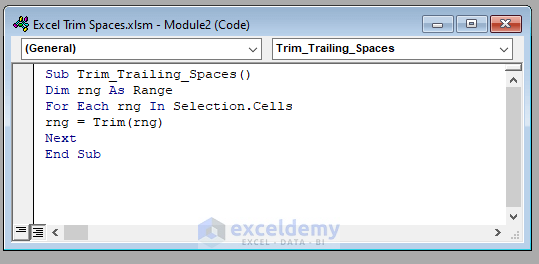
Then, type the following code in the Module.
Sub Trim_Trailing_Spaces()
Dim rng As Range
For Each rng In Selection.Cells
rng = Trim(rng)
Next
End Sub
Here, in the Sub Trim_Trailing_Spaces(), I declared the rng variable as Range.
Then, I used the VBA TRIM function to trim.
Now, Save the code and go back to the worksheet.
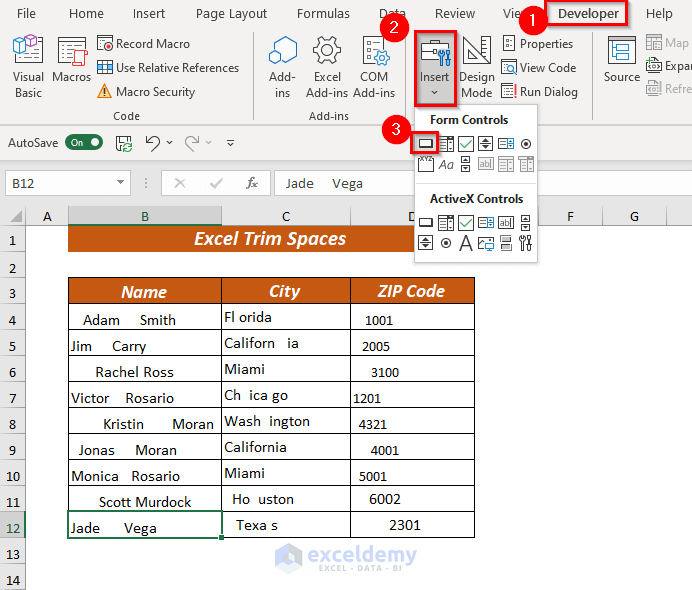
Open the Developer tab >> from Insert >> select Button from Form Controls
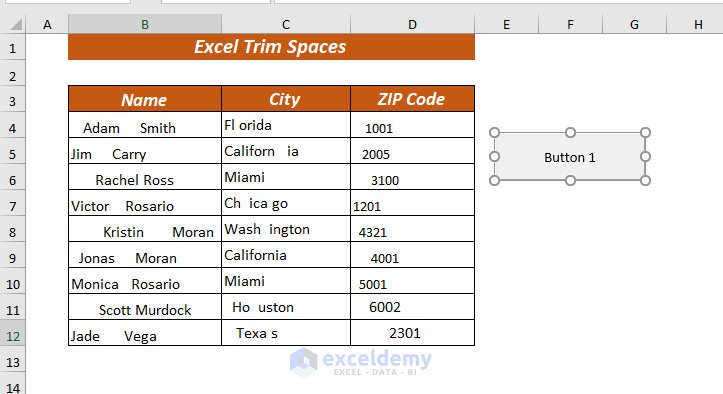
Now, Drag the Button to place it where you want to give the caption
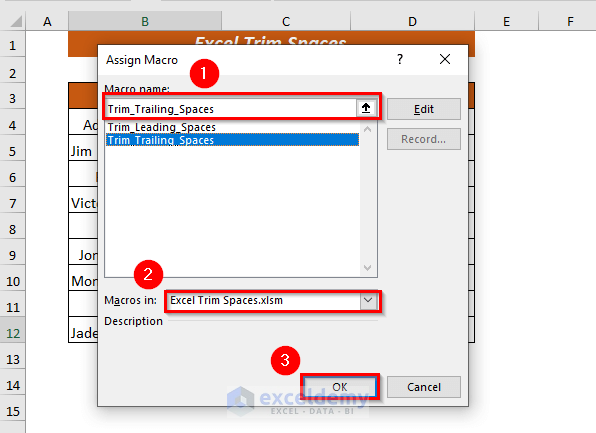
⏩ A dialog box of Assign Macro will appear.
Then, select the Macro name and Macros in.
⏩ I selected the Trim_Trailing_Spaces from Macro name selected Excel Trim Spaces.xlsm from Macros in.
Then, click OK.
Rename the Button.
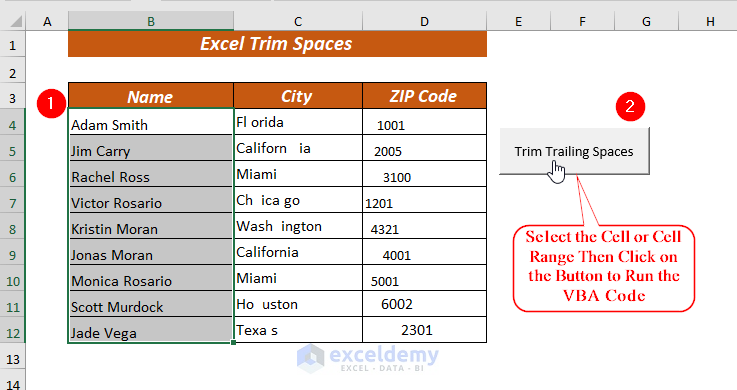
➤ I named it Trim Trailing Spaces.
Now, click on the Button to run the code.
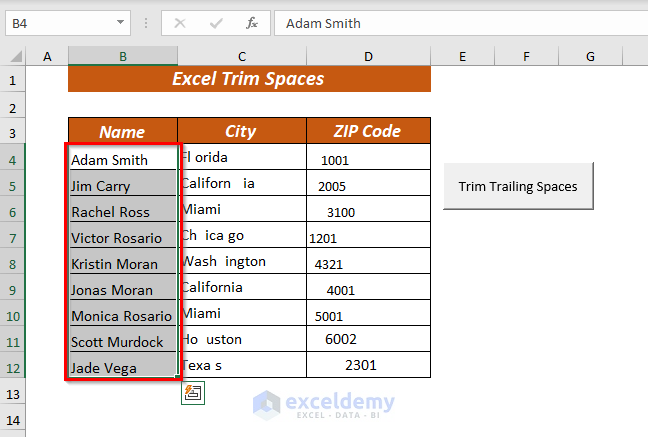
Hence, all trailing spaces will be trimmed.
Trailing spaces from the Name column are trimmed.
Things to Remember
🔺 The TRIM function treats all types of values as string values. So, be careful while trimming spaces from numeric values.
Practice Section
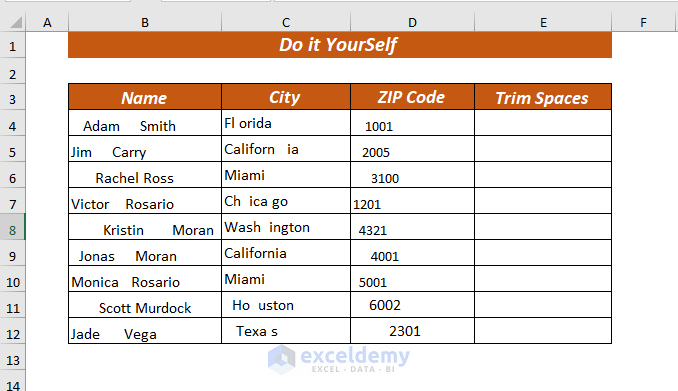
I’ve given a practice sheet in the workbook to practice these explained ways to trim spaces. You can download it from the above.
Download to Practice
Conclusion
I tried to explain 8 easy and quick ways to trim spaces in Excel. These different ways will help you to trim all types of values. Last but not least, if you have any kind of suggestions, ideas, or feedback please feel free to comment down below.
Related Articles
<< Go Back to Excel TRIM Function | Excel Functions | Learn Excel
Get FREE Advanced Excel Exercises with Solutions!