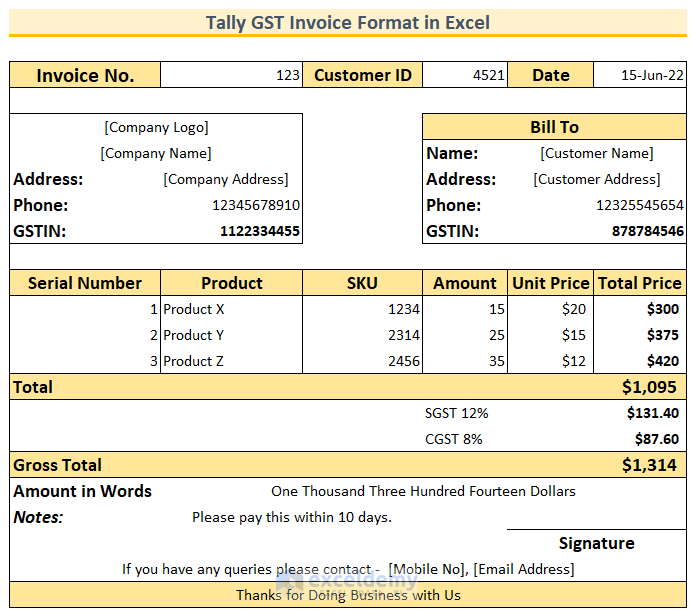
What Is a Tally GST Invoice?
GST means Goods and Services Tax which is a value-added tax imposed on goods and services for domestic consumption.
Here is some basic information that should be present in a tally GST invoice:
- Company Name, Logo, Phone Number, Address, and GSTIN
- Customer Name, Address, and Phone Number
- Invoice number and Date of issuance
- Applicable taxes such as – CGST, SGST, IGST, etc.
- Amount to be paid by the customers
- Signature from the in-charge
- Lastly, any additional notes regarding company policies
We’ll incorporate this information into our tally GST invoice format. Here is the final snapshot of our invoice format.
How to Create a Tally GST Invoice Format in Excel: 8 Quick Steps
Step 1 – Adding an Invoice Header
- Create the following fields at the top row of the invoice.
- Invoice No. – invoice number of the company.
- Customer ID – unique customer ID for the customers, this will help us to identify them later.
- Date – the date of issuance of the invoice.
![]()
Step 2 – Adding Company Details
- Add the company details to the top-left of the invoice.
- Company Logo – Add the company logo to make it more meaningful.
- Company Name – Obviously, we need to add the company name.
- Address – Location of the company.
- Phone – Phone number of the company.
- GSTIN – The GST Identification Number of the company.

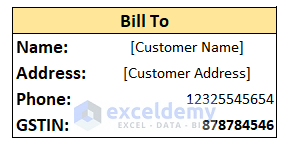
Step 3 – Including Customer Details
- Add the customer details to the invoice under the “Bill To” section with the following fields:
- Name – Name of the customer.
- Address – Location of the customer.
- Phone – Phone number of the customer.
- GSTIN – The GST Identification Number of the customer.
Read More: Tally Sales Invoice Format in Excel
Step 4 – Description of the Products
- Add the following columns:
- Serial Number – Serial number of the products.
- Product – Names of the products.
- SKU – Product codes.
- Amount – The number of units purchased.
- Unit Price – Price of a single unit.
- Total Price – We use a formula here that is Total Price = Amount * Unit Price.

- Use the following formula in cell G16 (Total) and press Enter.
=SUM(G13:G15)
This formula adds the prices of the 3 products.

Read More: Proforma Invoice Format in Excel with GST
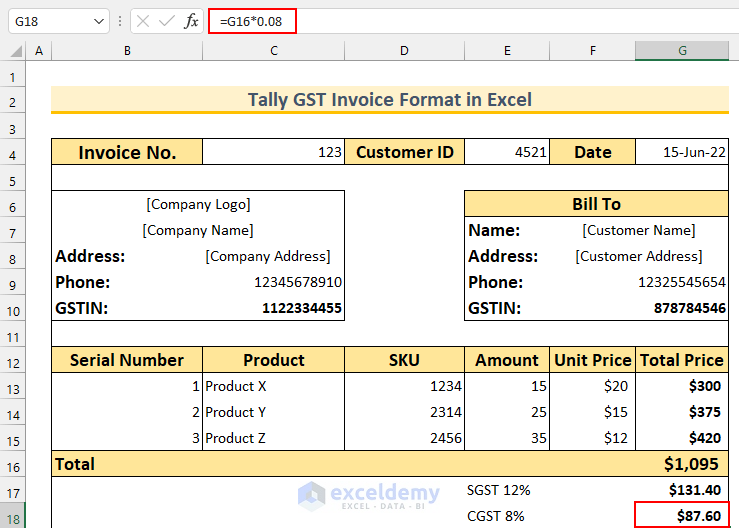
Step 5 – Adding GST Taxes
- Use the following formula in cell G17 and press Enter.
=G16*0.12
This formula finds 12% of the $1,095.

- Find the CGST by using the following formula in cell G18.
=G16*0.08
We calculated the CGST as 8% of $1,095.
Read More: How to Make GST Export Invoice Format in Excel
Step 6 – Calculating the Gross Total Using Formula
- Use the following formula in cell G19 and press Enter.
=ROUND(SUM(G16:G18),0)
We added the taxes with our value of $1,095. We rounded this figure using the ROUND function. As we want it to be rounded to the nearest integer, we have provided 0 in the formula.

Step 7 – Automating Amount in Words Using VBA
- Press Alt + F11 to bring up the VBA window.
- From Insert, select Module. We’ll put our code here.
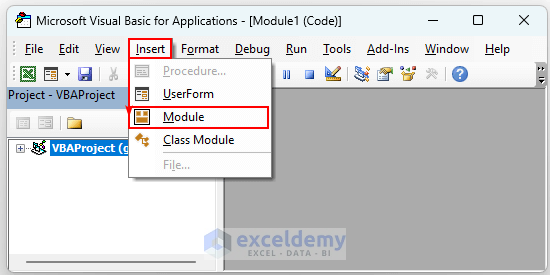
- Insert the following code.
Option Explicit
Function Number_To_Words(ByVal xNumber)
        Dim xDollars, xCents, xT
        Dim xPlace, xCount
        ReDim Place(9) As String
        Place(2) = " Thousand "
        Place(3) = " Million "
        Place(4) = " Billion "
        Place(5) = " Trillion "

        xNumber = Trim(Str(xNumber))
        xPlace = InStr(xNumber, ".")
        If xPlace > 0 Then
                xCents = xTens(Left(Mid(xNumber, xPlace + 1) & "00", 2))
                xNumber = Trim(Left(xNumber, xPlace - 1))
        End If
        xCount = 1
        Do While xNumber <> ""
                xT = xHundreds(Right(xNumber, 3))
                If xT <> "" Then xDollars = xT & Place(xCount) & xDollars
                If Len(xNumber) > 3 Then
                        xNumber = Left(xNumber, Len(xNumber) - 3)
                Else
                        xNumber = ""
                End If
                xCount = xCount + 1
        Loop
        Select Case xDollars
                Case ""
                        xDollars = "No Dollars"
                Case "One"
                        xDollars = "One Dollar"
                 Case Else
                        xDollars = xDollars & " Dollars"
        End Select
        Select Case xCents
                Case ""
                        xCents = ""
                Case "One"
                        xCents = " and One Cent"
                            Case Else
                        xCents = " and " & xCents & " Cents"
        End Select
        Number_To_Words = xDollars & xCents
End Function

Function xHundreds(ByVal xNumber)
        Dim xResult As String
        If Val(xNumber) = 0 Then Exit Function
        xNumber = Right("000" & xNumber, 3)
        If Mid(xNumber, 1, 1) <> "0" Then
                xResult = xDigit(Mid(xNumber, 1, 1)) & " Hundred "
        End If
        If Mid(xNumber, 2, 1) <> "0" Then
                xResult = xResult & xTens(Mid(xNumber, 2))
        Else
                xResult = xResult & xDigit(Mid(xNumber, 3))
        End If
        xHundreds = xResult
End Function

Function xTens(tt)
        Dim xResult As String
        xResult = ""
        If Val(Left(tt, 1)) = 1 Then
                Select Case Val(tt)
                        Case 10: xResult = "Ten"
                        Case 11: xResult = "Eleven"
                        Case 12: xResult = "Twelve"
                        Case 13: xResult = "Thirteen"
                        Case 14: xResult = "Fourteen"
                        Case 15: xResult = "Fifteen"
                        Case 16: xResult = "Sixteen"
                        Case 17: xResult = "Seventeen"
                        Case 18: xResult = "Eighteen"
                        Case 19: xResult = "Nineteen"
                        Case Else
                End Select
        Else
                Select Case Val(Left(tt, 1))
                        Case 2: xResult = "Twenty "
                        Case 3: xResult = "Thirty "
                        Case 4: xResult = "Forty "
                        Case 5: xResult = "Fifty "
                        Case 6: xResult = "Sixty "
                        Case 7: xResult = "Seventy "
                        Case 8: xResult = "Eighty "
                        Case 9: xResult = "Ninety "
                        Case Else
                End Select
                xResult = xResult & xDigit(Right(tt, 1))
        End If
        xTens = xResult
End Function

Function xDigit(dd)
        Select Case Val(dd)
                Case 1: xDigit = "One"
                Case 2: xDigit = "Two"
                Case 3: xDigit = "Three"
                Case 4: xDigit = "Four"
                Case 5: xDigit = "Five"
                Case 6: xDigit = "Six"
                Case 7: xDigit = "Seven"
                Case 8: xDigit = "Eight"
                Case 9: xDigit = "Nine"
                Case Else: xDigit = ""
        End Select
End Function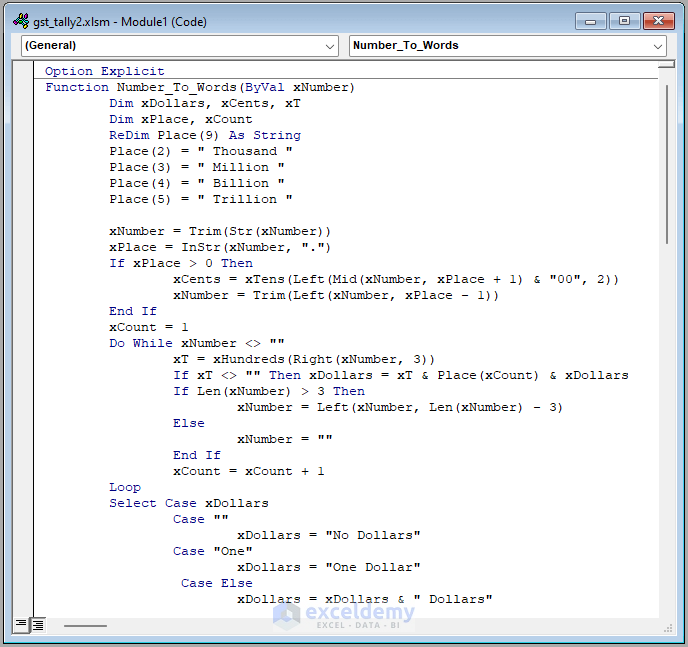
VBA Code Breakdown
- We are creating a custom function named Number_To_Words.
- We define the variable types.
- We use the VBA Case statement to apply the word converter for our numbers.
- We create 3 more functions – xHundreds, xTens, and xDigit to get the hundred, tens, and single-digit values, respectively.
- Save and close the Module.
- Use the following formula in cell G20.
=Number_To_Words(G19)
This formula converts the number to words as per the VBA code breakdown.
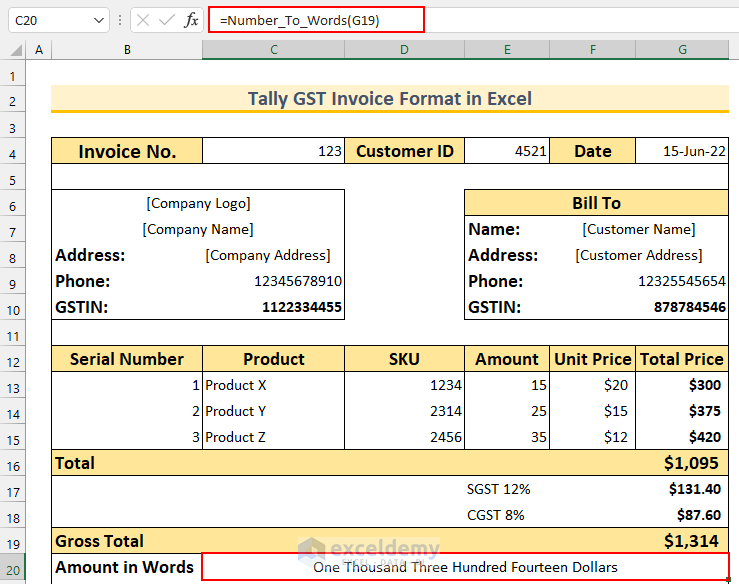
Step 8 – Adding Notes and the Footer Section
- Add Notes for the customer.
- Provide space to input the signature of the in-charge.
- Add the contact details of the company.
- Put a thank you note in a colored cell at the end.

Here’s the final tally GST invoice format.
Download the Template
Related Articles
- Create Non GST Invoice Format in Excel
- How to Create GST Rental Invoice Format in Excel
- How to Create Proforma Invoice for Advance Payment in Excel
- How to Create GST Bill Format in Excel with Formula
<< Go Back to Excel Invoice Templates | Accounting Templates | Excel Templates
Get FREE Advanced Excel Exercises with Solutions!
