In this article, we will describe in detail how to create a proforma invoice for advance payment in Excel. A Proforma invoice is used to request payment from a buyer for goods and/or services delivered. Advance payment means payment must be received before the goods or services will be delivered.
Step 1 – Inserting Company Details
Before creating a proforma invoice it it useful to create a sheet with various company details, so that the same proforma invoice can be easily re-configured for different requirements later.
For example, we created a sheet like this:

To make the details more accessible and controlled, we’ll use the Data Validation tool.
Here, we will insert multiple company names.
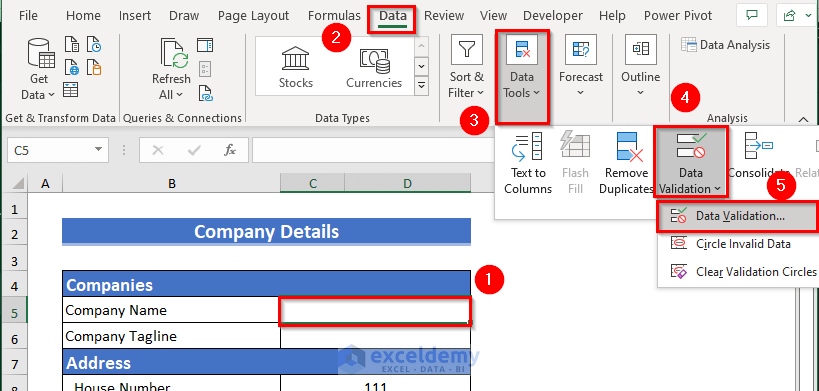
- Select cell C5.
- Open the Data tab >> go to Data Tools.
- Click Data Validation then Data Validation again.
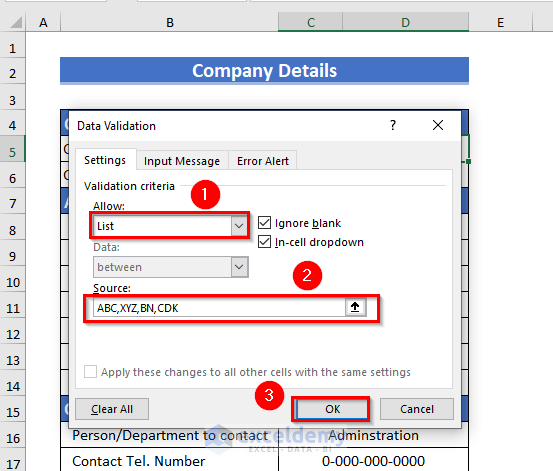
The Data Validation dialog box will appear.
- Select List from Allow.
- Enter the company names separated by commas. Here, we inserted ABC, XYZ, and CDK.
- Click on OK.
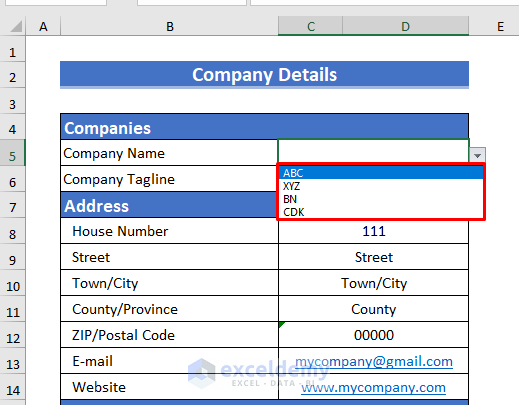
A drop-down list of Company Names is available in cell D5.
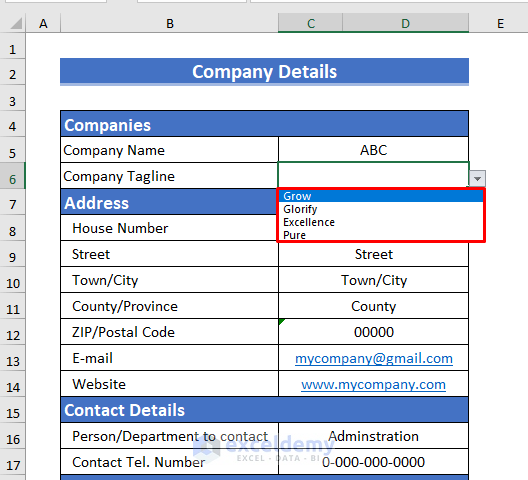
- Follow the same procedure to create a list for Company Tagline.
- Follow the same procedure to create a list of Currency inputs.
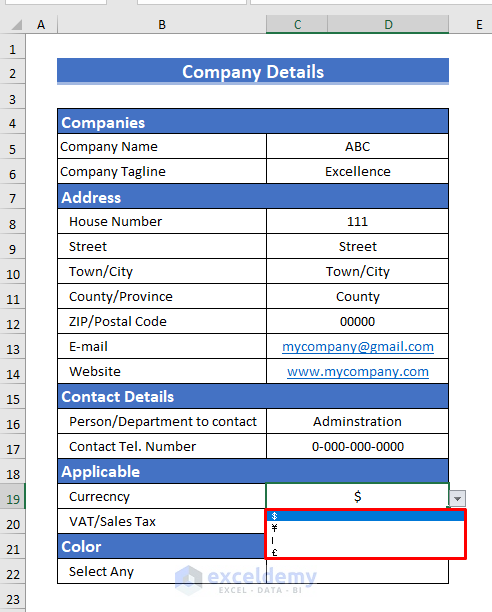
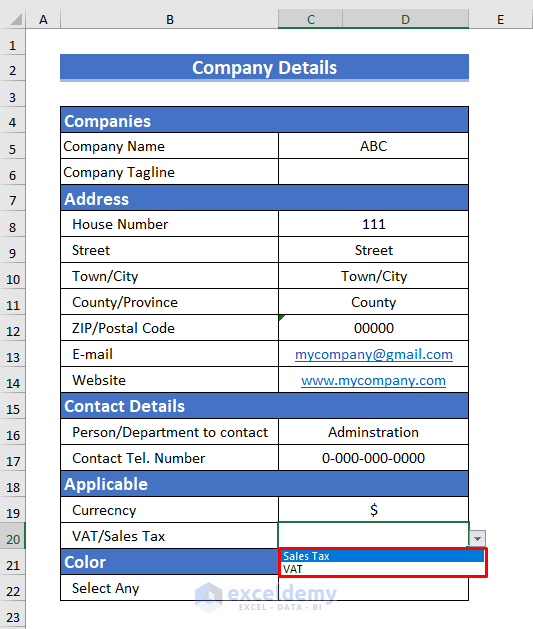
- Do the same for VAT/Sales Tax.
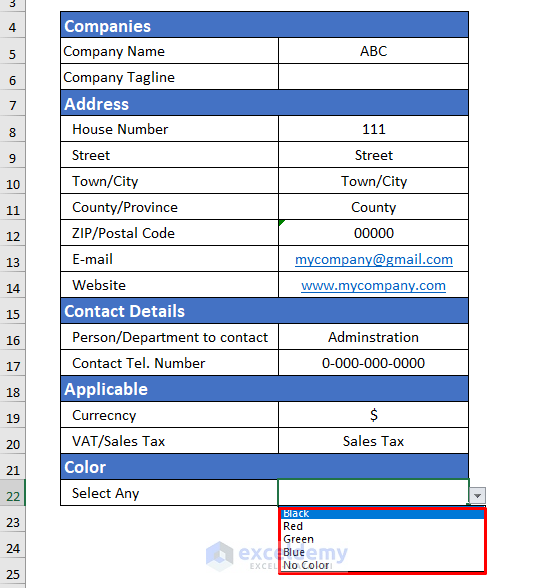
- Repeat for Color.
Read More: Proforma Invoice Format in Excel with GST
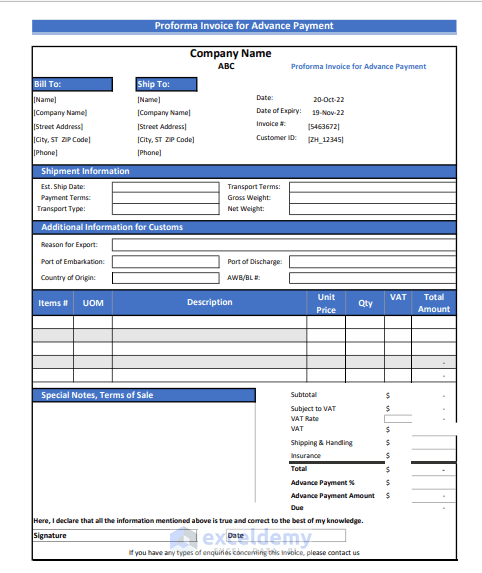
Step 2 – Information for the Proforma Invoice
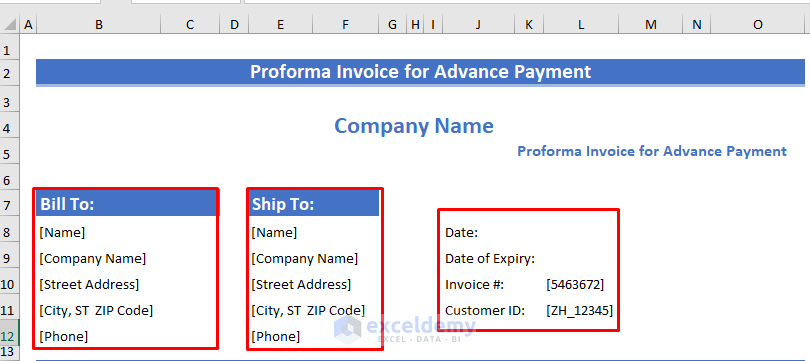
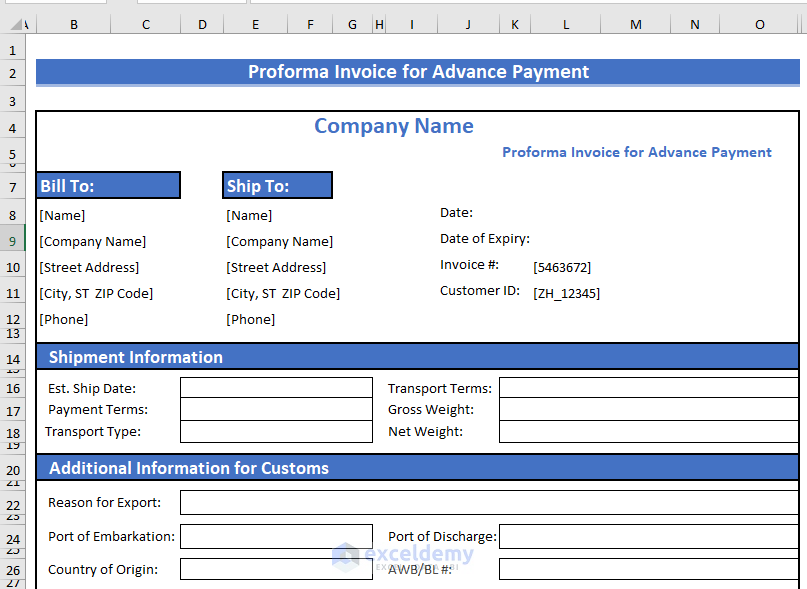
Now let’s create another sheet to insert all the information required for the proforma invoice.
- Enter all the vendor’s address details under Bill To.
- Enter all the delivery address details under Ship To.
- Enter the Invoice Number, Customer ID, and Date.
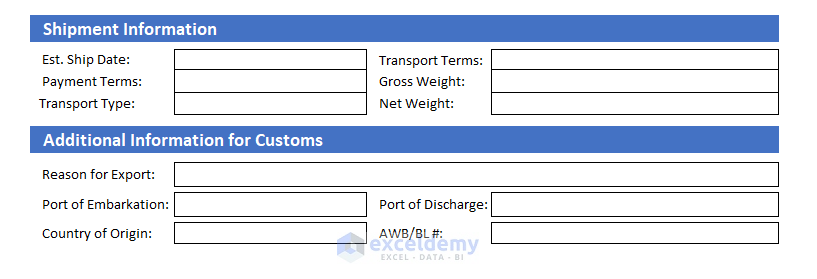
As it’s a proforma invoice, many jurisdictions require recording Export & Import information. For this purpose, we created two fields: Shipment Information and Additional Information for Customs.
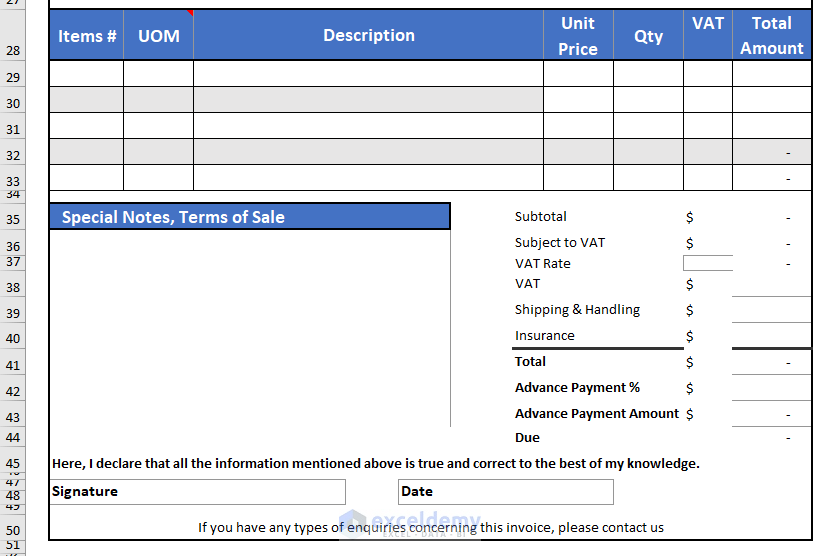
The section below will hold the line items of the goods or services delivered, including the Description, Unit of Measurement, Unit Price, Quantity, VAT/Sales Tax, and Total Amount.

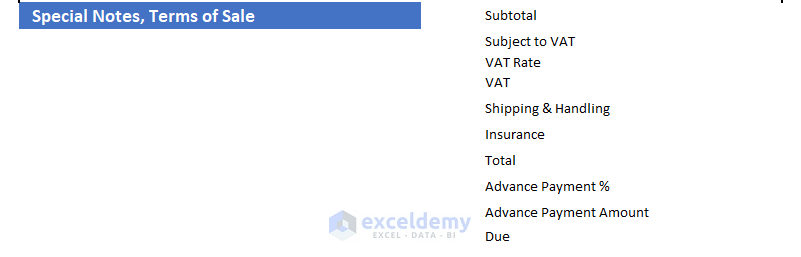
The next section contains the calculations of all applicable charges and payments including Advance Payment.
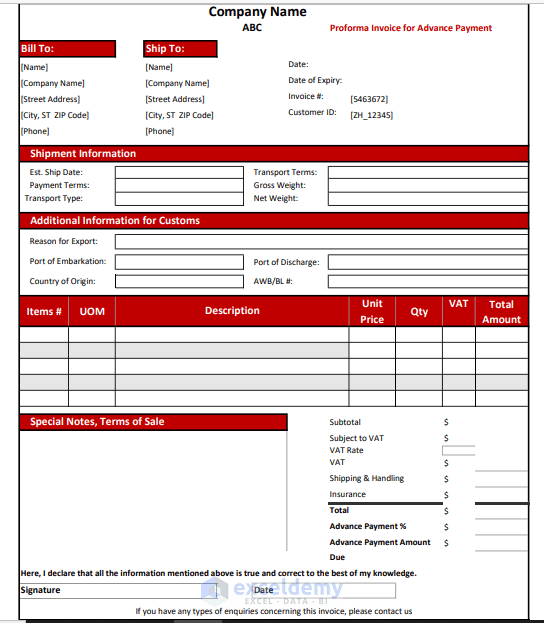
Step 3 – Formatting Proforma Invoice for Advance Payment
Let’s format the Invoice to make it more presentable and customer friendly.
- Use any Fill Color of your choice. Here, we used Blue color.
We used Thick Outside Borders in all the Headings.
We used some Fill colors in the Product Description rows.
Here is the final output after formatting.
Read More: Tally Sales Invoice Format in Excel
Step 4 – Using Conditional Formatting to Automate Colors
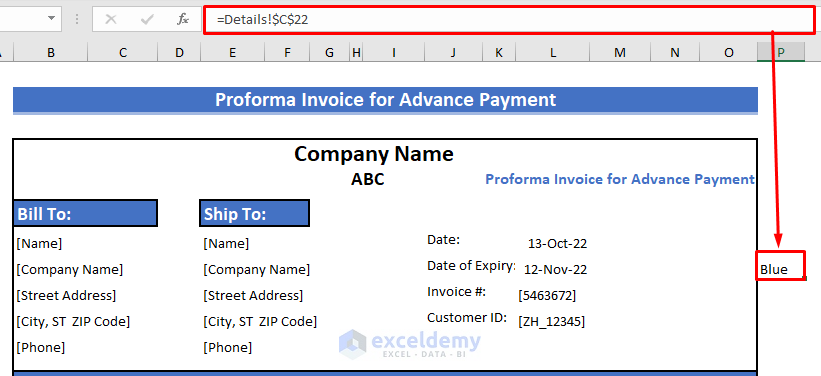
Now, we will automate the Fill Color by using Conditional Formatting and linking the details sheet with the invoice sheet.
- Select any cell outside of the invoice.
- Enter the following formula and press ENTER:
=Details!$C$25Blue will be returned, because Blue is selected in the Color field in the Details sheet (cell C25).
Now we’ll use Conditional Formatting to change the color of the Headings based on another sheet.
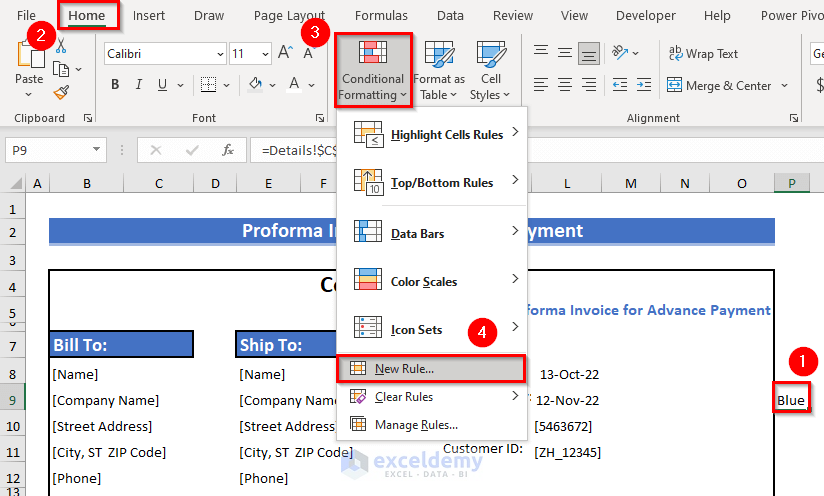
The Conditional Formatting dialog box will pop up.
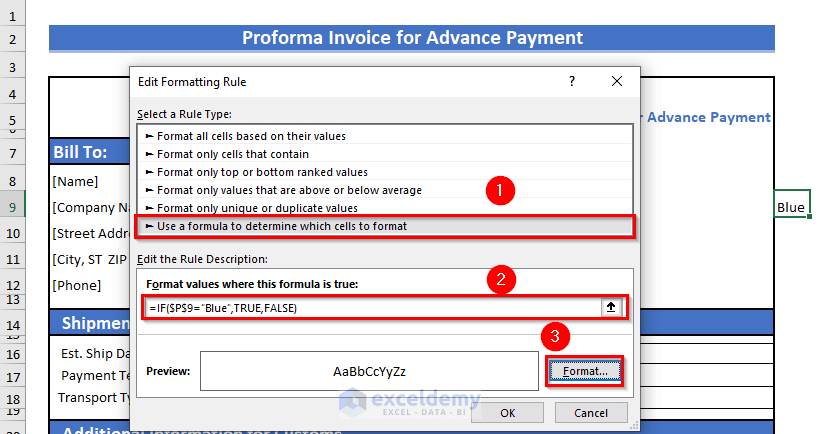
- Select Use a formula to determine which cells to format.
- Enter the following formula:
=IF($P$9="Blue",TRUE,FALSE)Here, the IF function will check whether the P9 cell contains Blue or not. If the cell contains Blue then it will format the Fill Colors with Blue.
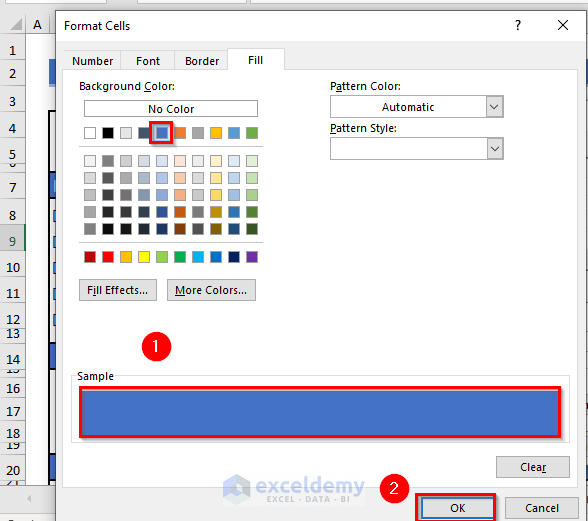
- Click on Format.
The Format Cells dialog box will appear.
- Select the color of your choice. Here, Blue based on the formula.
- Click OK.
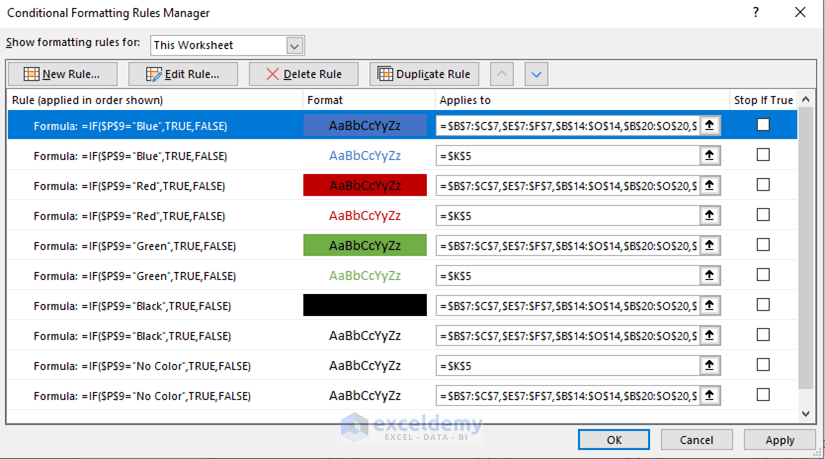
- Open the Conditional Formatting Rules Manager.
- Select Applies to.
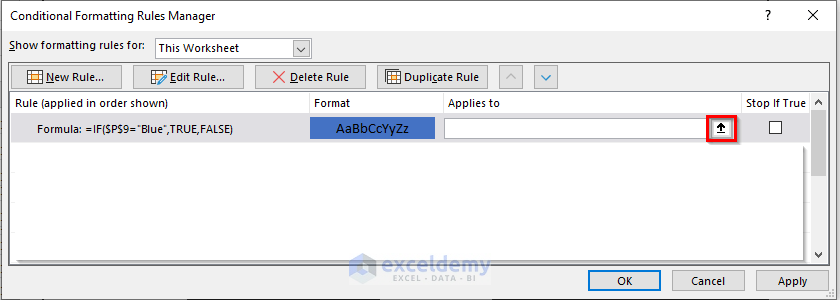
- Select all the cell ranges to apply the Conditional Formatting.
- Insert the following range:
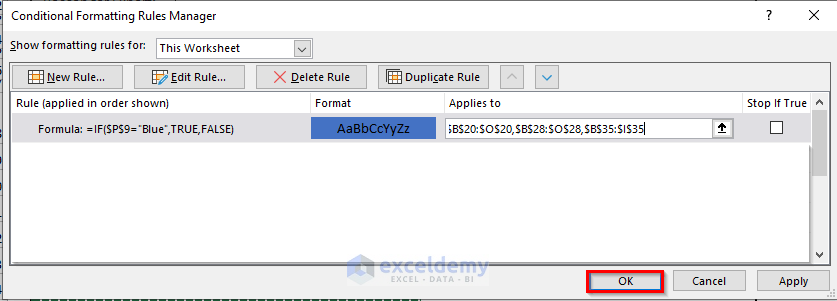
=$B$7:$C$7,$E$7:$F$7,$B$14:$O$14,$B$20:$O$20,$B$28:$O$28,$B$35:$I$35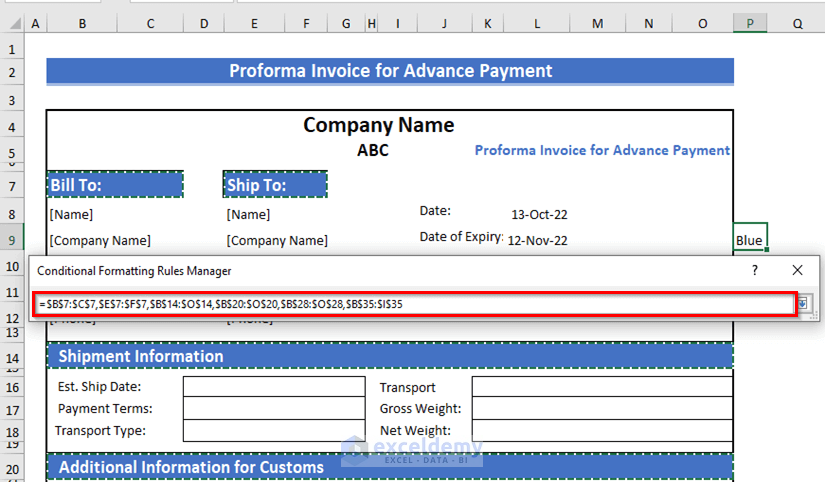
- Click on OK.
- Apply the formula for Conditional Formatting of Fill Color in cell K9 too.
Only the Font color of the Invoice of the K9 cell will be formatted.

Here is the Rule for all the colors used in the Details sheet:
- Go back to the Details sheet.
- Select any color from the list, for example Red.
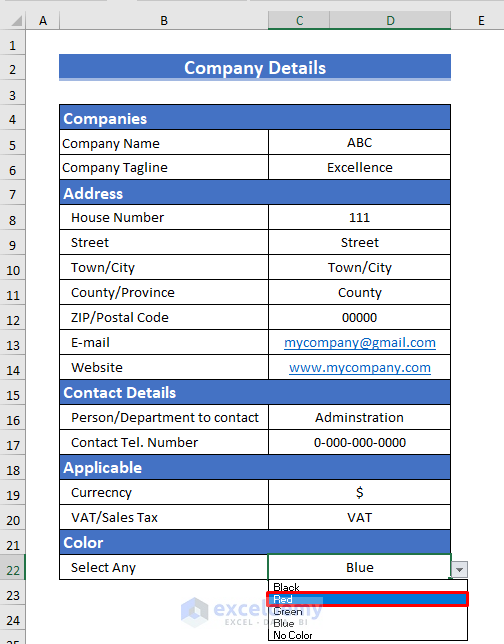
The Fill Color of the Invoice sheet changes automatically.
Step 5 – Using Formulas to Automate Advance Payment
To automate all the payments and options, we’ll use different formulas and link the details sheet with the invoice sheet.
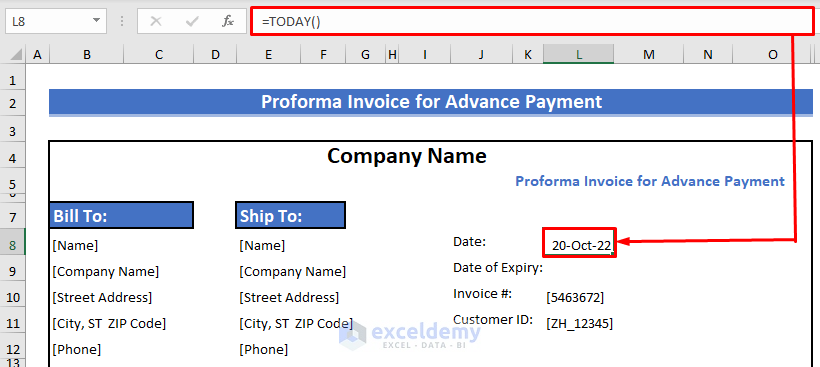
- To insert the invoice Date, use the TODAY function in cell L8 as follows:
=TODAY()This function will insert today’s date automatically.
- Press ENTER.
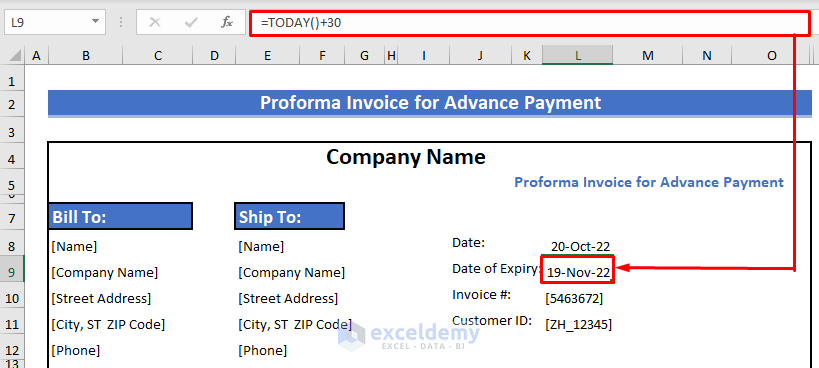
- For the Date of Expiry, use the following formula in cell L9:
=TODAY()+30Here, we added 30 days to the result of the TODAY function. Adapt as required.
- Press ENTER.
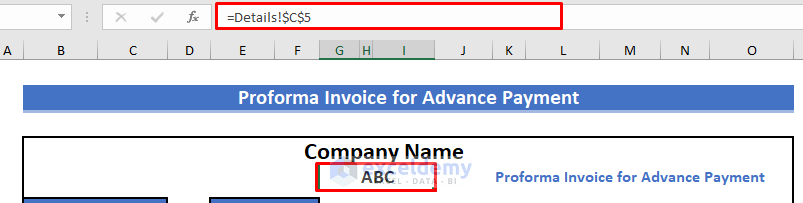
If you have multiple companies but want to keep the invoice format the same for all of them, then to change the name of the company on the invoice, we can use a formula that refers to the Details sheet list.
- Select any cell outside the invoice.
- Enter the following formula and press ENTER:
=Details!$C$5This will update the company name based on the Details sheet information.
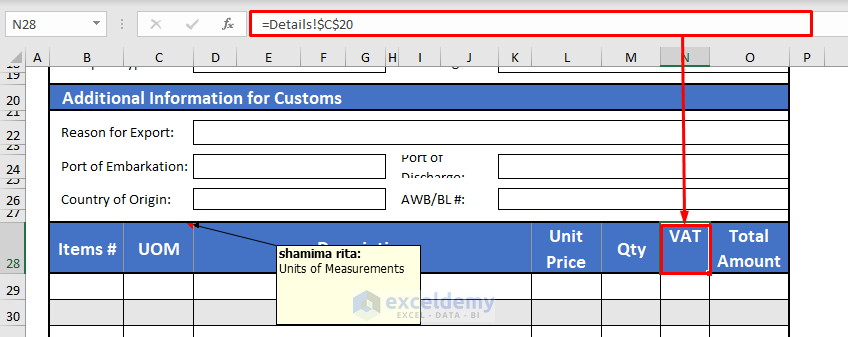
- Select cell N28 again
- Enter the following formula and press ENTER:
=Details!$C$20This will update the type of VAT based on the Details sheet information.
Now, we will calculate the Total Amount.
- Insert the following formula and press ENTER:
=L29*M29Here, we multiplied Unit Price with the Quantity.
- Use the Fill Handle to AutoFill the formula in the rest of the cells.

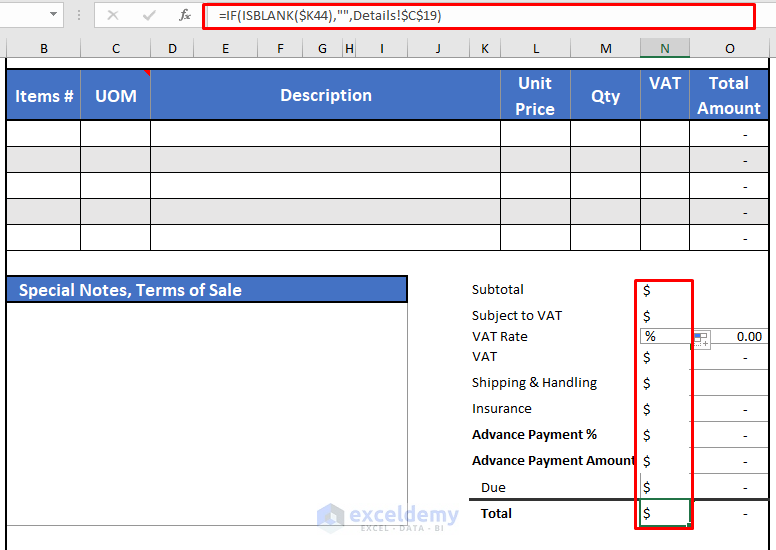
We listed different currencies in the Details sheet so that we can change Currency automatically.
- Enter the following formula and press ENTER:
=IF(ISBLANK($K35),"",Details!$C$19)Here, we used the IF function where the logical_test uses the ISBLANK function to check whether cell K35 is blank or not. If the condition is TRUE, then it will fetch the currency symbol from the Details sheet.
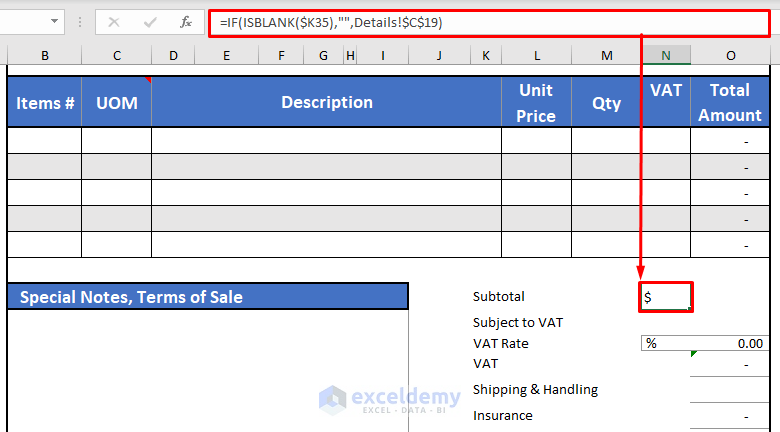
- Use the Fill Handle to AutoFill the formula in the rest of the cells.
We’ll again use the SUM function to calculate the Subtotal.
- Insert the following formula in cell O35 then press ENTER:
=SUM(O29:O33)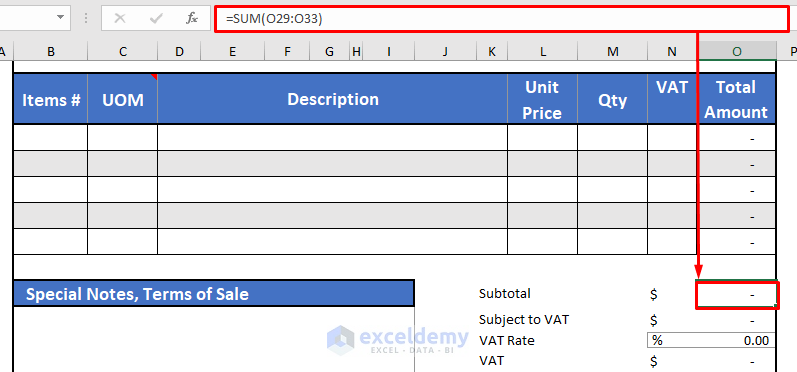
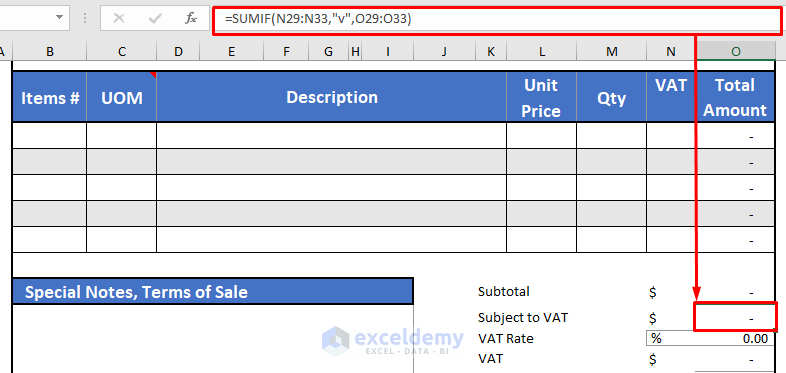
- Enter the following to calculate Subject to VAT:
=SUMIF(N29:N33,"v",O29:O33)Here, we used the SUMIF function to sum the products with VAT applied.
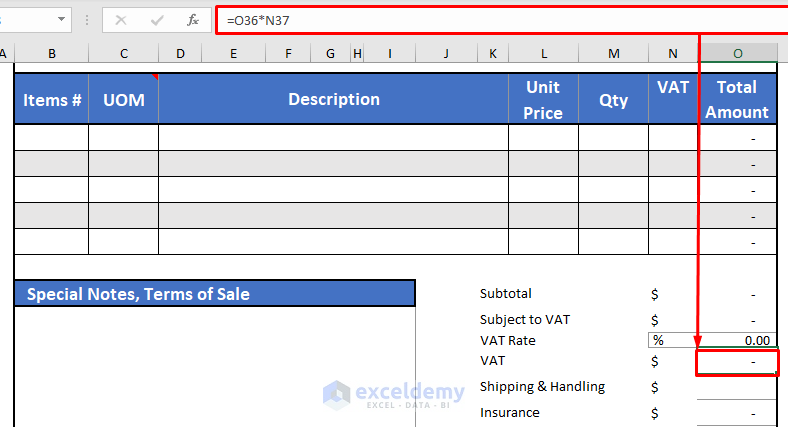
- To calculate total VAT, insert the following formula in cell O37 and press ENTER:
=O36*N37We multiplied Subject to VAT and the VAT Rate.
With all the components determined, we can calculate the Total bill.
- Enter the following formula in cell O41 and press ENTER:
=SUM(N35:O40)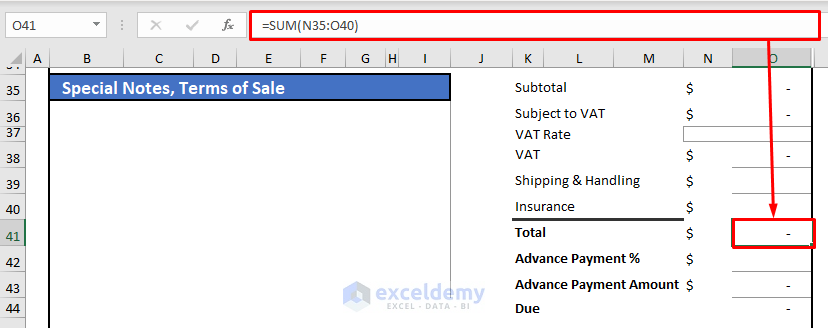
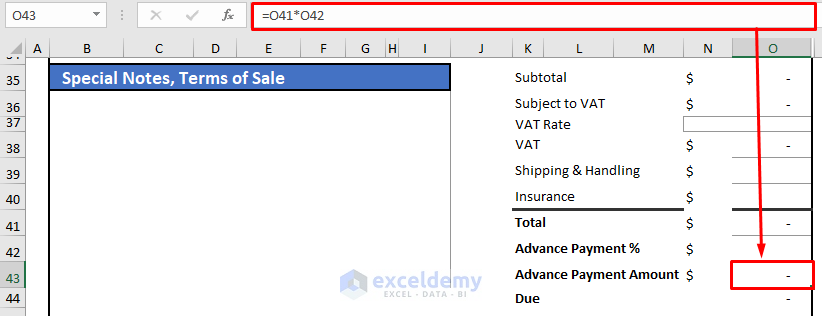
Now we calculate the Advance Payment Amount.
- Enter the following formula in cell O43 and press ENTER:
=O41*O42We multiplied the Advance Payment % percentage and the Total.
Finally, we calculate the Due amount.
- Enter the following formula in cell O44 and press ENTER:
=O41-O43By subtracting the Advance Payment Amount from the Total, we get the Due amount.

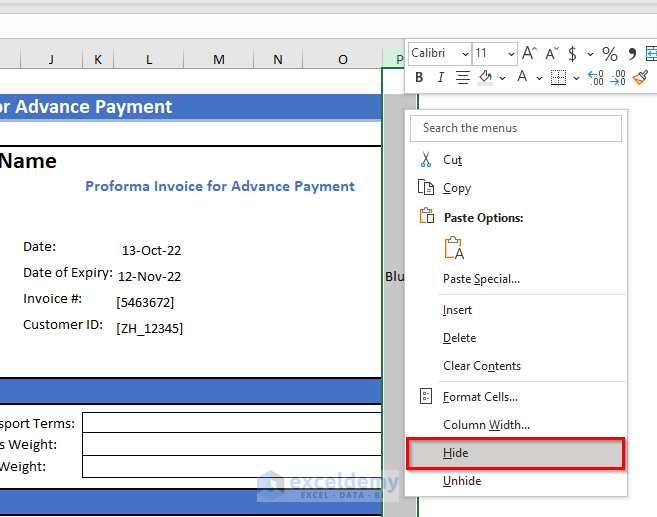
To make the invoice more eye-catching, hide any unwanted columns or rows, such as the color column.
- Select the entire column P then right-click.
- Select Hide from the context menu.
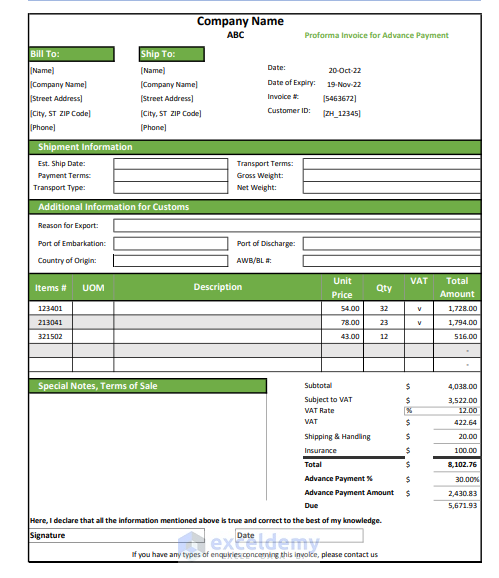
Example of Using Proforma Invoice for Advance Payment
Here, we inserted values into the required fields to show the invoice in action. These fields are editable; insert field name cell values as per your choice.

For example, here we changed the color again, this time to Green.
Download Practice Workbook
Related Articles
- How to Create a Tally GST Invoice Format in Excel
- How to Create GST Rental Invoice Format in Excel
- Create Non GST Invoice Format in Excel
- How to Make GST Export Invoice Format in Excel
- How to Create GST Bill Format in Excel with Formula
<< Go Back to Excel Invoice Templates | Accounting Templates | Excel Templates
Get FREE Advanced Excel Exercises with Solutions!
