Excel is exceptionally well to handle and calculate large datasets. When working with large datasets, it is a frequent need to move rows in Excel to columns. Moreover, it is also required sometimes for better visualization of datasets. Now, in this article, I will show you 4 effective ways to move rows in Excel to columns.
How to Move Rows in Excel to Columns: 4 Effective Ways
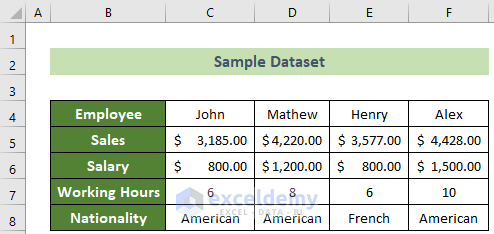
Say, we have a dataset of 4 employees containing their names, sales, monthly salary, working hours, and nationality. Each employee’s information is recorded in individual columns. Now, you want to move these rows in Excel to columns. Follow any of the 4 effective ways given below to accomplish this.
1. Using Paste Options to Move Rows to Columns
The easiest and simplest way to move rows to columns in Excel is to use the Paste Options button. Follow the steps below to do this.
📌 Steps:
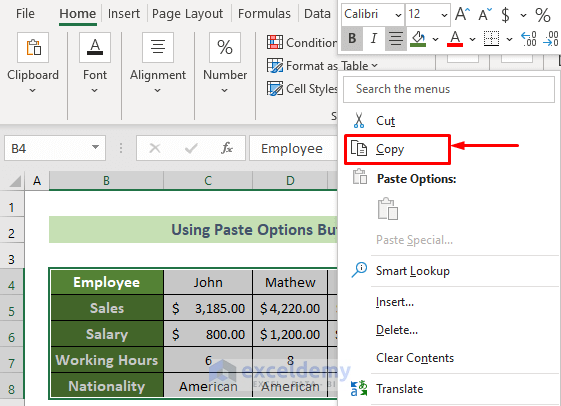
- First and foremost, select the cells B4:F8.
- Subsequently, click your right mouse button.

- Afterward, choose the Copy option from the context menu.
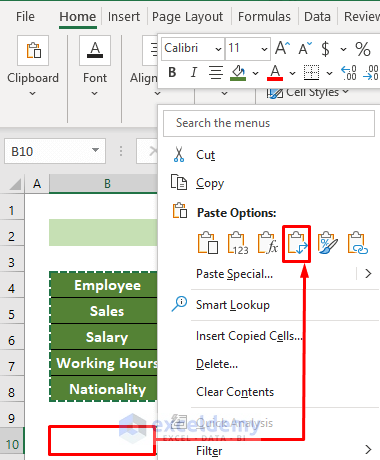
- Now, click on the B10 cell and press your right mouse button again.
- Following, choose the Transpose option from the context menu’s Paste Options: button.
Thus, you will see the rows are moved in Excel to columns successfully and the outcome would look like this.

2. Using TRANSPOSE Function
Another easy way to move rows to columns is to use the Excel TRANSPOSE function. Go through the steps below to do this.
📌 Steps:
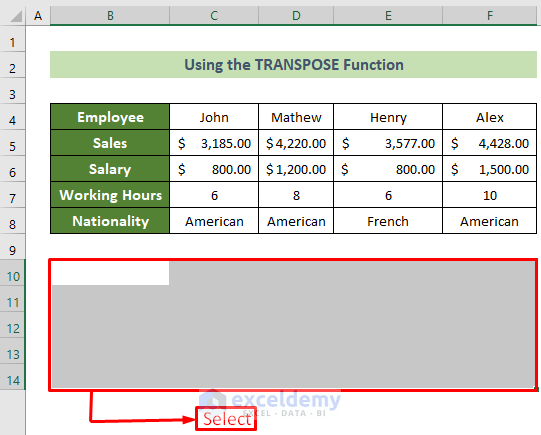
- As your dataset is 5 rows * 5 Columns, select the cells B10:F14 to move rows to columns.
- Afterward, insert the following formula.
=TRANSPOSE(B4:F8)- Subsequently, press Ctrl + Shift + Enter.
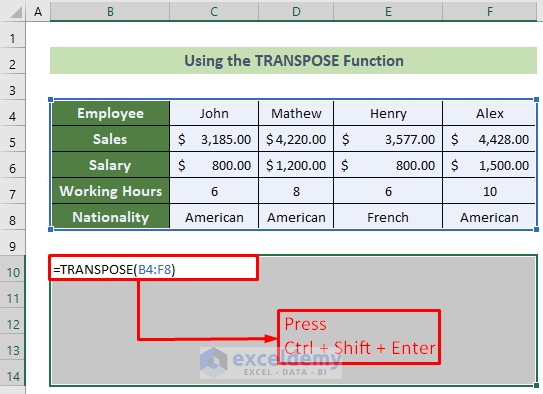
- Consequently, all the rows will be moved to columns like the following.

Now, you have to format your result as you want again. Finally, the result would look like this.

Note:
This is an array formula. So you must press Ctrl + Shift + Enter. If you press only Enter, it will work on a single cell only.
Read More: How to Move Rows in Excel Without Replacing
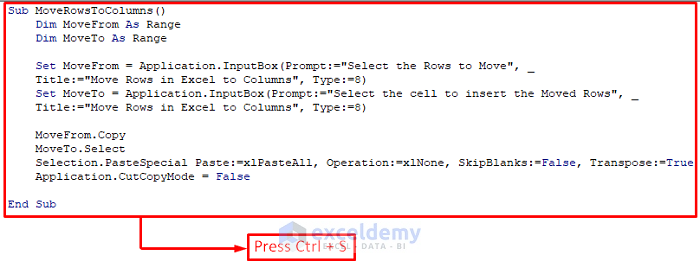
3. Move Rows to Columns by Applying VBA Code
Besides, you can use a VBA code to move rows in Excel to columns. Follow the steps below to do this.
📌 Steps:
- At the very beginning, go to the Developer tab >> Visual Basic tool.

- As a result, the Microsoft Visual Basic for Applications window will appear.
- Afterward, select Sheet4 from the VBAProject group.

- Following, write the following code in the appeared code window.
Sub MoveRowsToColumns()
    Dim MoveFrom As Range
    Dim MoveTo As Range
    Set MoveFrom = Application.InputBox(Prompt:="Select the Rows to Move", _
    Title:="Move Rows in Excel to Columns", Type:=8)
    Set MoveTo = Application.InputBox(Prompt:="Select the cell to insert the Moved Rows", _
    Title:="Move Rows in Excel to Columns", Type:=8)
    MoveFrom.Copy
    MoveTo.Select
    Selection.PasteSpecial Paste:=xlPasteAll, Operation:=xlNone, SkipBlanks:=False, Transpose:=True
    Application.CutCopyMode = False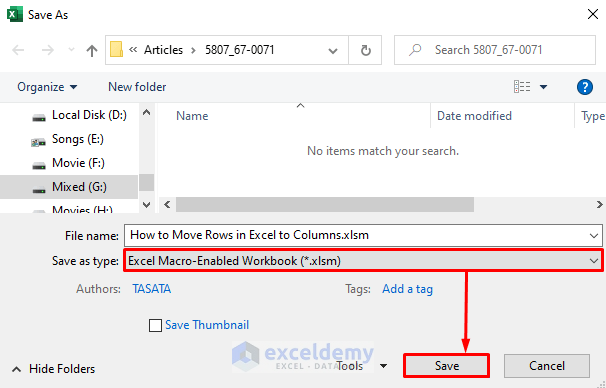
End Sub- After writing the code, press Ctrl + S.
- As a result, a Microsoft Excel dialogue box will appear.
- Subsequently, click on the No button.

- At this time, the Save As dialogue box will appear.
- Choose the Save as type: option as .xlsm file and click on the Save button.
- Now, close the VBA window and go to the Developer tab >> Macros tool.
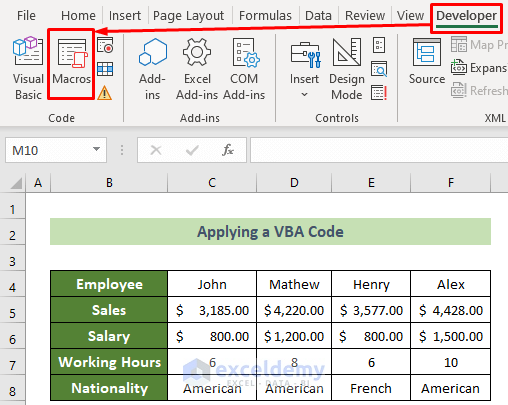
- As a result, the Macro window will appear.
- Choose Sheet4.MoveRowstoColumns option from the Macro name: pane and click on the Run button.

- As a result, the created Move Rows in Excel to Columns window will appear.
- Following, choose the cells B4:F8 in the Select the Rows to Move text box and click on the OK button.

- Afterward, the Move Rows in Excel to Columns window will appear again.
- Select the B10 cell in the Select the cell to insert the Moved Rows text box.
- Last but not least, click on the OK button.

Thus, your selected rows would be moved in Excel to columns. And, the output should look like the following.

Read More: Move Row to Bottom in Excel If Cell Contains a Value
4. Using Power Query Tool
Another thing you can do in accomplishing your target is to use the Excel Power Query tool. Follow the steps below to achieve this.
📌 Steps:
- First, go to the Data tab >> From Table/Range tool.

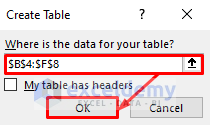
- As a result, the Create Table window will appear.
- Following, choose the B4:F8 cells for table data and click on the OK button.
- At this time, the Power Query Editor window will appear.
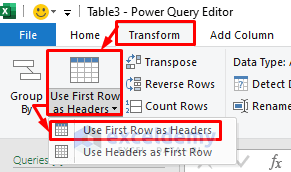
- Here, go to the Transform tab >> Transpose tool.

- Afterward, go to the Transform tab >> Use First Row as Headers tool >> Use First Row as Headers option.
- Now, close the Power Query window.
- Subsequently, the Power Query Editor dialogue box will appear.
- Following, choose the Keep option.

- As a result, you will see that the rows are moved into columns in the newly created table.
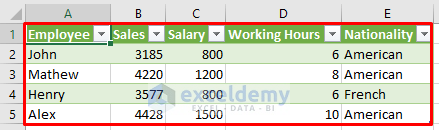
Now, format the table according to your requirements, and your task is accomplished. The final outcome should look like this.

Read More: How to Move Row to Another Sheet Based on Cell Value in Excel
💬 Things to Remember
- When working with formulas, you have to be extra careful. Because after moving the rows to columns the formula reference would change too.
- If you work with an Excel table, the transpose feature will not be available. In that case, you have to make the table a range and then move the rows to columns.
Download Practice Workbook
You can download our free practice workbook from here.
Conclusion
So, I have shown you the 4 effective ways to move rows in Excel to columns. Go through the full article carefully to understand it better and apply it afterward according to your needs. I hope you find this article helpful and informative. If you have any further queries or recommendations, please feel free to contact me.
Related Articles
- How to Move Rows Up in Excel
- How to Move Rows Down in Excel
- How to Rearrange Rows in Excel
- How to Move Every Other Row to Column in Excel
<< Go Back to Move Rows | Rows in Excel | Learn Excel
Get FREE Advanced Excel Exercises with Solutions!
