One of the common problems that most of us face in our daily lives while working with Macro in Excel is how to convert multiple Excel files to CSV files. In this article, I’ll show you how you can accomplish this comfortably and conveniently with proper examples and illustrations.
Macro to Convert Multiple Excel Files to CSV Files (Quick View)
Sub Convert_Multiple_Excel_Files_to_CSV_Files()

Application.ScreenUpdating = False
Application.EnableEvents = False
Application.Calculation = xlCalculationManual

Set File_Dialog = Application.FileDialog(msoFileDialogFolderPicker)

File_Dialog.AllowMultiSelect = False
File_Dialog.Title = "Select the Folder with the Excel Files"
If File_Dialog.Show <> -1 Then
    Exit Sub
End If

File_Path = File_Dialog.SelectedItems(1) & "\"
Destination_Path = File_Dialog.SelectedItems(1) & "\"

File_Name = Dir(File_Path & "*.xls*")
Do While File_Name <> ""
    Set File = Workbooks.Open(Filename:=File_Path & File_Name)
    Destination_Name = Destination_Path & Left(File_Name, InStr(1, File_Name, ".") - 1) & ".csv"
    File.SaveAs Filename:=Destination_Name, FileFormat:=xlCSV
    File.Close savechanges:=False
    File_Name = Dir
Loop

Application.Calculation = xlCalculationAutomatic
Application.EnableEvents = True
Application.ScreenUpdating = True

End Sub
Download Practice Workbook
Download this practice workbook to exercise while you are reading this article.
An Overview to Convert Multiple Excel Files to CSV Files Using Macro (Step-by-Step Analysis)
So, without further delay, let’s go to our main discussion today. Here we’ve got a folder in our computer ExcelFiles that contains 5 Excel files called Book1.xlsx, Book2.xlsx, Book3.xlsx, Book4.xlsx, and Book5.xlsx.

Our objective today is to convert the Excel files into CSV files using a Macro.
⧪ Step 1: Setting up the Environment
First of all, we’ll set some necessary parameters to the required values to set up an environment for running the code smoothly. These are:
Application.ScreenUpdating = False
Application.EnableEvents = False
Application.Calculation = xlCalculationManual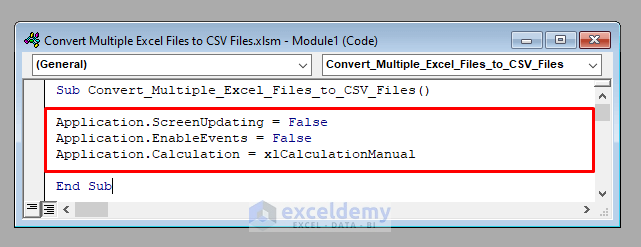
⧪ Step 2: Selecting the Folder with the Excel Files
This is one of the most important steps. Each time the code is run, the user will get an opportunity to select the folder with the Excel files. We’ll use the VBA FileDialog object for this purpose.
Set File_Dialog = Application.FileDialog(msoFileDialogFolderPicker)
⧪ Step 3: Allocating the FileDialog properties
Next, we’ll allocate the properties of the FileDialog object. One can’t select more than one folder. Also, if no folder is selected the code will stop automatically.
File_Dialog.AllowMultiSelect = False
File_Dialog.Title = "Select the Folder with the Excel Files"
If File_Dialog.Show <> -1 Then
    Exit Sub
End If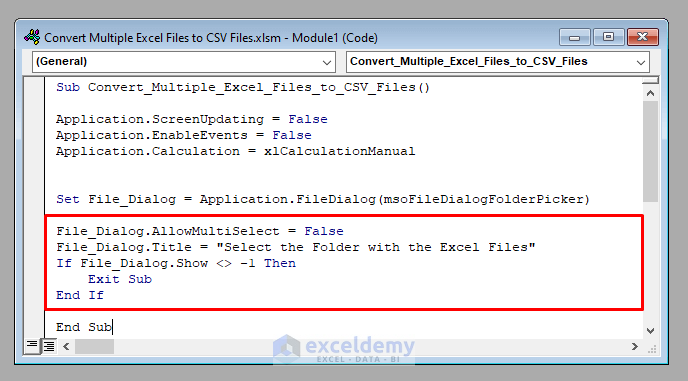
⧪ Step 4: Setting the Name of the Source Path and the Destination Path
Next, we’ll set the name of the source path and the destination path. In our data set, they are the same. That is the path of the folder selected by the user.
File_Path = File_Dialog.SelectedItems(1) & "\"
Destination_Path = File_Dialog.SelectedItems(1) & "\"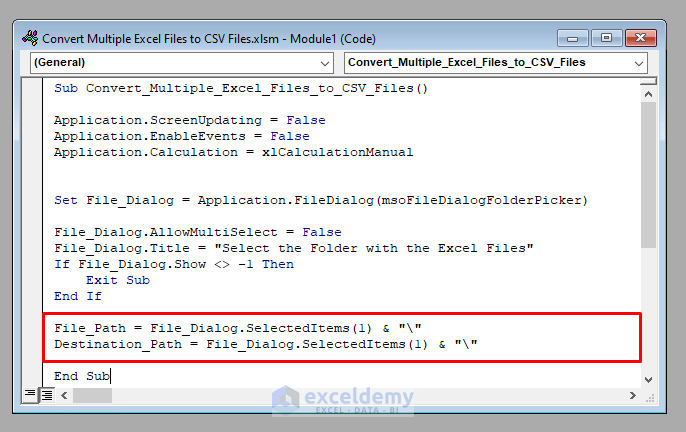
⧪ Step 5: Iterating through a Loop to Save All the Excel Files as CSV Files
Then we’ll iterate through a while-loop to save all the Excel files in the folder as CSV files.
File_Name = Dir(File_Path & "*.xls*")
Do While File_Name <> ""
    Set File = Workbooks.Open(Filename:=File_Path & File_Name)
    Destination_Name = Destination_Path & Left(File_Name, InStr(1, File_Name, ".") - 1) & ".csv"
    File.SaveAs Filename:=Destination_Name, FileFormat:=xlCSV
    File.Close savechanges:=False
    File_Name = Dir
Loop
⧪ Step 6: Closing the Process
Finally, we’ll close the process.
Application.Calculation = xlCalculationAutomatic
Application.EnableEvents = True
Application.ScreenUpdating = True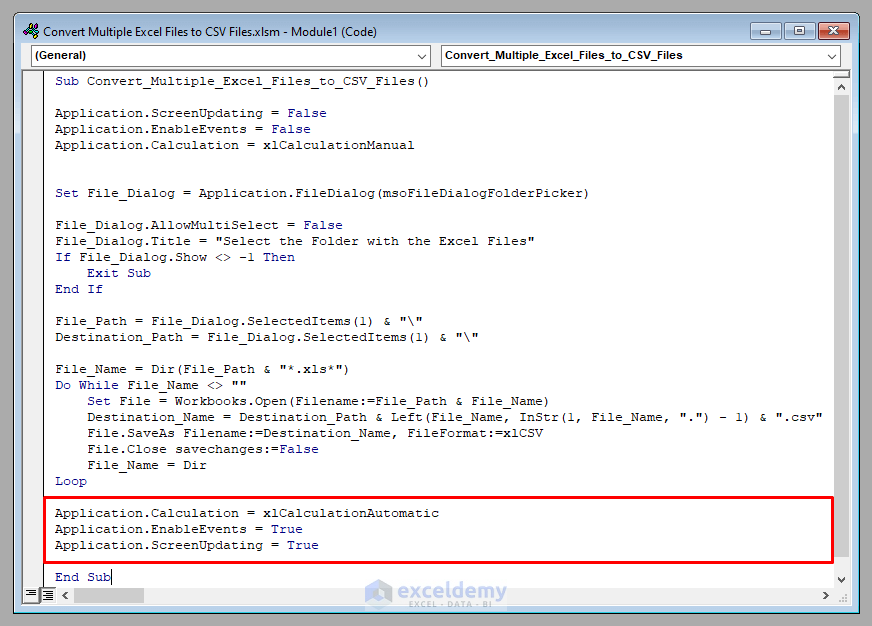
Read More: How to Convert Excel Files to CSV Automatically (3 Easy Methods)
Similar Readings
- How to Convert Excel File to CSV Format (5 Easy Ways)
- Macro to Convert Excel to Pipe Delimited Text File (3 Methods)
- How to Convert Excel File to Text File with Comma Delimited (3 Methods)
Developing the Macro to Convert Multiple Excel Files to CSV Files
We’ve seen the step-by-step analysis of the code to convert multiple Excel files to CSV files.
Therefore, the complete VBA code to develop the Macro will be:
⧭ VBA Code:
Sub Convert_Multiple_Excel_Files_to_CSV_Files()

Application.ScreenUpdating = False
Application.EnableEvents = False
Application.Calculation = xlCalculationManual

Set File_Dialog = Application.FileDialog(msoFileDialogFolderPicker)

File_Dialog.AllowMultiSelect = False
File_Dialog.Title = "Select the Folder with the Excel Files"
If File_Dialog.Show <> -1 Then
    Exit Sub
End If

File_Path = File_Dialog.SelectedItems(1) & "\"
Destination_Path = File_Dialog.SelectedItems(1) & "\"

File_Name = Dir(File_Path & "*.xls*")
Do While File_Name <> ""
    Set File = Workbooks.Open(Filename:=File_Path & File_Name)
    Destination_Name = Destination_Path & Left(File_Name, InStr(1, File_Name, ".") - 1) & ".csv"
    File.SaveAs Filename:=Destination_Name, FileFormat:=xlCSV
    File.Close savechanges:=False
    File_Name = Dir
Loop

Application.Calculation = xlCalculationAutomatic
Application.EnableEvents = True
Application.ScreenUpdating = True

End Sub
⧭ Output:
Run this code. A dialogue box will open that’ll ask you to select the folder with the Excel files.
Here I’ve selected the folder ExcelDemy.

Then click OK.
Then wait for a few moments, and you’ll find a copy of CSV files of all the Excel files created in the same folder.

Read More: How to Convert Excel to CSV without Opening (4 Easy Methods)
Things to Remember
- The code can convert not only .xlsx files but also all the files that have .xls in their extension (Like .xls, .xlsm, .xlsb, etc.)
- If you want to save them as CSV files in a different folder other than the parent folder, use one more FileDialog object in the code to let the user select the destination folder.
- While converting a large number of files, the code may take some time to finish running properly. So be patient and wait till the process ends successfully.
Conclusion
Therefore, this is the process to develop a Macro to convert multiple Excel files to CSV files. Do you have any questions? Feel free to ask us. And don’t forget to visit our site ExcelDemy for more posts and updates.
Related Articles
- Save Excel as CSV with Double Quotes (3 Simplest Methods)
- Convert Excel to Comma Delimited CSV File (2 Easy Ways)
- [Fixed!] Excel Not Saving CSV with Commas (7 Possible Solutions)


Thank you so much! It took me a while to get my head around things but I need this SO often with uploading assessment results!!!
Hello Jess, you’re most welcome! If you need any other solutions to more problems you can also email us.