Sometimes, we may be required to rearrange the data table of our Excel sheet by exchanging the data of columns or rows. Following copy or cut-paste feature won’t be an efficient method in this case, as it will be time-costly.
However, Excel has the feature to swap cells at once. Suppose, you mistakenly entered a column before another. Swapping cells will allow you to exchange those data immediately.
In this article, I’ll show you some easy and effective methods on how to swap cells in Excel. Please stay tuned to follow the method that suits you best for this job. The following image/video is an overview of how swapping cells works in Excel.
Here, we swapped Age column with the Email ID column.
What Does Swapping Cells Mean in Excel?
In Excel, swapping cells means interchanging the values of two cells. We can swap cells with text, numbers, or formulas in Excel. Cell swaps can also include formatting components like background colors and fonts. While manually switching the cells by copying and pasting or retyping the numbers is an option, there are other ways to alter the cells that can help you work more quickly and efficiently.
How to Swap Cells in Excel (4 Quick Tricks)
1. Swapping Cell Contents Manually Through Columns
In this section, we will see how we can swap cell contents through columns. Please follow the video below.
The procedure done in the video is described below.
- Select the desired column/range.
- Hold the Shift key and drag the selected range to the right or left as per your choice.
- Wait for this icon ‘工’ to appear.
- After that, release the mouse button. You will see that the column cells are swapped immediately.
Thus you can swap column contents within an instant.
Read More: How to Swap Non-Adjacent Cells in Excel
2. Using Cut-Paste Feature to Swap Contents Between Rows
Here, we will see how we can swap cell values between rows. Let’s have a look at the description below.
2.1 Applying Keyboard Shortcut
The following video will guide you on how cell contents can be swapped between rows by keyboard shortcut.
The procedure done in the video is described below.
- Select the desired row that needs to be swapped and press Ctrl + X.
- After that, select a cell from the row where you want to insert the Cut Cells.
- Press Ctrl + Shift + = and you will see the Cut cells in the desired row.
2.2 Use of Context Menu
The next video will guide you on how cell contents can be swapped between rows by the context menu.
The procedure done in the video is described below.
- Select the desired row that needs to be swapped and press Ctrl + X.
- After that, select a cell from the row where you want to insert the Cut Cells.
- Right-click on the mouse and select ‘Insert Cut Cells’ command.
- Next, you will see the Cut cells in the desired row.
Swapping Between Rows Without Cut-Paste Feature
Now, we will discuss the procedure of swapping cells between rows without the Cut-Paste feature. The following video provides a basic concept of this process.
The following steps were followed in the video.
- First, select your desired range to be swapped.
- Hold the Shift key and drag the selected range downwards as per your choice.
- Wait for this icon
 to appear and then release the mouse.
 - Finally, the cell swapping command will be fulfilled.
3. Swapping Cells Using VBA
We can also use Microsoft Visual Basic for Applications (VBA) to swap cell contents between rows or columns.
- First, go to the Developer Tab and then select Visual Basic.

- After that, the VBA editor will appear. You can also open it by pressing Alt + F11.
- Select Insert >> Module to open a VBA Module. This command will open a VBA module.

There can be two different criteria of swapping cells. Let’s go through the description below.
3.1 Swapping Any Range of Cells
If you want to swap the contents of any two ranges of cells, just copy the following code in the module.
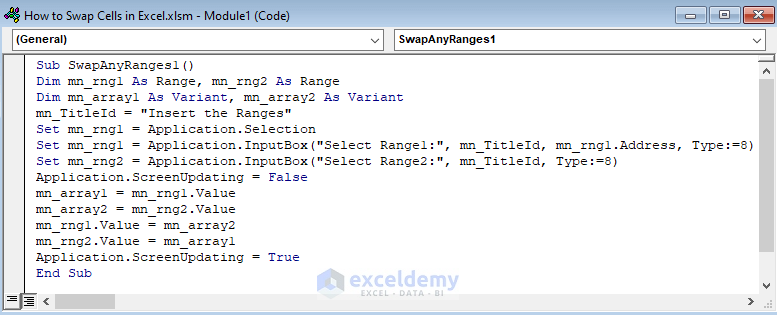
Sub SwapAnyRanges1()
Dim mn_rng1 As Range, mn_rng2 As Range
Dim mn_array1 As Variant, mn_array2 As Variant
mn_TitleId = "Insert the Ranges"
Set mn_rng1 = Application.Selection
Set mn_rng1 = Application.InputBox("Select Range1:", mn_TitleId, mn_rng1.Address, Type:=8)
Set mn_rng2 = Application.InputBox("Select Range2:", mn_TitleId, Type:=8)
Application.ScreenUpdating = False
mn_array1 = mn_rng1.Value
mn_array2 = mn_rng2.Value
mn_rng1.Value = mn_array2
mn_rng2.Value = mn_array1
Application.ScreenUpdating = True
End Sub
How Does the Code Work?
- First, we declared some variables for the ranges we want to swap.
- After that, a title is set for the InputBox.
- We will use the InputBoxes to insert the ranges that need swapping.
- Finally, we run the code.
Say, you mistakenly mixed up some of the employees’ first and last names. You can follow the steps below in the video to make that right.
- Return to the sheet and select the Macro button from the Developer You can also open it by pressing Alt + F8.
- Run the macro named SwapAnyRanges1 as it is the current macro.
- Insert your first desired range in the InputBox and click OK or press Enter.
- Another InputBox will pop up and insert the second range and click OK or press Enter. These two ranges will exchange their cell contents.
Finally, you will see the correct data in the Excel sheet as the macro swapped the ranges properly.
There is another way you can do this. This operation does not include any InputBox. Copy the code below in your module.

Sub SwapAnyRanges2()
Dim mn_rng As Range
Dim mn_tempRng As Variant
Dim mn_count As Long
Dim mn_rows, mn_columns As Long
Dim mn_s1, mn_s2 As Integer
Set mn_rng = Selection
mn_count = mn_rng.Areas.Count
If mn_count < 2 Then
    MsgBox "Please select not more than two ranges."
    Exit Sub
End If
mn_rows = mn_rng.Areas(1).Rows.Count
mn_columns = mn_rng.Areas(1).Columns.Count
For mn_s1 = 2 To mn_count
    If mn_rng.Areas(mn_s1).Rows.Count <> mn_rows Or _
        mn_rng.Areas(mn_s1).Columns.Count <> mn_columns Then
        MsgBox "Columns or Row number mismatch."
        Exit Sub
    End If
Next mn_s1
For mn_s2 = 1 To mn_count - 1
    For mn_s1 = 1 + mn_s2 To mn_count
        If Not Intersect(mn_rng.Areas(mn_s1), mn_rng.Areas(mn_s2)) Is Nothing Then
            MsgBox "Make sure selected ranges don't overlap."
        End If
    Next mn_s1
Next mn_s2
mn_tempRng = mn_rng.Areas(mn_count).Cells.Formula
For mn_s1 = mn_count To 2 Step -1
mn_rng.Areas(mn_s1).Cells.Formula = mn_rng.Areas(mn_s1 - 1).Cells.Formula
Next mn_s1
mn_rng.Areas(1).Cells.Formula = mn_tempRng
End Sub
How Does the Code Work?
- First, we declared the Subroutine and some variables for the ranges we want to swap.
- Next, we set the maximum range that can be selected to 2 by the Selection property. If we mistakenly select more than two ranges, a message box will appear showing ‘Please select not more than two ranges.’
- In the following part of the code, two more conditions are added. They are- Column or row number cannot be mismatched and the selected ranges don’t overlap
- Next, we set the swapping conditions.
Please follow the video to understand how to use this Macro.
Say, you want to put the Age column first and the ID column last. The video showed the following steps to do this task.
- Select the ID column first.
- Hold the Ctrl key and select the Age
- After that, run the macro named SwapAnyRanges2.
Thus you can swap cells using the above Macro.
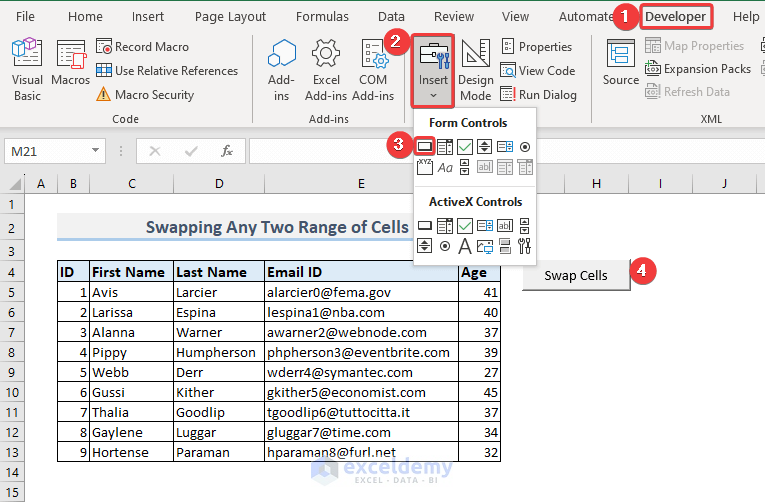
You can also assign this macro to a button which will make the process more effective. Please follow the steps below.
- Select Developer >> Insert >> Button from Form Controls.
- Create the button and give it a name.
- Right click on the button and select Assign Macro…
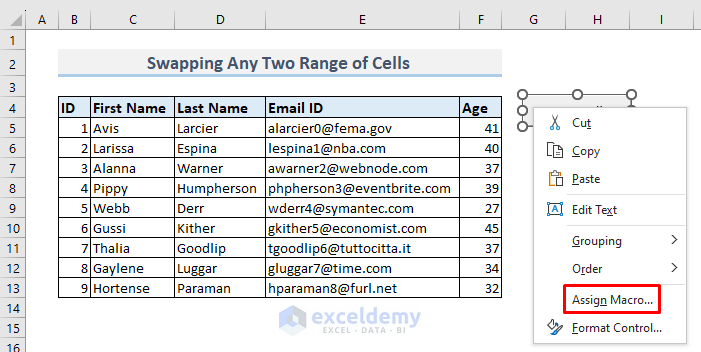
- Select the macro named SwapAnyRanges2 and click OK.

Now follow the video to see how you can use this button. You don’t need to bother opening the Macro window and selecting the macro each time you want to operate it.
3.2 Swapping Only Two Cell Contents
In this section, we will discuss swapping only two cells. If your work needs swapping only two cells, you can follow the process below.
- Copy the code below in the VBA.

Sub SwapTwoCells()
If Selection.Count <> 2 Then
MsgBox "Select any 2 cells."
Exit Sub
End If
Set mn_rng = Selection
If mn_rng.Areas.Count = 2 Then
mn_temp = mn_rng.Areas(2)
mn_rng.Areas(2) = mn_rng.Areas(1)
mn_rng.Areas(1) = mn_temp
Else
mn_temp = mn_rng(1)
mn_rng(1) = mn_rng(2)
mn_rng(2) = mn_temp
End If
End Sub- Follow the video below to execute the macro.
4. Transposing Data Table to Swap Cells
If you want to swap your rows and columns of the dataset, follow the video below. It will show you how to transpose a data table.
We covered the following steps in the video.
- Select the data range.
- Press Ctrl + C.
- Right-click on the cell where you want to transfer your data and select Transpose from the Paste Options.
Now the Transpose command swaps the rows and columns.
Read More: How to Swap Text in Excel
How to Insert Copied Rows in Excel Without Overwriting
Here, I’ll show you how you can copy and paste rows before some data at once. Please go through the following section.
- Select the rows of your choice. Here we select the 6th and 7th rows of the dataset.
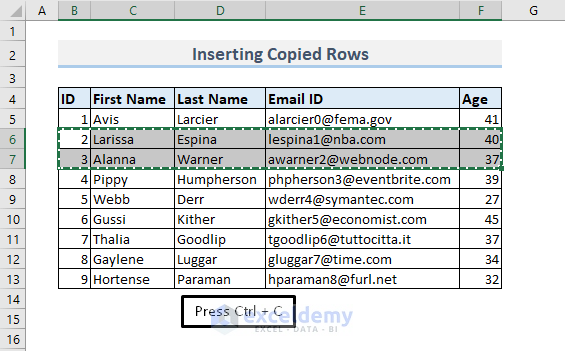
- Suppose, you want the copied rows before the 10th row. For this purpose, right-click on the first cell of this row in the data table.
- After that, select Insert Copied Cells.
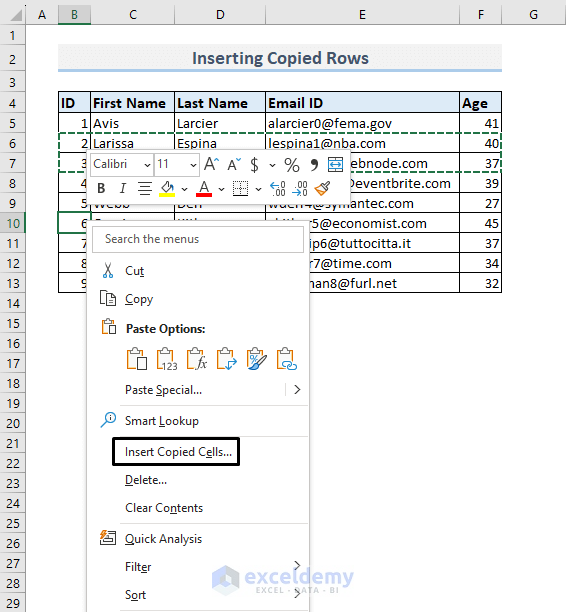
- A dialog box will appear. Select Shift Cells Down and click OK.
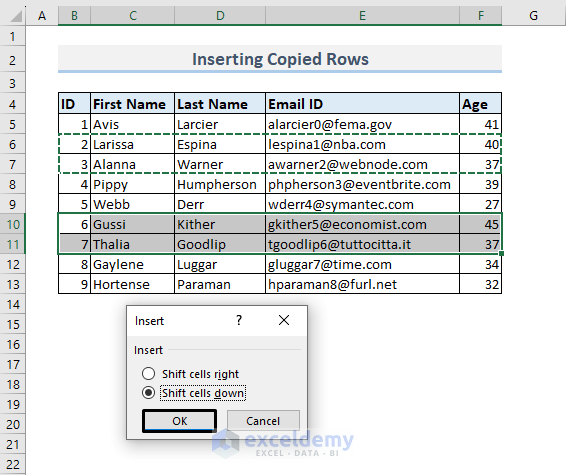
You will see the copied rows perfectly settled where you want to insert them.

Things to Remember
While swapping cells using VBA, you need to be careful about the following matter.
- Always keep the size of the ranges that are to be swapped equal.
- Do not select more than two columns to swap.
Download Practice Workbook
Download this practice workbook below
Conclusion
In the end, we can consider that you will learn some easy and effective methods on how to swap cells in Excel. It’s basically needed when we want to make a change in the format of our Excel sheet or if there’s a mistake on putting data. If you have any idea or suggestions or feedback regarding this article, feel free to leave them in the comment section.


=rand formula also swip data
The RAND function is supposed to return only a random value, which is used for shuffling the dataset values. In this case, we are trying to swap cell values within two separate cells. This means your statement is not applicable. If you insist that it is possible, please write down the process or send us your Excel file through email. Thank you.